
Second Life lighting projectors are an extremely useful capability that can be put to a wide variety of uses. I first covered their basics far back in 2011. Since then they’ve been notably easier to use (and that original article was subsequently updated to reflect this).
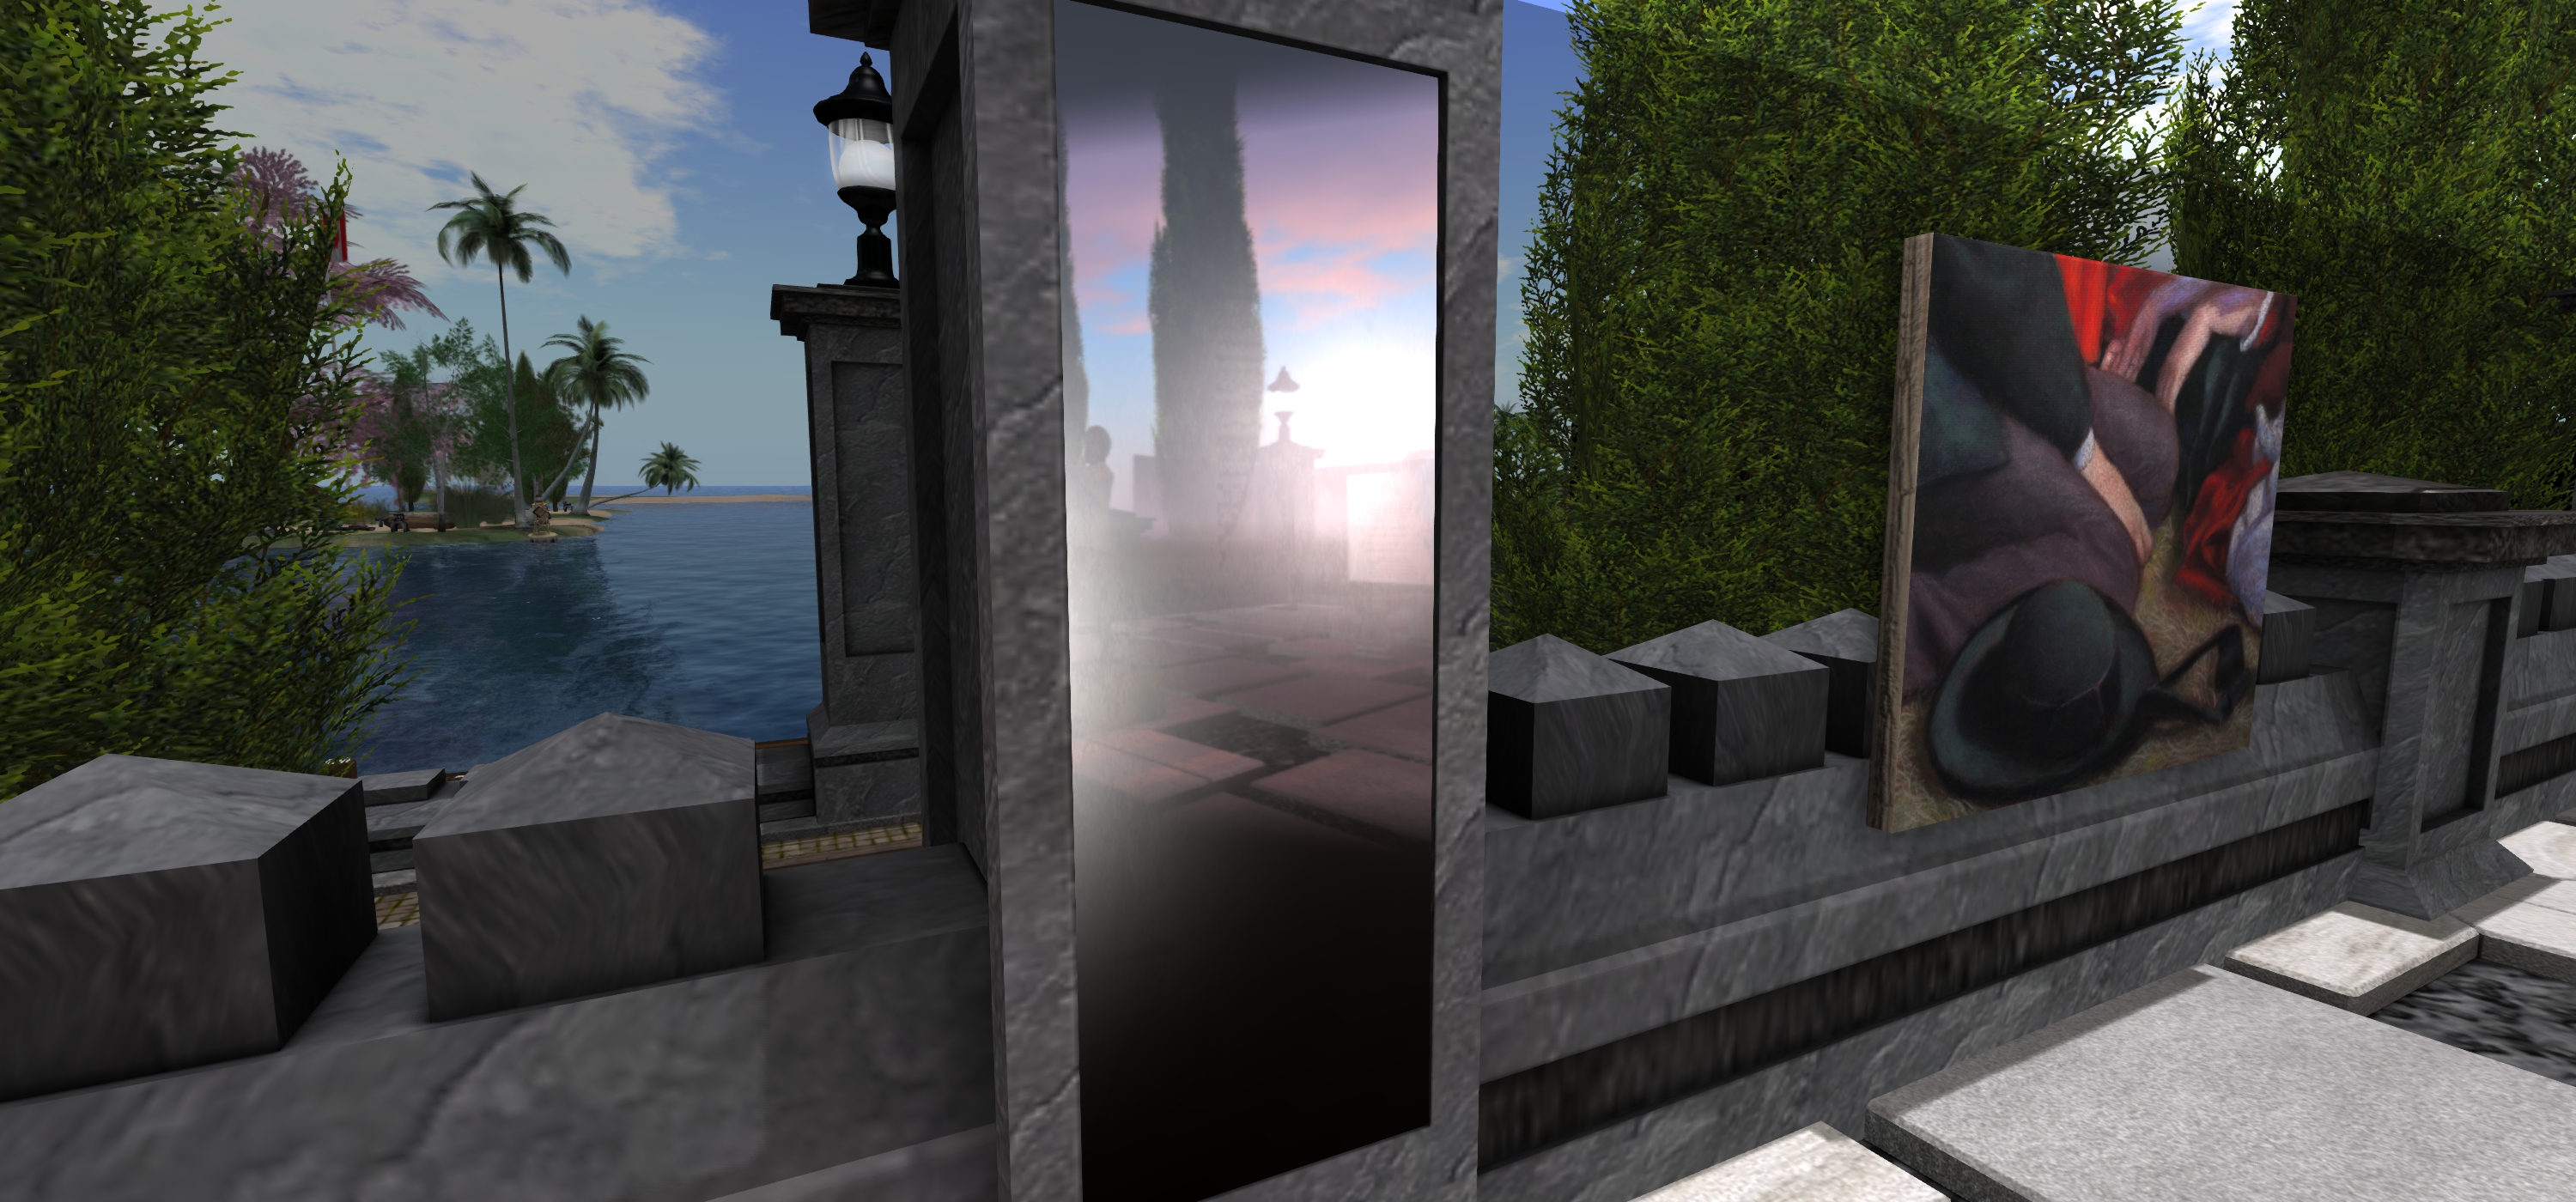
In 2016, for his art display, Mirrored Garden, at Holly Kai Garden (see here for details), Silas Merlin demonstrated a means to create mirror-like effects in Second Life, with a number of “mirrors” mounted around his sculptures “reflecting” them and the garden in which they were being displayed. I’ve since seen a number of SL artists use a similar approach to add depth to their work, and in April 2018, Adeon Writer offered a video tutorial on using projectors to create “portal-like” effects.
Given the latter, I thought it high time a revisited a draft of an article about Silas’ approach I started in 2016, but never quite finished (my apologies to him), gave it a polish and present it as a tutorial for those interested in using projector-based “mirrors” in SL.
Prerequisites
- For this time of “mirror” to work, those looking at it must have viewer’s Advanced Lighting Model (ALM) enabled via Preferences > Graphics. Anyone who does not have ALM enabled will just see a blank surface instead of any reflections.
- The “mirror” itself is made up of a number of elements: the “reflective” surface itself (which can be a mesh or prim face), and one or more lighting projectors – the exact number and their placement will be subject to the effect you are trying to achieve.
For this tutorial, I’m producing a single “mirror” using a single projector to create a finished item – a simple household room mirror. Adeon’s video provides an outline on how to use multiple projectors to achieve a result.
Create the “Mirror”
The “mirror” is simple flat surface (face) of a prim or mesh. When done, it can be made part of a more ornate item – so you could add a frame around it, etc.).
- Create a prim and size it.
- Right-click the prim and click the Select Face radio button, then click on the face of the prim you want to make “reflective”.
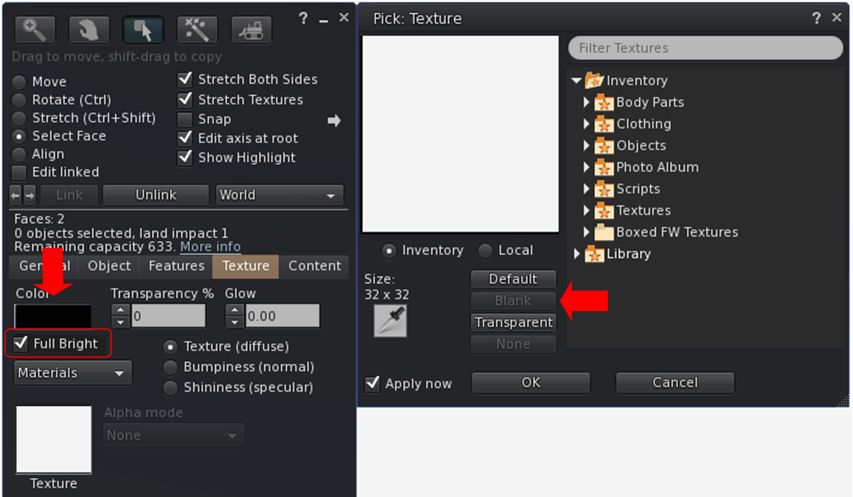
- In the Edit > Texture tab:
- Use the texture picker to set the texture to Blank.
- Set the colour of the face you have selected to black and leave Transparency at 0
- Enable Full Bright to reduce unwanted reflection of nearby lights.
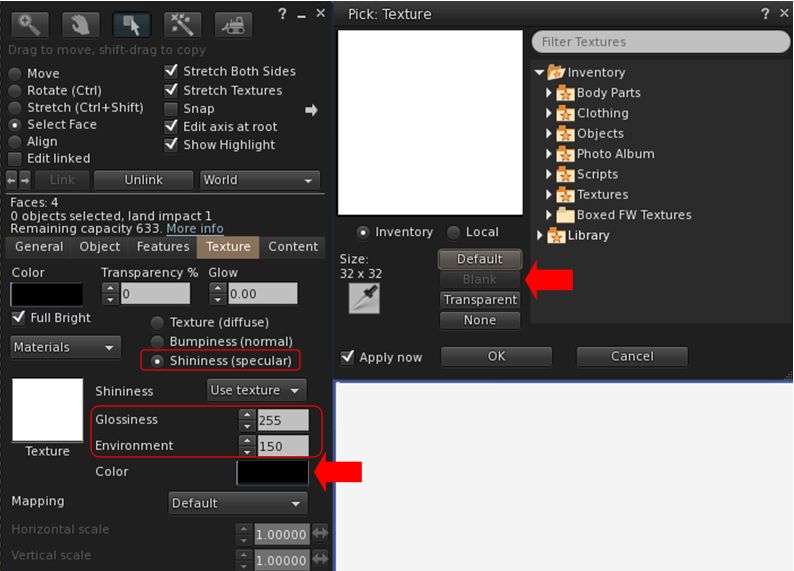
- Click Shininess (specular) radio button and:
- Use the picker to set the map to blank (white).
- Set Glossiness to 255 (highest).
- Set Environment to a value that works best for your overall lighting conditions – generally speaking, higher is better.
- Set the specular colour swatch to black to further reduce unwanted light reflection.
Create Your “Reflections”
This can sound complicated, but it’s actually relatively straightforward, requiring two main steps: create an image that will form the “reflection”; create the projector that will use the image.
Create the “Mirror” Image
- Position your “mirror” in the location you intend to hang it. Position your camera “in” the “mirror”, and facing out – so you are looking from the “mirror’s” point-of-view (e.g. from the wall on which it hangs looking out into the room it which it is hanging).
- Take a snapshot at a reasonably high resolution.
- Use an image editing tool to crop the image to give the desired look for the “reflection” – and flip it horizontally before saving.
- Repeat for any additional projectors you are using, taking your snapshots from the perspective of each projector.
- Don’t upload the texture(s) as yet.
Create the Projector(s)
Repeat the following steps for each of the projectors you’ll be using.
- Create a prim.
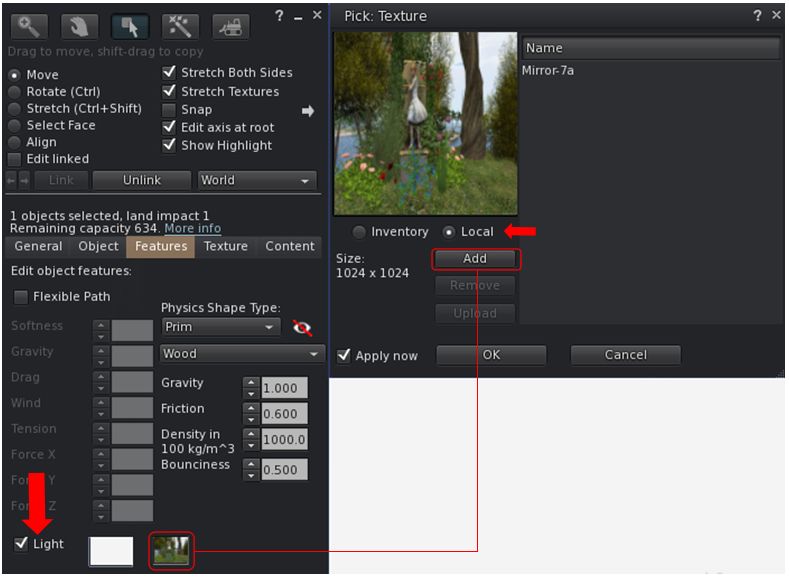
- Edit the prim and select the Features tab.
- Check the Light option to enable it and then:
- Click the second box alongside the Light option to open the texture picker.
- Click the Local radio button.
- Use the ADD button to allow you to select the projector texture from your hard drive (note: only you will be able to see the results when using the Local option, but it allows you to experiment without having to upload textures multiple times).
- When you have selected the required texture it will appear in the texture list on the right of the picker.
- Click on the texture name to select it; the texture will be applied to the bottom face of the prim.
Correctly Adjust and Size the “Reflection”
You must now correctly position, size, and adjust the projected image. Again, if you are using multiple projectors, you may have to repeat the following steps for each one.
- Rotate and position the projector so that the applied texture is projected on the “mirror” surface. This generally involves rotating the projector prim so that its bottom face is pointing towards the “mirror” prim.
- The image may be repeated multiple times and appear blurred or otherwise odd. To correct this:
- Edit the projector prim and select the projector face.
- In the Textures tab, made sure the Horizontal and Vertical scales are set to 1.0 each.
- In the Features tab, locate the Intensity option towards the bottom of the tab and reduce this down to around 0.5. The set Focus to -20.0. this should result in just a single “reflection” being projected onto your “mirror”.
- You can continue to adjust the intensity to suit the size of your “reflection” and the local lighting conditions where the mirror is to be located.

- Continue to adjust and refine the projected image until you achieve the desired result on the surface of your “mirror”.
- Make the projector transparent via the Texture tab in the Build floater and, if it is located where avatars might walk into it, make sure you make it Phantom.
- When you are satisfied with the result and have the “reflection” in your mirror you want, remember to actually upload the image texture to Second Life, Edit the prim and select the Features tab and:
- Click on the texture box to the right of the Light check box
- Use the texture picker to apply the uploaded image from your inventory to the projector.
- If you forget to upload the “reflection” texture, your mirror will be blank the next time you log in, and until such time as you do upload and apply it to your projector.
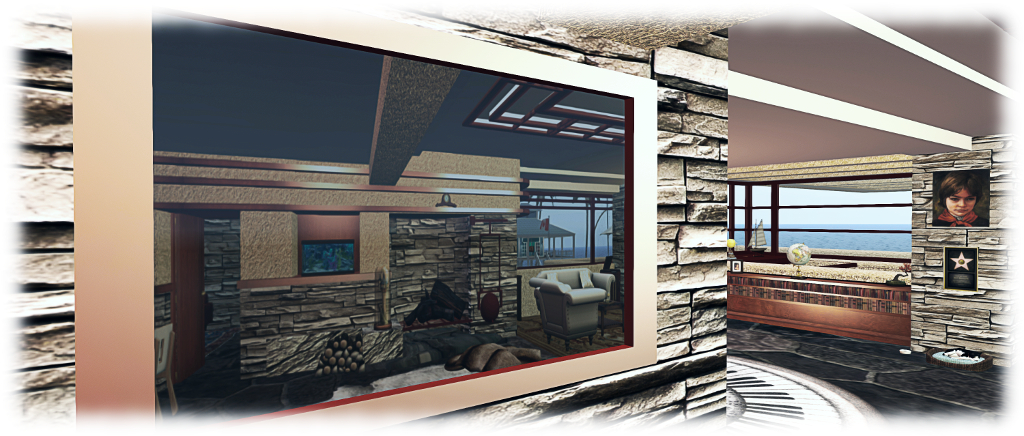
It’s A Matter of Size and Perspective
As we all know, the reflection cast in a mirror can change when seen from different angles / as our viewing perspective shifts. This can be achieved in an SL “mirror” by sizing the projector somewhat large than the “mirror”, so the projected image overlaps the “mirror” surface. I’ve hopefully demonstrated this in the GIF at the top of this article and with the images above and below this paragraph.

As I noted in my 2011 tutorial on projectors, they are extremely flexible and offer plenty of opportunities to do different things in second life. Yes, they do require the use of ALM in order for them to be seen, but this shouldn’t ordinarily over-tax your system (allowing for whatever else is going on around you).
Hopefully, this tutorial sets out how they can be used to make workable (if not perfect) “mirrors” in SL, and do please take a look at Adeon’s video for further ideas on how they can be used to achieve a similar effect. Do keep in mind that as a projection, the “mirror” won’t reflect your avatar, and if you have shadows enabled, anything between the projector(s) and the “mirror” might cast a shadow on the the face of the “mirror”. Otherwise, have fun playing, and my thanks to Silas Merlin!
Update, May 14th: Loki Eliot has blogged a means to create a mirror he and Silas have developed using a cubemap / 360-degree image via the SL snapshot viewer. Read Loki’s post here.

Amazing. I will save this article to try sometime down the track.
LikeLike
Very useful, thank u 🙂
LikeLike
You’re welcome!
LikeLike
Thanks for posting this excellent tutorial! And yay, because I made some changes to my social media I can now post “likes” on your blog without having to go through 80 changes to do it! (seicher rae)
LikeLike
You’re welcome!
LikeLiked by 1 person
I must try this too!! thank you!
LikeLike
Let me know how you get on 🙂 .
LikeLike
Reblogged this on KULTIVATE MAGAZINE.
LikeLike
I’ve always missed the SL® mirrors … you can put pictures, but it’s not the same. A mirror gives opening, feeling of greater space etc. Thank you, very useful.
LikeLike
You’re welcome – have fun!
LikeLike