Projectors as mirrors in Second Life

Using a projector and “reflective” surface in SL to creator a mirror in our living room at home. Note how the “reflection” changes as the viewing perspective moves

Second Life lighting projectors are an extremely useful capability that can be put to a wide variety of uses. I first covered their basics far back in 2011. Since then they’ve been notably easier to use (and that original article was subsequently updated to reflect this).

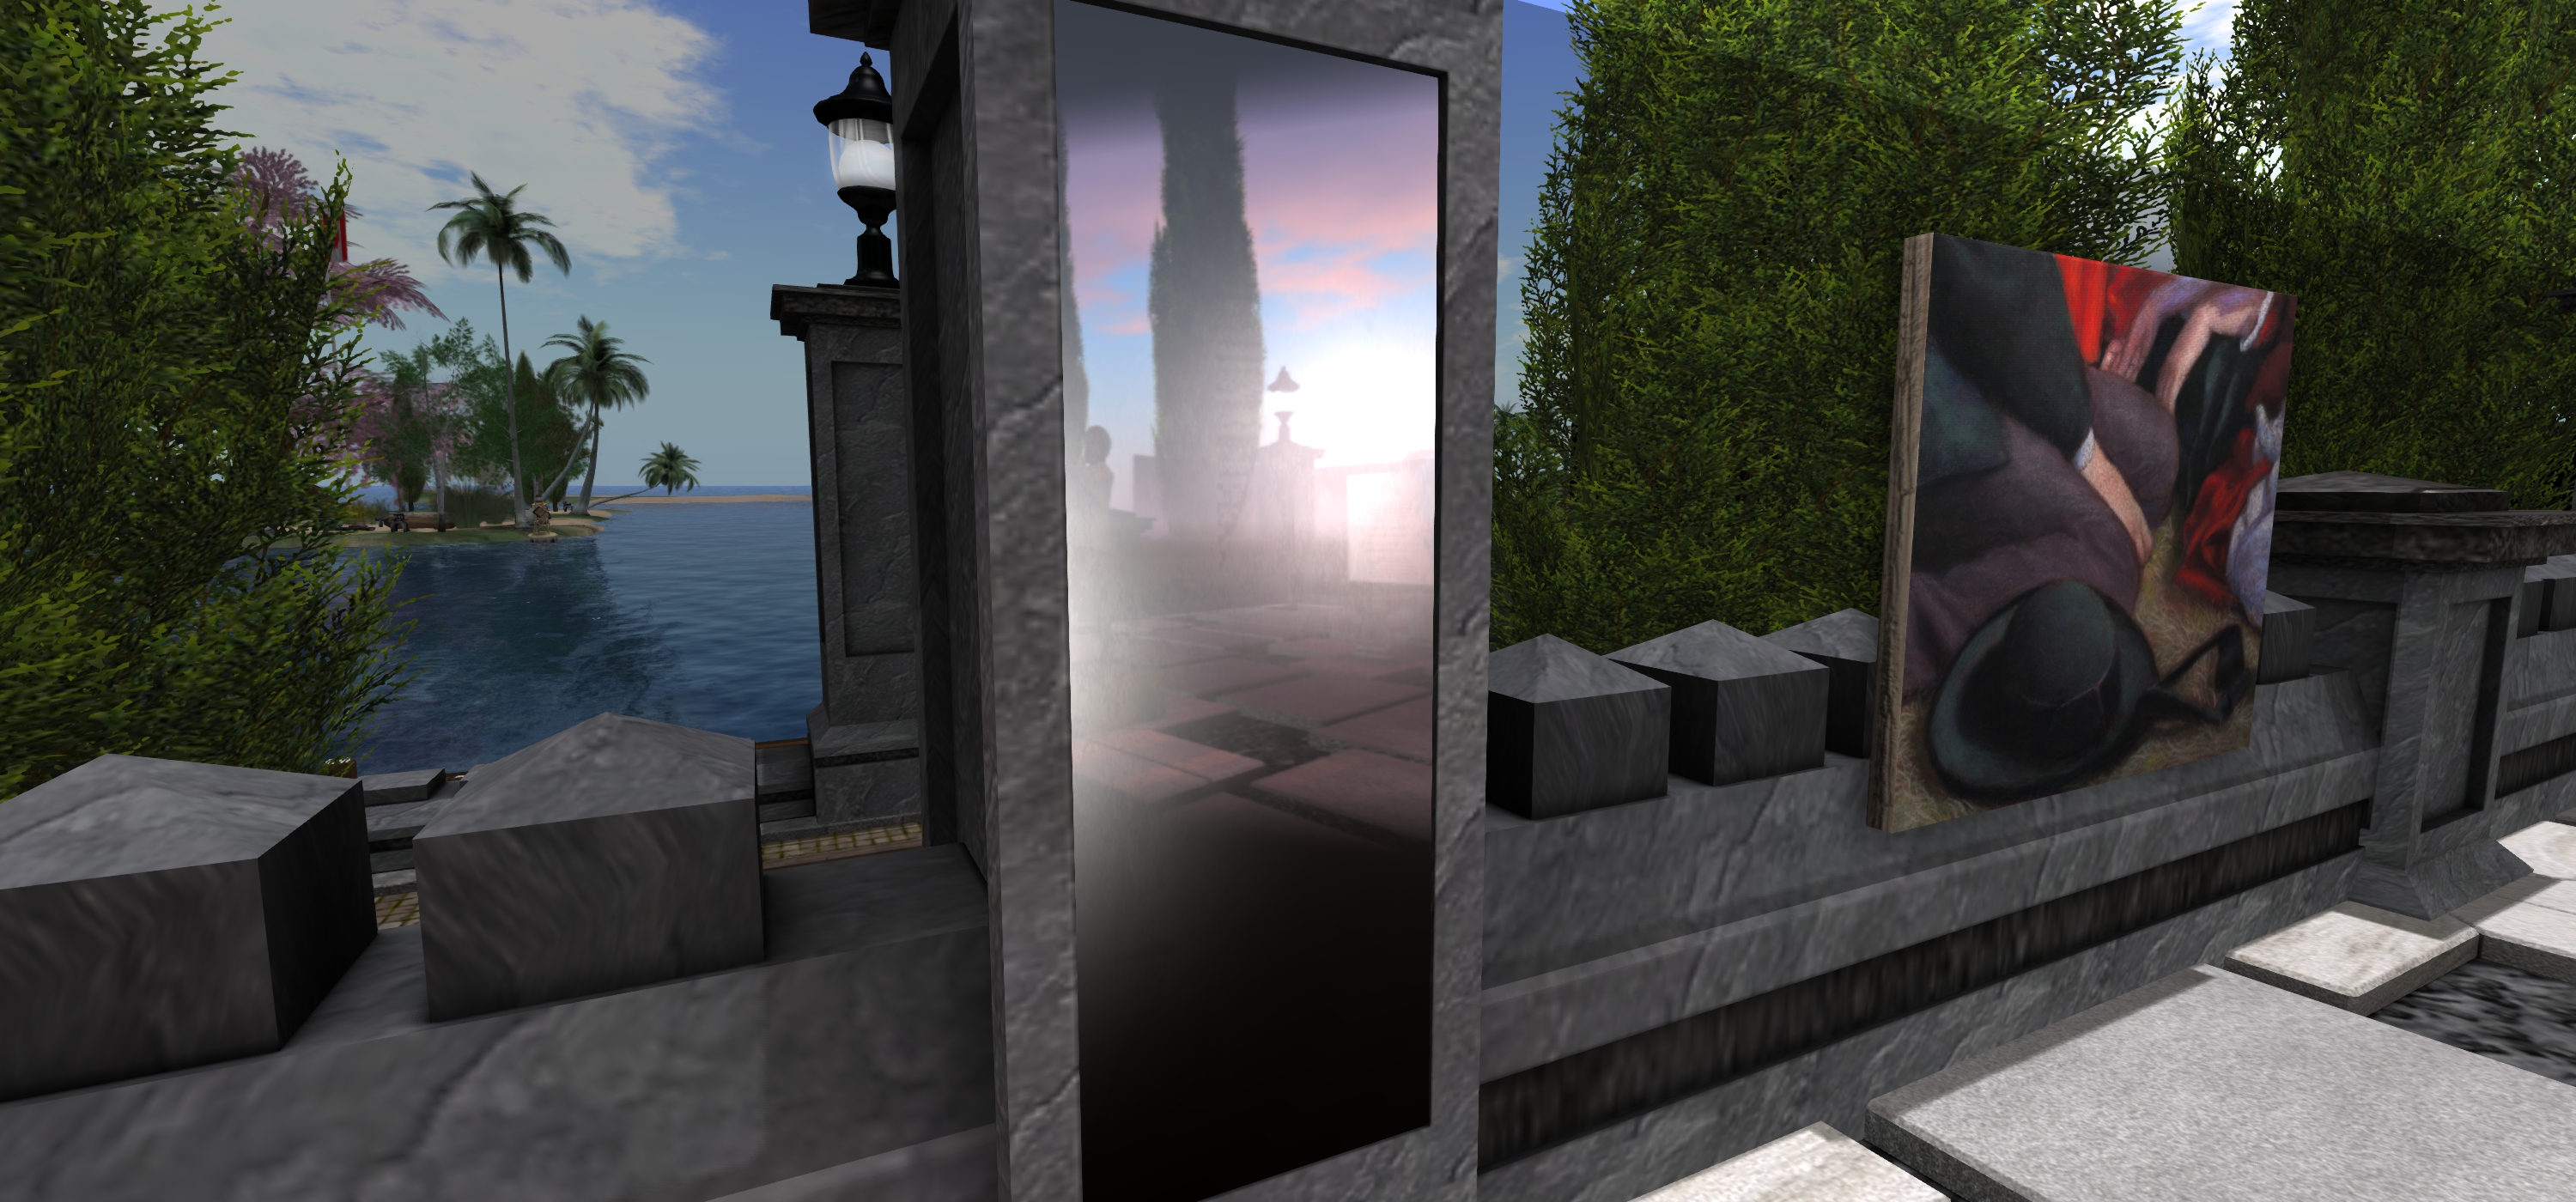
In 2016, for his art display, Mirrored Garden, at Holly Kai Garden (see here for details), Silas Merlin demonstrated a means to create mirror-like effects in Second Life, with a number of “mirrors” mounted around his sculptures “reflecting” them and the garden in which they were being displayed. I’ve since seen a number of SL artists use a similar approach to add depth to their work, and in April 2018, Adeon Writer offered a video tutorial on using projectors to create “portal-like” effects.

One of the “mirrors” Silas Merlin created for his Mirrored Garden art exhibition at Holly Kai Park in April 2016

Given the latter, I thought it high time a revisited a draft of an article about Silas’ approach I started in 2016, but never quite finished (my apologies to him), gave it a polish and present it as a tutorial for those interested in using projector-based “mirrors” in SL.

Prerequisites

  • For this time of “mirror” to work, those looking at it must have viewer’s Advanced Lighting Model (ALM) enabled via Preferences > Graphics. Anyone who does not have ALM enabled will just see a blank surface instead of any reflections.
  • The “mirror” itself is made up of a number of elements: the “reflective” surface itself (which can be a mesh or prim face), and one or more lighting projectors – the exact number and their placement will be subject to the effect you are trying to achieve.

For this tutorial, I’m producing a single “mirror” using a single projector to create a finished item – a simple household room mirror. Adeon’s video provides an outline on how to use multiple projectors to achieve a result.

Create the “Mirror”

The “mirror” is simple flat surface (face) of a prim or mesh. When done, it can be made part of a more ornate item – so you could add a frame around it, etc.).

  1. Create a prim and size it.
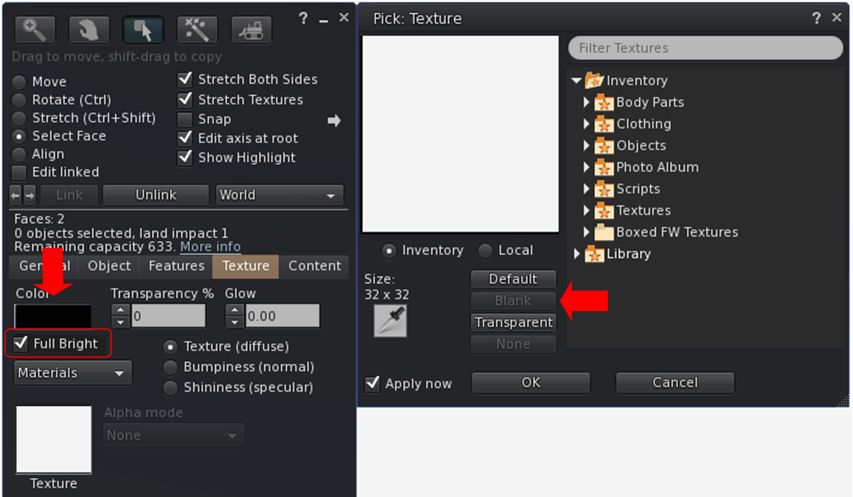
  2. Right-click the prim and click the Select Face radio button, then click on the face of the prim you want to make “reflective”.
  3. In the Edit > Texture tab:
    • Use the texture picker to set the texture to Blank.
    • Set the colour of the face you have selected to black and leave Transparency at 0
    • Enable Full Bright to reduce unwanted reflection of nearby lights.
Setting the texture options for a reflective “mirror” surface.
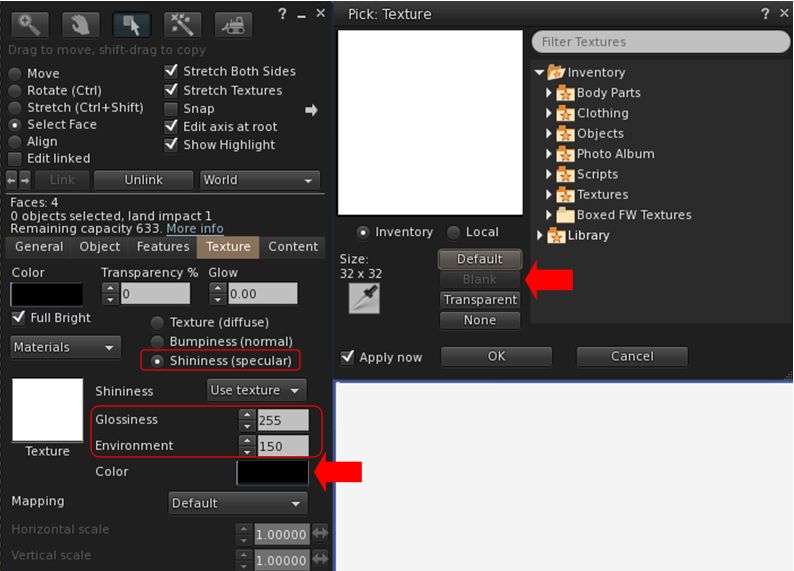
  1. Click Shininess (specular) radio button and:
    • Use the picker to set the map to blank (white).
    • Set Glossiness to 255 (highest).
    • Set Environment to a value that works best for your overall lighting conditions – generally speaking, higher is better.
    • Set the specular colour swatch to black to further reduce unwanted light reflection.
Setting the specular options for your reflective “mirror” surface

Create Your “Reflections”

This can sound complicated, but it’s actually relatively straightforward, requiring two main steps: create an image that will form the “reflection”; create the projector that will use the image.

Create the “Mirror” Image

  1. Position your “mirror” in the location you intend to hang it. Position your camera “in” the “mirror”, and facing out – so you are looking from the “mirror’s” point-of-view (e.g. from the wall on which it hangs looking out into the room it which it is hanging).
  2. Take a snapshot at a reasonably high resolution.
  3. Use an image editing tool to crop the image to give the desired look for the “reflection” – and flip it horizontally before saving.
  4. Repeat for any additional projectors you are using, taking your snapshots from the perspective of each projector.
  5. Don’t upload the texture(s) as yet.

Create the Projector(s)

Repeat the following steps for each of the projectors you’ll be using.

  1. Create a prim.
  2. Edit the prim and select the Features tab.
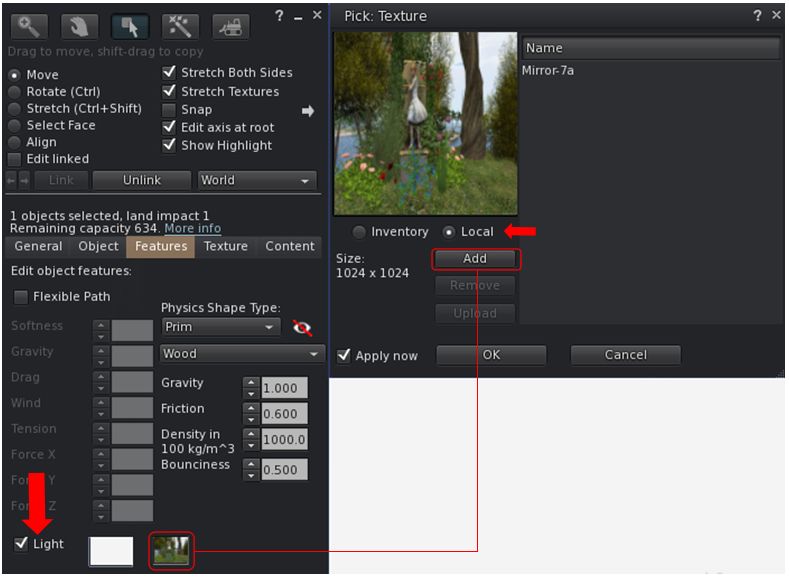
  3. Check the Light option to enable it and then:
    • Click the second box alongside the Light option to open the texture picker.
    • Click the Local radio button.
    • Use the ADD button to allow you to select the projector texture from your hard drive (note: only you will be able to see the results when using the Local option, but it allows you to experiment without having to upload textures multiple times).
    • When you have selected the require texture it will appear in the texture list on the right of the picker.
    • Click on the texture name to select it; the texture will be applied to the bottom face of the prim.
Applying a texture to a projector

Continue reading “Projectors as mirrors in Second Life”

2018 SL UG updates #19/2: TPVD meeting

Maison de L’amitie: Salar de Uyuni – blog post

The following notes are taken from the TPV Developer meeting held on Friday, May 11th 2018. A video of the meeting is embedded below, my thanks as always to North for recording and providing it.

This was another short meeting – around 30 minutes, with about half of that covering SL projects, which are noted below. The rest of the meeting was more general conversation, and I’ll leave it to the video to cover them. As always, time stamps in the text below will jump you to the relevant points in the video.

SL Viewer

There have been no updates to the current crop of official viewers during week #19. This leaves the pipelines as:

  • Current Release version 5.1.3.513644, dated March 27th, promoted April 13th – formerly the media update RC.
  • Release channel cohorts (please see my notes on manually installing RC viewer versions if you wish to install any release candidate(s) yourself):
  • Project viewers:
  • Linux Spur viewer, version 5.0.9.329906, dated November 17th, 2017 and promoted to release status 29 November – offered pending a Linux version of the Alex Ivy viewer code.
  • Obsolete platform viewer, version 3.7.28.300847, May 8th, 2015 – provided for users on Windows XP and OS X versions below 10.7. This viewer will remain available for as long as reasonable, but will not be updated with new features or bug fixes.

[1:53 -2:45] Currently, the Ouzo Maintenance RC has a slightly lower crash rate than the Love Me Render RC, and so at this point in time looks like the more likely of the two to gain promotion to de facto release status.

Forthcoming Updates

[2:46-3:28] There are a number of viewer-visible updates which will be surfacing in upcoming viewers in the near future. These include (and in no particular order):

  • Updates to the estate management tools for better management and update of ban lists, etc.
  • Changes to viewer texture caching.
  • Further SL Voice improvements.
  • [24:43-25:39] New capability for abuse reports to be called from the simulator by the viewer, rather than being hard-coded into the viewer. This work had some delays while the AR categories were translated into other languages for display by the viewer. However both the simulator and viewer updates are now progressing
  • [30:45-31:35] New capability for receiving off-line IMs to avoid loss of IMs on logging-in. This capability is also now in testing.

GDPR and the Viewer

[5:25-7:17] The Lab recently offered an initial blog post on the upcoming European Union General Data Protection Regulation (GDPR – also see my blog post on the subject as well). Subject to further updates on the matter from the Lab, it would appear that the view being taken that data gathered by the viewer which is used in-world will not be subject to any requirements defined by the GDPR. A benefit the Lab has had in terms of GDPR compliance, is that the company has never viewed users’ personal data as a potential asset for revenue generation.

Other Items in Brief

  • [8:03-10:35] Texture Copying: There have been requests for the Lab to make texture copying “harder”. Given that texture data is held on a local computer, and UUIDs are trivial to capture, and the data they point to can also be obtained, this is no easy task. The Lab therefore finds itself caught between trying to offer better protection for textures and risking giving the impression they can prevent all texture copying, although they do look at ways to at least deter it.
  • [11:18-12:42 (mainly text chat) and 14:28-16:50 (with text chat)] Parcel Banning and Object Information: there appears to have been a recent change that means if an individual is banned from a region, they no longer receive information about objects on that parcel. The change, if made, may have been with good intent but is possibly having unwanted side effects. A JIRA is to be raised on the issue.
  • [12:43-14:20] BUG-216032: A recent back-end security change made to PRIM_MEDIA_CURRENT_URL reportedly broke a lot of content. Following initial complaints, the Lab offered to help those experiencing problems as a result of the change if they got in contact with the Lab. Some are reportedly still having issues, however, the Lab do not appear to have been contacted for assistance. so if assistance is required – contact Oz Linden.