Modding a house in Second Life: tips and pointers

This slideshow requires JavaScript.

I recently wrote about my purchase of the CONVAIR Edelweiss Chalet and work on modifying it for use on our main island home (see: A little Edelweiss in Second Life).  The article prompted a request from BarbarA for me to go into more detail about how I go about such work – and it’s not the first time I’ve received such a request.

Truth is, and for a variety of reasons (e.g. how any particular house is put together, what someone might want to do with a house, etc.), providing a step-by-step guide to modding a house isn’t really practical. So instead, I’ve tried to provide a set of more general notes focused on how I go about things.

Basic Skills

Obviously, any modding requires some basic skills:

  • An understanding of the core Build functions (e.g. creating prims; moving / rotating / resizing objects; using Shift-select; linking (CTRL-L) and unlinking (CTRL-SHIT-L) objects / object parts; use of the Show Transparent Prims toggle (CRTL-ALT-T).
  • Knowledge of texturing: how to select object faces, apply textures, scale and (possibly)  rotate them; how to use Local Textures to “test fit” textures you may wish to upload from your computer & use; and a basic appreciation of basic texture memory use. Note that “seamless” textures are generally best for buildings.
  • A basic understanding of the permissions system, particularly the Modify and Copy permissions (the former is vital to any form of modification, since without it you won’t be able to alter a building so easily; latter a nice-to-have).

An article like this isn’t really the place to go into any of the above in particular depth, so I refer those who need to learn more about editing and building in SL, I’m including some links to resources at the end.

My General Approach

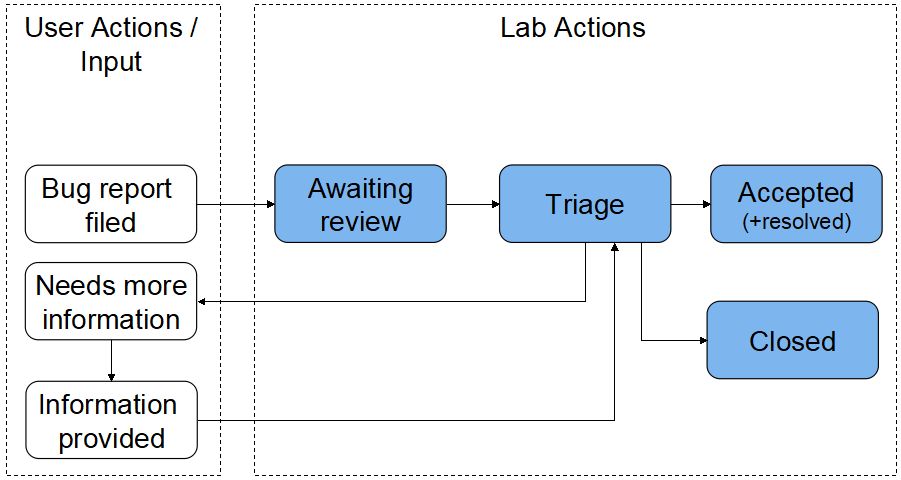
I tend to approach modding any building as a 3-step process:

  1. Determine what is to be done. For example: will the work require combining parts of different buildings? Will it involve integrating items from other creators? Will it require inclusion of purpose-made new prim elements (e.g. walls, floors, etc.)?
  2. Visit a copy of the building in-world (e.g. a copy displayed at an in-world store or found in a public region) before any purchase and:
    • Confirm it has the required permissions (generally Copy and Modify).
    • Examine the use of textures to determine if they might need replacing / make require replacing as a result of my changes (e.g. because some surfaces have shadows or lighting effects “baked” into a texture.
    • Check how the building has been put together, and whether the desired changes can easily be made (e.g. by removing parts), or whether there might be complications / whether you may have to include “replacement” prim parts yourself.
    • Look at the general structure of the building and whether simple structural changes can be made to  improve LI.
  3. Revise plans accordingly after (2.), and if the decision is made to go ahead, break the work down into logical steps and complete each in turn.

Checking the Suitability of a Building for Modding

Checking Textures

There are a couple of reasons why textures might need to be replaced:

  • They don’t meet the desired aesthetics.
  • They include “baked” details that may not be wanted.

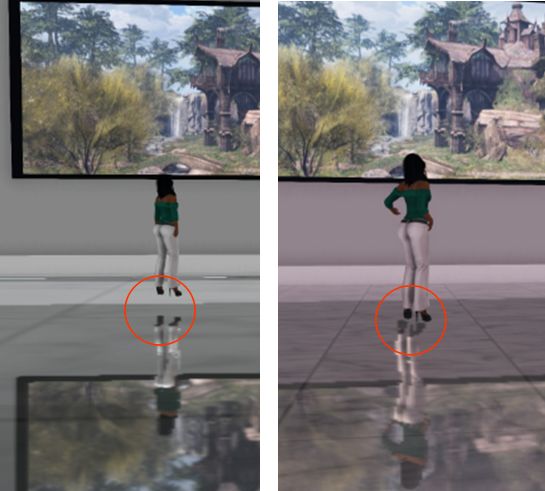
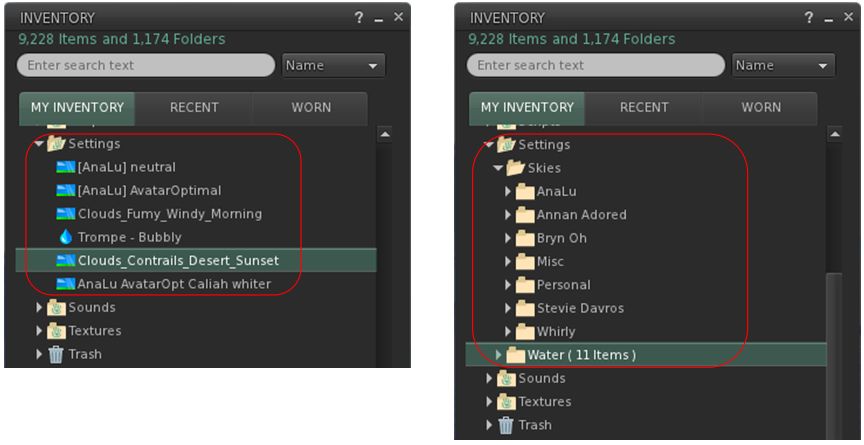
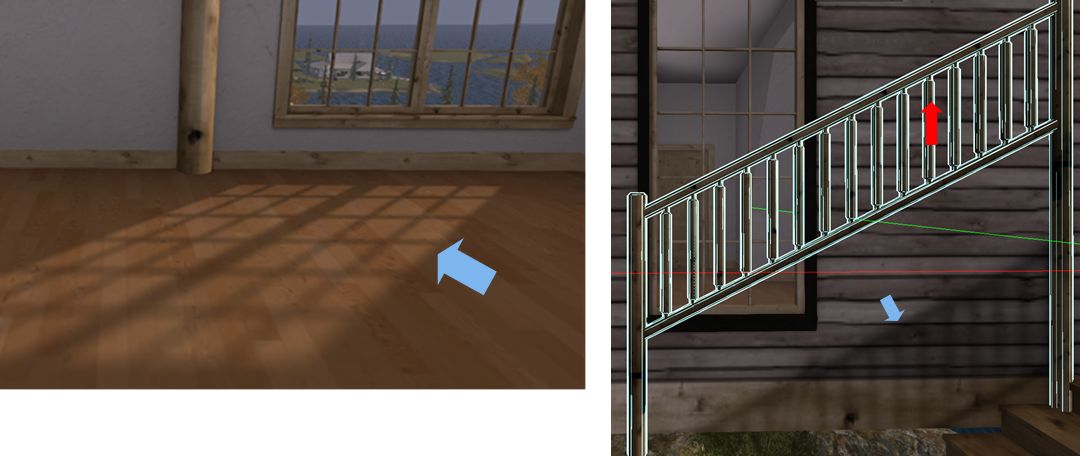
In the case of the latter, some baked details may be easy to spot – as per the image below left, other may be harder to identify, such as with the image below right, and may not be revealed until you actually start physically altering the build, should you go ahead. However, in both cases, it’s worth checking the faces (surfaces) of a building that you might want / need to re-texture.

Some builders bake details into their textures, such as the light “cast” by windows (l); or shadows which can be left behind when an element of the building is moved or removed, as with the railings (r). So careful checking of a building may help determine where / if textures may be replaced.

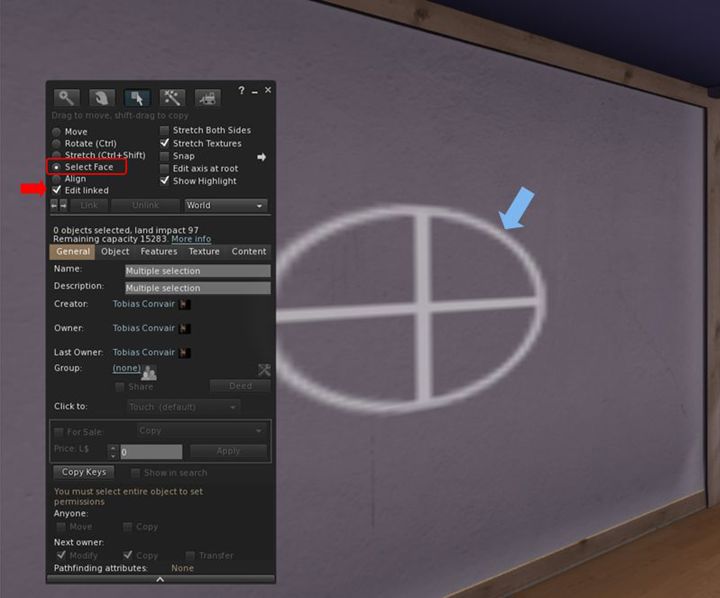
Carrying out such checks is pretty straightforward:

  • Visit a copy of the building in-world and right-click on it and select Edit from the menu.
  • In the Edit floater, do two things:
    • Click on the Edit Linked selection box to make sure it is ticked (enabled).
    • Click on the Select Face radio button to enable it as well.
  • Finally, left-click on the surface in the building you would like to re-texture to display the texturing cross-hairs.
Identifying and checking surfaces for re-texturing it. Use the Edit Linked and Select face options in the Edit / build floater to identify the extend of a given face, shown by the cross-hairs (arrowed).

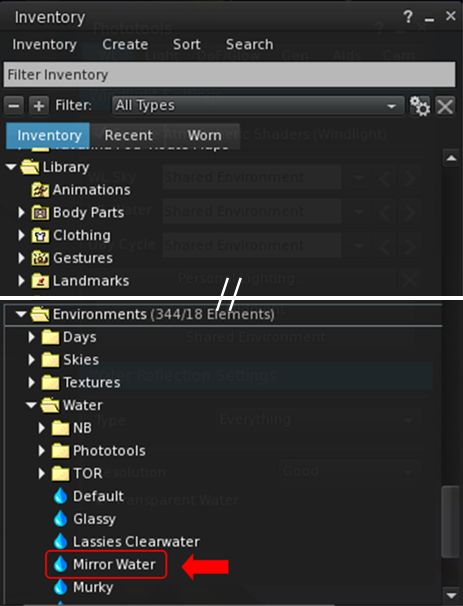
Note that some builders incorporate transparent prims in their builds (e.g. in walls and floors). Such prims can get in the way of checking surfaces, so you must keep an eye out for them. There are two ways to do this:

  • By pressing CTRL-ALT-T: this will highlight all transparent surfaces in red. If a part of the red is highlighted, then you have likely selected a face of the transparent prim.
  • With the surface selected, click on the Texture tab in the Edit floater. If the Transparency % spinner is set to 100, you have selected the face of a transparent prim.

Should you find you’re actually selecting a transparent prim face instead of the surface you want, I’m afraid there is no easy solution except manoeuvring your camera in as close as possible to the surface you want, and then trying to select it. To assist with this, go to the Advanced menu (use CTRL-SHIT-ALT-D to display the Advanced menu if not already enabled) and make sure Disable Camera Constraints is checked (click it if not).

With the required surface selected, check around it carefully for any of the following:

  • If the cross-hairs / highlighting on a wall / floor / ceiling extend into other rooms beyond the one you’re checking (e.g. a neighbouring wall / floor).
  • Whether the highlighting extends to other features within the surface you’ve selected (e.g. if you’re checking a wall with a window frame, is the frame also highlighted, or if you are checking a door, is the handle and other furniture also highlighted?).
  • Do any other parts of the house you might not expect to be highlighted appear to be so?
Always check around surfaces you might want to re-texture to see how other surfaces might be affected. Left: the texture cross hairs extend beyond a doorway into the next room, indicating they share a single wall face. Centre: selecting a single roof beam (arrowed) all selects those “in front” and “behind” it, indicating they are all a single texture face. Right: selecting the paintwork of the door (right side arrow) also highlights the door handle (left side arrow), indicating they are the same face and any texture applied to the door will also cover the door handle.  

If the answer to any of these questions is “yes”, then the items that are highlighted will also be affected by any texture you apply. This doesn’t mean you cannot necessarily go ahead with your ideas, just that you may revise what your re-texture or how you go about your alterations (e.g. might your problem be overcome by adding a prim and texturing that?).

Continue reading “Modding a house in Second Life: tips and pointers”

Tutorial: Using EEP for reflective floors

With EEP, it is now possible to have reflective floors at the parcel level that everyone can see, and contained within the parcel

Within Second Life there have been numerous ways to produce reflective floors within buildings – the most popular being to build a near-duplicate of what is in a room / building and inverting it “below” a textured, semi-transparent floor, allowing the duplicate to act as a reflection.

It’s a clever means of achieving the idea of reflections in polished floors, and has the advantage of being relatively “efficient” performance-wise (if a little hard on land impact, depending on the degree to which a person goes with the “reflected” items under the floor), as it means re-use of loaded textures and avoids rendering avatar reflections and mirroring movement. Although that said, the fact that the technique doesn’t show avatar reflections can spoil the effect.

Nitroglobus Roof Gallery provides an excellent demonstration of using a duplicate build to create the illusion of a reflective floor (although note the lack of any avatar shadow)

As has long been known, Linden Water can also be used as a means of producing reflective floorsthat can reflect avatars as well as objects. However, under Windlight, it has tended to suffer from a couple of observable weaknesses: if applied at the region level, it meant all water viewed from the region with produce the mirror effect – which could be a problem when outdoors (e.g. a mirror-flat surrounding sea); while to use it at parcel level meant using a viewer that accepted viewer-side parcel Windlight support – so anyone not using such a viewer would see a building / room with “flooded” floors.

EPP, with its simulator support for for parcel-level environment settings, means that is now possible to use Linden Water to create reflective floor effects within ground-level building that can more easily been seen by anyone entering the building, regardless of the viewer they are using. There are some pre-requisites involved, both it terms of creating the effect and viewing it, but even so, it is relatively easy to implement for anyone who wishes to do so.

Those prerequisites are:

  • As the approach uses Linden Water, it can only bee used at ground level (and on ground-level rooms of such buildings).
  • Some skill with terraforming is required, in particular:
    • Lowering / levelling land – this is important as the “reflective” floors must be at water level.
    • Ability to sub-divide land into parcel – this is particularly important if there is Linden Water is visible from outside the building with reflective floors, as you’ll be making changes to how Linden Water appears.
  • For parcels, you’ll need to have permission to set the environment at parcel level – if you do not own the region, and parcel level EEP support has been disabled via the region level controls, you will have to discuss the matter with the region holder / owner.
  • Those visiting the building must have Preferences → Graphics → Water Reflections set to All Avatars and Objects or Everything in order to see the water reflecting everything, including avatars.

The approach works best with your own builds, but can be used with pre-fab builds if they are modifiable, and can have floors modifed / replaced.

1 Prepare Your Land and Building

The first thing you need to do, is determine the shape of the floor space you wish to has as a reflective space and prepare the part of your land where it is to go.

  • Make a simple prim template of the shape of the room / building.
  • Place the template on your land where the room is to be positioned.
  • Keep in mind that depending on your location, you may want to sub-divide your land (if you have the necessary permission) so you can see natural-looking Linden Water when outside your house.
  • Use the terrafrorming tools in the Build / Edit floater to carefully lower the land under the template to expose the Linden Water.
  • Note that the “reflective floor” will, when the work is finished, need to sit just below the level of Linden Water. This means you may have to set it lower than the floors in other rooms on the ground floor of the building, or have the building itself surrounded by a mesh / prim surround to blend it with the ground level.
  • When you’re set, position the building and if necessary sub-divide your parcel.
  • Edit the building and:
    • Sset each of the floors you wish to be reflective to around 80% transparent – note that you may have to experiment with this setting, depending on the floor texture you use.
    • Apply a suitable texture for the reflective floor(s) (e.g. a wood texture for a polished wooden floor, or a marble effect for a public building).

2. Set the Water Environment

As noted above, you’ll need a suitable normal map to replace the one used for Linden Water.

  • The easiest way to do this is to use the Mirror Water environment asset that is included in the viewer under Library → Environments → Water.
  • You will need to copy this asset from its default Library location to your inventory (e.g. to the Settings folder – or a sub-folder within Settings, if you organise your EEP assets in sub-folders).
You can use the Mirror Water environment asset to help create your reflective floor. Make sure you copy it (e.g. via drag-and-drop) to your Settings folder
  • With the Mirror Water environment asset copied to your inventory, double-click on it to edit it. This will open the Fixed Environment – Water panel.
  • Within the panel, make the following changes (see the image below for reference):
    1. Set the water fog colour to white (note that depending on things like ambient lighting, the floor texture you use, etc., you may need to adjust this towards a more grey colour).
    2. Set all of the following to 0.0:
      • Fog Density Exponent and Underwater Multiplier.
      • Fresnel Scale.
      • X, Y, Z Reflection Wavelet Scale.
      • Large and Small Wave Speed.
      • Refraction Scale (Above) and (Below).
    3. Set Fresnel Offset to 0.50 (note that depending on things like ambient lighting, the floor texture you use, etc., you may want to adjust this up or down).
    4. Set Blur Multiplier to 0.80 (note that depending on things like ambient lighting, the floor texture you use, etc., you may want to adjust this up or down).
    5. From the Save / Apply Drop-down, select Save As and save your updated environment asset under a new name (e.g. “Reflective Floor”).
Adjusting the water settings for a reflective floor effect
  • Once saved, Select Apply to Parcel from the Save / Apply drop down to apply the environment to the parcel.

3. See How It Looks / Fine Tuning

You should now have a nicely reflective floor to your building, as shown below.

The finished product again, as per the banner image, note the avatar reflection and well as the reflections of in-world objects (1), and also the use of steps to access the low-set floor of the gallery from the outside “ground level” (2)

What’s more, if the building is sitting within its own parcel, when you leave the building, any visible Linden Water should look like natural water  / waves (although if you cam into the building or glimpse the “reflective floor” from outside of the parcel, it might look a trifle odd until you actually enter the parcel).

You might find that some additional “fine tuning” of the build is required to achieve a perfect result. If you’ve placed your floor a little above the level of Linden Water, for example, you may find your avatar “floats” over its reflection (below left), or if the floor is set a little too far below the level of Linden Water, the avatar and reflection may appear to “merge” at feet / ankles. But errors can be corrected with careful adjustment of your floor either down or up.

You may have to adjust the floor level relative to the Linden Water level to prevent avatar reflections giving the impression avatars are floating above the floor (l) – or standing with feet embedded in it – and actually standing on the floor (r).

Conclusion

There are still some limitations on the effectiveness of this approach: as noted above, it can only be used for ground-level interiors, and the effect does require visitors to have their graphics preferences set to reflect avatars in Linden Water. However, once set-up, it can add a certain edge to places like stores and galleries.

I’m not sure how much of a performance hit would occur in viewers trying to render a lot of avatars and their moving reflections in a ballroom or other dance venue, so these might require greater consideration. But if you do want to have a different ground-level flooring for your building, and you can meet the prerequisites noted above, it might well be worth giving it a go.

Tutorial: Viewer Camera Presets

The default viewer camera placement has long been the bane of the Second Life viewer. Placing the camera well above and behind the avatar, it gives an awkward over-the-head view of the world, rather than the more intuitive over-the-shoulder view seen in many video games.

While the camera’s debug settings have allowed a custom camera preset to be set-up, it has never really been possible to easily create, save, and swap between presets according to need.

Table of Contents

The Camera Presets controls, developed and contributed by Jonathan Yap, the developer responsible for the graphics presets options in the viewer (see Avatar Complexity and Graphics Presets in Second Life for more), changes this. It is a capability that allow users to create one more more custom camera presets within the viewer to suit particular needs and then save them. This means, for example, you can now have a camera position for general exploring, another suitable for combat games, another for building, etc., all of which can easily be accessed and used at any time.

This tutorial explains how to create and use presets via Camera Presets options.

Note: at the time of writing, the camera presets options are only available in the official viewer, version 6.4.2.541639 or later.

UI Elements

There are five UI elements associated with creating and using camera presets:

  • The Camera Presets icon and drop-down – presenting the means to quickly access and use created camera offsets.
The Camera Presets icon, found in the top right of the viewer window, and a populated version of the drop-down that can be displays on clicking on it.
  • The Camera Controls floater. This provides access to provides access to the following:
    • The familiar “on the fly” controls for positioning the camera / selecting any of the pre-set camera positions, setting the camera focus or switching to Mouselook. These can also now be used to create a custom camera preset.
    • Camera Position floater for creating new camera presets numerically.
    • Save Camera Preset floater – save any preset you have created or replace an existing preset with new values.
    • My Camera Presets floater – allows you select and delete any preset you have created, or reset your camera to one of the viewer’s default front, side or rear camera positions.
    • In addition, the Camera Controls floater includes a drop-drop menu to provide quick access to any custom camera presets you have created.
The Camera Controls and camera presets floaters – click for full size, if required

Creating a Custom Camera Preset

Using the Camera Controls

  1. Open the Camera Control floater by:
    • Hovering the mouse over the Custom Preset icon at the top right of the viewer window to open the drop-down and then clicking the Open Camera Floater button OR.
    • Clicking on the Camera Controls (Eye) button in your viewer’s tool bar, OR
    • Selecting Me→Camera Controls… from the viewer menu bar.
  2. With the Camera Control floater open, clicked the required view button (Front, Side, Rear) if required.
  3. Use the camera orbit, slide and zoom controls on the left of the camera floater to position your camera as you would like it to be relative to your avatar.
  4. When you are satisfied with the camera position and angle, click Save As Preset button in the floater, and:
    • Either make sure the Save As New Preset radio button is selected and type a name for the preset in the text box.
    • Or click the radio button for Replace a Preset, then click the button to display a list of current presets and highlight the one you wish to replace (including one of the three default positions, shown in italics).
  5. When you have entered a name or made your choice, click Save.
Using the camera controls to create a camera preset

Using the Precise Controls

If you have a numeric set of camera and focus offsets you use (e.g. such as those provided by Penny Patton, or use the table below to set your camera to some typical view points):

  1. Open the Camera Control floater by:
    • Hovering the mouse over the Custom Preset icon at the top right of the viewer window to open the drop-down and then clicking the Open Camera Floater button OR.
    • Clicking on the Camera Controls (Eye) button in your viewer’s tool bar, OR
    • Selecting Me→Camera Controls… from the viewer menu bar.
  2. In the Camera Controls floater, click on Use Precise Controls.
  3. In the Camera Position floater:
    • Enter the X, Y and Z figures for the camera offset position.
    • Enter the X, Y, Z figures for the focus offset position,
    • Use the slider to set how near / far the camera is to be positioned from your avatar.
  4. When you are satisfied with the camera position and focus, click Save As Preset button in the floater, and:
    • Either make sure the Save As New Preset radio button is selected and type a name for the preset in the text box.
    • Or click the radio button for Replace a Preset, then click the button to display a list of current presets and highlight the one you wish to replace (including one of the three default positions, shown in italics).
  5. When you have entered a name or made your choice, click Save.
Setting a precise position for a camera preset

The following table offers Penny Patton’s recommended positions for over-the-shoulder camera presets.

Over the Left Shoulder
Centre
Over the Right Shoulder
Camera Offset
X= -2.0
Y= 0.4
Z= -0.2
X= -2.0
Y= 0.0
Z= -0.2
X= -2.0
Y= -0.4
Z= -0.2
Focus Offset
X= 0.9
Y= 0.7
Z= 0.2
X= 0.9
Y= 0.0
Z= 0.2
X= 0.9
Y= -0.7
Z= 0.2
Offset Scale Slider
1.5 1.5 1.5

Using Your Custom Presets

From the Presets Icon

  1. Hover the mouse over the Custom Preset icon at the top right of the viewer window to open the drop-down.
  2. Click on the required preset name to select it.

From the Camera Controls Floater

  1. Click on the Use Preset button in the Camera Controls floater.
  2. A drop-down of custom camera presets is displayed.
  3. Click on the required preset name.
  4. The preset is selected, and the button updates to display the preset’s name.
Using a custom camera preset

Deleting or Resetting Default Presets

Notes:

  • You can only delete custom presets and reset default presets.
  • No confirmation is requested: actions will be immediately implemented – so if you have overwritten one of front, side or rear camera position presets, your custom version of that preset will be lost when reset.
  1. Display the Camera Controls floater.
  2. Click the gear icon.
  3. The My Camera Presets panel opens (may default to the top left of your screen).
  4. Hover the mouse over the preset you wish to delete or reset.
    • Custom presets will display a trash can. Click it to delete the preset.
    • Default presets will display a reset icon. Click it to return the preset to its original values.

Environment Enhancement Project: a primer

The Environment Enhancement Project (EEP) is a set of environmental enhancements designed to replace windlight XML settings to control the water and sky environments seen in Second Life, and provides a wide range of additional / new capabilities for region holders, parcel holders and general users. It represents a fundamental shift in how environment settings are used and applied.

In brief EEP:

  • Uses environment objects that you can keep in your inventory and / or share with others.
  • Provides parcel-level control of environments.
  • Allows up to four different, independently controlled sky layers.
  • Allows the Sun, Moon and Cloud textures to be replaced with custom textures uploaded to the viewer.
Table of Contents
  • Provides an extended day cycle of up to 168 hours (thus allowing a 7-day, 24-hour day / night cycle to be defined, for example).
  • Allows users to override region / parcel settings as seen within their own viewer, by either attaching EEP settings to their avatar or through the Personal Lighting floater.
  • Provides new LSL functions to allow scripts to interact with parcel environments.
EEP allows you to have a little fun, if you wish. Credit: Bellimora

Many have already gained familiarity with EEP whilst it has been in development, using both the original project viewer and iterations of the release candidate viewer. However, given it is such a fundamental shift in how environment settings are created and used, I have attempted to break things down into more easily digestible pieces through the use of this EEP primer, and a more comprehensive EEP tutorial.

  • This primer is designed to provide an overview of the basic EEP capabilities and options from the point-of user of someone wishing to use them.
  • The EEP Tutorial is intended to provide a comprehensive breakdown of EEP capabilities, including how to create new EEP sky, water and day settings for personal use or which can be given or sold to others.

You can use either this primer or the tutorial to better understand EEP (the information here is also presented in the tutorial, which also explores the various floaters and options in greater depth).

For official information on EEP, please refer to the Environment Enhancement Project SL wiki page.

EEP Basic Concepts and Terminology

In brief EEP:

  • Uses environment objects that you can keep in your inventory and / or share with others – including selling (subject to the SL permissions system) via in-world stores and on the Marketplace.
  • Provides parcel-level control of environments.
  • Allows up to four different, independently controlled sky layers.
  • Allows custom textures for the Sun, Moon and clouds.
  • Provides an extended day cycle of up to 168 hours (thus allowing a 7-day, 24-hour day / night cycle to be defined, for example).
  • Means that as environments settings are simulator-side, and so by default are automatically seen by anyone using any EEP enabled viewer on entering the region / estate / parcel.
  • Still allows the use of “personal” settings seen only be the use applying them, for the purposes of photography, machinima, etc.

Terminology

EEP uses some key terminology that should be understood.

  • Settings: used to define the environment you see. There are three settings types:
    • Sky: define the atmosphere and lighting for a day (or night); the movement, density, etc., of the clouds; and the appearance of the Sun and / or the Moon (which remain in a fixed point in the sky).
    • Water: define the appearance of Linden Water (prim or mesh animated water is not affected): water colour and reflection; wave movement; amount of light refraction, etc.
    • Day Cycles: collections of Sky and Water settings that are combined to present a dynamically changing environment over a user-defined time period representative of a “day” (by default this is set to the legacy Second Life day / night cycle of 4 hours, but can be extended out to represent physical world time periods of up to one week).
    • Note that Sky and Water settings are referred to as Fixed Environments.
  • EEP assets: physical “containers” for storing EEP settings. These are inventory items that by default, are stored in the new Settings folder in your inventory (see below), they are split into three types:
    • Sky – Sky settings. Icon: a blue sky with clouds.
    • Water – Water settings. Icon: a water droplet.
    • Day Cycle – for Day Cycles. Icon: a split Sun / Moon.
    • EEP assets (permissions allowing) can be exchanged, given away, and / or sold through a store or via the Marketplace.

Note that EEP settings are:

  • Created or edited using their corresponding EEP asset (e.g. to create Sky settings, you use the Sky asset type).
    • New EEP assets can be created directly from inventory, just like any other system inventory asset type (notecard, clothing item, gesture, script, body part).
    • Creating / editing EEP assets and settings is covered in depth in my EEP tutorial.
  • By default stored within a new system folder in inventory – the Settings folder. This folder may be hidden until such time as an EEP asset is created.
By default, EEP assets are stored and created in the Settings folder in your inventory (l). If you want, you can manually sub-divide your settings into suitable folders for easier tracking (r)

EEP Permissions

There are a few notes on permissions associated with EEP settings / assets.

  • Copy/no-copy: EEP settings assets may never be marked no-copy. A person who owns a setting object may always make a copy of it in their inventory.
  • Transfer/no-transfer: the no-transfer permission is persistent. If you import any no-transfer day or water setting into a day cycle, that day cycle will also become no-transfer. Once saved, this change cannot be undone.
  • Modify/no-modify: these permissions behave as normal.

EEP Library Assets

EEP includes a collection of Sky, Water and Day Cycles, together with a set of textures that can be used for clouds and / or to replace the Sun and Moon, etc.

  • These are located in Inventory (CTRL-I) → Library → Environments.
  • They can be used in one of two ways:
    • Unmodified, directly from Library → Environments.
    • By copying them to your inventory (e.g. to your own Settings folder, if it is visible through the creation of an EEP asset; if not, any other folder can be used), where they will become modifiable, allowing you to adjust them / use them to create your own settings.
    • See my EEP Tutorial for editing / modifying EEP assets and settings.

Differences to Windlight

Some of the key differences between EEP and windlight are:

  • EEP settings are stored in inventory assets, not as XML files saved to your computer.
  • Because they are server-side, EEP settings are by default seen by any viewer affected by the. This can mean:
    • Parcel owners using a specific set of environment settings no longer have to request visitors manually switch to them.
    • Settings are no longer dependent on visitors to a parcel with a custom environment having the precise windlight XML file stored on their computer.
  • EEP setting do not require any external storage (e.g. Dropbox) in order to be shared with other users, if they are to be given away.

Tutorial: Second Life Names Changes

via Linden Lab

Second Life offers Premium Account holders the opportunity to change the the first name, the last name or both the first and last names of their account at any time, or to revert to any name they name have used in the past (again, first name, last name or both).

This Tutorial is intended to provide an overview of using the Name Change capability.

Important Points

First some points to note:

  • Premium members may change their first name or their last name or both their first and last name whenever they wish.
    • First names are free-form.
    • Last names are selected from a list, with the available names updated periodically.
  • There is a fee applicable each time the capability is used. This fee is displayed as a part of the Name Change process.
    • VAT at applicable rates will be added to accounts in VAT-paying countries.
  • Once a first name+ last name combination has been applied to an avatar account, it cannot be used by any other account (so “Josephine Bloggs” cannot use Name Change to become “Inara Pey”).
  • It is possible for you to revert back to any previously-used name assigned to your account.
  • If you are Premium and use the Name Change capability, then subsequently downgrade to Basic, you will retain whatever avatar / account name you have at the time you downgrade. You will not not “revert” to any past name you may have had, and you won’t be able to change you name again until such time as you re-up to Premium.
  • Name Changes is not replacing Display Names – these will remain available at no charge to all who wish to use them.
  • Name changes are made via the Second Life dashboard, and you must be logged-out of Second Life in order to make sure any Name Change you make is correctly applied to your account.

Changing Your Name

Note: It is possible (and based on some feedback received), that a name change might take a little time to propagate through SL’s various services, which may have some impact on things like scripted objects such as security systems.

Premium Members can change their names as follows:

  • Log out of the viewer if you are currently in-world.
  • Log on to your dashboard at secondlife.com.
  • Click Account on the left-menu.
  • Click on Change Name.
  • The Change Your Account Name page is displayed. This comprises:
    • The account availability of Name Changes (including a link for Basic account holders to upgrade to Premium.
    • The fee that will be applied to your account, including and VAT that may be added.
    • A reminder than you can change your first name, your last name or both.
    • An option to go ahead and change your account name.
The Change Your Account Name page
  • Click the Next Step button to proceed.
  • The Choose a New Name page is displayed. This comprises three parts:
    1. The Change First Name option.
    2. The Change Last Name option with a list of currently available last names names.
    3. A list of previous last names you have used – if you have not previously used Name Changes, only your current last name is displayed.
The Choose a New Name page, showing the three options for changing your first name (1); selecting an new last name from a list of currently available names (3), and for any previously-used last names (if available – 3)

Change Your First Name Only

  • Leave the Change First Name option checked.
  • Use the text input field to enter your desired first name.
  • Uncheck the Change Last Name option.

Change Your Last Name Only

  • Uncheck the Change First Name option.
  • Leave the Change Last Name option checked.
  • Click the radio button next to last name you would like to use.

Change Both Your First and Last Names

  • Keep both the Change First Name option and the Change Last Name option checked.
  • Enter your desired first name in the text input field under Change First Name
  • Click the radio button next to last name you would like to use.

Reverting to a Previously Used Name

If you have previously used Name Changes, and would like to change back to an “old” name:

  • Enter the first name in the Choose a First Name text input field (if required).
  • Click on the require last name from the list of your previously used Last Names (if available).

Completing the Change

  • When you are happy with the name(s) you have set / selected, click the Review Changes button.
  • A summary of your changes is displayed (if you have made no changes, you’ll be taken back to the Change Your Account Name page).
The Name Change summary – use it to make sure you are happy with the name(s) you have selected
  • Make sure the details are as you want them, or use the Go Back link to change your selection(s).
  • If you are certain of the changes:
    • Log out of the viewer if you have not already done so.
    • Click on Continue to Checkout.
  • On the check-out page, you are presented with your payment options:
    • Via an US dollar balance on your Tilia account.
      • Requires acceptance of the Tilia Terms of Service, if you have not already done so.
      • If you have a sufficient US dollar balance on your Tilia account, but do not with to use it, click the Don’t Use button.
    • Via any credit / debit card already tied you your Second Life Account.
    • By clicking the More Payment Options… and making a selection (e.g. assigning another credit / debit card to your account).
  • When you have selected your preferred payment method, click the blue Buy Now button to complete your Name Change.
Name Change payment options

SL Jira Tutorial part 2: feature requests

Introduction

This tutorial has been written as a guide to filing SL bug reports and feature requests using the Second Life Jira. It comprises two parts:

Bug Reports:

  • What is / is not a bug report.
  • Filing a bug report.
  • What a Security Exploit is.
  • Filing a Security Exploit report.
  • What happens to a report once filed.

Feature Requests (this section):

  • What a feature request should be.
  • Filing a feature request.
  • Using a proposal.
  • What happens to a feature request once filed.

Both sections are self-contained and can be bookmarked / referenced independently of one another for ease of use. However, to further assist in finding information, the table of contents on the right can be found in both part of the tutorial, and can be used to reference specific sections of either one.

Table of Contents

Acknowledgements and Thanks

I would like to express my thanks to the following people for their input into this tutorial and for sanity checking the contents: Alexa Linden, Grumpity Linden, Kyle Linden, Soft Linden and Whirly Fizzle.

What is the Jira For?

As noted above, the Jira is primarily for:

  • Filing reports on bugs that impact Second Life (covering the viewer, the simulator and the web), and which in doing so adversely impact the user experience.
  • Putting forward suggestions on features and capabilities that might enhance Second Life for users.

The Jira can also be used by third-party viewer (TPV) developers to have their viewer added to the TPV Directory, or for reporting TPVs that may be violating the TPV Policy / Second Life Terms of Service. Both of these options fall outside the scope of either part of this tutorial.

When using the Jira, please keep in mind:

  • It should not be used to report problems which are specific to you or for general enquiries about things like log-in issues; tier payments; running Second Life on a specific hardware configuration, land issues, and so on.
  • If you believe the bug presents a security risk (such as allowing griefing or exposing sensitive information), you should use the SEC bug report, details of which can be found in Security Exploits.
  • When adding comments to a report / feature request (see Commenting on filed requests), these should focus on technical feedback / input pertinent to the issue/ request being made. Personal opinion or general discussions on a bug / feature request can be held through the Second Life forums.

Feature Request Overview

Feature requests are ideas for the technical improvement of Second Life that are submitted to Linden Lab by users. While not all are accepted / actioned, many enhancements have come about as a direct result of submitted feature requests. However, when considering filing a feature request, some basic points need to be considered:

  • The chances of how and when a feature request being adopted depends on a number of factors, including:
    • How well the case is written up:  the more informed a feature request is, the more likely it is to be considered by Linden Lab. Think of a feature request as a mini project proposal.
    • Scope: requests that are focused on achieving a single, clearly defined goal are more likely to be viewed positively than requests that call for sweeping (and potentially vague) changes to SL.
      • It is better to file multiple feature requests on ideas / suggestions than to try to cram multiple ideas into a single request.
      • Remember, the Lab need to be able to digest your idea(s) and be able to see how they might fit with current work being carried out, or might fit with future work being planned. Keeping to one idea per feature request helps with this.
    • How the idea fits with the current roadmap of improvements: the Lab is constantly working to improve Second Life, and look at feature requests in terms of what is on their current roadmap of improvements. Requests that match what is planned many be implemented sooner than others.
    • How well it benefits the entire Second Life community: LL is especially interested in ideas that improve everybody’s experience. It is rare that resources are available for very special case needs.
    • Offer of code (viewer feature requests only): if a request for a new viewer feature includes code supplied under a contribution agreement, the feature might be adopted ahead of others / alongside of the Lab’s own work in enhancing the viewer, again allowing for the above points.
  • Use images and attachments.
    • Providing a mock-up image of how you’d like a new panel in the viewer to appear, or a diagram showing the flow of how a new feature would be used, etc., can be a lot clearer than a wall of text.
    • If the idea warrants it, don’t be afraid to provide an outline in the Feature Request form and then provide a more comprehensive project proposal as an attachment (see Using a Proposal, below).

Before You File a Feature Request

It is possible that the idea you have may already be the focus of a feature request, so please consider using the Jira search capability to look for similar ideas before submitting a request.

If you find that a feature request already exists for the idea, you can opt to click the Watch option (top tight of a feature request, under People) to receive updates to the Jira via e-mail (you can uncheck Watch should you no longer wish to receive these updates).

You can receive e-mail updates on a Jira by clicking the Start Watching… (l) option (under People in the top right of a displayed Jira). The option will update to Stop Watching… (r), indicating you’re receiving updates. Click the option again to stop receiving updates; the option will revert to Start Watching.

Filing A Feature Request

Setting the Project and Issue Type

  • Log-in to the Second Life Jira using your Second Life log-in credentials.
  • Click on the blue Create button in the top menu bar.
  • Check the top of the form and make sure:
    • Project is set to 1. BUG Project (BUG).
    • Issue Type is set to New Feature Request.
    • Use the drop-downs to set either, if required.
When filing a feature request, make sure Project is set to 1. BUG Project (BUG), and Issue Type to New Feature Request.

Completing the Form

  • Summary (required field): provide a concise summary of the feature request (also forms the request title).
    • If the request is related to a specific project (e.g. EEP), please include the project name at the start of the summary in square braces (e.g. [EEP]).
  • How Would You Like This Feature To Work (required field): provide an outline of how your proposed feature should work.
    • Be as clear and concise as possible.
    • Try to provide a step-by-step guide to how the feature would work.
    • If the feature is viewer-related and requires a new or updated UI panel, offer image mock-ups of how it should look using the Attachments option, and reference them here.
  • Why Is This Feature Important To You? How Would It Benefit The Community? (required field): describe why the feature would be useful to you / to Second Life users in general.
    • Be as clear as possible.
    • If the request is intended to overcome a specific shortfall in SL, outline what that shortfall is.
    • If there are a number of potential benefits, list them in turn.
    • If possible, include a use case on how the featured would be used, if implemented.
    • Include any relevant images that may help explain things, and reference them here.
  • Attachment: use this option to add any suitable attachments to the request (e.g. mock-ups of new / updated viewer panels).
    • Multiple images can be submitted, but ensure each is clearly labelled / annotated and properly referenced in the relevant text fields in the first part of the feature request form.
    • Keep in mind that individual images can be no larger than 10 Mb in size.

Note that feature requests do not have to be long or complicated. The image below illustrates a simple, straightforward request that has been accepted by the Lab.

Sample feature request, showing that they need not necessarily all be long and complex – click to enlarge, if required

Using a Proposal

If you are offering a significant feature request – such as a new user interface option for users, a new viewer or simulator capability, etc., – consider offering a complete proposal to the Lab, submitted as an attachment to a feature request.

A proposal can:

  • Let you summarise your idea in the Feature Request form, and then go into greater detail in your proposal.
  • Allow you to structure your idea clearly, and present it logically and together with related images (UI mock-ups, etc.).

Keep your proposal to a single idea, and don’t forget to explain how it should work and why it would be of benefit. It doesn’t have to be a treatise, just so long as it explains the idea, why you believe it is important and how it would benefit the SL community.

A proposal can be attached to a feature request as a .PDF file or included as a link to a publicly viewable Google Docs file.

For a good example of a feature request see the Hover Height proposal submitted to Linden Lab in 2015, and which led to the inclusion of the “on the fly” hover height adjustment capability in the viewer.

Submitting Your Feature Request

When you have confirmed the information is correct and as clear as possible, and any images / files you wish to include are attached, click the Create button at the bottom right of the form to file your bug report.

Refer to What Happens Next?, below, for information on what happens to a filed bug report.

Commenting on Filed Requests

Sometimes after filing a feature request, there may be additional information you wish to add. You can generally do this via the Comment button at the bottom of a feature request page.

  • Who can comment on a feature request depends on a variety of factors, including general permissions, the security level for the report (Public or Triagers and Reporters), together with the current status of the report (Open, Needs More info, Accepted).
  • If the Comment button is unavailable, you will need to request permission to make Jira comments. Send  an e-mail to letmein-at-lindenlab.com, giving your avatar name and a clear reason for requesting access.
  • Note that you do not need comment rights in order to file bug reports or feature requests.

What Happens Next?

The Jira Workflow

A submitted feature request follows a set workflow, as shown in the diagram below.

The Jira workflow – simplified
  • Awaiting Review: when you submit a feature request, it enters a queue for review (triage) by the Lab’s QA and Product teams.
  • Triage: incoming requests are triaged on a weekly basis. The outcome is generally one of the following, as indicated in the status area of the report:
    • Needs More Information: if the report is vague or not easy to understand or doesn’t contain sufficient information needed to understand the request, it will be flagged by the Lab as requiring more information from the reporter.
      • This sets the Needs More Info flag on the feature request, and in addition a comment is generally provided by the Lab as to what is required.
      • The reporter should review the request and any comment(s) recorded by the Lab and attempt to provide the missing information.
    • Information Provided: when additional information has been added to a request, it is essential the Info Provided button is clicked. This will update the bug report to inform the Lab that the information has been supplied. Note that a failure to click the button could result in a delay in a request being further actioned.
The Needs More Info flag (arrowed) and the Info Provided button
  • Accepted: the feature request is accepted by the Lab and cloned into their internal JIRA system for tracking.
    • However, Accepted does not mean a feature request will acted upon immediately. Rather, it may mean the Lab are sufficiently interested in the idea to keep track of it, but implementation may be held until such time as it fits / can be slotted into the SL development road map.
    • Sometimes, on further reviewing a bug report / feature request, Linden Lab may request even more additional information, and will re-open the original (see Needs More Information, above).
    • Once an accepted report / feature request has been implemented, the originating Jira will be Closed with a status of Resolved.
  • Closed: the request is not to be taken any further. Typically, a feature request will be closed and annotated with one of the following reasons:
    • Duplicate: there’s another feature request covering the same idea.
    • Unactionable: the described feature has been declined by the Linden Lab feature request review team.
    • Not Applicable: the reporter has decided to close the issue.
    • Resolved: the request has been implemented.

Where Next?