| The default viewer camera placement has long been the bane of the Second Life viewer. Placing the camera well above and behind the avatar, it gives an awkward over-the-head view of the world, rather than the more intuitive over-the-shoulder view seen in many video games.
While the camera’s debug settings have allowed a custom camera preset to be set-up, it has never really been possible to easily create, save, and swap between presets according to need. |
Table of Contents |
The Camera Presets controls, developed and contributed by Jonathan Yap, the developer responsible for the graphics presets options in the viewer (see Avatar Complexity and Graphics Presets in Second Life for more), changes this. It is a capability that allow users to create one more more custom camera presets within the viewer to suit particular needs and then save them. This means, for example, you can now have a camera position for general exploring, another suitable for combat games, another for building, etc., all of which can easily be accessed and used at any time.
This tutorial explains how to create and use presets via Camera Presets options.
Note: at the time of writing, the camera presets options are only available in the official viewer, version 6.4.2.541639 or later.
UI Elements
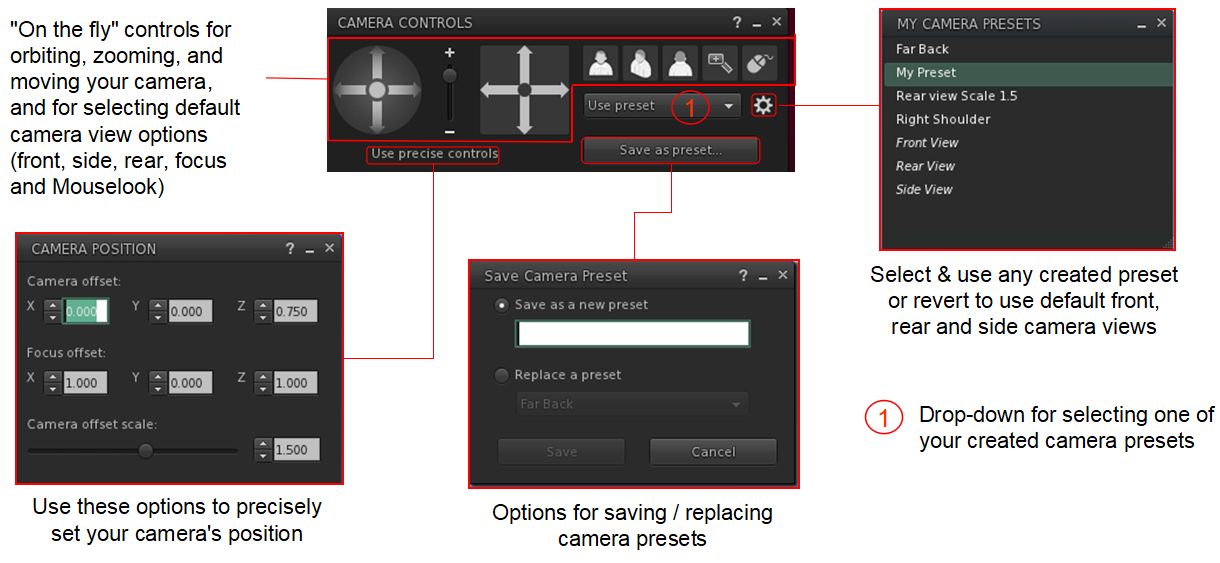
There are five UI elements associated with creating and using camera presets:
- The Camera Presets icon and drop-down – presenting the means to quickly access and use created camera offsets.

- The Camera Controls floater. This provides access to provides access to the following:
- The familiar “on the fly” controls for positioning the camera / selecting any of the pre-set camera positions, setting the camera focus or switching to Mouselook. These can also now be used to create a custom camera preset.
- Camera Position floater for creating new camera presets numerically.
- Save Camera Preset floater – save any preset you have created or replace an existing preset with new values.
- My Camera Presets floater – allows you select and delete any preset you have created, or reset your camera to one of the viewer’s default front, side or rear camera positions.
- In addition, the Camera Controls floater includes a drop-drop menu to provide quick access to any custom camera presets you have created.
Creating a Custom Camera Preset
Using the Camera Controls
- Open the Camera Control floater by:
- Hovering the mouse over the Custom Preset icon at the top right of the viewer window to open the drop-down and then clicking the Open Camera Floater button OR.
- Clicking on the Camera Controls (Eye) button in your viewer’s tool bar, OR
- Selecting Me→Camera Controls… from the viewer menu bar.
- With the Camera Control floater open, clicked the required view button (Front, Side, Rear) if required.
- Use the camera orbit, slide and zoom controls on the left of the camera floater to position your camera as you would like it to be relative to your avatar.
- When you are satisfied with the camera position and angle, click Save As Preset button in the floater, and:
- Either make sure the Save As New Preset radio button is selected and type a name for the preset in the text box.
- Or click the radio button for Replace a Preset, then click the button to display a list of current presets and highlight the one you wish to replace (including one of the three default positions, shown in italics).
- When you have entered a name or made your choice, click Save.

Using the Precise Controls
If you have a numeric set of camera and focus offsets you use (e.g. such as those provided by Penny Patton, or use the table below to set your camera to some typical view points):
- Open the Camera Control floater by:
- Hovering the mouse over the Custom Preset icon at the top right of the viewer window to open the drop-down and then clicking the Open Camera Floater button OR.
- Clicking on the Camera Controls (Eye) button in your viewer’s tool bar, OR
- Selecting Me→Camera Controls… from the viewer menu bar.
- In the Camera Controls floater, click on Use Precise Controls.
- In the Camera Position floater:
- Enter the X, Y and Z figures for the camera offset position.
- Enter the X, Y, Z figures for the focus offset position,
- Use the slider to set how near / far the camera is to be positioned from your avatar.
- When you are satisfied with the camera position and focus, click Save As Preset button in the floater, and:
- Either make sure the Save As New Preset radio button is selected and type a name for the preset in the text box.
- Or click the radio button for Replace a Preset, then click the button to display a list of current presets and highlight the one you wish to replace (including one of the three default positions, shown in italics).
- When you have entered a name or made your choice, click Save.

The following table offers Penny Patton’s recommended positions for over-the-shoulder camera presets.
| Over the Left Shoulder |
Centre |
Over the Right Shoulder |
|
| Camera Offset |
X= -2.0 Y= 0.4 Z= -0.2 |
X= -2.0 Y= 0.0 Z= -0.2 |
X= -2.0 Y= -0.4 Z= -0.2 |
| Focus Offset |
X= 0.9 Y= 0.7 Z= 0.2 |
X= 0.9 Y= 0.0 Z= 0.2 |
X= 0.9 Y= -0.7 Z= 0.2 |
| Offset Scale Slider |
1.5 | 1.5 | 1.5 |
Using Your Custom Presets
From the Presets Icon
- Hover the mouse over the Custom Preset icon at the top right of the viewer window to open the drop-down.
- Click on the required preset name to select it.
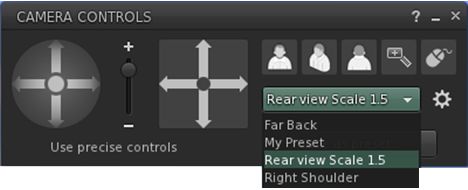
From the Camera Controls Floater
- Click on the Use Preset button in the Camera Controls floater.
- A drop-down of custom camera presets is displayed.
- Click on the required preset name.
- The preset is selected, and the button updates to display the preset’s name.
Deleting or Resetting Default Presets
Notes:
- You can only delete custom presets and reset default presets.
- No confirmation is requested: actions will be immediately implemented – so if you have overwritten one of front, side or rear camera position presets, your custom version of that preset will be lost when reset.
- Display the Camera Controls floater.
- Click the gear icon.
- The My Camera Presets panel opens (may default to the top left of your screen).
- Hover the mouse over the preset you wish to delete or reset.
- Custom presets will display a trash can. Click it to delete the preset.
- Default presets will display a reset icon. Click it to return the preset to its original values.

Thanks for the great tutorial. Is there a way to resize the Camera Controls Floater? (make it smaller on the screen)
LikeLike
Sadly, no.
LikeLike
Reblogged this on KULTIVATE.
LikeLike
OMG Inara! Something wonderful happened while I was sleeping! As you stated, the default camera is *way* too high and far behind! Like so many avatars, I prefer a closer and lower camera. Although I might prefer even lower than most:
Camera Offset RearView: x -1.8, y 0, z -0.65
Focus Offset RearView: x 0.9, y 0, z -0.1
Offset Scale Slider: 1.0
Sometimes I’ll sling it over with a small amount of Y offset, but 0 often suits me pretty well.
Those settings give me a nice and full view of my somewhat shorter avatar. I feel present with those settings. One problem with them, however, is shopping. The above settings put the camera too low for seeing boards when I walk into a shop. So I either have to cam up to see, or go back into the debug settings and change Focus Offset Rearview to something like z +1.1. As you noted, it’s easy enough to do with debug settings, but easier and faster to do with this fantastic new addition!
I can’t recall if I had played with the Offset Scale Slider before. I think maybe I dabbled but didn’t fully understand it. That changes everything! I will have to experiment with it for a while. I’m starting with the limits of -3.0 and +5.0 as sort of birds-eye-view and worms-eye-view. I think they might be nice for different sorts of overviews. Or, for that, simply caming to the view you want might be great. For sure, having different FO-RV Z values preset will be fantastic.
Thank you, Jonathan Yap, for making this happen!
Thank you, Inara, for letting us know about it!
**DIFFERENT CAMERA QUESTION**
As long as we’re talking about cameras… a modern RL digital camera can shoot an 8-bit .jpg file, similar to an SL .jpg or .png photo. But the RL camera can also shoot a 16-bit RAW file that contains dramatically more data and allows phenomenal adjustments for things like recovering highlights and shadows and more in apps like Lightroom, CaptureOne, et al.
Is there a way to capture anything like a RAW, greater than 8-bit, file in SL?
LikeLike