TaKe Heart in Second Life

TaKe Heart; Inara Pey, October 2016, on Flickr TaKe Heart – click any image for full size

Years ago on the BBC there was a kids TV series called Take Hart, featuring artist Tony Hart. intended to encourage children to get involved in art of almost any form – drawing. painting, 2D, 3D. It took over from an earlier show called Vision On, and both  featured a piece of music called Left Bank Two by the Noveltones, which became an iconic part of British culture in the 1980s (and still is among those who went through there early years back then).

I mention this, because when Caitlyn and I explored TaKe Heart, the homestead region Kess Krystal and spazz Tackett have opened to the public, I was immediately put in mind of the show and the music – and once the theme had lodged in my head, I could shift it. Kess told me I’m not alone – there was apparently a lot of humming and singing the theme during the work of designing the region. even to the point of thought being given to adding a little Morph somewhere.

TaKe Heart; Inara Pey, October 2016, on Flickr TaKe Heart

While there is a similarity between the region’s name and the show, the former is not directly tied to the latter – the TaKe in the region’s name is a combination of TAckett and KEss. Nevertheless, it does contain an echo of Tony Hart’s passion for art: it is so photogenic, it brings out the artist in anyone who visits.

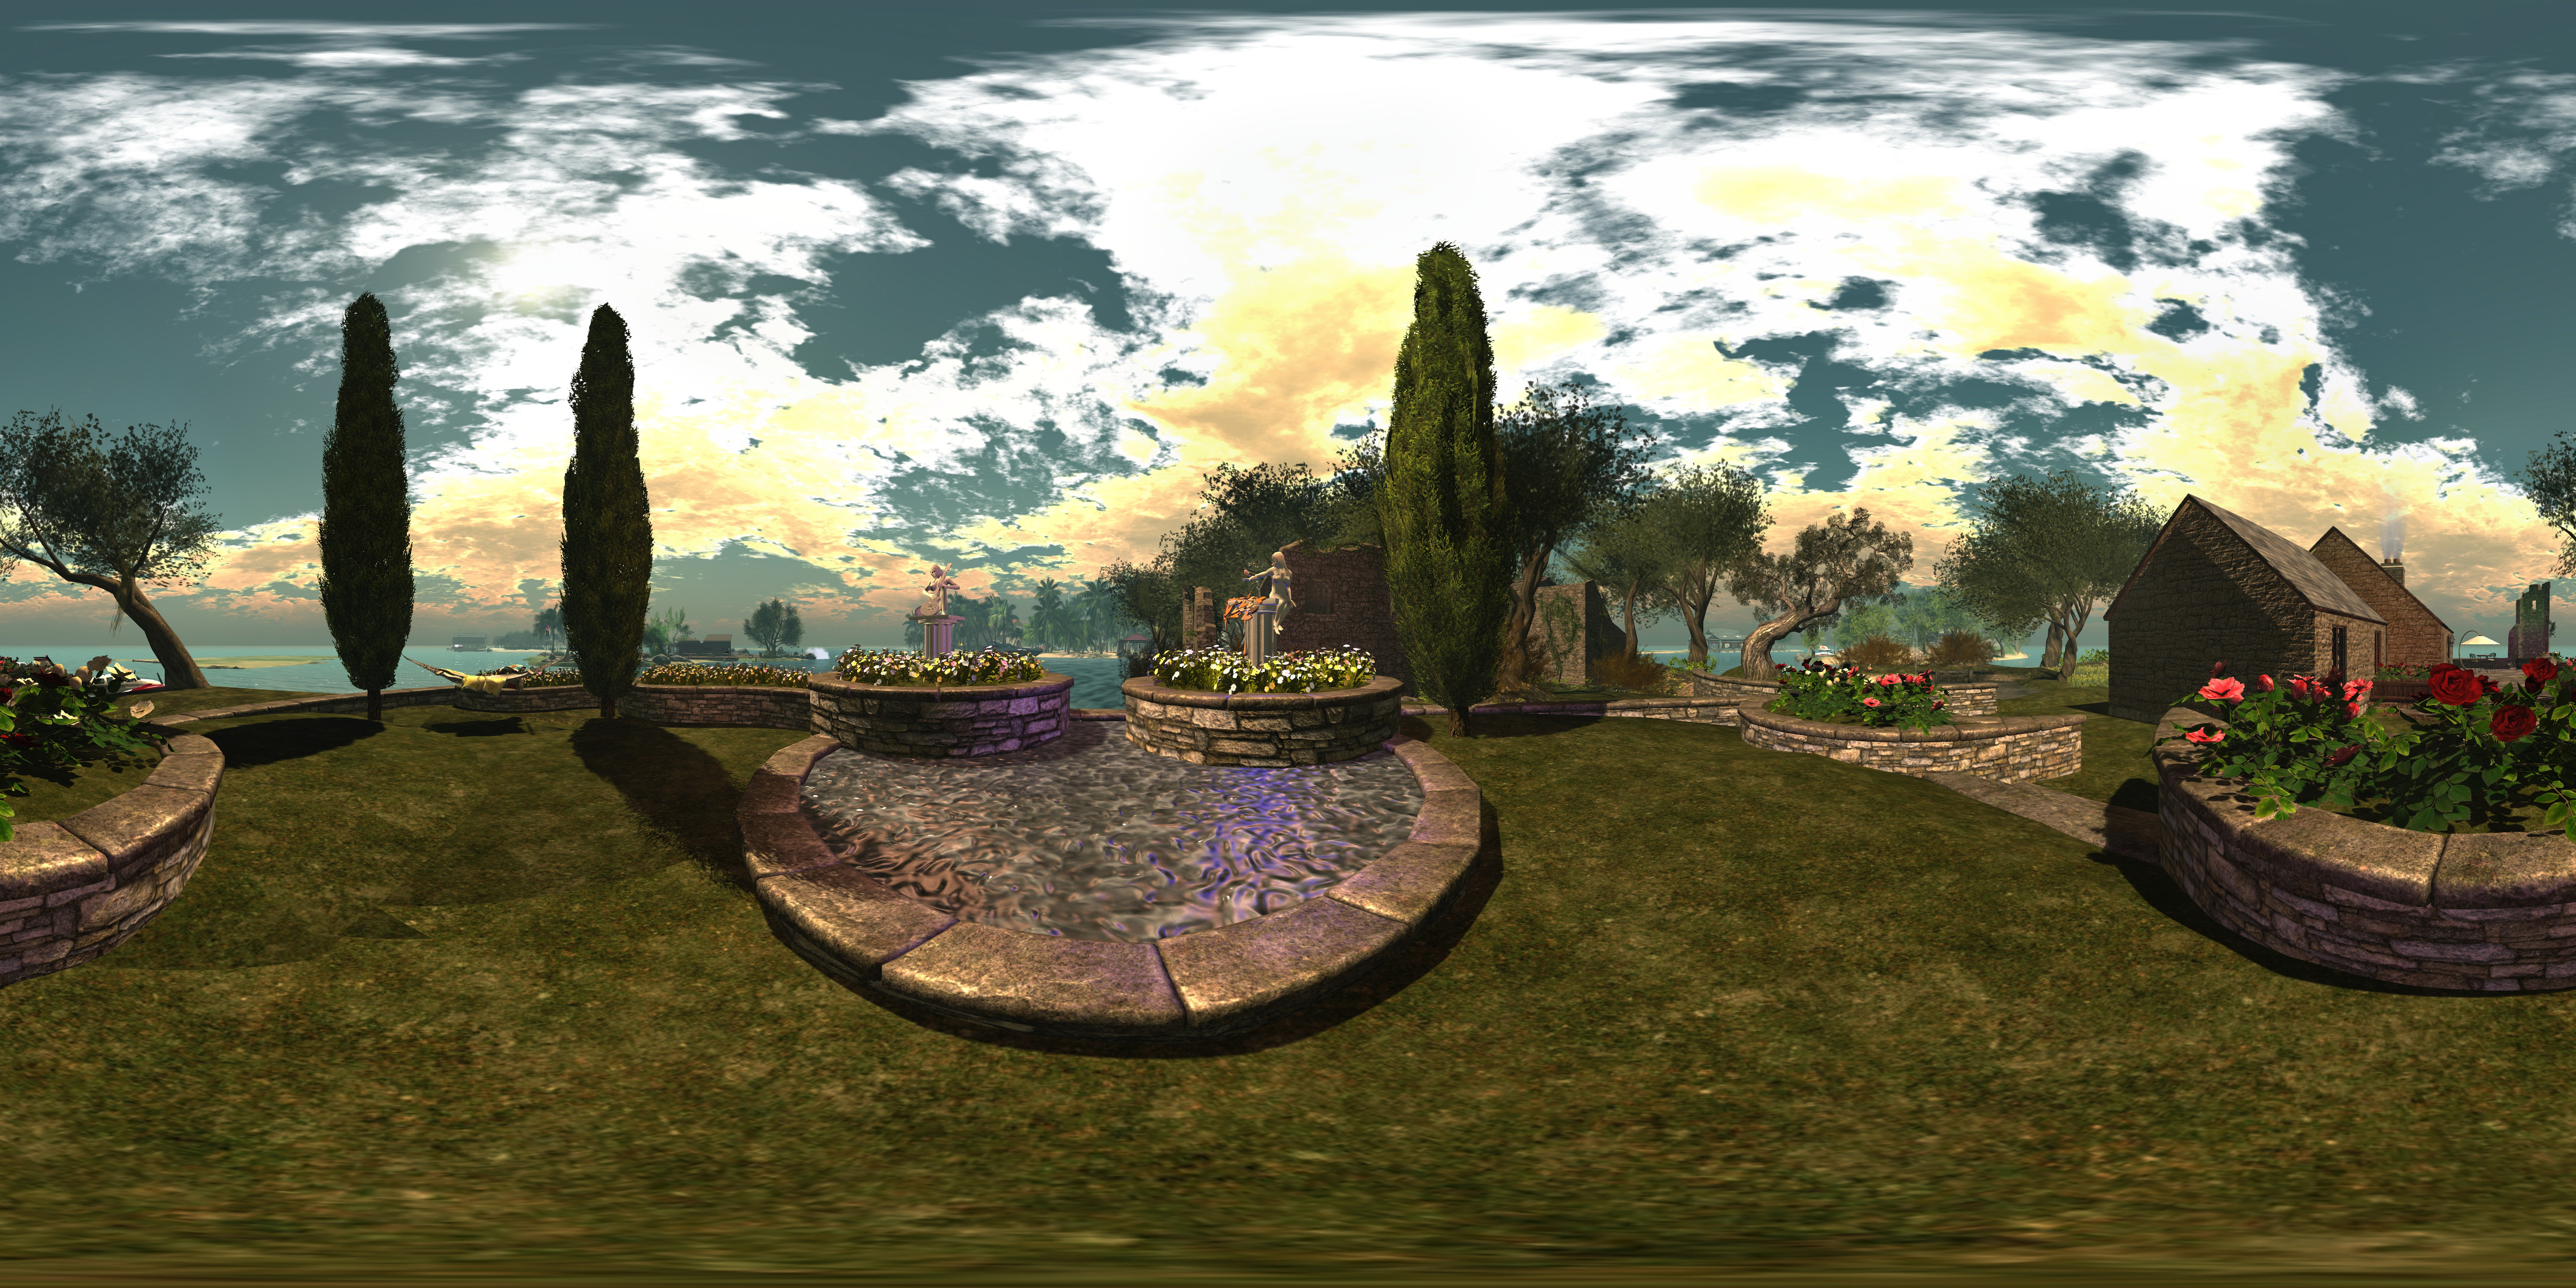
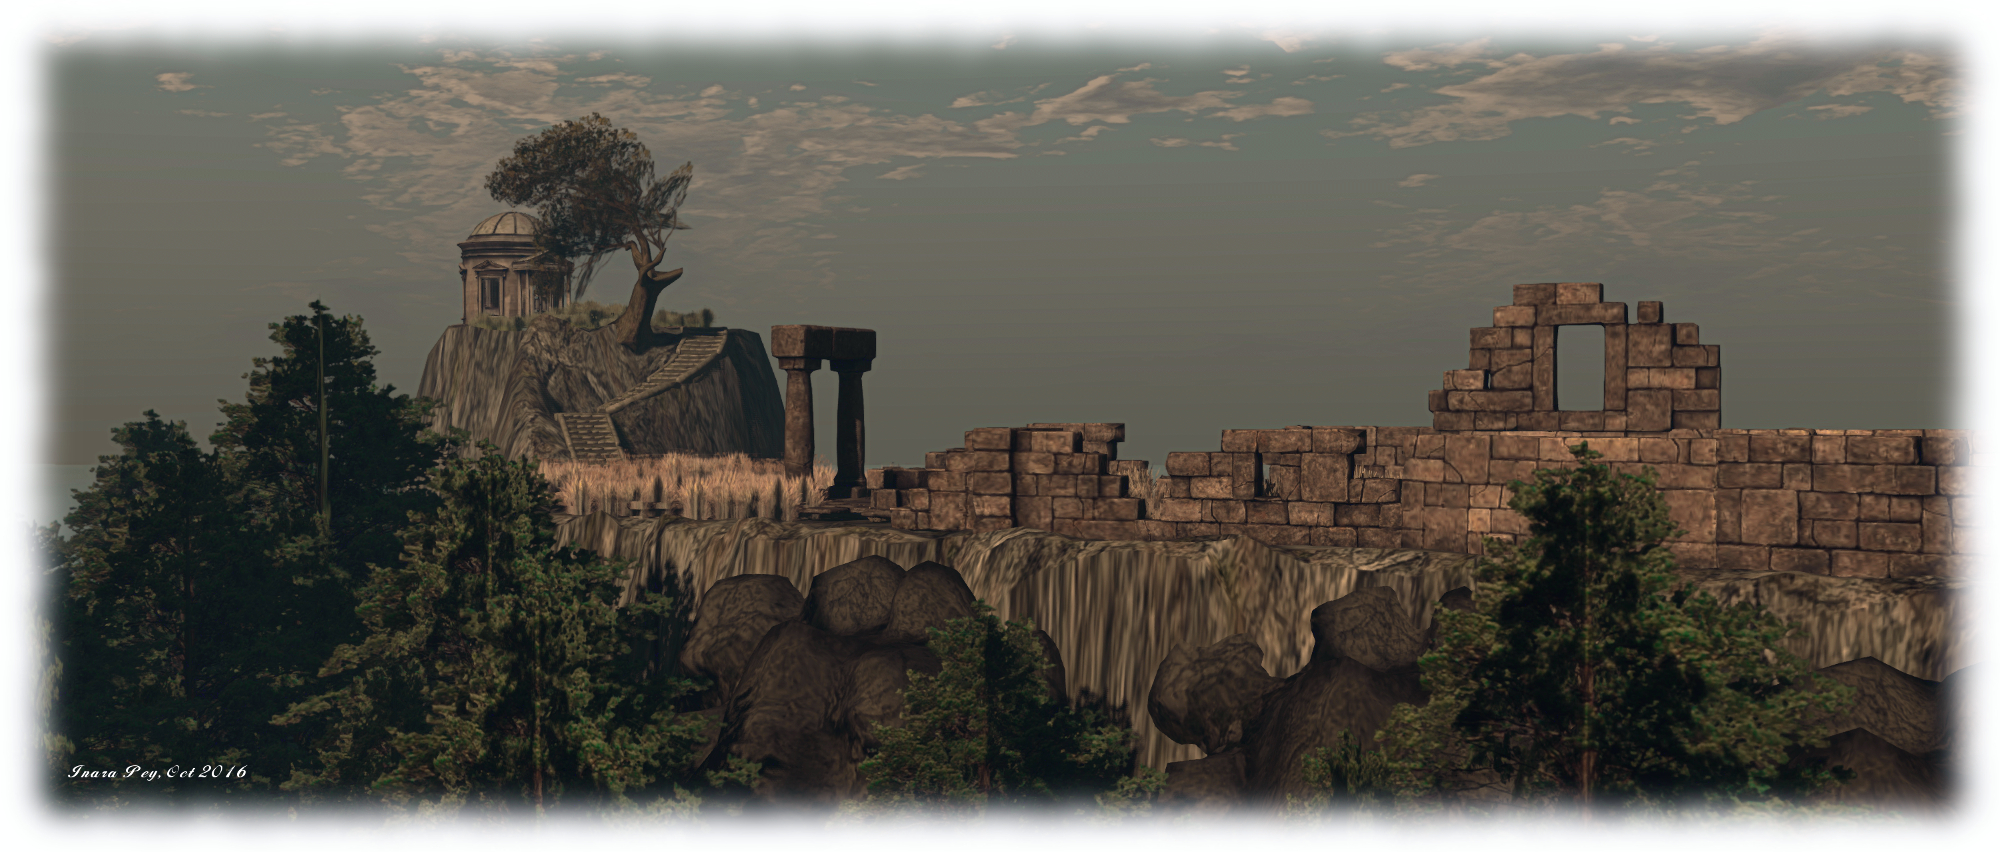
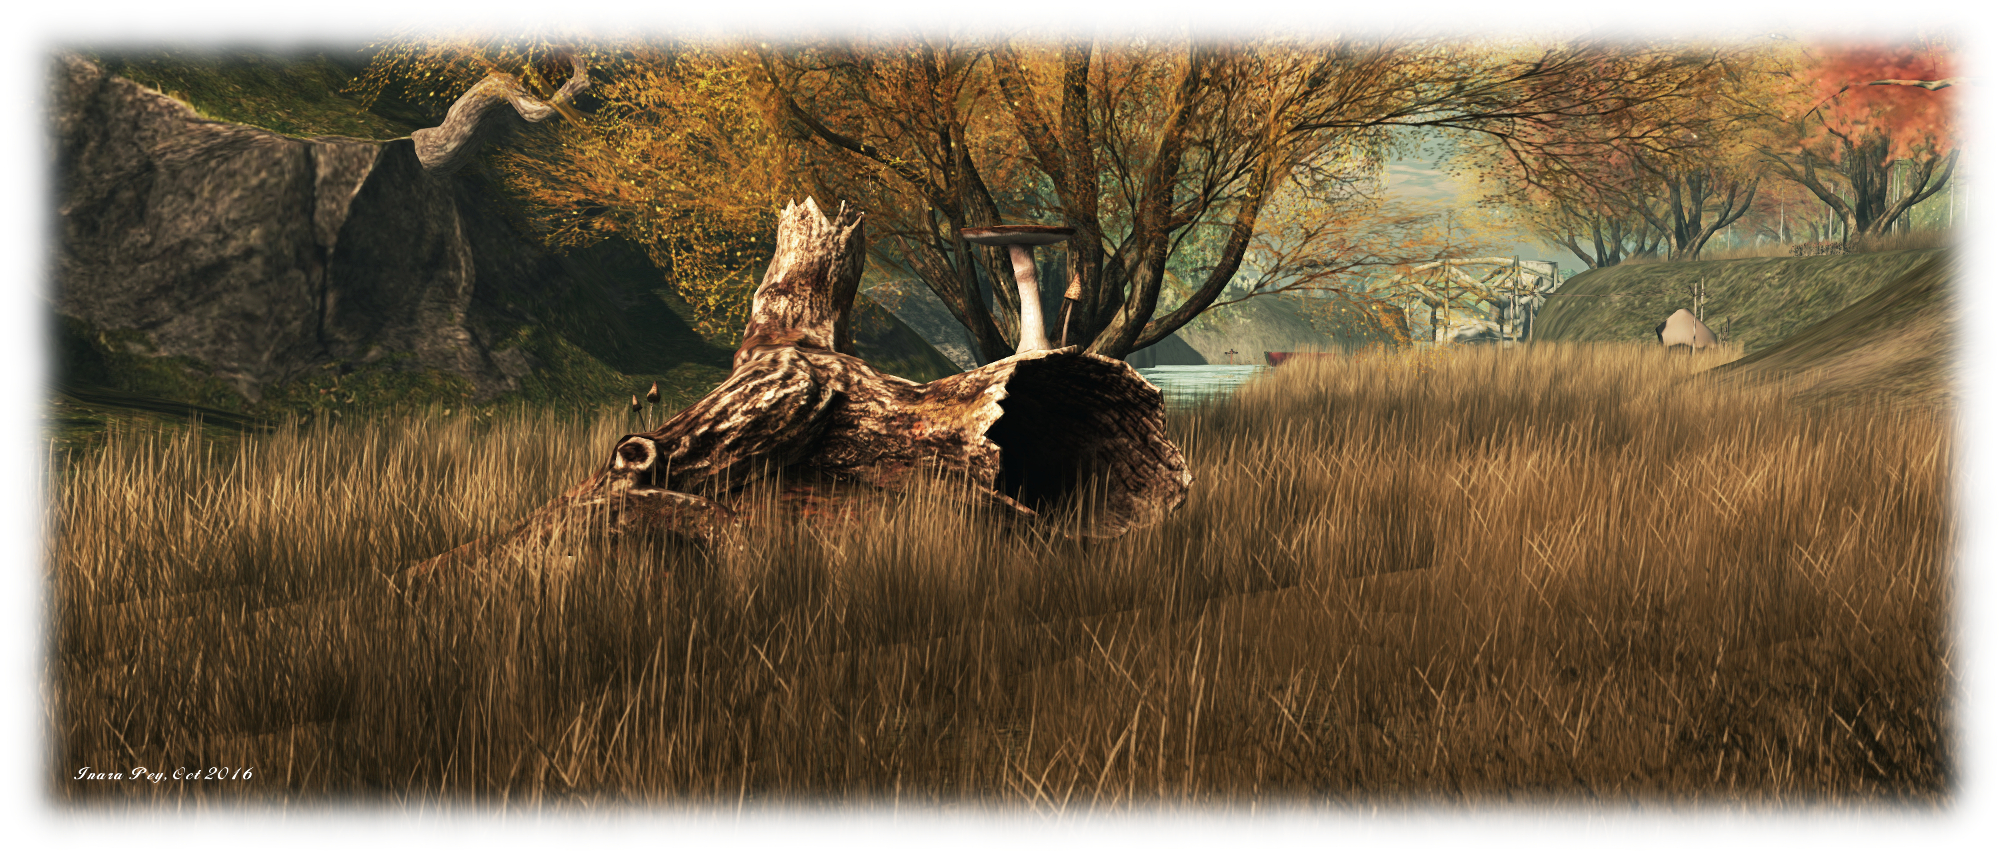
Surrounded by rugged island peaks rising from the sea, TaKe Heart is a rugged, rural place, with steep cliffs, undulating swathes of grass, long and short, where trees are misted by glowing points of light twinkling like fireflies in the gathering dusk. It’s a tranquil place which can be enjoyed whether exploring on your own or with friends. There’s even a couple’s walking animation. allowing romantics to  walk hand-in-hand.

TaKe Heart; Inara Pey, October 2016, on Flickr TaKe Heart

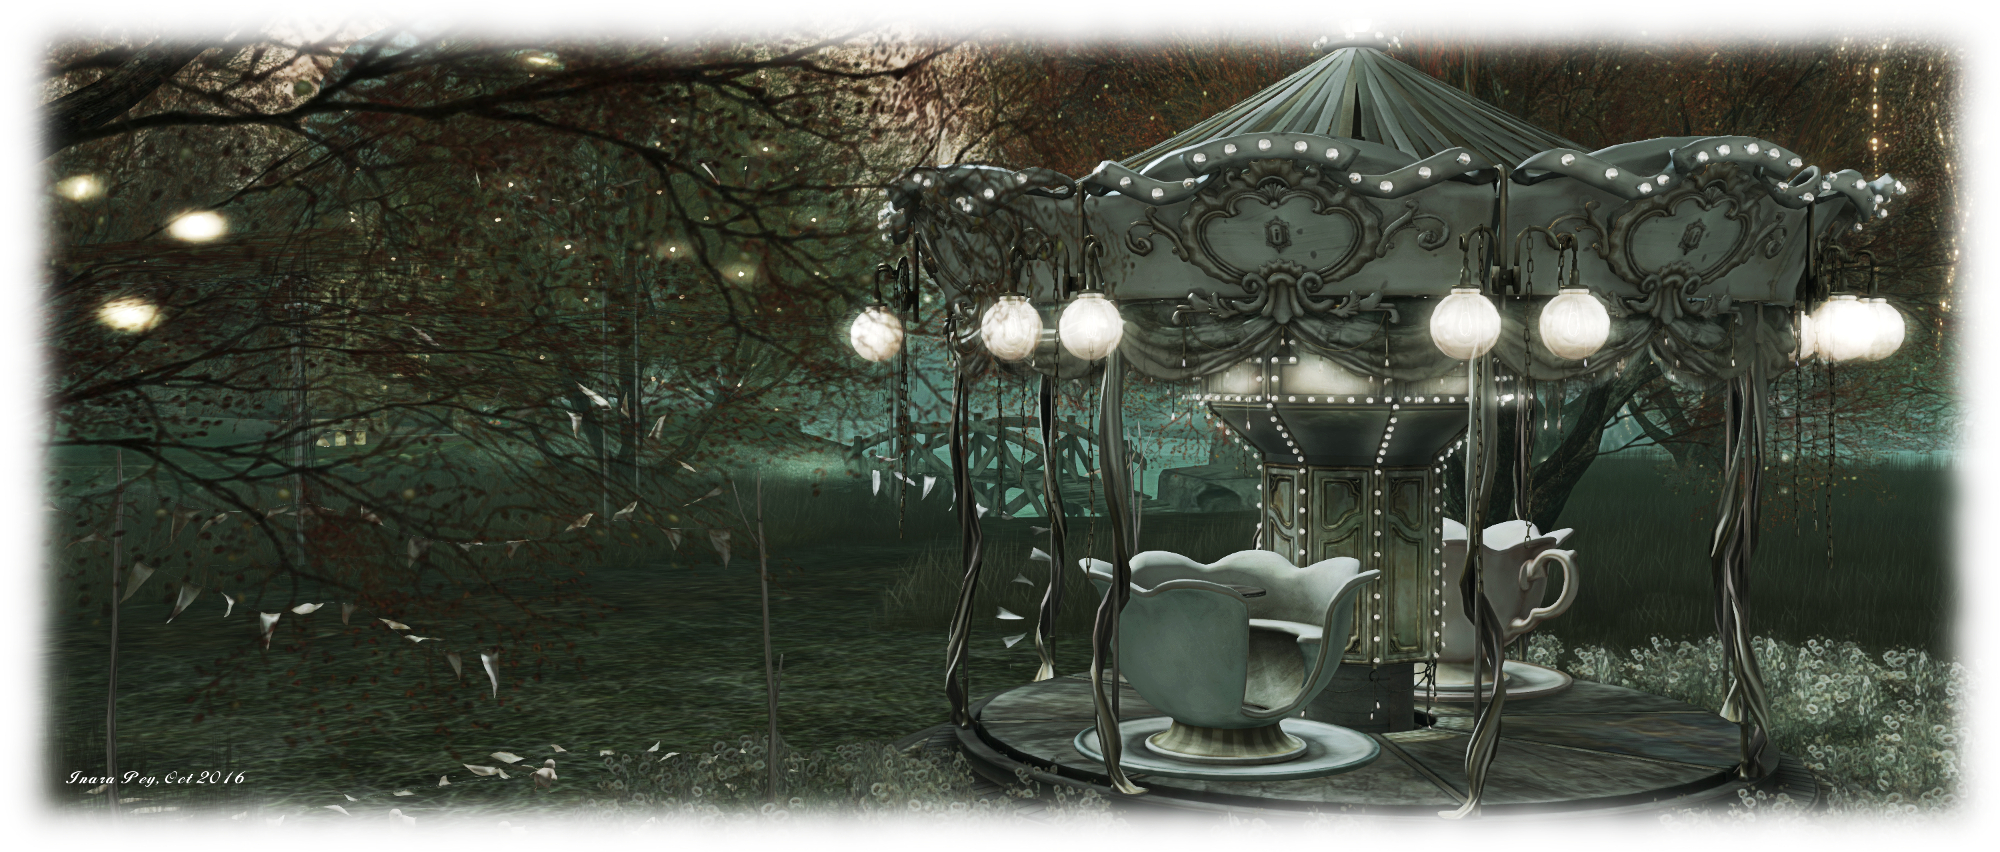
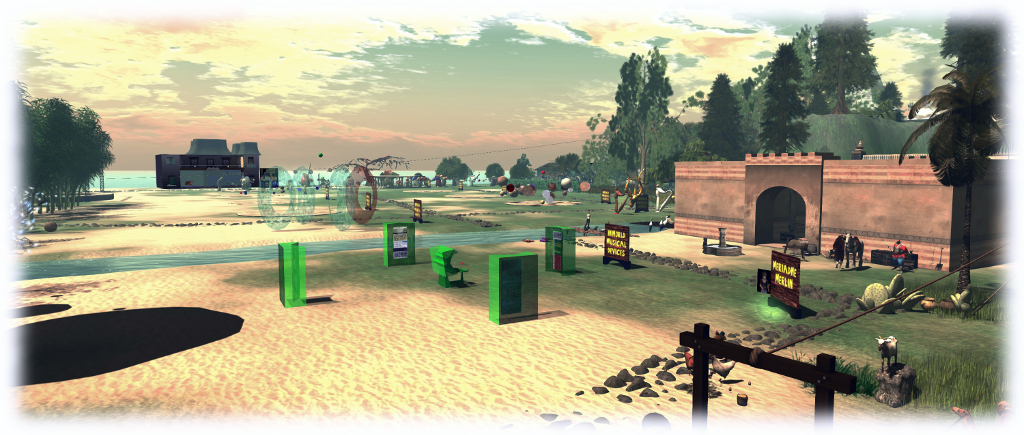
Split into three islands, the region offers plenty of space to explore, starting from the west side of the largest island, where sits the landing point.  From here visitors, can wander around the large lake of main island – and try the swan boat or the precarious-looking Ferris wheel cars floating on the water. A picnic table between lake and sea offers the chance for lantern lit refreshments, while further away, and up a sharp rise, an arched circle offers the chance for a twilight dance.

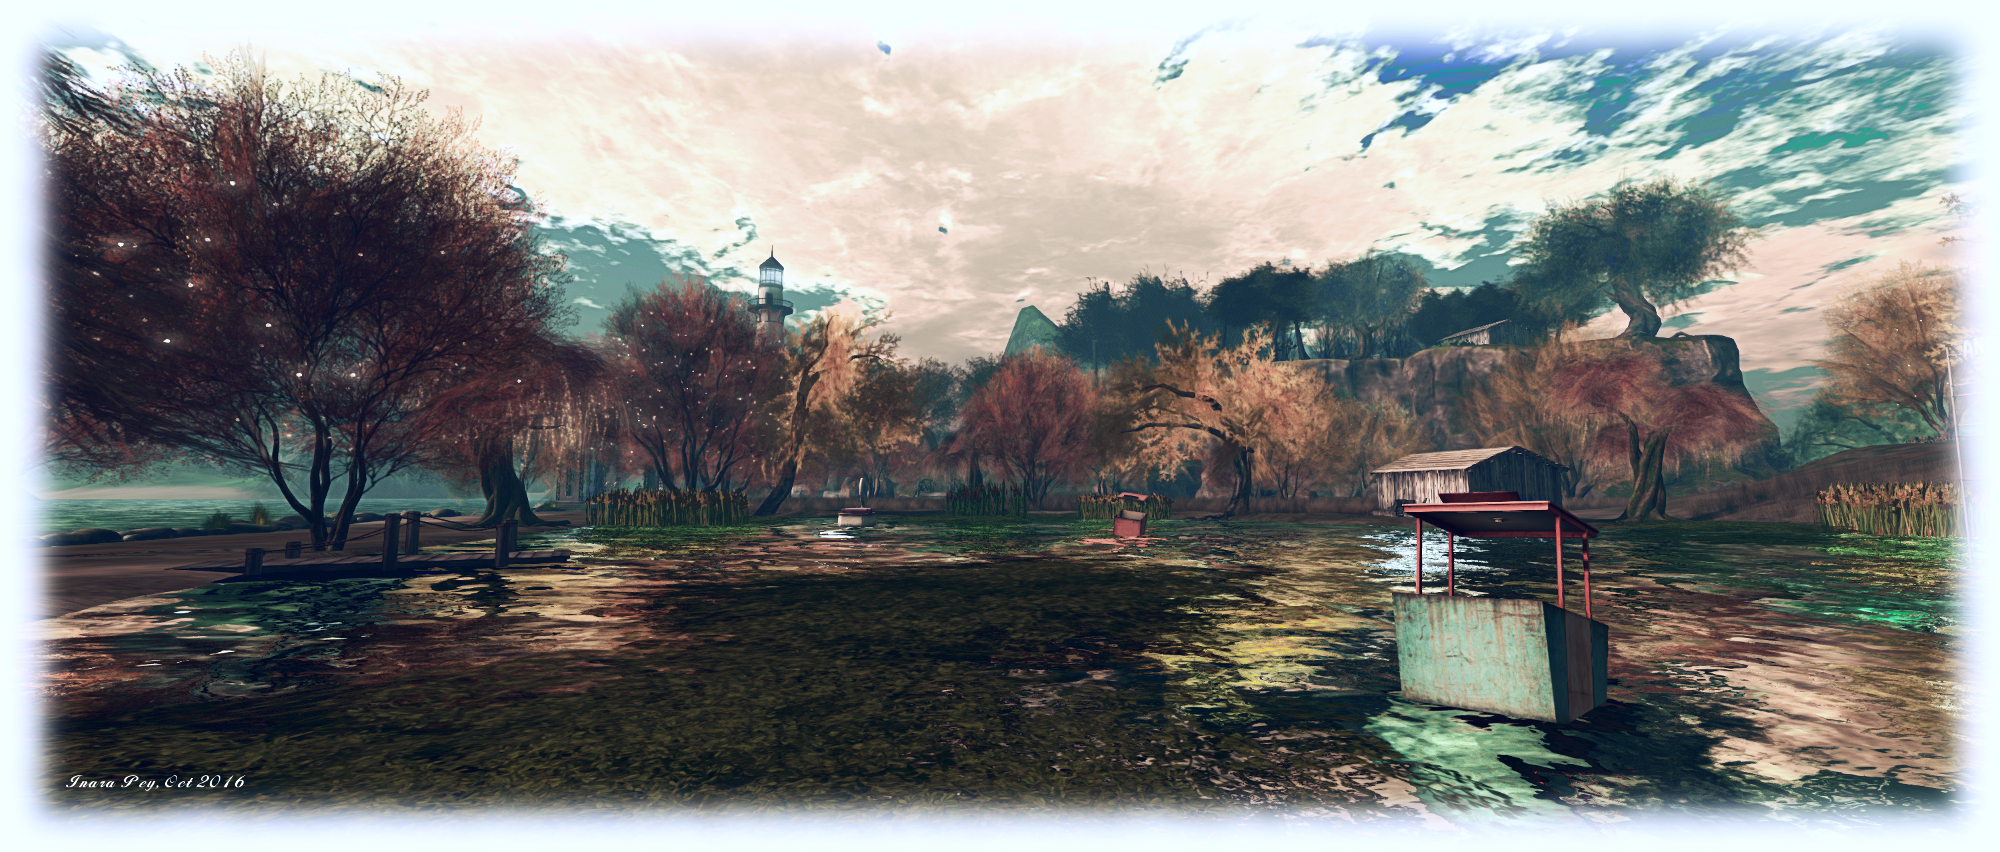
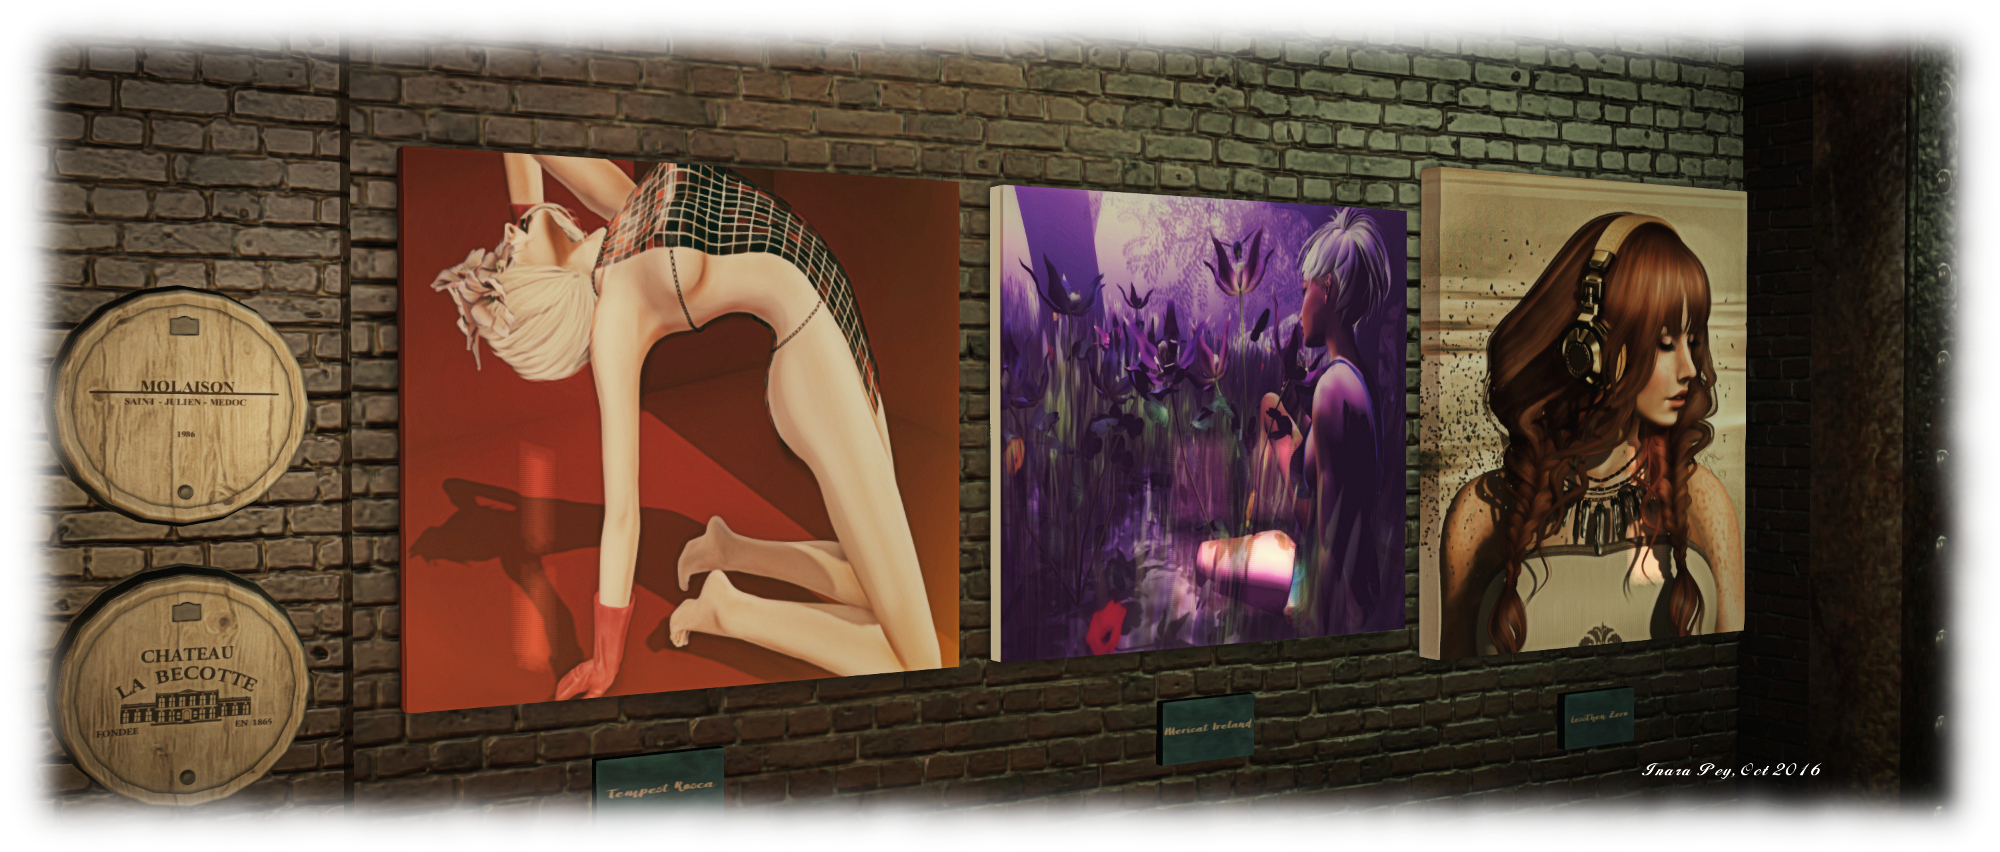
Two bridges connect this island with its smaller siblings. The first and larger of these is home to a tall lighthouse, sitting on a headland, a floating house in its lee and a church sitting on a low hill not far away, spire vying for height with the surrounding trees. The other, and smallest of the island is home to the TaKe Two Gallery featuring some excellent photography by friends Kess invited to display there, and which I highly recommended visiting.

TaKe Heart; Inara Pey, October 2016, on Flickr TaKe Heart

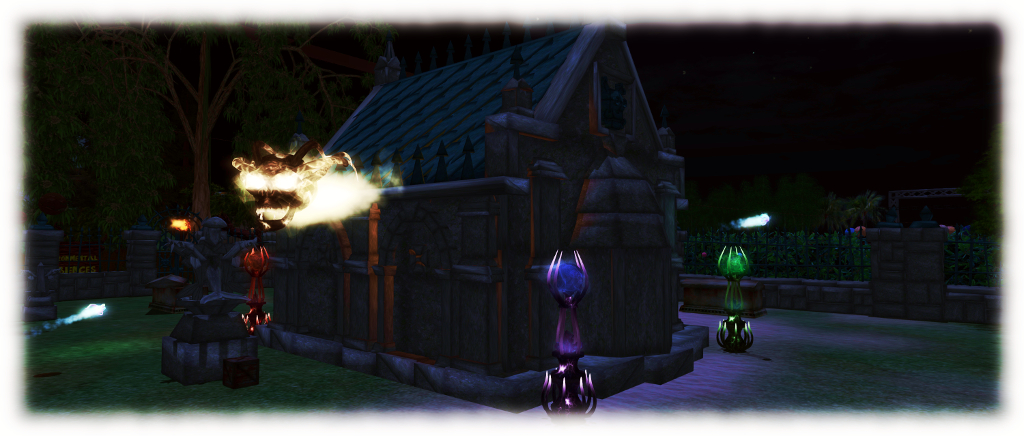
Elsewhere can be found more places to sit indoors or out, with opportunities to snuggle. Old barns hide cars – one of which has seen better days, while, for the month of October at least, there are suitable macabre elements to be found.

However, rather than write reams about TaKe Heart, I’m going to encourage you to pay a visit and enjoy it for yourself. Instead, I’m going to sign-off with a little trip into childhood days, those of us of a certain age from the UK will remember with a smile.

SLurl Details

The Camera Panoramic: 360 photo fun in Second Life

Camera Panorama 360 demonstration via Flickr; Inara Pey, October 2016,Camera Panoramic 360o spherical demonstration via Flickr – click to view with 360o scrolling

Following my look at the Illiastra Panoramic Camera HUD, Lalwende Leakey invited me to try the HUD system she has been developing for 360o cylindrical and spherical images from within Second Life.

Called Camera Panoramic , the system is a comprehensive package for producing cylindrical (rectangular) images, full 360o spherical images suitable for upload to Facebook, VRchive, Flickr and other platforms or uploading as 360o videos on YouTube,  as well as planar images and 360olittle planet” images. A set of image presets are coded into the HUD to make taking shots easier – including the ability to take “selfies” of your avatar in 360o views.

Full documentation for the HUD is available on the web and via a downloadable PDF file file. In this article I’ll be looking at some of the core aspects of the system and running through how to produce a 360o image for uploading to Flickr.

The HUD

The Camera Panoramic HUD comprises 8 buttons, summarised below and described in detail in the supporting documentation.

Camera Panoramic HUD

Note that some of the camera placement buttons may appear greyed-out; this is because they are toggle activated; clicking one shows it in blue (active), while the others turn grey – as is the case with the camera placement options in the image above. The camera image options are only available when the HUD is capturing images.

All of the options can be accessed by gesture-driven hot keys and chat commands on channel /3, as detailed in the camera documentation. I’ll be referring to the HUD buttons throughout this article.

hud-textWhen worn, the HUD also displays information in text. Again, full details on this information can be found in the camera documentation, but in brief, the information comprises: the image type you’re using (cylindrical or 360o) with the selected preset; the number of pictures to be captured: whether you are using a camera offset (X,Y,Z axis), and the required camera defaults.

Note that FOV and Focal Length are determined by the preset, but you must manually set the Camera Angle within your viewer (you may also need to remember the Focal Length value for stitching your shots together into a single image during post-processing).

To set the camera angle, use either the debug setting – use CTRL-ALT-SHIFT-S to open the debug floater and type CameraAngle – or use the Cam tab in Phototools.

Setting the camera angle via debug or Phototools (if you use a TPV other than Firestorm, you may be able to use any shortcut to camera options that viewer provides to set the required value)
Setting the camera angle via debug or Phototools

Before starting to take shots with the HUD, there are a some things you’ll need to do:

  • Set your preferred windlight and daytime settings.
  • Make sure you freeze the clouds – you’ll be taking up to 26 images which will need to be stitched together, and moving clouds could make that a bit of a bugger to do. Use Menu > World > Environment Editor >Sky Presets > Edit Presets or PhotoTools > Clouds and check the scroll lock check boxes
  • If you are using the At Avatar position, hide yourself from view  – used the supplied alpha mask after removing all attachments or use something like a Vanish gesture. Otherwise, parts of your avatar will appear in some of the shots.

Taking Your Shots

Important Notes:

If you want to upload your images to something like Flickr, VRchive or Facebook, you should use the 360o spherical image type, as this will produce an image in the required 2:1 (width:height) pixel aspect ratio (PAR).

Setting your viewer window size for 360 spherical shots

When using the 360o spherical image type, you must set your viewer’s window size to a square aspect ratio. Use Advanced > Set Window Size (click CTRL-ALT-D to display the Advanced menu option, if required) or if you have Phototools, click on Aids > Set Window Size.

Either option will display the Window Size floater (right) – type 1024×1024 in the text box and click Set. Your viewer window will resize itself.

Image Capture Basic Steps

Detailed instructions on taking shots with the HUD can be found in the documentation. The following is a summary of key steps:

  • Prepare your viewer windlight, freeze the clouds and, for 360o spherical images, set the viewer window size.
  • Wear the camera HUD and select your desired preset.
  • Make sure the preset’s Camera Angle is set for the viewer’s camera (see above)
  • Select the require camera position in the HUD (remembering to hide yourself if using At Avatar)
  • Tap ESC to free your camera, then click the Start button on the HUD to position the camera for your first shot, and pressing CTRL-‘ (tilde) to capture your first frame to disk.
    • The first time the camera is used, you’ll be asked for a file name and location for the shot & all subsequent shots will be automatically saved to this location
    • Subsequent uses of the HUD will automatically save shots to the last location you used to save snapshots to disk when using the snapshot floater.
  • Click the Right arrow on the HUD to advance the camera and use CTRL-‘ (tilde) to save all remaining shots. After saving the last shot, the camera will automatically exit the capture mode.

You should now have a set of images ready for stitching together.

Selfies / Camera Offsets

Camera Panoramic has a set of presets for “selfies”, allowing you to include your avatar in your images. The process for capturing is the same as above, and the presets are selected by clicking the Offset button on the HUD, then selecting Preset from the dialogue box. The presets are defined by starting position.

Remember, as well, the offset option also allows you to offset the camera in increments of 0.1, 1.0 or 10 metres in the X, Y and Z axis’s – refer to the camera’s documentation for more on this.

Continue reading “The Camera Panoramic: 360 photo fun in Second Life”

Mont Saint Michel now gone from Second Life

Mont Saint Michel - now departed Second Life
Mont Saint Michel – now departed Second Life

Update November 21st: Mont Saint Michel is back on the grid, same SLurl.

Several people have contacted me over the last couple of days concerning Mont Saint Michel, Second Life.

In September 2015, and following Ciaran Laval’s lead, I reported the region would apparently be closing at the start of October, the news of the closure having been given by Moeka Kohime via her Flickr stream.

It seemed the news was premature; come November 2015, Petr Hastings-Vanbeeck dropped me a line to say the region was still alive and kicking. It continued to be that way through early 2016 and on through the year.

However, at the start of September 2016, Tyche Sepherd listed the region as one of 55 removed from the grid at the end of August, 2016 – almost a year after notice was first posted of its departure from SL. It’s not clear why the region remained so long after notice was first given; attempts to contact region holder Moeka kohime without success – but suffice it so say, many were pleased to see it continue well beyond its stated date of expiration.

The build, pre-dating mesh, was a fine example of prim architecture in Second Life, and a beautiful reproduction of the physical world place. It was a region many of us enjoyed visiting time and again (I still remember my first visit there back in 2011, and made a point of returning around once a year thereafter, blogging about it in brief again in 2013). As such, I have little doubt it is a place that will be missed by many.

With thanks to chankingyin_hk (Flickr), Silvana Cassini, Jo Yardley and John Brianna for passing along information about the region’s removal. 

The Drax Files 41: animating Second Life

The vista Animation team: adding action to Second Life since 208 - and now in 360-degree Technicolor!
The Vista Animation team: adding action to Second Life since 208 – and we can see their work in 360-degrees thanks to The Drax Files World Makers

The Drax Files World Makers #41 arrived on Wednesday, October 12th, 2016. At just a shade under four minutes in length, it is an intriguing beast, exploring in-world animations and motion capture through a 360-degree video format.

The latter is suitably underplayed at the start of the video, as Drax introduces it – but the clue comes much sooner when watching on a flat monitor – the 360-degree cursor located up in the top left of the screen, which you can use to steer your way around the video view, or you can left click and drag. Obviously, if you’re using a mobile device, you can tilt and turn the device, allowing the gyro to move the image around, and those with a head mounted display can instantly enjoy in in 360-degree surround.

Motion Capture in the Vista Animation Studios

“I’ve been playing with some of the cheaper systems available,” Drax told me, as we discussed the video, and why he opted to go with the 360-degree format for this segment of World Makers. “Like the Ricoh Theta and Samsung Gear 360, and Mambo Morane has been working in real life with the Go Pro array, so I started thinking in June about how we could do this in SL.”

This turned out to be harder than anticipated. The first attempt involved using an array individual viewers synchronised by a device built by Arduenn Schwarztmann which would enable simultaneous filming through all six viewers, and included additional audio cues to further assist in the post-production stitching process. Unfortunately, this approach revealed that differences in how GPUs process the recording, even with the same windlight and camera defaults in the viewer, could result in recorded clips sufficiently different one to another that stitching them together failed to produce a smooth result.

And translated to Second Life

“Then Mambo Morane came up with the idea of filming in six instance of the viewer running on the same machine, using Open Broadcaster Software to bring them all up together,” Drax continued. “We could then pull them apart in post-production and stitch the individual clips together using 360-editing software, with all of them having the same look and feel. Unfortunately, this may not be something for many machinima makers right now. The software for editing and stitching the video cost US $800.”

The result is a very smooth video, freely intermixing physical world footage shot at Vista Animation’s offices near Barcelona, with footage stages and shot in Second Life which presents an exceptionally immersive and unique view of Second Life, even when seen on the flat screen of a video monitor.

Certainly, the 360-degree aspect is guaranteed to be one which will have people watching the video at least twice, simply because scrolling / looking around in side SL is addictive, and there are some nice little touches to be found – such as little Marianne McCann gamely holding up a boom microphone in some of the in-world footage. This inevitably means it is easy to become wrapped-up in scrolling and looking, without paying attention to what is being said, prompting a second viewing to focus on the main aspect of the audio narrative: animations.

Animations for an important, if often taken-for-granted aspect of Second Life

Animations – walks, stands, sits, dances, runs, hops, crawls – whatever form they take – are something we’re all familiar with to some degree. An animation override system can often be one of the first purchases made in Second Life (allowing for the worn AOs now supplied with starter avatars and those supplied by the makers of avatars, human or otherwise), and we’re all familiar with the idea of mocap – motion capture – going into their production.

Vista Animations is widely regarded as one of the premier providers of animation packs for overriders, dances, etc., and World Makers #41 offers something of a glimpse into their work, albeit it without going too in-depth with matters of production and workflow (although Drax has previously covered elements of MoCap in Drax Files World Makers #6, so this sits as a good companion piece, and Vista Animations also offer a look at their work for those interested in other aspects of animation creation.

What is offered here is a feel for both the complexity of motion capture and how rapidly the field is changing, as well as a look behind the curtain at a small, successful business which has grown out of Second Life. It terms of the former, the Vista team point out that when they started with their first MoCap suite in 2008, it cost them US $45,000. The system they use today, which I believe was purchased in around 2012/13, set them back US $2,000.

Two of the 12-camera rif vista Animation use in their motion capture process
Two of the 12-camera rif vista Animation use in their motion capture process. Image courtesy of Vista Animations

The MoCap process isn’t just a case of pulling on a suit of sensors and then moving around with the cameras running. Everything has to be calibrated – sensors (50+ for the body and additional elements for the hands), skeleton, props, etc. – to ensure a smooth capture process, which can be time-consuming. Then, once captured, there is the entire editing and post-process work required to produce the finished animation files which can be uploaded to Second Life.

While this latter aspect isn’t really touched upon in the video, what is fascinating to see is how physical world actions translate in-world through the clever use of cross-fading in the segment. This is particularly effective as we see Drax doing a mock interview while being motion captured, then transition to him carrying out an interview in-world.

Continue reading “The Drax Files 41: animating Second Life”

2016 SL project updates 41 (1): server, viewer

Venta Silurum; Inara Pey, October 2016, on Flickr Venta Silurumblog post

As always, please refer to the server deployment thread for updates or changes.

  • There was no deployment to the Main (SLS) channel on Tuesday, October 11th.
  • On Wednesday, October 12th, all three RC channels should receive a new server maintenance package comprising the new Experience Key scripted sitting (Project Espeon). Note that at the time of writing, the release notes were awaiting update to reflect this.

SL Viewer

The VLC Media Plugin RC viewer was promoted to de facto release status on Monday, October 10th. Version 4.1.1.320331 includes a new media plug-in based on LibVLC, which replaces QuickTime as the media player in the WINDOWS version of the viewer. Other versions of the viewer will be updated to use VLC when their 64-bit versions are issued.

The leaves the current viewer pipeline as follows:

  • Project Bento  RC (avatar skeleton extensions) viewer version 5.0.0.320160, dated October 7th
  • Maintenance RC viewer version 4.0.9.320231, dated on October 4th – over 70 crash fixes, improvements and other fixes
  • Obsolete platform viewer version 3.7.28.300847 dated May 8, 2015 – provided for users on Windows XP and OS X versions below 10.7.

Premium Weapons Testing and New Sandbox Quad

There is a new Premium users Weapons Testing sandbox available, which has been requested numerous times by Premium users. It sits kitty-corner with the existing Weapons Test sandbox.

The new Premium Weapons Testing Sandbox on the world map

There is also  a new 4×4 group of general sandboxes coming on-stream, with each of the regions is running on one of the four simulator channels (Main SLS, BueSteel RC, Le Tigre RC, and Magnum RC). These are designed to make easier for creators to make comparisons between the four underpinning simulator versions during product testing, etc. They are:

All have a General rating.

Tone and ambience in Second Life

Lorin Tone
Lorin Tone

Lorin Tone is the name of a new aural installation, open through to the end of 2016, intended to to demonstrate the wide variety of uses in-world sounds can be put to within Second Life. The installation takes it name from the master of ambient sound, Lorin Tone, who shares the environment with Nance Clowes “and others” (one of whom I assume could be Lorin’s partner, Judi Newall).

For those who travel the grid extensively with local sound enabled, this might sound a “well, duh!”, kind of idea: many region designers spend a good deal of time adding a soundscape to their environment, so we’re accustomed to hearing them every day (although that in itself can cause us to “tune them out”).

Lorin Tone - Madcow Cosmos' whimsical sound creatures
Lorin Tone – Madcow Cosmos’ whimsical sound creatures

But sounds are also more than just ambient background; they can be used in a wide variety of ways to add atmosphere to an environment, both passively and actively, triggered or experienced in a wide variety of ways – touch, collision, proximity, and so on.

So it is that this installation offers a series of individual parcels (denoted by the stone paths running between them) in which various sound scape can be experienced. The layout might not be that visually appealing, but a slow exploration through it will reveal how aurally rich they are, and the cornucopia of sound options available for in-world use. There are things to touch, walk past and through; to step on, play, bounce across and ride.

Lorin Tone
Lorin Tone – hunated graveyard (set your environment to midnight 🙂 )

Signs throughout the installation offer an introduction to each area and when touched will furnish some additional information on what is being achieved (and how to use each area). There is a certain degree of fun to be had in exploring and colliding with or touching things, and it is hard not to end up smiling. The bouncy (sand) castles got things off to a good start for Caitlyn and I (take the rope slide to the right of the landing point as you face them), while a skyborne race track offers something for petrol heads.

But – there is sadly a “but”, albeit a small one. The soundscapes largely stand as parcels without visual theme, and some might be seen as slightly repetitive in form. While this is intended to be an aural environment, I couldn’t help but feel more might have been gained by making it more visually immersive as well.

Lorin Tone
Lorin Tone

That said, for anyone interested in the depth and range to which in-world sounds can be put to good effect, the installation is well worth a visit. As noted, it will be open through until the end of December 2016.

SLurl Details