On Wednesday October 26th Linden Lab announced the release of the 360o snapshot viewer, which I’ve had the good fortune to be able to play with for the last week.
The viewer is still very much under development, and has been released as project viewer with a number of caveats against it as development continues. Essentially, it allows you to take a set of images (6 in total) of the location around your camera, and then produce these as a scrollable 360o view – you can see the results in action on this sample page. Just click drag on an image to manually scroll around it.
The viewer is available via the Alternative Viewers wiki page as project viewer, with documentation on the wiki. As noted there are some caveats concerning it, which need to be kept in mind:
- The 360o capture operates all around your field of view simultaneously. This can lead to conflicts with the viewer’s Interest List, so that objects which may be “behind” your camera position may not be properly rendered, etc. To avoid this, always pan your camera around (or turn your avatar around if you are taking a picture from your avatar’s position) to completely view the scene and allow things to initially load, before taking a shot.
- The current viewer saves the resulting image to your local disk as a zip file. You’ll need to set-up your own local web host in order to view them (or if you have your own website, you could set one up there). Again, this will be changing as the project develops
- However, even in this format, once you are viewing an image, you can download it in a 2:1 aspect ratio suitable for upload to Flickr for sharing with friends and viewing in 360o.
As I’ve covered three of the 360o camera HUDs available in Second Life, I’m offering the rest of this article as a walk-through in using the new viewer and viewing your photos.
Note – these instructions apply to Windows, I don’t have access to a Mac to provide guidelines for that platform.
Setting Your Viewing Environment
Before taking your photos, you’ll need – for the time being at least – to set-up a simply local web server. Callum Linden has made this relatively easy.
- Download Python from the Python website. You can select to install either Python 3.5.x (latest) or Python 2.7.x (the Lab uses Python 2.7 as a point of reference).
- When installing Python, make sure you add the installation to your Windows path.
- If you are installing Python 3.5.x, simply check the box in the installer
- If you are installing Python 2.7, click the Advanced button in the installer, scroll down the list of customisable options and set Add Python .EXE to Path to Will be installed on local hard drive.

- Download the Lab’s 360 snapshot web viewer ZIP file from the Lab’s 360 snapshot wiki page.
- If you are familiar with Mercurial, you can clone the existing web framework via the link given in the wiki page. I found going the ZIP file route easier.
- Unzip the web viewer files to a location on your hard drive.

Using the Viewer
When you have downloaded and installed the 360o snapshot viewer, proceed as follows:
- Position your avatar / camera at the centre of the area you wish to photograph. If you are using your avatar, not that you should “hide” it via removing all attachments and alpha-masking, or by using something like a “vanish” gesture.
- Note that you can positioning your camera for a 360o snapshot simply by positioning your camera (e.g. using ALT-zoom or by flycamming).
- Make sure you freeze the clouds in order to assist the image “stitching” process, and to avoid visual discontinuities in the finished image. Use Menu > World > Environment Editor >Sky Presets > Edit Presets. You should also avoid using Depth of Field.
- Set your preferred windlight / time of day setting.
- Turn your camera / avatar slowly around in a circle to view everything in the field of view around it, and allow everything to render.
- Open the Snapshot floater and click on the 360 option – not that although this displays the filter options for snapshot, the filter effects are not currently captured when taking 360o shots.
- When you are ready, Click Save to save the image set – you will be prompted to save a ZIP file to your hard drive.
- Navigate to the location where you unzipped the web viewer files (above) and then save the ZIP file (with a suitable file name) in the SHOTS folder.
Viewing Your Shots
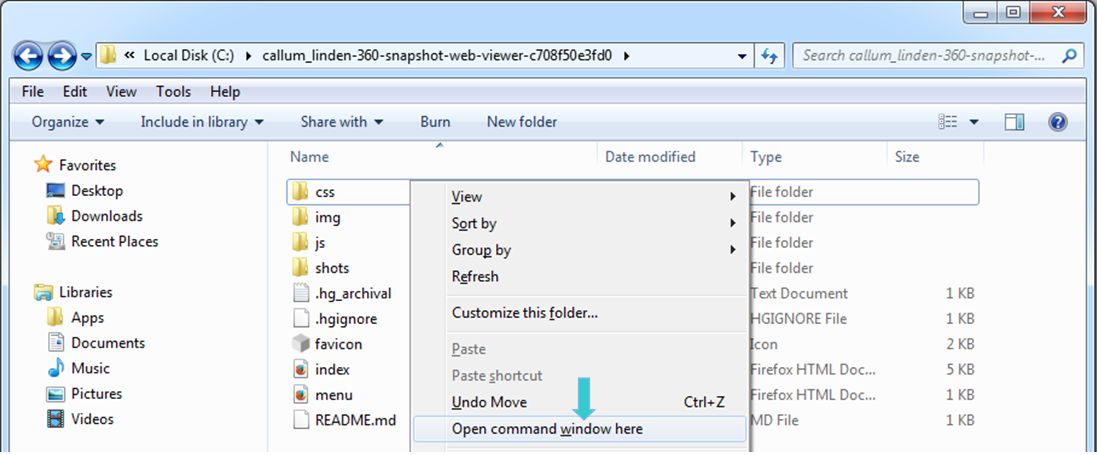
- Use Windows Explorer to navigate to the location where you’ve saved the web viewer files.
SHIFT-Riight-click in to display a menu and select Open Command Window here.
- A command window will open. In that window:
- If you are using Python 2.7.x, type: python -m SimpleHTTPServer
- If you are using python 3.x, type: python -m http.server 8000
- Press
RETURN. You should get a response: Serving HTTP on 0.0.0.0 on port 8000. Do not close the command window.

- Notes:
- The above assumes that you have set your Python installation in your Windows path. If you have not, you will have to add the full pathname to your Python installation in the command – (e.g. “C:\[pathame]\python -m … “)
- You should only need to do this once per viewing session, unless you close the command window, in which case you’ll have to re-open it and re-issue the relevant HTTP server command again.
- To view your images, copy and paste the following into your web browser, replacing NAME with the name of the actual ZIP file of images you wish to view:
http://localhost:8000/index.html?shot=shots/NAME.zip
- You can now view any ZIP files of snapshot simply by replacing the ZIP file name at the end of the address.
Web Viewer and Uploading to Flickr
The web viewer includes a number of buttons, as shown below.
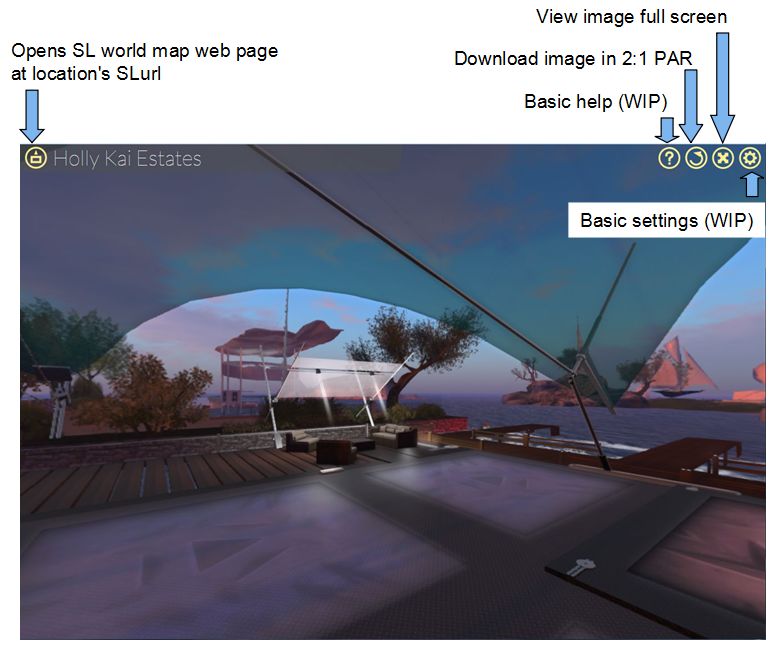
For SL photographers, the download button is liable to be of the most interest. Images download using it are in 2:1 pixel aspect ration (PAR), meaning they can be uploaded directly to Flickr for 360o viewing / sharing.
See my sample here, and Torley’s album.
Menu.HTML and JSON
The web viewer framework includes a simple HTML file, menu.html, which if you have your own website can be edited to provide a means to display your images as shown in the sample page provided by the Lab. As WordPress.com doesn’t support <i frame> tags (although WordPress.org does, for those of you who self-host WordPress), I can’t show this in action. A JSON file in the framework also provides the means for image embedding in websites.
Feedback
This may be an initial pass with 360 photography, but the results are impressive, and even allowing for setting-up a local web viewer, the whole process is pretty straight-froward. Having the ability to download finished shots as 2:1 PAR shots means the flexibility for sharing on Flickr is already present, even if the Lab plans to make such things easier. In terms of selfie shots, this is probably the easiest 360o camera system I’ve used in SL to date.
Kudos to Callum Linden, and all who worked on developing this approach, both at the Lab and among the community. Looking forward to seeing how this develops.
For more on the viewer, Ai Austin also has a write-up as well.
My thanks to Nicky Dasmijn and Cubey Terra for Python pointers.

Thanks for the usual really excellent review and tips Inara. I had a go at this and it is indeed very easy to set up and use. I used our usual University web server area, and Callum Linden’s excellent web framework worked right out of the box. My blog post and examples are at
https://blog.inf.ed.ac.uk/atate/2016/10/26/360-snapshots-in-second-life/
1. A few small glitches I noticed are that when the avatar is hidden, prim attachments like hair and shoes still show in the 360 degree snapshots.
2. There is a distinctly “box” effect when taking a snapshot of a region from a decent height (probably unavoidable with only 6 shots to make the image).
3. The menu.html file in the web template could usefully have a link to open the full sized image when clicked.
LikeLiked by 2 people
The menu.html file actually does open the full sized 360 image I realize now… the icon in the top left corner of the menu thumbnail view opens the full sized image, and the same icon in that full sized view gives you a link to the Second Life map location. Maybe two different icons would work better, especially as the “About -> Controls” help page indicates that icon is to visit the region via the map… as I assumed.
LikeLiked by 2 people
I hadn’t noticed the double function nature of the left button; it only opens the map location for me as per image of the web viewer in the article. For full screen, I use the icon / button among the group on the right, again as per the image in the article. So … interesting!
LikeLiked by 2 people
I meant when you use the menu.html file rather than the single page 360 viewer. Its a template by Callum Linden on his samples page and in the web viewer framework he provided that can be edited to show the contents of your shots directory.
See http://www.aiai.ed.ac.uk/~ai/360/menu.html
LikeLiked by 2 people
Sorry.. misunderstood… hadn’t looked at menu.html
LikeLiked by 2 people
I’ll add a pointer to your article – thanks for that 🙂 .
In terms of the glitches – I should have been specific in the supplied hide avatar means doesn’t work that well. I actually prefer to use a “vanish” gesture that puts my avatar underground (or flycam position my camera with avatar simply out-of-sight).
LikeLiked by 2 people