Overview: Creating and Editing EEP Assets
Creating EEP Assets
New EEP assets can be created either from the My Environments floater or from inventory. Each offers two means to create a new asset.
- By clicking on the + button at the foot of the panel and then selecting the required asset type (Sky, Water, Day Cycle) – when using inventory, you’ll need to go via the create menu → New Settings sub-menu.
- Using this method will automatically place the created asset within your Settings folder.
- By right-clicking on the Settings folder and selecting the required Asset type via the create menu.

Notes:
- You can create new settings in any folder of your choosing in Inventory (or visible in the My Environments panel), but the Settings folder is the recommended location for EEP settings.
- You can obviously create sub-menus in Settings to organise your EEP assets if you want.
Editing EEP Assets
To edit a settings asset:
- Open your inventory or the My Environments floater.
- Navigate to the folder containing the settings asset you wish to edit and then:
- The relevant edit floater will open (Sky, Water, Day Cycle). These are described in detail in the following sections.
Overview: Applying EEP Settings
EEP settings are applied using their corresponding asset. They can also be applied in two ways:
- Directly to your avatar = so they will only be visible in your viewer.
- To a region/estate or to a parcel – so they will, by default, be visible to everyone entering the region / parcel (applying EEP settings to a region/estate or to a parcel is subject to permissions).
To Your Avatar
A new concept with EEP is that you can apply environment Sky or Day Cycle settings directly to your avatar.If you have not used EEP before, copy some of the Sky and Day Cycles From Library → Environments to your Settings folder, and experiment using the notes below.
There are a few points to remember when attaching EEP assets to your avatar:
- Only you will see the environment settings as applied to your avatar.
- You can only apply one sky or one day cycle to yourself at a time, but you can attach one or the other and a water setting at the same time.
- Attached EEP settings will persist across region crossings. This means that:
- If you are travelling across multiple regions when driving, flying or sailing or similar, you can avoid the time of day changing on you when crossing between regions with different local environments.
- If you are a photographer, you can see regions and parcels using your preferred environment settings (also see Personal Lighting).
- Attached EEP setting will not persist between log-in sessions, unless you use a debug setting to force them to do so (see Making Personal EEP Settings Persistent, below).
- When you attach an EEP asset to your avatar:
- The viewer will automatically disable World → Environment → Use Shared Environment.
- Re-enabling World → Environment → Use Shared Environment will detach any EEP asset and settings you have applied to your avatar.
- You can make temporary adjustments to the setting (e.g. for photographic purposes) by accessing the Edit floater for the asset (double-click on the asset in Inventory / in the My Environments floater – see Editing EEP Assets) and making adjustments there.
EEP assets can be applied to your avatar in one of three ways:
- By the right-clicking context menu in Inventory or the My Environments floater and selecting Select Apply Only To Myself from the menu
- By clicking on the Gear icon at the bottom of the My Environments floater panel and select Apply Only to Myself in the drop-down menu.

- From the Save / Apply button in any of the environment edit panels – see Fixed Environments and/or Day Cycles.
Making Personal EEP Settings Persistent
By default, EEP setting applied to your avatar do not persist between log-in sessions. However, if you wish this to be the case (so you always see the same fixed sky / day cycle), the environmentPersistAcrossLogin debug setting:
- If it is not already displayed in the viewer menu bar, enable the Advanced Menu by either:
- Going to Preferences (CTRL-P) → Advanced tab → checking Show Advanced Menu → OK.
- Pressing CTRL-ALT-D / CTRL-ALT-SHIFT-D (Mac: Option-CTRL-D).
- The Advanced menu item is shown to the right of Help in the menu bar.
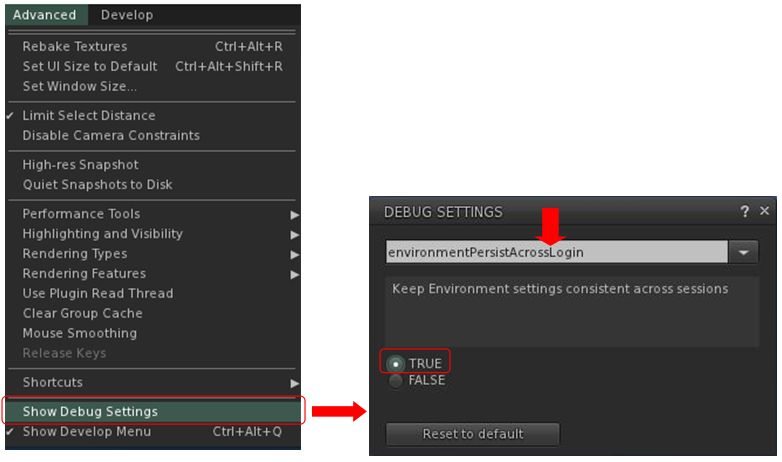
- Click the Advanced menu heading to open the menu and then click on Show Debug Settings. The Debug Settings floater will open.
- In the text entry field, type “environment” (without the quotes) – the setting should auto-complete to read “environmentPersistAcrossLogin”.
- Note that in future, further options using “environment” as part of the descriptor might be added to the viewer, in which case, you can either type “environmentPersistAcrossLogin” to display the option, or (if the TPV you are using supports it) pick the required setting from a list displayed within the debug setting window.
- Click the True radio button to cause the viewer to automatically re-apply any personal EEP setting attached to your avatar whenever you log-in to Second Life.
- Close the Debug Settings floater.
Notes:
- You can switch to using the EEP settings for the region / parcel you are in at any time by going to World → Environment → Use Shared Environment.
- To disable personal EEP settings persistence, repeat the steps above for accessing the debug environmentPersistAcrossLogin, and either click on the False radio button or the Reset To Default button.
To Your Region / Estate or Parcel
Subject to permissions, EEP asset settings can be applied to a region or parcel in the following ways:
- Region: World → Region / Estate → Environment tab, click the Use Inventory button and select the desired EEP asset.
- Parcel: About Land → Environment tab → click the Use Inventory button and select the desired EEP asset.
- Both: open the Environment tab, and drag and drop the desired asset from Inventory and into the desired altitude box where you want it to apply.
- By using the Save / Apply button located on the Fixed Environment – Sky, Fixed Environment – Water and Edit Day Cycle panels and selecting either Apply to Parcel or Apply to Region – see Save / Apply and Cancel buttons in either see Fixed Environments and/or Day Cycles.
Personal Lighting
What Is Personal Lighting?
With Windlight, SL photographers and machinima makers are familiar with being able to visit an in-world location and using the environment tools within the viewer to make changes to the environment to suit their needs: move the sun higher or lower in the sky, move it around the sky, change the cloud density, alter the horizon haze, etc.
However, as EEP assets have permissions associated with them, this may not always be possible: if a No Modify EEP asset is applied to a region or parcel, then things like the Sun position, the clouds, etc., cannot be altered.
To get around this, EEP offers a couple of options:
- You can apply an EEP asset from inventory to your avatar (see: Applying EEP Assets To Your Avatar). However, doing so means the applied settings probably won’t offer a reasonable match to the location’s actual environment, which might be preferred, and trying to get it to more closely resemble to location’s environment could be a painstaking task.
- You can instead use the Personal Lighting floater to take a local “snapshot” of the environment.
Use of the Personal Lighting floater means that:
- Any changes made to the environment are only visible in your viewer.
- Changes cannot be saved back to inventory as a new EEP asset, so preserving the permissions of of the original.
- Changes made via Personal Lighting will persist until you:
- If you are in a location where the environment can be modified, and you wish to make adjustments to it and then save those changes as an EEP asset you can re-use, you should used the Fixed Environments options.
The Personal Lighting Floater
As noted above, the Personal Lighting floater allows you to make changes to a location’s environment that are only seen in your viewer – although they will remain in place until you either select World → Environments → Use Shared Environment or log out of Second Life.

- Ambient Colour and Density pickers: set the ambient sky and cloud colours – simply click on the required picker, select the required colour and use the slider on the picker to set the colour density.
- Haze sliders: used to adjust the atmosphere and horizon haze. If you’ve not used them before, the simplest way to understand them is to experiment with them.
- Scene Gamma: set the overall brightness.
- Position trackballs: use the Sun / Moon image on the trackball to adjust the position of the Sun and / or Moon.
- If the sun/moon image on a trackball is dimmed it is below the horizon in-world, use CTRL-left-click and drag to raise it above the horizon (or conversely, to move it below or onto the horizon).
- Glow and brightness sliders (Sun and Stars only): sliders for setting glow and star brightness. Note that with stars:
- Show beacon: toggle Sun / Moon beacons on / off (also accessible via the beacons option World → Show → Beacons Ctrl-Alt-Shift-N).

“Note: at the time of writing this piece, the official Second Life viewer – version 6.4.0.540188, dated April 15th (or later) to see / use EEP capabilities. However, TPVs will be releasing version supporting EEP in due course.”
Hello everyone!
I’m really excited about this new project but I have one main doubt… I’m using Firestorm viewer. Can we use EEP only with the official Second Life Viewer?
Thank you for your answer.
Victoria Dawson
LikeLike
Currently, the only viewer supporting the release version of EEP is the official SL viewer. Other TPVs may have release or beta versions supporting earlier (RC) released of the viewer code, but have yet to update to the release code version – but with some this will happen fairly rapidly, others may take a little longer.
So right now, if you want to try creating EEP assets, playing with the settings options, etc., and see the results, your best bet is the EEP release viewer.
LikeLike
Hi there, silly question but where do you get the EEP Viewer? And, sorry I still don’t understand something… if I create a day cycle for my parcel using EEP viewer, will others only see it if they use the same viewer? Or, will they be able to see the settings regardless, i.e. if they use Firestorm? Thanks so much for your help and sorry if the answer was answered, I still find it confusing!
LikeLike
Hi Lee!
No worries on the questions. To answer in turn:
them to be seen.
All third-party viewers with rendering capabilities, including Firestorm, will eventually have EEP support, it just depends on how quickly / smoothly they can merge the EEP code. As it stands, I believe that, alongside the official viewer, Kirsten’s Viewer, Cool VL viewer and Black Dragon all have EEP support.
LikeLike
On 29July2020 Firestorm released version 6.4.5 EEP Public Beta. I’ve been using it since then and it appears to be totally stable and it’s just great to finally be able to implement and enjoy the EEP features it supports
LikeLike
Yes – see: Firestorm 6.4.5 Beta: EEP and Camera Presets, which highlights some of the additional aspects of the Firestorm EEP implementation.
LikeLike
The overwiew on creating eep assets is great, but is there any plans for a step by step guide. As a beginner i’d love that, especially if eventually the eep version of the firestorm viewer will become the standard one.
LikeLike
Hi, Scott.
I’m not actually sure what else can be said.
The key to EEP really, is to gain an understanding of the various floaters and then fiddle with the settings yourself to see how they work and how you might like to apply them. Again, there is no risking of “damaging” anything in doing so.
Also, don’t forget you have a library of 200 EEP assets available to you – many by the top Windlight settings providers – which you can copy into your inventory and play with, adjust and then save – see: EEP Library Assets, AND if you have your own Windlight settings, don’t forget you can import them as EEP settings / assets.
LikeLike