This is a significant update to Firestorm, containing major new elements aimed at helping to improve viewer performance / the user experience. As such, these elements for the major focus for the notes below. As per usual, it also brings Firestorm closer to the current official SL release viewer by including a number of updates and capabilities previously released by LL. Again, from an end-user perspective, one of the most noticeable of this is likely to the incorporation of the 360º snapshot capability, which is also looked at in detail below. Also as per usual, Firestorm 6.5.3 includes additional fixes and updates directly from the Firestorm team to also improve the user experience. Not all of these are covered in the notes below, and readers are referred to the official release notes alongside of this article. |
Table of Contents |
Installation
- There is no need to perform a clean install with this release if you do not wish to.
- Do, however, make sure you back-up all your settings safely so you can restore them after installing 6.5.3.
Splash Screen Update
Whilst not strictly part of the 6.5.3 release, having been prototyped with and added to the 6.4.21 release, Firestorm now has a new splash / log-in screen. It incorporates elements familiar to Firestorm users and also to users of viewers that use splash screens more closely modelled on Lab’s own.
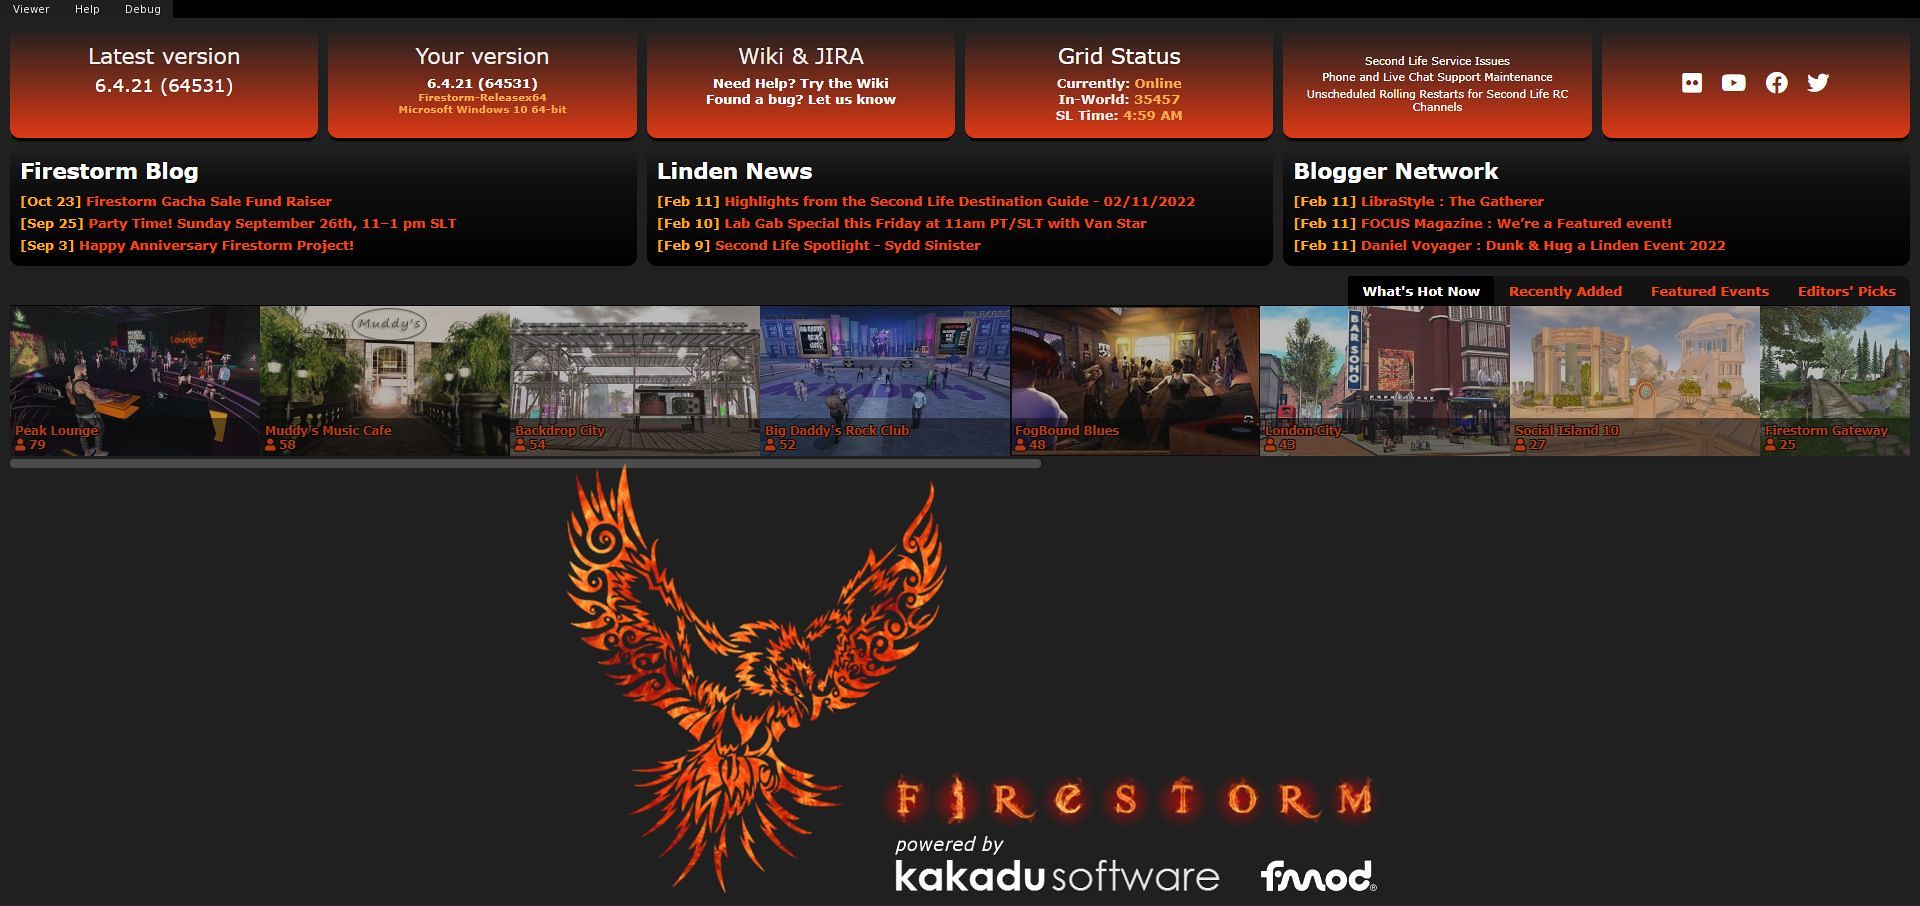
In all, the “new” Splash screen can be split into five elements:
- A set of six panels at the top, four of which are Firestorm-specific (version details, wiki and Jira links, and on the far right, Firestorm social media links), and two related to official SL information (grid status data and links to information on current grid issues, LL support and grid status updates).
- A three-panel selection of blog links from the Firestorm blog, the official SL Featured News blog and the SL Blogger’s Network.
- An expandable scrollable list of currently-popular destinations in Second Life (complete with a count of recent visitors).
- These are drawn from the What’s Hot Now (default), Recently Added, Featured Events and Editors Picks sections of the Destination Guide (the corresponding links on the right of the panel to select these).
- Clicking on any of the displayed thumbnails will provide further information on the destination in a pop-up floater, complete with the option to Visit This Destination after logging-in.
- The Firestorm & associated software logos.
- The log-in panel at the bottom (unchanged, and not shown below).
 The updated Firestorm splash screen (click for full size)
Linden Lab Viewer Parity
This release brings Firestorm up to parity with the official viewer release 6.5.2, and so includes updates seen in the following official viewer releases:
- Mac Voice hotfix viewer, version 6.5.2.567427, dated January 13th, 2022.
- Cache + 360º Capture viewer, version 6.5.1.566335, dated December 7th, promoted December 15th – see below for more on the 360º capture.
- Maintenance RC viewer version 6.5.0.565607, dated November 10th, promoted November 15th, 2021.
- The Apple Notarisation Fix viewer, version 6.4.23.564172, issued September 24th and promoted October 15th, 2021.
- CEF update viewer, version 6.4.22.561752, dated July 24th, promoted August 10th, 2021.
- Fernet Maintenance RC, version 6.4.21.561414, dated July 14th, promoted July 19th, 2021.
More Robust Encryption of Login Credentials
In line with changes from Linden Lab, the way Firestorm encrypts your log-in credentials has been changed to make it more robust and to reduce the number of times stored passwords will have to be re-entered. The update to the new method is automatic on logging-in to SL for the first time using Firestorm 6.5.3; however, it means that should you switch back to using an older version of Firestorm, you will have to re-enter your credentials.
Note: this update is not in any way related to multi-factor authentication in the viewer, which is currently in RC testing in the official viewer.
360º Snapshots
Linden Lab’s 360º snapshot capability allows you to capture of 360º degree panoramic images of environment around your avatar / camera position (if freecamming). The images are automatically processed by the viewer so that they can be uploaded to most platforms supporting 360º panoramic images (e.g. Flickr, Meta), and for embedding into blogs that support 360º images (such as WordPress).
Within Firestorm, the capability can be accessed in one of three ways (Firestorm have disabled the shortcut option of CTRL-ALT-SHIFT-S, as this combination is bound to opening the viewer’s Debug settings):
- Via Avatar → 360 Snapshot.
- By clicking on the links seen in the expanded Preview image view of the Snapshot floater.
- Via a toolbar button (when enabled in a toolbar area).

Taking an image comprises a few simple steps:
- Position your camera.
- Select the image quality – for finished images you’ll need to set High or Maximum quality using the radio buttons.
- Click the Create 360º Image button to generate a preview in the floater’s preview panel.
- Click on the preview image and drag it around to ensure what you’re seeing is what you want / that things like textures have actually rendered correctly.
- Check the Hide All Avatars option, if required – if not, the process to include all avatars present, which could be blurred if they are moving at the time the image elements are captured.
- When you are satisfied with the preview, click Save As… to save it to your hard drive, renaming it if / as required.
Note: if you change the image quality, you must also click Create 360 button to update the preview AND image capture process to the new image quality, before clicking Save As… once more.
Further information on the capability can be found in the following blog posts :
- 360 Capture viewer now de facto SL release viewer (this blog, December 2021).
- Embedding Second Life 360 images directly into WordPress (this blog, December 2021).
Improve Graphics Speed (Experimental)
Overview (please read!)
This is a new UI floater Developed by Beq Janus. It brings together a range of viewer graphics options and is intended to help keep you better informed of the viewer’s performance in terms of frame rates, rendering, etc.), and make your own adjustments to suit the environment you’re in. It is also intended to help users be better informed about viewer performance.
The floater comprises three core elements:
- The Frame / Performance Summary.
- An Auto Tune Capability.
- Four additional floater panels that can be used together / individually and independently of Auto Tune. These bring together some of the most commonly-user graphics / rendering options, allowing you to make changes quickly and easily to manually adjust performance, including defining how avatars around you are individually rendered, and lowering to load your own avatar places on both your system and those of the people around you.
This section is intended to provide an overview to the new floater, and offer general notes on the various options and their use. When reading it, please remember:
- The entire panel – and particularly the Auto Tune capability – is experimental. Options presented may well change over time (such as in reference to LL’s own performance improvement work).
- While intended to try to optimise the viewer’s performance, please note: these options will not magically make elderly (e.g. 6+ year old) computers with outdated CPUs / GPUs suddenly zoom along at rates seen with the latest high-end gaming rigs; everything is very much dependent on the capabilities of your hardware.
- Also, and in respect of Auto Tune:
- While it will try to maintain your frame rate at the expense of other settings (such as overall graphics quality). So, depending on your system, the frame rate selected, the complexity of the scene, you may find other aspects of your experience suffering.
- Does not run on Mac M1 systems at present.
- If you experience particularly awkward results or are unhappy with how the in-world scene looks, you can disable all performance optimisation, and the floater includes the means to quickly load / revert to any Graphics Presets you have previously set-up.
Accessing the Floater
The Improve Graphics Speed floater can be accessed in two ways:
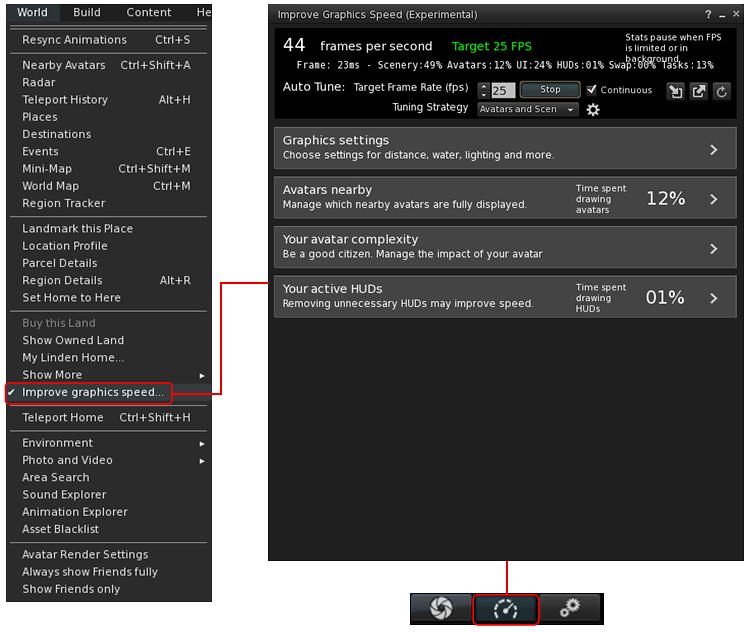
The various options and panel displays are examined in the sections below.
Frame / Performance Summary
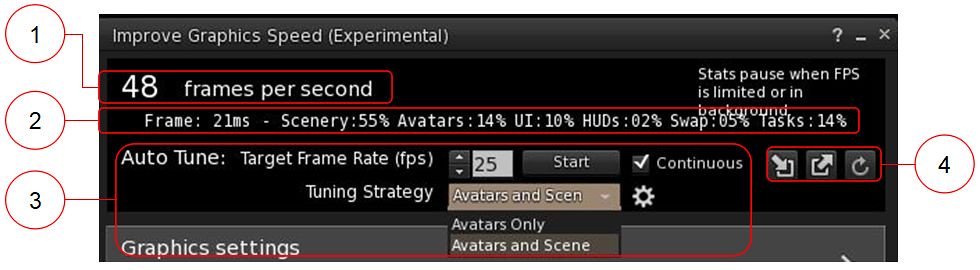
Located at the top of the floater, this comprises:
- The viewer’s current frame rate at any given time. This may either be a “pre-tuning” time, or “real time” cost based on the tuning being used.
- When Auto Tune is running, this will additionally display a colour-coded Target FPS. The colours are: Green – the viewer is exceeding the target; Purple – FPS is being adjusted; Red – the viewer is falling below the target; Yellow – the viewer is running in the background on your system.
- The total time taken in milliseconds (ms – 1000th of a second) to render a frame, together with a breakdown – for informational purposes – of the render time in terms of the major render elements in the viewer:
- Avatars: the time spent rendering each avatar.
- UI: the time spent actually rendering the viewer UI and all the floaters / panels you have open, the buttons you opt to display, etc. It is worth looking at how much certain UI elements cost and how frequently you need to use them if you are looking to maximise your FPS.
- HUDs: an approximation simplification of the amount of time spent rendering the HUDs you have attached to your screen.
- This is an approximation not only because HUDs tend of have a high texture overhead which increases the time / cost of rendering them, the textures can also displace textures needed for scene rendering, and this interdependency of textures and graphics processing by the CPU / GPU cannot be accurately reflected in breakdowns like this.
- Tasks: time spent keeping your viewer connected to the Second Life simulator and back-end services, processing all the messages and so forth. This should be comparatively low and stable.
- Swap: this is a fairly nuanced measure that at its simplest refers to how the viewer can draw elements of an in-world scene using an “off-screen canvas” (such as the parts of a setting just off-camera in your view) and then swapping what it has drawn with the currently-displayed scene when required, thus allowing one element of the scene to be rendered whilst showing another.
- Scenery: a catch-all for all the rendering activities that do not fit the above categories – the general scene, the environment, and those “hidden” overheads the viewer needs to perform that cannot be easily assigned to the other categories / are too granular in nature to be individually defined.
- Auto Tune: This is looked at in the section below.
- Graphic Presets: three buttons linked to the viewer’s Graphic Presets capability (see: Firestorm 4.7.9.50527: “I see jelly people!” and Avatar Complexity and Graphics Presets in Second Life if you need assistance with Graphics Presets). Three buttons are provided (l to r):
- Save the current graphics settings created through the Performance Floater options as a Graphics Preset.
- Load a previously saved group of graphics presets.
- Note that either of the last two options can be used to help correct issues should you find either the Auto Tune options (see below) or changes you manually make through the Performance Floater result in poor quality graphics or other graphics issues.
Auto Tune
Auto Tune is a means by which the viewer can be set to make “snapshot” or “continuous” adjustments to try to maintain the selected frame rate (FPS). It comprises two elements:
- Information displayed in the Frame / Performance Summary section of the UI.
- A panel of additional tuning options.
Both of these are examined in more detail below.

- Target Frame Rate (FPS): allows you to set a minimum frame rate you would like the viewer to try maintain as far as possible.
- Auto Tune will supply a target frame rate based on analysis of your computer, and you should preferably use this, or avoid a setting that is greatly in excess of this.
- Remember, the viewer will try to maintain the rate set by making adjustments elsewhere which can seen other aspects of your experience degrade. So, if you have a system with limited capabilities and set an unreasonably high frame rate compared to the typical rates your system can manage, you’re going to defeat the purpose of Auto Tune by forcing your system to give you a poorer experience in other areas of performance.
- Note that this is a minimum value – if you are in an environment where your viewer can run at a higher average FPS, it will do so.
- Start / Stop button and Continuous check box:
- Clicking the Start button the viewer to make “snapshot” adjustments to achieved your desired frame rate for the scene you are viewing. Should you move elsewhere / change your view, you will need to click Start again to run Auto Tune.
- Continuous: when checked, Auto Tune will run continuously within the viewer after clicking Start, and until such time as the option is unchecked once more.
- Tuning Strategy: allow you to define how Auto Tune is applied – to avatars only (so directly influencing options such as number of imposters, adjusting the complexity settings, etc.), or to avatars and the entire in-world scene.
- Gear Icon: accesses the Auto Tune Preferences panel, described below.
Auto Tune Preferences
A series of additional options that allow you to fine-tune the Auto Tune capability.
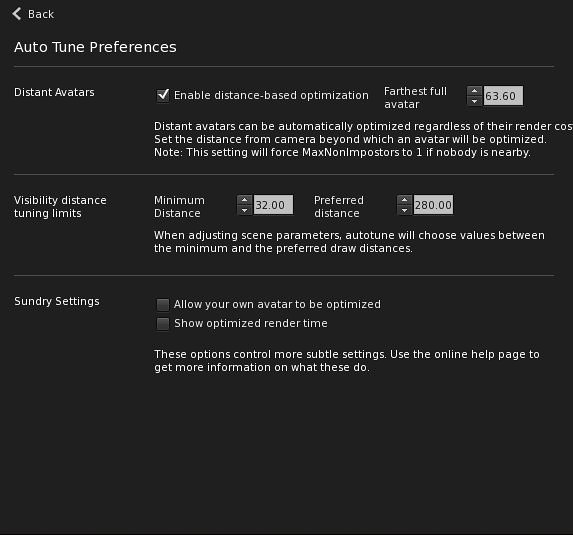
- Distant Avatars: the text provided within the panel describes this option fairly well.
- Visibility Distance Tuning: defines the minimum and preferred draw distances Auto Tune will try to work within to maintain the desired minimum frame rate (minimum being the viewer’s default (unless changed) and preferred being based on the Graphics Presets you are currently using).
- Sundry Settings:
- Allow Your Own Avatar to be Optimised: when checked, this may cause your viewer to render your own avatar as a imposter, should it need to in order to maintain frame rates.
- Show Optimised Render Time: when checked, the Frame Time shown in the Frame / Performance Summary is the current render time (ms), not the pre-tuning render time.
Additional Improve Graphics Speed Floater Panels
Four further panels can be displayed in the Improve Graphics Speed floater by clicking on one of the four main buttons displayed below the Summary / Auto Tune.
These four panels can be used entirely independently of Auto Tune, allowing you to make on-the-fly changes to your viewer settings in order to manually adjust viewer performance, and those options that are supported by the viewer’s Graphics Presets capability can be saved as presets, if required.
However, do note that if you opt to employ Auto Tune continuously, settings made within these panels may well be dynamically overridden as the viewer attempts to maintain the minimum frame rate you have defined for Auto Tune.
Graphics Settings
- Brings together the graphics setting that can have the most impact on performance, allowing on-the-fly changes to be made.
- In addition, changes can be saved as a Graphics Preset, or a desired Preset can loaded using the Graphic Preset buttons in the Summary area, and described above.
- The options in this panel are all fairly self-explanatory, and no further explanation is given here.
Avatars Nearby
This panel lists all the avatars your viewer is currently rendering, and presents the time is takes to render them in microseconds (µs – a millionth of a second) and their Avatar Rendering Cost (ARC), a measurement that is at best questionable, hence why microseconds are used as a more reliable measure.

There are five key informational elements within this panel, as shown in the image above:
- The total number of avatars being rendered by the viewer at any given time, and their total render time in microseconds.
- A slider representing the maximum amount of time you want the viewer to spend rendering and avatar.
- You can adjust this slider to set a threshold on the total render time to be devoted to any avatar exceeding the cap will not be fully rendered.
- If you run Auto Tune, any threshold you set may be raised / lowered as the viewer dynamically changes settings to maintain your desired frame rate and the amount of work the viewer must do to render everything around you.
- A list of the avatars in your view – this may expand to be scrollable depending on the number of avatars at any given time.
- Left-clicking any avatar name in the list will highlight it.
- Clicking on the “i” icon to the right of the highlight will provide access to the avatar’s Profile.
- Right clicking on an avatar name (highlighted or not) will allow you to determine how that avatar is rendered (see Avatar Menu – Avatar Rendering Options, below), and options to both zoom on the avatar and inspect them (see a list of attachments, etc.), as you were right-clicking on them directly.
- Note that avatars you have selected to Never Fully Render will be listed in grey in this list.
- The time taken to render the avatars in your view in microseconds:
- The order can be set from the longest to shortest render times and vice versa.
- See the notes in Why Use Render Time as a Metric? for a further explanation on render time.
- The ARC cost (in 000s and rounded to the nearest whole number) for avatars, again the ordering here will be impacted by changing the microsecond ordering.
- Whether any additional tuning is being applied to individual avatars by Auto Tune:
- I = impostering is active for the avatar.
- S = shadow rendering for the avatar has been disabled by the viewer.
- Shadow rendering can more than double the render time of an avatar due to the complexities of calculating the position of the Sun, the corresponding shadows, etc.
- By allowing the viewer to automatically disable shadow rendering for an avatar, the render time can be reduced, hopefully bringing it within the threshold set with the slider in (2.).
Why Use Render Time as a Metric?
ARC has been the “traditional” means of assessing the render impact of avatars; however, it has significant flaws. Firestorm instead uses microseconds which, although while also somewhat imperfect, is actually a better means of determining the “real” cost of rendering avatars, allowing us to take more appropriate action to lessen their impact on the performance of your viewer.
To best understand the difference between render time and ARC, look at the Avatars Nearby image above:
- The top 5 avatars at the time the images was captured all had render times in excess of 1 millisecond (1,000 microseconds) – but their ARCs were all between 35K and 73K.
- By contrast the 10th avatar in the list has render time of just 339.98 microseconds (0.33998 milliseconds) – roughly a third of the top five, but an ARC of 109K.
- Thus, while render time indicates the high ARC avatar as actually more efficient in terms of rendering, ARC points to it as being the avatar that is having the biggest impact on my system.
- To put it another way: if you had 5 avatars with render times averaging 3,500 microseconds each (which is not inconceivable), they would total around 17 milliseconds, or approximately 19FPS.
As noted there are benefits and limitations to using render time as a metric. These might be summarised as:
- Benefits:
- Those avatars having the most direct impact on your viewer’s performance.
- How your avatar might be affecting other viewers – see Your Avatar Complexity, below).
- Highlighting the effect of settings changes (shadows on/off, water reflection, draw distance).
- Limitations:
- The lack of accountability in SL for what we wear – there is no means for region owners, for example to access render time and use it to set a cap that prevents avatars that excessively eat into render time from accessing their regions.
- It does not (easily) help creators know “up-front” what the performance of their creation might be.
- It cannot account for the non-rendering impact of complex assets – the time taken to prepare, transmit, unpack and validate the asset prior to rendering, the time required to fetch the associated textures / maps – all of which occurs over multiple frames.
- However, these are limitations common to ARC as well.
Your Avatar Complexity
This panel provides a breakdown of your avatar’s attachments and their render time / cost. It comprises four main elements:
- The total number of attachments worn by your avatar and their total render time in microseconds.
- A list of the actually attachments.
- Left click to highlight any attachment
- Click the X to the right of the highlight to remove it, if desired.
- Render time for each attachment, with the option of ordering the list from highest to lowest render times or vice-versa.
- The ARC associated with each attachment (in 000s).

In particular, this panel can be used with Avatars Nearby to directly adjust how your avatar may be impacting other people’s experience.
For example: suppose in Avatar Nearby, your avatar is listed as having one of the highest render times, and you would rather reduce it to help other people’s experience, you can use Your Avatar Complexity to determine which of your attachments is contributing the most to that time and then take steps to remove it or replace it from inventory with an item that has a lower render time.
Your Active HUDs
- Provides a breakdown of all the HUDs you are wearing and their individual rendering times (note that HUDs can be texture intensive, placing additional load on your viewer, and can be constantly running a lot of scripts, potentially impacting server-side performance, although this isn’t measured by this tools).
- Clicking on a HUD and then the X displayed next to it will detach it, allowing you to remove non-essential HUDs that may be affecting the viewer performance for yourself.
In Summary
- Offer the means – Auto Tune – for the viewer to manage the key viewer settings that can affect frame rates in an attempt to maintain a minimum FPS you set.
- This will not “automagically” allow old systems to run at high frame rates with all graphics bells and whistles enabled, nor will it cause older systems to run SL like they are high-end gaming rigs.
- Auto Tune can be set to run scene-by-scene or continuously.
- The FPS you set should be in keeping with the capabilities of your system – use the suggested FPS as a guide.
- A set of additional panels (Graphics Settings, Avatars Nearby, Your Avatar Complexity and Your Active HUDs) that can be used as a means to:
- Guide you in optimising your attachments and understanding good avatar content.
- Manually manage your viewer’s performance by making informed adjustments to settings that can most directly affect your viewer’s performance, and in response to your current environment and the avatars around you.
- Manage your own avatar to help improve your own experience and that of those people around you.
Further Information
For further information on the Graphics Speed floater and on avatar-related performance issues, please refer to the following Firestorm wiki page and blog posts by Beq Janus:
- Firestorm Auto Tune wiki page
- How to use the new Firestorm Performance Floater and Autotune feature
- Upgraders of the lost ARC – covering avatar rendering costs in terms of ARC and render time.
- I don’t wanna Mesh with nobody – covering the impact of your own avatar and avatar attachments.
- Why crowds cause lag, why “you” are to blame and how “we” can help fix it and Find me some body to love…benchmarking your lagatar – why segmented mesh avatars can be a headache, and what we can all do to help with their impact.
Menu Updates
The following updates have been made to the Firestorm menus:
- Avatar: 360º Snapshot floater access (see above).
- World: Improve Graphics Speed (see Above).
- Help: Guidebook – opens the Second Life Guidebook for new users.
Avatar Menu – Avatar Rendering
The options for selecting how other avatars are rendered via the right-click Avatar menu / Pie menu have changed.
- Right-click Avatar menu: the three options at the end of the menu – Render Normally, Do Not Render and Render Fully seen in Firestorm 6.4.21 and earlier have been replaced by two / three options:
- Always Display Full Detail and Never Display Full Detail – these are always displayed on the menu.
- Removed from Display Exceptions – this is added to the menu when either o the above has been selected for an avatar. When it is unchecked, the avatar reverted back to being rendered in accordance with your complexity settings, and this option is removed from the menu.

- Pie menu: the three options – Fully, Never, Normally – remain unchanged. However, the option for accessing them has been changed from “Render” to “Display” (so right-click for Pie → More → More → Display.)
Preferences Updates
- Network & Files → Connection: the option to Adjust Proxy Settings has been removed, and Firestorm will instead use you system’s proxy settings.
- Backup & Restore: options to back-up Windlight settings have been removed from the Folders section, as environment settings are now contained in EEP inventory assets.
Linux Updates
The Linux version of Firestorm has received some love, courtesy of Nicky. Updates include:
-
Many updates to libraries and Improvements
-
Linux is now building on a newer Linux kernel
-
Improved clipboard handling (via Cool VL).
-
Inclusion of LGPL license.
-
Swiftshader has been repackaged.
Firestorm AO Updates
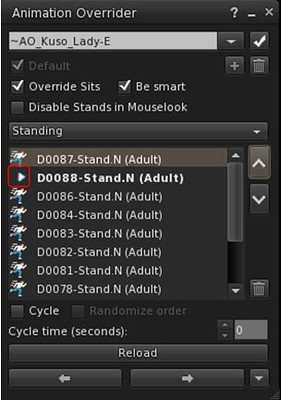
The Firestorm client-side AO (animation override) system has received some updates and fixes:
-
An icon has been added alongside the currently-playing animation (in addition to the animation being highlighted) – see FIRE-29572.
-
The AO should now start more robustly on viewer start, preventing the default SL stand running before the AO loads and runs – see FIRE-1213.
-
A fix for the avatar position being incorrectly reported when using seating that uses sit_ground and toggling AO enable – see FIRE-29712.
-
Ensure that when stopping animations, a stand animation on top of a ground sit is not run.
-
General improvements to the AO UI.
Other Updates and Fixes
Please refer to the release notes for details of all other updates and fixes within this Firestorm release.
Personal Feedback
Firestorm 6.5.3 represents a major update to the viewer, notably with the Graphics Speed UI elements, but also with a ranging of fixes and under-the-hood improvements (e.g. cache handling), all of which should improve stability and the user experience.
In terms of the graphics speed elements, the UI brings together a number of controls otherwise split among several other UI elements, making it a natural choice when making changes (where the Graphics Presets buttons are also useful). Whether Auto Tune receives a lot of use is liable to depend a matter of personal choice; if it is run continuously, it can be intrusive at times – notably in busy areas (which is to be expected, as it will be working harder to maintain performance), so those enjoying a reasonable experience at the best of times might find it a little too intrusive.
That said, taking the time to familiarise yourself with the options and understand how best to employ and set the options can yield positive results and help those on low-to-mid range systems (but again, just don’t expect the options to do the computing equivalent of giving a 10-year old Ford Fiesta a performance to match that of a top-of-the-range Ferrari.
Another update that is liable to prove highly popular will be that of the 360º snapshot floater, hence the coverage in this overview.
In general terms, I’ve been running Firestorm 6.5.3 for the past week, and outside of a few issues not necessarily related to the viewer, I’ve experienced few issues and a generally smooth experience.

We’re investigating an issue with the Media. Our TV has a section for radio stations and the majority of them don’t work anymore. A few still do. I noticed a multitude of “slplugin” in my Mixer window at first, and dullahan_host appears to be gone, while I still have a plethora of them in my Task Manager.
one such example is the stream
https://streams.1radio.ca/just
taken from website
https://1radio.ca/just-classic-rock/
works in VLC, does not work in SL Stream settings (About Land/Sound/Set Music URL) either
But some of the radio presets work in the radio in the TV we have still
no difference if mainland or not, or different sims
LikeLike
Any issues you are having (with media or in general) are best tested with the current SL release viewer to check whether the problem appears to be with Firestorm or more general with the viewer code. Once tested/repro’d, it is then best to raise a bug report Jira with Firestorm and / or Linden Lab to ensure the issue gets the attention it requires – I’m afraid I cannot offer any form of support or referral for support.
LikeLike
thankyou Inara 🙂 II have determined the same issue is with Linden Labs and I’ll follow up from there. Hugs!
LikeLike
Any way to bring back the Adjust Proxy settings box 😐
I had a Squid proxy setup specifically for SL… but now it will need to be system wide… not a huge issue I guess, as not many sites use http traffic now… so hopefully it wont affect the squid storage too much.
… be nice to have the button back though 🙂
LikeLiked by 1 person
Hi, where is the money/tip tracker in the newest build? It doesn’t appear to be under Avatar anymore unless missing it.
LikeLiked by 1 person
Still there under Avatar -7th up from the btoom, between 360 Snapshot and Pose Stand …
LikeLiked by 1 person
Thank you
LikeLiked by 1 person
Cancel question, it was found 🙂
LikeLiked by 1 person