The following notes were taken at the Simulator User Group meeting held on Tuesday, May 19th. Not a lot was discussed in terms of meaningful reportage (again), so just a short update on server deployments / official viewer updates.
On Tuesday, May 19th, the majority of the grid was updated to server maintenance release 541970, comprising:
A fix for a bug that disabled the “Acquire an Experience” button for some premium users – see Bug-228676.
Internal fixes.
On Wednesday, May 20th there should be two RC deployments:
542403, to fix the group notice archive timestamps bug – going to Bluesteel, LeTigra and Preflight.
542391, with further updates related to the cloud migration – going to Magnum and Snack.
SL Viewer
On Tuesday, May 19th:
The Camera Presets RC viewer, version 6.4.2.541639, was promoted to de facto release status. For more on camera presets, see my tutorial: Viewer Camera Presets.
The Love Me Render RC viewer updated to version 6.4.3.542484.
The remaining official viewer pipelines are as follows:
Release channel cohorts:
FMOD Studio RC viewer, version 6.4.2.541570, issued May 11th.
CEF Special RC viewer, version 6.4.1.541204, dated April 30th.
Project viewers:
Mesh uploader project viewer, version 6.4.2.541645, issued May 15th.
Copy / Paste viewer, version 6.3.5.533365, December 9th, 2019.
Project Muscadine (Animesh follow-on) project viewer, version 6.4.0.532999, November 22nd, 2019.
Legacy Profiles viewer, version 6.3.2.530836, September 17th, 2019. Covers the re-integration of Viewer Profiles.
360 Snapshot project viewer, version 6.2.4.529111, July 16th, 2019.
The default viewer camera placement has long been the bane of the Second Life viewer. Placing the camera well above and behind the avatar, it gives an awkward over-the-head view of the world, rather than the more intuitive over-the-shoulder view seen in many video games.
While the camera’s debug settings have allowed a custom camera preset to be set-up, it has never really been possible to easily create, save, and swap between presets according to need.
The Camera Presets controls, developed and contributed by Jonathan Yap, the developer responsible for the graphics presets options in the viewer (see Avatar Complexity and Graphics Presets in Second Life for more), changes this. It is a capability that allow users to create one more more custom camera presets within the viewer to suit particular needs and then save them. This means, for example, you can now have a camera position for general exploring, another suitable for combat games, another for building, etc., all of which can easily be accessed and used at any time.
This tutorial explains how to create and use presets via Camera Presets options.
Note: at the time of writing, the camera presets options are only available in the official viewer, version 6.4.2.541639 or later.
UI Elements
There are five UI elements associated with creating and using camera presets:
The Camera Presets icon and drop-down – presenting the means to quickly access and use created camera offsets.
The Camera Presets icon, found in the top right of the viewer window, and a populated version of the drop-down that can be displays on clicking on it.
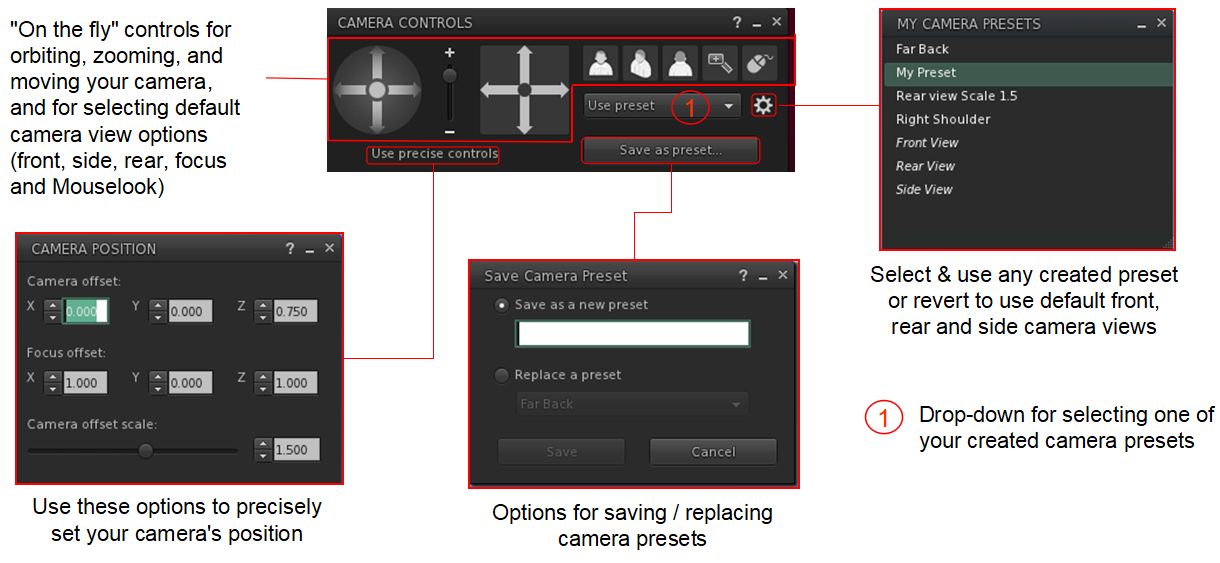
The Camera Controls floater. This provides access to provides access to the following:
The familiar “on the fly” controls for positioning the camera / selecting any of the pre-set camera positions, setting the camera focus or switching to Mouselook. These can also now be used to create a custom camera preset.
Camera Position floater for creating new camera presets numerically.
Save Camera Preset floater – save any preset you have created or replace an existing preset with new values.
My Camera Presets floater – allows you select and delete any preset you have created, or reset your camera to one of the viewer’s default front, side or rear camera positions.
In addition, the Camera Controls floater includes a drop-drop menu to provide quick access to any custom camera presets you have created.
The Camera Controls and camera presets floaters – click for full size, if required
Creating a Custom Camera Preset
Using the Camera Controls
Open the Camera Control floater by:
Hovering the mouse over the Custom Preset icon at the top right of the viewer window to open the drop-down and then clicking the Open Camera Floater button OR.
Clicking on the Camera Controls (Eye) button in your viewer’s tool bar, OR
Selecting Me→Camera Controls… from the viewer menu bar.
With the Camera Control floater open, clicked the required view button (Front, Side, Rear) if required.
Use the camera orbit, slide and zoom controls on the left of the camera floater to position your camera as you would like it to be relative to your avatar.
When you are satisfied with the camera position and angle, click Save As Preset button in the floater, and:
Either make sure the Save As New Preset radio button is selected and type a name for the preset in the text box.
Or click the radio button for Replace a Preset, then click the button to display a list of current presets and highlight the one you wish to replace (including one of the three default positions, shown in italics).
When you have entered a name or made your choice, click Save.
Using the camera controls to create a camera preset
Using the Precise Controls
If you have a numeric set of camera and focus offsets you use (e.g. such as those provided by Penny Patton, or use the table below to set your camera to some typical view points):
Open the Camera Control floater by:
Hovering the mouse over the Custom Preset icon at the top right of the viewer window to open the drop-down and then clicking the Open Camera Floater button OR.
Clicking on the Camera Controls (Eye) button in your viewer’s tool bar, OR
Selecting Me→Camera Controls… from the viewer menu bar.
In the Camera Controls floater, click on Use Precise Controls.
In the Camera Position floater:
Enter the X, Y and Z figures for the camera offset position.
Enter the X, Y, Z figures for the focus offset position,
Use the slider to set how near / far the camera is to be positioned from your avatar.
When you are satisfied with the camera position and focus, click Save As Preset button in the floater, and:
Either make sure the Save As New Preset radio button is selected and type a name for the preset in the text box.
Or click the radio button for Replace a Preset, then click the button to display a list of current presets and highlight the one you wish to replace (including one of the three default positions, shown in italics).
When you have entered a name or made your choice, click Save.
Setting a precise position for a camera preset
The following table offers Penny Patton’s recommended positions for over-the-shoulder camera presets.
Over the Left Shoulder
Centre
Over the Right Shoulder
Camera Offset
X= -2.0
Y= 0.4
Z= -0.2
X= -2.0
Y= 0.0
Z= -0.2
X= -2.0
Y= -0.4
Z= -0.2
Focus Offset
X= 0.9
Y= 0.7
Z= 0.2
X= 0.9
Y= 0.0
Z= 0.2
X= 0.9
Y= -0.7
Z= 0.2
Offset Scale Slider
1.5
1.5
1.5
Using Your Custom Presets
From the Presets Icon
Hover the mouse over the Custom Preset icon at the top right of the viewer window to open the drop-down.
Click on the required preset name to select it.
From the Camera Controls Floater
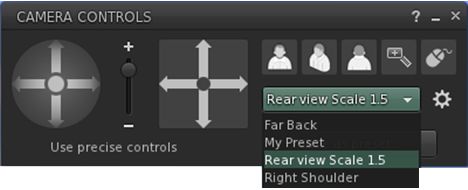
Click on the Use Preset button in the Camera Controls floater.
A drop-down of custom camera presets is displayed.
Click on the required preset name.
The preset is selected, and the button updates to display the preset’s name.
Using a custom camera preset
Deleting or Resetting Default Presets
Notes:
You can only delete custom presets and reset default presets.
No confirmation is requested: actions will be immediately implemented – so if you have overwritten one of front, side or rear camera position presets, your custom version of that preset will be lost when reset.
Display the Camera Controls floater.
Click the gear icon.
The My Camera Presets panel opens (may default to the top left of your screen).
Hover the mouse over the preset you wish to delete or reset.
Custom presets will display a trash can. Click it to delete the preset.
Default presets will display a reset icon. Click it to return the preset to its original values.
Cherishville, May 2020 – click any image for full size
Lam Erin is a gifted landscape artist who is also responsible for the design of Cherishville, a Homestead region we have enjoyed visiting on a number of occasions over the past few years. This being the case, it was an obvious choice for a re-visit when we heard Lam have redressed the region for spring / summer 2020. For this design, Lam has turned to what is something of a traditional theme for the summer months in Second Life: a tropical setting that also includes a Mediterranean touch with the style of buildings selected for it.
Surrounded by off-region islands, the setting is in two parts: a smaller circular island that has the appearance of perhaps once having been a major fortification, but which is now home to a pair of stone houses and an old, copper-domed watchtower / lighthouse. Facing this, the rest of the region forms a curving finger of an island, the north-western end of which continues the theme found in the smaller island: cut-stone walls rising to a table-flat top, its paved parapet offering a walk for those so inclined.
Cherishville, May 2020
It’s easy to imagine this area as either a continuation of the old fort – the ruins of which still occupy a part of the round island – if not actual fortification, then perhaps barracks or similar. Now, however, it home to a Mediterranean-style villa and a farmhouse-style home, each with is share of outhouses, all perhaps built using the stones that once formed the fort’s own walls.
Beyond this, the land drops to a curved beach that cups a shallow bay in its arms. Curving north and east, it forms a beach-come-sandbar backed on its east side by rocks, with a single large outcrop supporting a second lighthouse. This is not a pristine place; the sand and the buildings on it show signs of age, while the north-eastern tip of the sandbar is home to a windmill that puts its time of construction as 1918. All of this gives a further sense of presence to the region and the idea it has been inhabited for a long time.
Cherishville, May 2020
An ageing psychedelic VW van and an old Lambretta / Vespa style scooter sitting on the beach give the suggestion that the region might have once been connected to one or more of the surrounding islands, allowing them to be driven here before being deserted.
The beach offers numerous places to sit, from deck chairs to sun loungers to rowing boats, while those prepared to explore the south side of the island will find an old fisherman’s hut sitting atop a shelved beach. It offers a little more privacy than the more open beach.
Cherishville, May 2020
There were one or two rough edges to the setting we couldn’t help but notice during our visits – a building or wall set slightly above ground here, floating plants there, one or two unsupported flights of steps. These can be a little unsettling once noticed, and give the impression the region may have been put together in a hurry. However, during one of my return visits I did see Lam working on things, so it’s likely this ruffles are liable to be smoothed out as he has time.
As noted at the top of this article, tropical / Mediterranean themes tend to be a popular choice for region designs as spring progresses into summer in the northern hemisphere. What sets Cherishville apart is the sense of longevity / history I’ve alluded to here that is imbued in the region’s design; this allows a visitor to build up a story about where the island might be, and the past it may have seen.