2020 TPVD meetings week #4 summary

Recollection, December 2019 – blog post

The following notes are taken from the TPV Developer meeting held on January 24th, 2020. A video of the meeting is embedded below, my thanks to Pantera for recording and providing it. As always:

  • Time stamps are given with links that will open the video at the appropriate point in a separate browser tab for reference.
  • Core points of the meeting are listed below. Other subjects of lesser import may have been discussed, please refer to the video.

The latter part of this (brief) meeting comprised a text chat discussion amongst Firestorm people on profile picture aspect ratios and Firestorm UI skins. If interested, please refer to the video.

SL Viewer News

[0:13-6:35]

The rest of the viewer release pipelines remain unchanged:

  • Current Release version 6.3.5.533275, formerly the Wassail RC viewer, dated December 4, promoted December 12 – No change.
  • Release channel cohorts:
  • Project viewers:
    • Copy / Paste viewer, version 6.3.5.533365, December 9, 2019.
    • Project Muscadine (Animesh follow-on) project viewer, version 6.4.0.532999, November 22, 2019.
    • Legacy Profiles viewer, version 6.3.2.530836, September 17, 2019. Covers the re-integration of Viewer Profiles.
    • 360 Snapshot project viewer, version 6.2.4.529111, July 16, 2019.

General Viewer Notes

  • It is anticipated the Xanté Maintenance RC will be promoted to de facto release status in week #5 (commencing Monday, January 27th). This is a milestone viewer for the Lab as it will be the first to be built and released using the new Github infrastructure.
    • Under the new structure, both viewer-dev and viewer build should have their master branch updated when a viewer is promoted.
    • Most viewer builds outside of the release version should now be seen as branches within viewer-dev.
  • Viewer build work is now primarily focused on the transition to using Visual Studio 2017 and a recent version of Xcode.
    • Python 3 will be made a part of the viewer build process “over the next couple of months”.
  • [13:48-14:00] Despite it being only a project viewer, the Legacy Profiles viewer is being touted as the next in line for release after the Xanté Maintenance RC, so it would seem the viewer is going to go through a rapid RC promotion and cycle.

In Brief

  • [9:16-10:25] the graphics / rendering team has been focused on trying to clear the EEP bugs so that project can be released. However, the issue of OSX OpenGL deprecation issue is “pretty much” next on their list to dig into. Even so, it might still be a while before the Lab is in a position to discuss anything related to decisions and future direction on the matter, although as changes start to be made, they will be through publicly-viewable repos.
  • [13:17-13:46] There are some issues in dealing with “long names” that are affecting the deployment of Name Changes. As this is a web-based capability, it is not anticipated there will be a project of RC viewer specific to the capability.

First looks: Camera Presets Second Life RC viewer

On Friday, January 24th, Linden Lab issued the Camera Presets release candidate viewer – links at the end of this article.

Developed as a result of the code contributions and work of Jonathan Yap, who was responsible for bringing graphics presets to the viewer (which allows users to create and store custom graphics settings for their viewer – see: Early looks: Avatar Complexity and Graphics Presets (2015)). This idea with this viewer is to provide an easy and intuitive means for users to be able to create avatar camera positions they find comfortable to use, and which can be saved and used as needed.

Many people have developed custom camera placement options that range from instructions on editing the camera debug settings through to the use of scripted HUDs. Some third-party viewer developers also provide adjusted defaults within their viewer offerings. There are many reasons for doing this – from things like improved game play (combat games, etc.), through to being able to better build to scale without fear of cameras ending up stuck the wrong side of ceilings, etc. For my part, and as an example, I’ve long used Penny Patton’s camera offsets, which she first allowed me to reproduce in these pages far back in 2011 (see: SL Camera Offsets), and which I still use today, saved as a part of my personal settings for Firestorm.

However, manually setting up a camera preset involves a dive into using the viewer’s Debug settings – something many users do not find comfortable and which is not particularly easy unless you know exactly which debug options to play with. The Camera Presets Viewer eliminates this by providing access to the required options through the viewer UI and by using the camera controls. What’s more, it makes it possible to create and save multiple camera presets that cane be used as requires with a simple click or two of the mouse.

To achieve this, the Camera Presets RC viewer presents five new or updated UI elements::

  • The Camera Presets icon and drop-down – presenting the means to quickly access and use created camera offsets.
  • An updated camera floater, which is used to both control your camera and create any camera presets you may need. It in turn provides access to three new options:
    • A new Camera Position floater – allows you to create a camera preset using the Camera Offset and Focus Offset debug settings.
    • A My Camera Presets floater – allows you manage your camera presets:
      • Delete any custom ones you have created or
      • Reset a “standard” Front, Rear or Side camera preset you may have replace with your own values to its default position.
    • A Save option – directly save a camera offset you have created under a unique name (adding it to the Presets drop-down) or using it to replace one of the default camera positions of Front, Side or Rear.
The Camera Presets options and floaters (includes the updated Camera Controls floater, centre)

A Quick-Fire Guide to Creating and Using a Camera Preset with the Viewer

Note that you can create multiple camera presets, depending on your SL needs.

Creating a Custom Preset Using the Camera Controls

  1. Open the Camera Control floater by:
    • Either clicking the Custom Preset icon at the top right of the viewer window to open the drop-down and then clicking the Open Camera Floater option.
    • Or clicking on the Camera Controls (Eye) button in your viewer’s tool bar.
  2. With the Camera Control floater open, clicked the required view button (Front, Side, Rear) if required.
  3. Use the camera orbit, slide and zoom controls on the left of the camera floater to position your camera as you would like it to be relative to your avatar.
  4. When you are satisfied with the camera position and angle, click Save As Preset button in the floater, and:
    • Either make sure the Save As New Preset radio button is selected and type a name for the preset in the text box.
    • Or click the radio button for Replace a Preset, then click the button to display a list of current presets and highlight the one you wish to replace (including one of the three default positions, shown in italics).
  5. When you have entered a name or made your choice, click Save.
The revised Camera Controls floater and using it to create camera presets

Creating a Custom Preset Using the Precise Controls

If you have a numeric set of camera and focus offsets you use (e.g. such as those provided by Penny Patton):

  1. Follow steps (1.) and (2.) above to display the Camera Controls floater.
  2. In the Camera Controls floater, click Use Precise Controls to display the Camera Position floater.
  3. Enter your X, Y and Z figures for the Camera and Focus offset positions. Use the spinners to fine-tune your positioning, if required.
  4. As there is no field for entering a CameraOffsetScale adjustment, zoom must be used as an arbitrary means of setting camera distance from the avatar, should this require adjusting.
  5. When you are satisfied with the camera position, follow steps (4.) and (5.) above to save your camera preset.

Using Your Presets

  • From the Presets icon:
    • Click the Custom Preset icon at the top right of the viewer window to open the drop-down.
    • Click on the required preset name to select it.
  • From the Camera Controls floater:
    • Either click on the required view button (Front, Side Rear).
    • Or click on the Use Preset button (only available if custom presets have been created) and select the required custom preset.
  • Note that with either approach, the currently-selected custom preset will be indicated in both the presets drop down (by a tick appearing next to it) and in the Camera Controls (the Use Preset button will update to display the name of the preset being used).

Deleting or Resetting Default Presets

Note you can only delete custom presets and reset default presets. Note that no confirmation is requested: actions will be immediately implemented.

  1. Display the Camera Controls floater.
  2. Click the gear icon.
  3. The My Camera Presets panel opens (may default to the top left of your screen).
  4. Hover the mouse over the preset you wish to delete or reset.
    • Custom presets will display a trash can. Click it to delete the preset.
    • Default presets will display a reset icon. Click it to return the preset to its original values.

Feedback

This capability has been in development by Jonathan for a while, and it is good to see it finally surface. As a long-time user of custom camera presets I’ve been looking forward to Jonathan’s work seeing the light of day in the hope it will provide an easier means for people to adjust their camera without the fear / concern of having to dive into debug settings.

In this, I was somewhat disappointed to see there is no option to quickly enter a value CameraOffsetScale using the “precise controls”. It’s a minor niggle, although it can be advantageous to some views in having the camera set back further than the usual default distance. While the zoom slider can still be used to achieve this, it is somewhat arbitrary compared to entering a precise value, which still requires the use of the debug setting to achieve.

On the positive side, being able to set a preset through the familiar orbit, zoom and slide controls in the Camera Controls floater is probably going to be more than enough for most users, and the approach makes experimentation and playing with camera presets a lot less off-putting than tweaking debug settings.

Also, all of the new panels and drop-downs are clear and easy to understand, although some on laptops or lower-resolution screens might find the increased size of the Camera Control floater gives rise to a certain amount of gritting of teeth if it is a floater they like to keep open. For my part I admit to liking the way in which it brings all the Camera Control options together as a single visible element, rather than having to “page” between them as is currently the case with the release viewer.

Given the contained nature of the capability and the fact it appears to be working exactly as advertised – and my hope that CameraOffsetScale might find a way to being included in Camera Positions Floater with a future release notwithstanding – I suspect this might be a viewer that could quickly find its way to being promoted to de facto release over the next few weeks, rather than awaiting its turn in line behind others.

Links

A Dream of Asia in Second Life

Th Dream of Asia, January 2020 – click any image for full size

Miro Collas recently suggested we drop into the regions designed by Tatjana DeCuir and her SL partner, arvo, which have recently been redesigned to have an Asian / far east theme. Comprising two Full private regions making use of the additional 10K Land Capacity, they form a two-region estate that is home to a range of activities, including DJ sessions and dancing, and some that are more adult-related.

The range of activities is reflected at the skyborne landing point, which features a large teleport board (also to be found at various points on the ground) directing visitors to various locations. Which option you take is entirely dependent upon personal choice and the reason for visiting. However, if you’re dropping in to explore and / or to take photographs, Caitlyn and I would recommend the Bubble Tour teleport as a good place to start.

The Dream of Asia, January 2020

Located on a beach sitting in a broad bay, the Bubble Tour is a point from which it is possible to complete a full tour of the regions either on foot or via the multi-seat bubble that will fly you around and over the islands to give you a bird’s eye view of their layout and surrounds. The latter is a particularly unhurried way to pass the time when travelling with someone, as the speed ensures you can relax, set your camera position (and rotate it occasionally) and enjoy a conversation, point of the sights to one another and just appreciate the view.

Given the setting does cover two regions, there is a lot to see, and there is more than enough variation in the design to keep visitors fully engaged in travelling from beach to hilltop walk, passing through rain forest or along semi-paved paths along the way, discovering ancient ruins or well-maintained gardens, all the while drawn by the high roofs of buildings perched on cliffs or straddling stone plateaus. The network of paths and trails means that is is possible to find your way around both regions without resorting to the use of the teleport boards, but care needs also to be taken as some of the paths may not be as obvious as others.

The Dream of Asia, January 2020

This rich mix of settings brings together hints of Malaysia and the Philippines with those of Japan and China (notably through the buildings and the presence of panda). Given the off-sim surrounds, the feeling is very much that this is a place hidden somewhere along the Pacific coast of Asia (the presence of African elephants on the beach notwithstanding); a realm hidden amongst a group of protective islands, shielding itself from prying eyes.

From the bubble tour landing point, it is possible to go inland, climbing a natural “stairway” that looks to have been worn into the rock by the passage of time and feet (or perhaps in the distant past, by water), rather than being cut by hand, or follow the beach to the north. I’d recommend the latter route, as it presents a logical means to circumnavigate the regions, starting by taking the low bridge to cross the channel of water feeding the bay to enter the eastern region. Here the land points a bent-tipped finger out into the eastern sea, home home to a DJ stage built both over a natural pool of water and partially under the protective arc of a natural rock arch.

The Dream of Asia, January 2020

The finger ends in the tall and foreboding form of what might have once been a fort watching over the bay to the south. Sitting in  its own grounds and elevated in a defensive manner, it is now a location for some of the more adult activities in the estate, being a Shibari house. To one side of its paved forecourt stands a red wall with circular open gateway. Pass through this, and a shrub and tree bordered path leads back to the western region, passing by way of pandas and a bamboo glade into the region’s rain forest.

Here can be found a sense of ancient design – flagstoned ground, a broken statue to Buddha (which appears to have a rock formation sprouting through it!), shrines, water channels and much of the region’s wildlife. multiple paths wind through it, offering opportunity to explore. Some of these lead the way directly up to the plateau sitting above the rain forest that is home to what might be regarded as a former palace or similar official residence, complete with outbuildings, a water garden, reception pavilion and fountains. All are open to public use and make for a striking setting.

The Dream of Asia, January 2020

Just below this large terrace, however, and nestled into the south-west corner of the region is the most marvellous house and gardens setting. It can be reached by both the rock steps leading up from the beach not far from the bubble tour, or by finding the corner path and steps that clip one side of the rain forest as they descend from the plateau. I’d highly recommend leaving this aspect of the estate for the final part of any exploratory tour, and that you reach it via the path down from the high terrace, simply because the beauty of the design is well worth holding until last.

The path from the plateau will bring you by way of rock and stone arch to a gorgeous hanging garden lit by cast-iron lamps (found elsewhere in the region as well), presenting a shaded path to the house and its broader gardens. With the mix of trees, plants, water and winding paths, it is an idyllic and romantic setting which invites visitor to again relax and appreciate a natural beauty. The house itself does not appear to be a private residence, although I would suggest the best way to appreciate it is from the gardens, where there are several places to sit and pass the time.

The Dream of Asia, January 2020

Being a predominantly mesh build that has a very high volume of textures, it can be somewhat taxing on viewers, so saving the use of shadows for taking photos and turning them off when walking might be advisable, as might dropping draw distance if you have it set to longer distances.  However, with much to see and many places to sit and enjoy a cuddle or a dance to be found throughout both regions, and additional attractions such as the self-fly bubble cars (rezzers marked by signs), this iteration of LebensRaum is a place that can easily entice visitors into passing their time.

SLurl Details

2020 Content Creation User Group week #4 summary

RioSisco Studio Pictures, December 2019 – blog post

The following notes are taken from my audio recording of the Content Creation User Group (CCUG) meeting held on Thursday, January 23rd 2020 at 13:00 SLT. These meetings are chaired by Vir Linden, and agenda notes, meeting SLurl, etc, are available on the Content Creation User Group wiki page.

Environment Enhancement Project

Project Summary

A set of environmental enhancements (e.g. the sky, sun, moon, clouds, and water settings) to be set region or parcel level, with support for up to 7 days per cycle and sky environments set by altitude. It uses a new set of inventory assets (Sky, Water, Day), and includes the ability to use custom Sun, Moon and cloud textures. The assets can be stored in inventory and traded through the Marketplace / exchanged with others, and can additionally be used in experiences.

Resources

Current Status

  • EEP is now viewed as a priority for release by the Lab.
  • Work is continuing on the final bug fixes on the graphics side.
  • Release is anticipated by LL to be within the next month or so.
  • Those who use windlights for photography or within their regions are strongly urged to test the EEP RC viewer (last updated on January 9th, 2020, at the time of writing this summary).

Project Muscadine

Project Summary

Currently: offering the means to change an Animesh size parameters via LSL.

Current Status

  • Now officially on hold pending other projects / work (notably major projects such as:
    • The cloud migration project.
    • Transitioning the viewer build tools to Visual Studio 2017 and to a recent version of Xcode (OS X)
    • Completing the migration of viewer repositories from Mercurial to Github.
  • The status of the project will be reviewed as other work progresses, but it is unlikely there will be any further work on Muscadine in Q1 2020 (through until the end of March).

ARCTan

Project Summary

An attempt to re-evaluate object and avatar rendering costs to make them more reflective of the actual impact of rendering both. The overall aim is to try to correct some inherent negative incentives for creating optimised content (e.g. with regards to generating LOD models with mesh), and to update the calculations to reflect current resource constraints, rather than basing them on outdated constraints (e.g. graphics systems, network capabilities, etc).

Current Status

As of January 2020 ARCTan has effectively been split:

  • Immediate viewer-side changes, primarily focused on revising the Avatar Rendering Cost (ARC) calculations.
    • This work will also involve providing additional viewer UI so that people can better visibility and control to seeing complexity. For example:
      • Which attachments are taking the most rendering resources / rendering time.
      • Available options for improving local performance.
    • The aim is to provide users with information they can understand and make use of to assist in their local performance (e.g. “these red figures on your avatar attachment mean it is impacting YOUR system’s performance and slowing YOU down”, rather than jut pointing the finger elsewhere).
    • It is hoped that providing this information may also encourage creators produce better, more efficient avatar-related content.
  • Work on providing a UI for in-world object rendering costs (LOD models, etc.) which might affect Land Impact has been deferred to a later tranche of project work.
  • The belief is that “good” avatar ARC values can likely be used as a computational base for these rendering calculations.

In Brief

LOD product: LL is considering taking future look at how level of detail is managed by Second Life.

  • GLOD is now 15+ years old and there are potentially better ways to handle things.
  • Automation of some LOD options might be seen as possible.
  • It is recognised that avatar LODs are not the most efficient (e.g. 2X bounding box LODs), but how they might be better managed is seen as a complex issue (e.g. avoiding situations where the viewer uses one LOD for an avatar’s body and another for the avatar’s head, so the head looks deformed compared to the body, or vice-versa).

Content Tools: interest was also expressed in hearing about the preferred tools used by creators and what creators might like to see by way of better support for said tools / file formats related to said tools and in general. The question was not asked with any specific project in mind, but simply to gain a broader understanding of what content creators use, etc.

The tools mentioned by creators at the meeting include:

  • Clothing: Marvelous Designer, Blender, Maya, Substance Painter, 3D Coat.
  • Other tools mentioned: Topogun, Zbrush.

PBR was also mentioned, although this would require a large-scale overall of SL’s rendering engine.

Requests were also made for:

  • Better handling of sub-meshes during the upload process (e.g. consistent linking between different uploads of the same multi-part mesh).
  • Ability for mesh instance recognition (e.g. if a specific sub-mesh is repeatedly used in a build, then it should be uploaded only one and instanced across the build) – or at least the viewer to be able t instance sub-mesh elements when rendering.


Bryn’s Standby Sketches in Second Life

The Standby Sketches

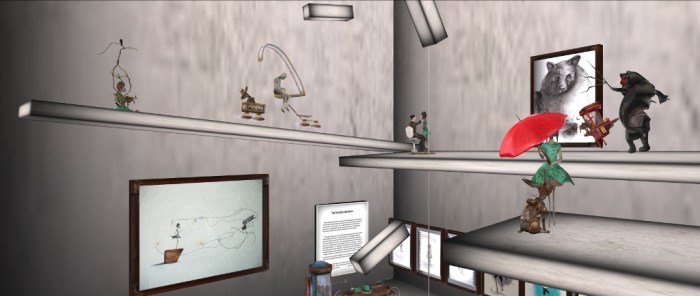
I recently reviewed Bryn Oh’s Daughter of Gears / Rabbicorn trilogy (see A Daughter of Gears and a Rabbicorn in Second Life), and while it may be only a brief two article break before returning to Bryn’s work again, there is a reason for this. It comes in the form of an exhibition of Bryn’s 2D and 3D art currently open at the Surreal Art Gallery, curated by JulietteSurrealDreaming.

The Standby Sketches offers a unique insight into Bryn’s creative process, specifically in reference to the three parts of the The Standby Trilogy.

Often when planning a new virtual artwork I still step back to the traditional art, from where I began, to sketch ideas and help myself understand what I want to convey in my artwork. This exhibit shows some of the various bits taken from my sketchbooks, the pen and ink drawing, the oil paintings, and even the bronze sculpture that materialise during the creative process.

– Bryn Oh, describing The Standby Sketches

The Standby Sketches

Spread over two level of the gallery (accessed via the teleport point in the foyer area), the exhibition presents a series of sketches showing the evolution of The Daughter of Gears, mesh models from various scenes from the trilogy (including some that do not appear to have been used in the final installations), and drawings that appear to show the evolution of the rabbicorn as well asstory scene ideas.

This is a small display, but one that is fascinating nonetheless, providing insight into Bryn’s creative process. While it might have been enhanced with some additional textual information to accompany the sketches and sets of images, one cannot find fault with none appearing; for one thing, Bryn tends to keep busy with preparing art, whether intended for SL or elsewhere. For another, these pieces on offer speak eloquently in and of themselves, particularly for those who have visited the trilogy whilst it is at Immersiva, while the sketches and drawings are more than capable of standing up in their own right as works of art.

With individual pieces available for sale, and an opportunity to obtain limited edition bronze pieces cast of The Daughter of Gears and the Rabbicorn, The Standby Sketches will be open through the rest of January and February. Given the pairing of the exhibition with the Standby Trilogy, I’d recommend a visit to this ahead of The Standby Sketches so that the fullest appreciation of both can be gained.

The Standby Sketches

SLurl Details

Taking wing with Made in SL

Marianne McCann gets a little Top Gun as she discusses aviation in Made in SL

The latest Made in SL video launched on Thursday, January 23rd, with a look at the aviation scene in Second Life, and featuring Second Life long-term resident, aviation enthusiast and SL historian, Marianne McCann providing the commentary.

Second Life aviation is a genuinely broad and layered subject to try to cover in under three minutes, but thanks to Marianne’s expertise in the subject, Aviation Made in Second Life packs a huge amount into its brief running time. We get a brief peek at SL history, with names like Garth FairChang and the legendary Cubey Terra rightly popping up, (Cubey actually got me into SL skydiving, which is kind-of related to flying 🙂 ), as well as touching on the range of aviation communities and flying-related role-play in SL by touching on the Passengers of SL group (a good way to get flying with the many airlines and charter flight operations that offer point-to-point services in SL) and a look at the work of the Second Life Coast Guard (SLCG) role-play group that combines airborne and marine vehicles and role-play in places like Blake Sea and its surroundings (I’d personally note that the Get The Freight Out community also encompasses flying – see: An inside look at Get the Freight Out in Second Life).

Also given the short time frame of the film, coupled with the breadth of aircraft content available in SL, Marianne wisely focuses on just a couple of options for getting into the air at the controls, pointing to Sherwood aviation – an ideal for those who wish to have a high degree of simulated realism in their flying – and to Arduenn Schwartzman’s Warbugs, which have been design purely for fun and to allow single-region air combat (I actually wrote about Warbugs back in 2012 in Bitten by the (War)bug, but I confess I’ve not flown my own Warbug “seriously” for about 3-4 years).

Flying in SL takes many forms and includes many different aircraft and aircraft styles. I don’t really have any good examples of “unusual” flying machines, but the Piaggio Orion autogyro is both fun (and challenging at times!)

However, given the range of aircraft is so vast, getting to grips with what to buy can be difficult. Hence, Marianne points to some of the more popular or bigger airports, many of which have vendors offering demo versions of aircraft. In this, places like Hollywood Airport and Hona Lee Field can be particularly helpful, as they sit on the edges of the wide open skies of Blake Sea, where having to compete with skyboxes occupying the same piece of sky as you is removed. Many aircraft makers also have their own airfields where demos are offered, so when parsing the Marketplace for ideas, allows be sure to click any link to an in-world location and go see what demos might be available and give them a go.

As a keen aviator in SL myself, I’d probably also add to Marianne’s thoughts by saying those seeking to ease themselves into SL flying and want to have fun without worrying too much about things like instrument flying via Mouselook or having to learn the correct start-up sequences and so on, might want to try the likes of DSA (available at Hollywood Airport, noted above) for fixed-wing light aircraft flying (I’ve covered several of the DSA aircraft in these pages, and as I noted back in A look at my most-used SL vehicles (thus far!), one of them remains one of my preferred aircraft today; while for rotary flight, the likes of Spijkers Aviation & Marine (just across the channel to the west of Honah Lee Field) offer a range of helos that are pretty easy to master and are a good way to get started.

Airports like Hollywood Airport and airfields can be found throughout the Second Life continents and along the interconnecting waterways and places like Blake Sea and its surrounding private estates

Of course there are some drawbacks to flying (like any other form of SL travel), such as region crossings. However, and like everything else, the best way of dealing with these is by practice and gaining familiarity with the grid’s behaviour. Certainly, fear of region crossings should be a reason to put you off.

All told, a great promotional / introductory video.