It’s time to kick-off a week of story-telling in voice, brought to our virtual lives by the staff and volunteers at the Seanchai Library. As always, all times SLT, and events are held at the Library’s Second Life home at Bradley University, unless otherwise indicated.
Join Caledonia Skytower as she reads selections from Neil Gaiman’s 2009 Newbery Medal winning children’s fantasy novel, simultaneously published in Britain and America during 2008, which also collected the annual Hugo Award for Best Novel from the World Science Fiction Convention and the Locus Award for Best Young Adult Book selected by Locus magazine subscribers.
Nobody Owens, known to his friends as Bod, is a normal boy. He would be completely normal if he didn’t live in a sprawling graveyard, being raised and educated by ghosts, with a solitary guardian who belongs to neither the world of the living nor of the dead. There are dangers and adventures in the graveyard for a boy. But if Bod leaves the graveyard, then he will come under attack from the man Jack—who has already killed Bod’s family . . .
Monday October 24th, 19:00: The War Hound and the World’s Pain (Von Bek #1)
Gyro Muggins opens the covers of Michael Moorcock’s 1982 supernatural novel.
Europe, the 17th century: nations are ravaged by the Thirty Years’ War, driven by religion and engulfing most of the Great Powers. Weary of the fighting, disillusioned, faithless and cynical, Ulrich von Bek, the War Hound, deserts his troops and travels through a Germany ruined by the war and religious persecution.
Coming to a strange forest, he finds within it a castle which appears to have escaped the war. He decides to seek shelter within its walls – only to find this is no ordinary castle. The lord within it is none other than Satan himself.
Von Bek discovers he has been allowed into the castle so that Satan might seek his help. In return for his soul, the Devil asks him to seek out the Cure for the World’s Pain, so that Satan might use it as proof to God that he wishes to be reconciled with heaven.
The hosts of Hell, however, aren’t that keen on the idea of reconciliation…
Tuesday October 25th, 19:00: Fantastic Tales: Visionary and Everyday
With this posthumously published anthology and successor to his best-selling Italian Folktales, Italo Calvino, a contemporary surveyor of the otherworldly, pays homage to twenty-six of his nineteenth-century precursors.
Join Trolley Trollop on a journey through this volume, which is both an education in the history of fantastic literature and a roller-coaster ride of wonder and terror, vampires, ghosts, and the rebellious creatures of our own psyches.
Wednesday October 26th, 19:00: Haunts and Ghosts
Shandon Loring reads from his personal haunted library!
Thursday, October 27th, From the Shadows
More spooky tales with Shandon Loring in Second Life and Kitely. Check Kitely event announcements for specific grid location
Sunday October 30th, 13:00: The Great Boo at Holly Kai Park
A buffet of the scary, the spooky, and other thrilling tales of the season. Two hours of stories with a delightful selection of storytellers, live in voice at the Storyteller’s Circle, Holly Kai Park!
Please check with the Seanchai Library SL’s blog for updates and for additions or changes to the week’s schedule.
The featured charity for September-October is Alex’s Lemonade Stand Foundation (ALSF), a childhood cancer foundation dedicated to raising funds for research into new treatments and cures for all children battling cancer.
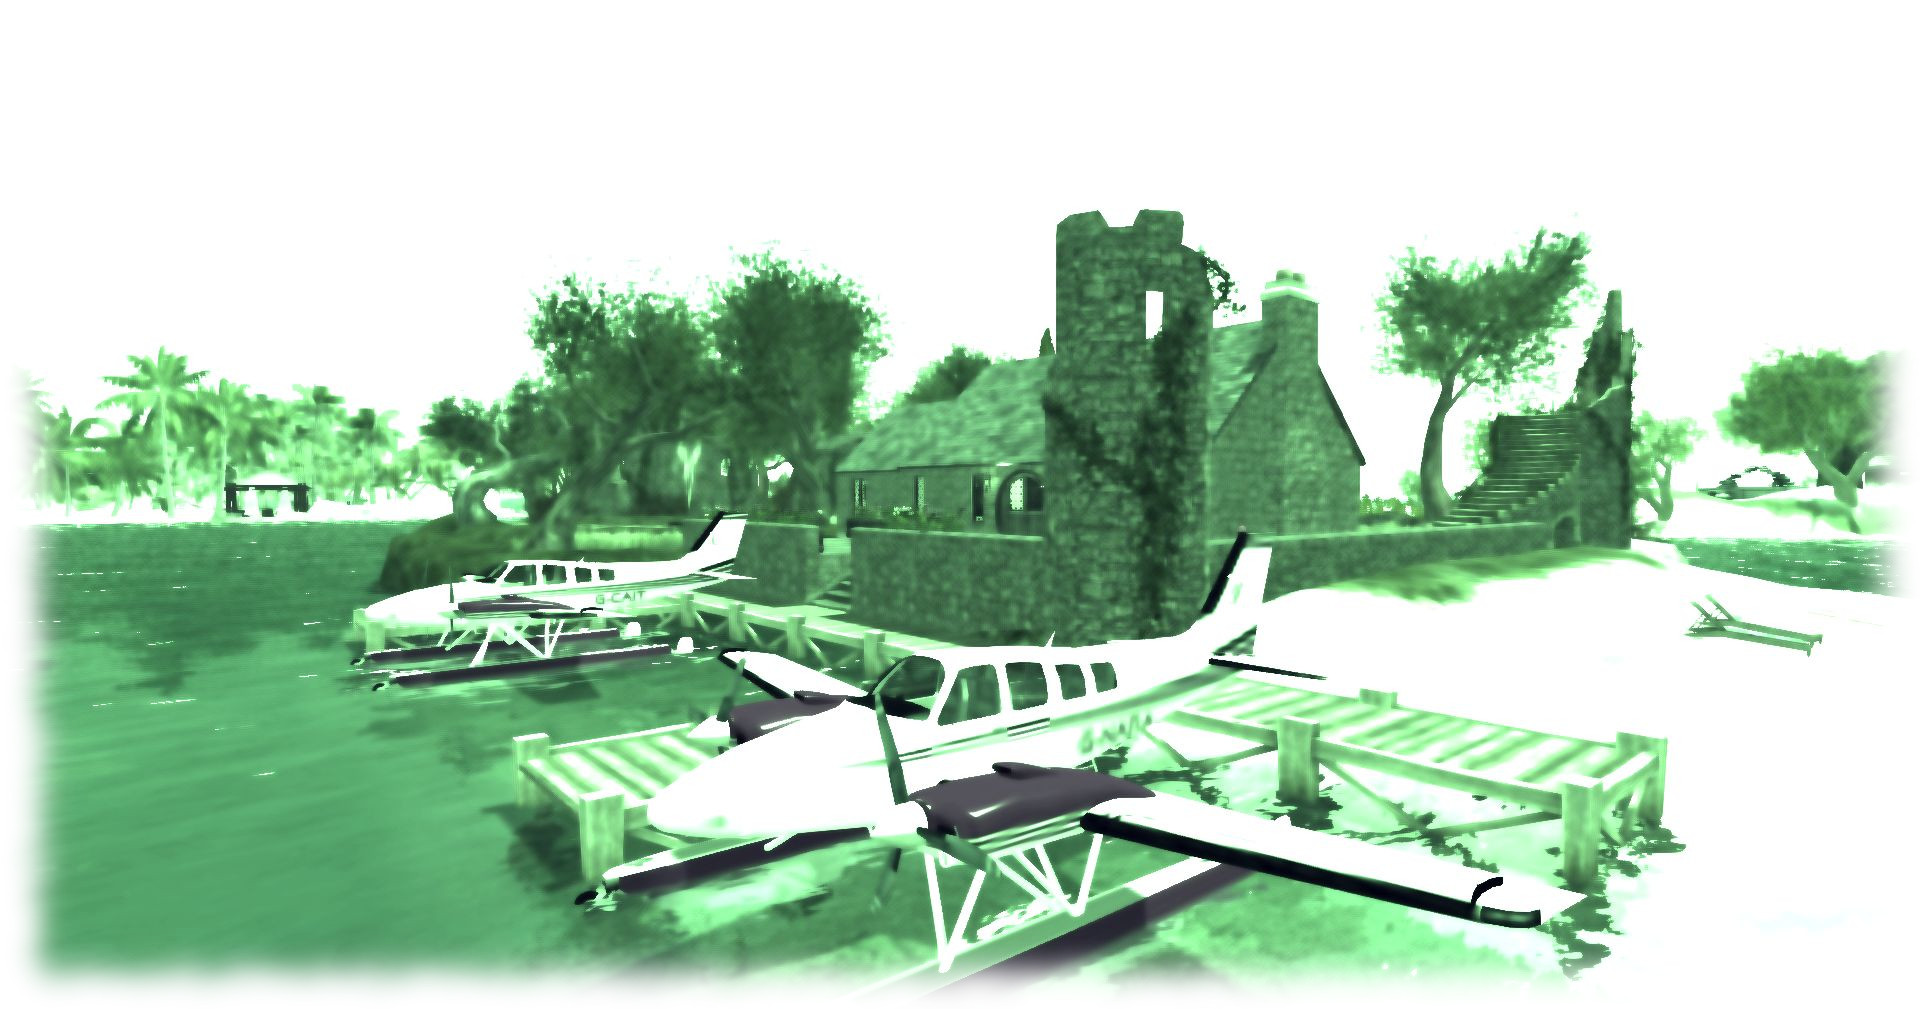
Reshade is a real-time post-process injector allowing you to overlay Second Life with various shader effects, individually or collectively, to produce assorted results, real-time, in both images and video
Back in August 2015, I blogged about Reshade, a post-processing injector for games and video software available for Windows. When installed and associated with a game or application like Second Life, it can be used to overlay the screen with a wide range of shader-based effects. These can them be used in screen captures or when recording machinima, to provide “real-time” visual effects.
Since that time, Reshade has been through a couple of iterations, with version 3.0.3 appearing on October 21st. As I’ve not revisited Reshade since that 2015 article, I thought I’d provide a short overview of installation and general use of this latest version.
A quick and dirty demo video I made with Reshade 1.0, showing how it can be used used in Second Life machinima filming
Installation
Please ensure you’re logged out of Second Life when setting-up ReShade.
Go to the Reshade website and download the installer, double-click to run it.
You will be prompted to select a programme for association with Reshade:
Click Select Game and navigate to the installed folder of the viewer with which you want to use Reshade and click on the viewer EXE file.
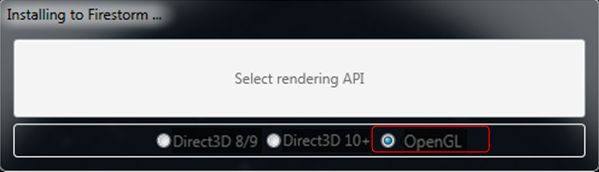
You will be prompted to Select Rendering API:
Click on OpenGL (note this may already appear to be selected – click on it anyway). You will be asked if you want to install the shaders- make sure you do.
The shaders will be downloaded and installed in a folder in your viewer’s installation location on your computer.
The Reshade installer will report Done, and can be closed.
To associate Reshade with any other viewer you have installed on your PC, you will have to follow these instructions again. You do not necessarily have to install the shaders again (although this is easiest) – you can set any additional versions of Reshade to point to shaders already installed.
Using Reshade
Note: the following is not intended to be an exhaustive guide to using Reshade. It is intended to get you started. The best way to gain familiarity with Reshade is to use it; should you need additional assistance, please refer to the Reshade forums. I don’t profess to be an expert in the applications, and will probably not be able to help with detailed technical support!
Reshade is available whenever you launch the viewer with which it has been associated. To access it, press SHIFT-F2. This will display the UI panel which may enter Tutorial mode, if you haven’t saved any presets.
Click the Continue button in the Reshade panel.
The preset selection bar will be highlighted. Click on the + button to the right of it to open the Name bar, and type in anything you like – this will become the name of a preset INI file, which yo can save and then select at a later date, loading all the sahder settings you have established in it.
The available shaders are loaded (and highlighted in red in the tutorial). Read the explanatory text and click continue.
The settings panel is highlighted and briefly explained. Read and click Finish.
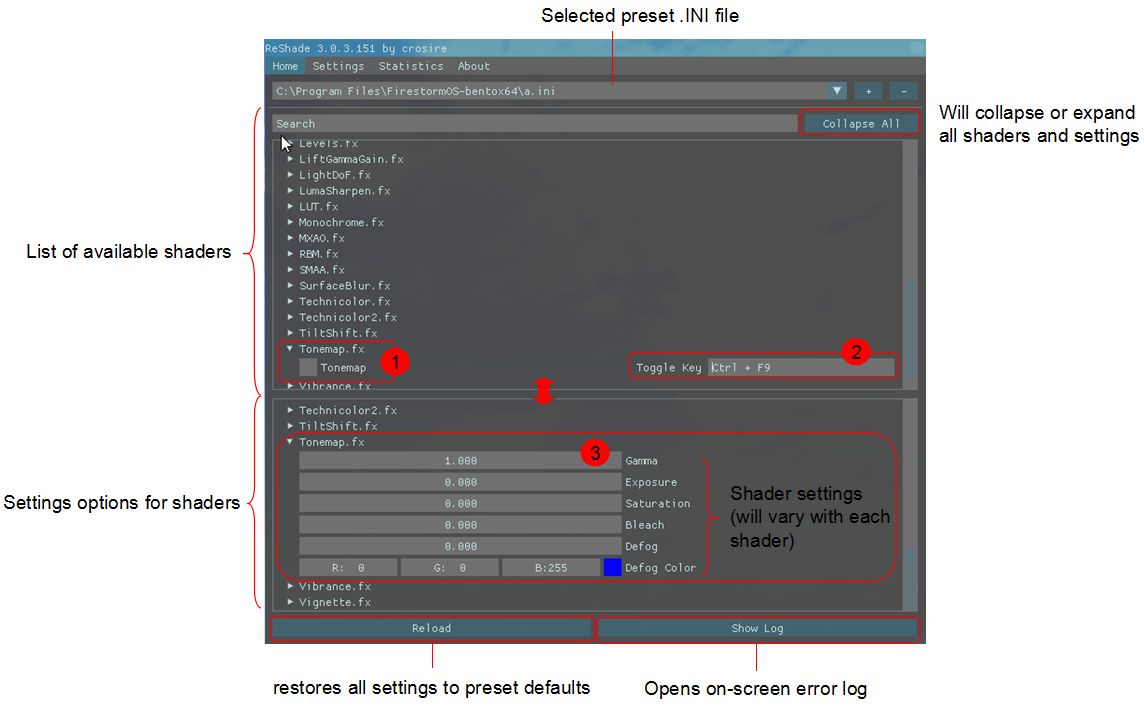
The full Home tab will be displayed.
The Reshade Home tab – click for full size
This comprises 5 sections:
Preset selection area (top), with + (create a new preset INI) and – (delete selected preset INI)
The shader search bar – type in all or part of a shader to display just that shader and its settings options. This also includes the Collapse / Expand toggle for opening / collapsing all shaders in the upper and lower panes of the tab
A scrollable list of available shaders. Clicking on any one of these will open it to display the activation button (1), above, and the hotkey toggle option (2), above – you can type-in any key combination you like here to automatically select the shader.
A scrollable list of settings, by shader (3), above).
The Reload button (reset everything to defaults) and Show error log buttons.
The two main panes in the tab – shader list and settings – can be adjusted by clicking on the divider between them and moving it up or down.
The majority of the notes in this update are taken from the TPV Developer meeting held on Friday, October 21st. The video of that meeting is embedded at the end of this update, and references to it are indicated through the use of time stamps in the paragraphs below. My thanks as always to North for recording and providing it.
Server Deployment Recap
On Tuesday, October 18th, the Main (SLS) channel was updated with the server maintenance package previously deployed to the 3 RC channels, comprising the new Experience Key scripted sitting. Details: Google overview; wiki page.
On Wednesday, October 19th, the three RC channels were all be updated with the same new server maintenance package, comprising internal simulator changes and a fix for (non-public) BUG-37758 “OBJECT_REZZER_KEY returns creator key of root key with all in-world copied objects instead of the agent who copied it.”
SL Viewer Status
[02:35] On Thursday October 20th, the current RC viewers were both updated for parity with the release viewer:
Project Bento RC (avatar skeleton extensions), updated to version 5.0.0.320815
Maintenance RC viewer updated to version 4.1.2.320804
As per my Bento update #31, there are still issues being addressed within that viewer, which some affecting existing content on the grid, which the Lab is gradually addressing.
There is no “release date” for Bento, as with all of the RC viewers, it will remain in the viewer release channel until such time as the Lab feel confident in promoting to release, something dependent on a number of factors (crash rates, remaining issues, other viewers in the release channel, etc). However, the hope is it could reach release status be US Thanksgiving.
So, if you are a mesh avatar / accessories content maker, and you haven’t tested for issues with your content on the Bento viewer (e.g. possible deformations of avatars) – now is the time to install the viewer and test your products and JIRA issues; this is especially true of rigged mesh. If issues aren’t reported, the Lab cannot investigate them.
64-Bit Viewer
[04:46] Work on the 64-bit versions of the viewer is progressing, and they should be appearing “soon”. [11:15] More than half of the required libraries are now built ready for the new build process, out of a total of around 50. When available, the plan remains to offer the viewer on Windows as 32-bit and 64-bit, and on Mac OSX and Linux as 64-bit only.
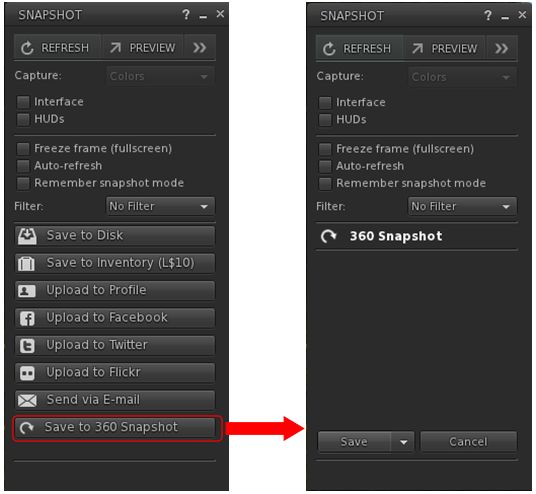
Snapshot Viewer
[06:50] As I’ve previously reported, the Lab is working on a 360-degree photosphere capability built into the viewer. The initial test version of this viewer is progressing and may be appearing in the next week.
The new 360-snapshot option in the test viewer
It works by capturing 6 images (zenith+ 4×90-degree wide images around the horizon + nadir), which are saved to your hard drive as a .ZIP file, together with a JSON file. [23:46] When issued, the viewer will be an extremely “first cut” version which will have flaws in it, but the idea is to get it in front of the community and work with the community to make the capability something useful to everyone.
I’ll have more on this, hopefully in week #43, once I’ve been able to play with it.
The viewer also includes some contributed capabilities, some of which appear to break snapshots under certain conditions – see BUG-40745.
During the TPVD meeting, Oz floated the idea that in order to make Linux support somewhat easier, would be to stop providing an integrated binary, distributed as a TAR file with links to all the required Linux libraries maintained by the Lab directly (some of which are broken or have odd requirements). Instead, the Lab would focus on providing the means to build the viewer specific to one version of Debian Linux, then distribute that package, but not distribute or build all the various dependencies required for the viewer, and instead leave these to TPVs to provide as a part of their Linux platform.
This is seen as beneficial, as it would remove many of the idiosyncrasies involved in building the Linux viewer, and eliminate the overhead of having to build and maintain multiple libraries associated with the viewer, transitioning the build process back towards a more “Debian like” means of providing a basic viewer package.
The downside is, the work would initially require a lot of input and upstream contributions from open-source developers. However, Oz indicated that if sufficient interest is show, the Lab would – other priorities allowing – be willing to work with the viewer community to put such a mechanism for Linux builds in place, providing it doesn’t result in changes with break the Windows or Mac viewer build process or result in a functionally different viewer.
Other Items
Voice Updates
[05:03] The voice updates are awaiting an issue resolution following testing between the Lab and Vivox. These updates will include support for a new codec, includes better error handling and addresses some of the more serious Voice exploits to make it “much, much” harder for Voice to be abused. The latter is seen as a “step on the path” to a larger solution for Voice exploit issues.
Inventory UI
[08:00] The Lab is interested in receiving recommendations on how to improve the inventory UI in the viewer. However, such recommendations should be “well-considered and carefully described”, and which should preferably include implementations of the ideas stated in the recommendation, or at least screen shots (captured using the official viewer) and clear descriptions of the recommendation.
Such ideas may then be included in the upcoming round of work the Lab is planning with regards to eliminating more of the common inventory problems people can experience, and make inventory handling more robust. As such, ideas that are simply cosmetic in nature (e.g. ideas for different inventory icons, etc.), are unlikely to be seen as high priority.
Viewer Code Clean-Up
[25:02] An under-the-hood project with the viewer is to clean-up a lot of the code. Some of this work in the current Maintenance viewer, with further work still being carried out. Among other things, it is hoped that these changes will reduce things like shut-down crashes and other issues, as the are released into the viewer.
General Chit-Chat
[29:58-end] There is a general discussion session covering assorted topics, including:
The fix so that people banned from a group are booted from an active group chat, although ejecting them from the group will not kick them from any active group chat; so ejecting then banning can fail, although the Lab will likely examine this
The windows version detection issue and Intel HD2000 and HD3000 graphics, which can cause severe issues for users. This is apparently an Intel OpenGL implementation failing to recognise Win 10, but one solution the Lab is considering is have the 32-bit version of their Windows viewer won’t opt-in to the Win 10 features, and thus avoid the issue for 32-bit users.
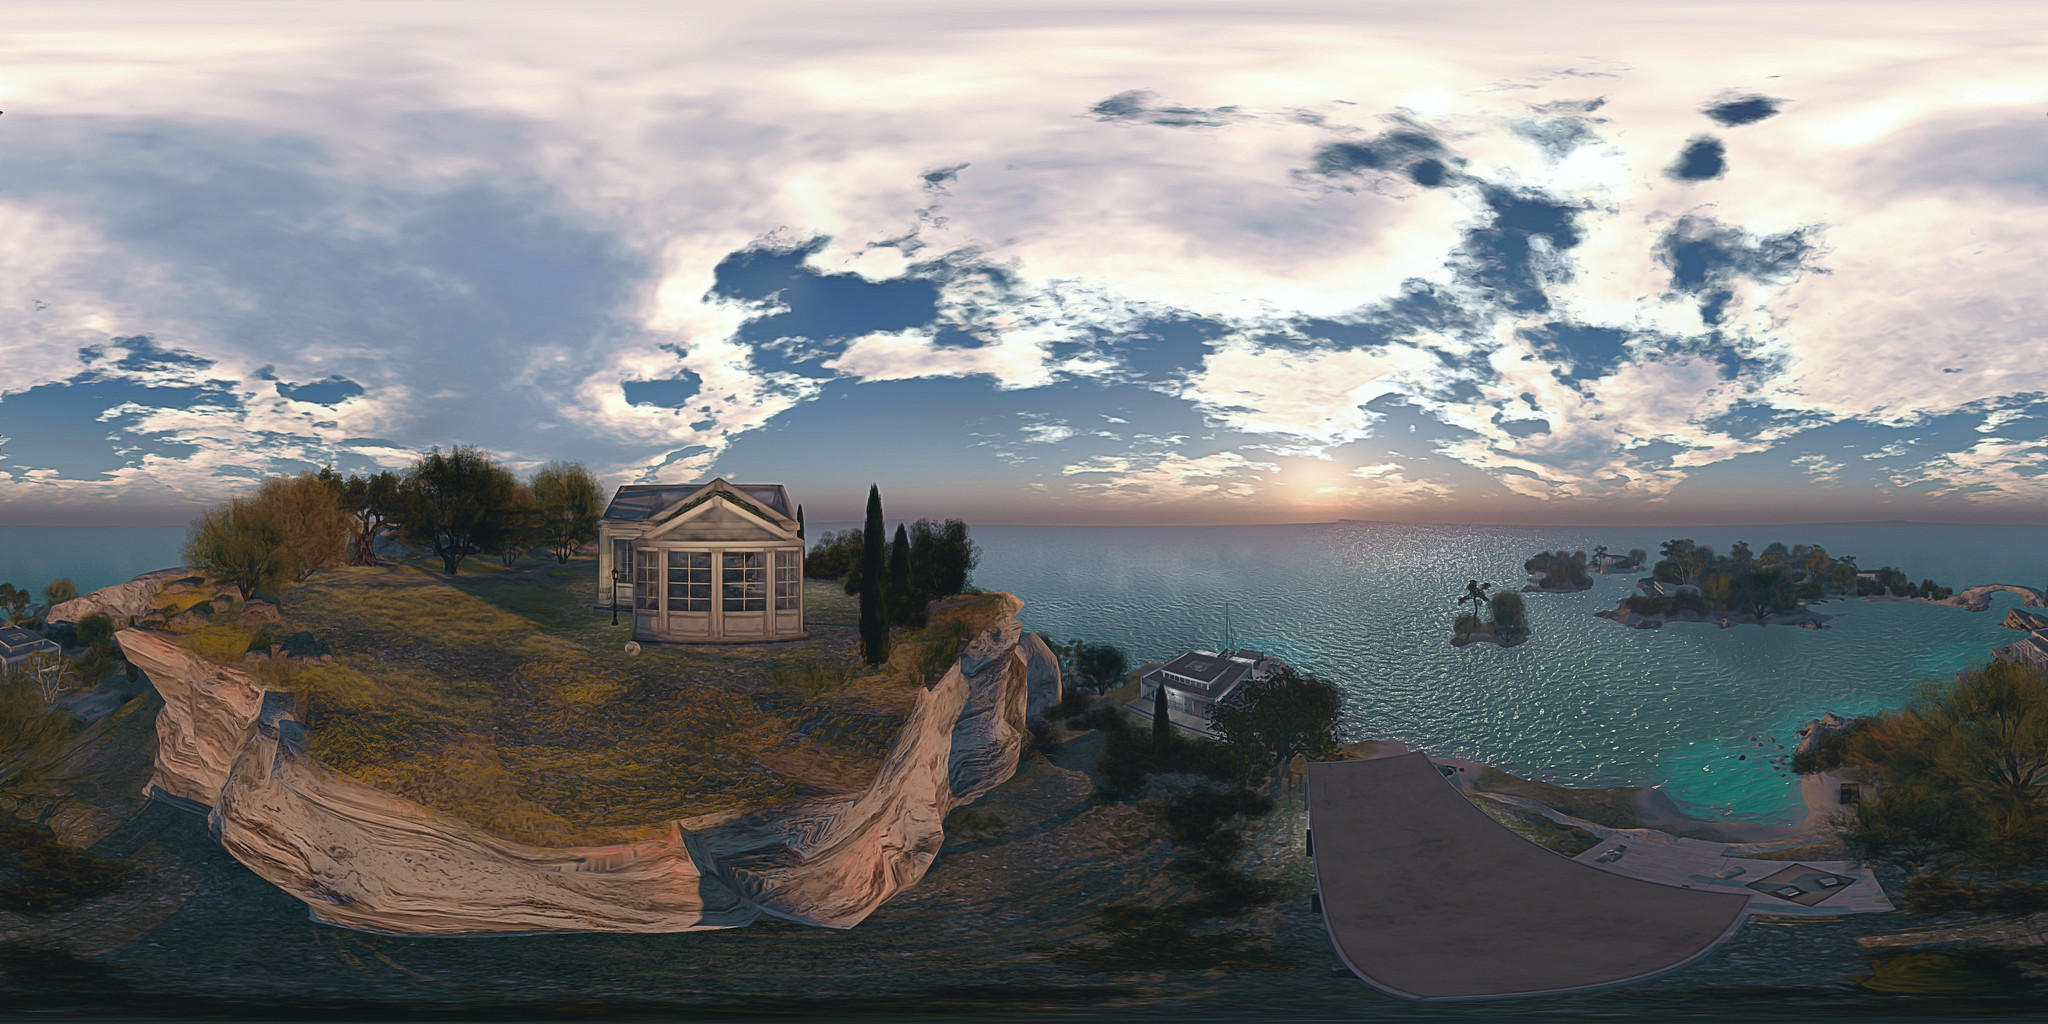
Summers Wind – 360 image, click to open and scroll
The summer wind, came blowin’ in from across the sea
It lingered there to touch your hair and walk with me
All summer long we sang a song and then we strolled that golden sand
Two sweethearts and the summer wind.
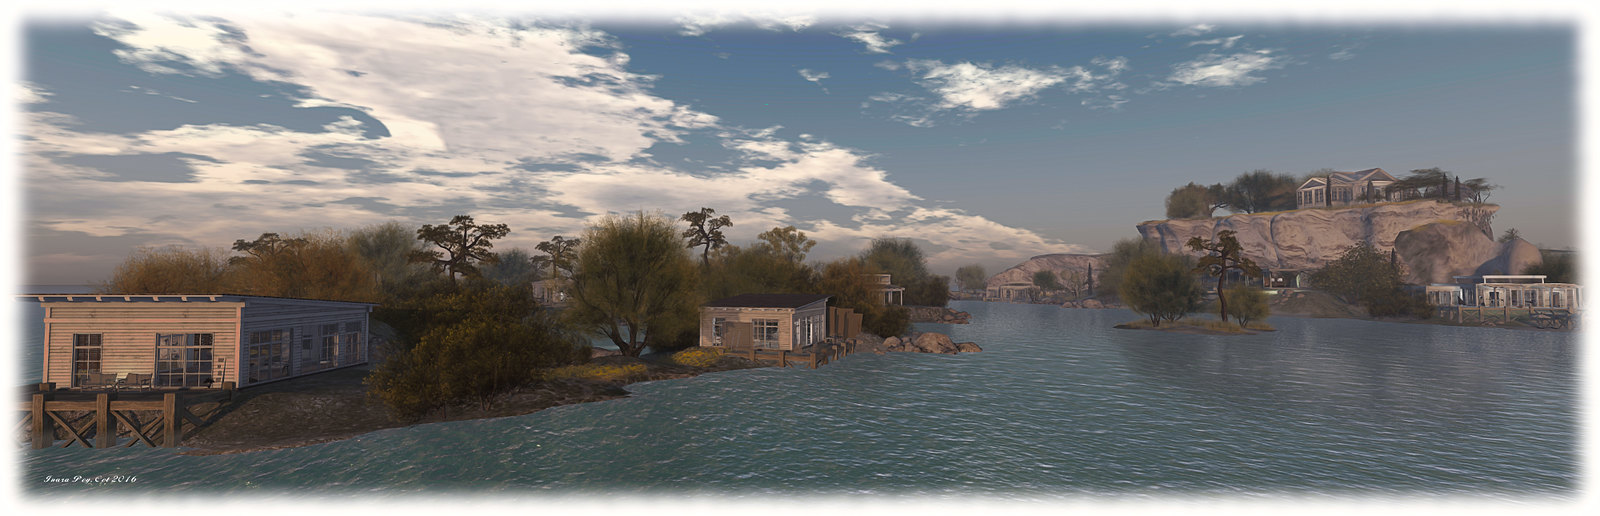
So open the lyrics to Summer Wind, Johnny Mercer’s 1965 re-working of the lyrics from German Der Sommerwind by Hans Bradtke (music by Heinz Meier). It’s a song perhaps most associated with Frank Sinatra, and I mention them because the song popped into my head as Caitlyn and I explored the sister regions of Summers Wind and Winters Wind – and the more I thought about it, the more appropriate the song seemed to fit the regions.
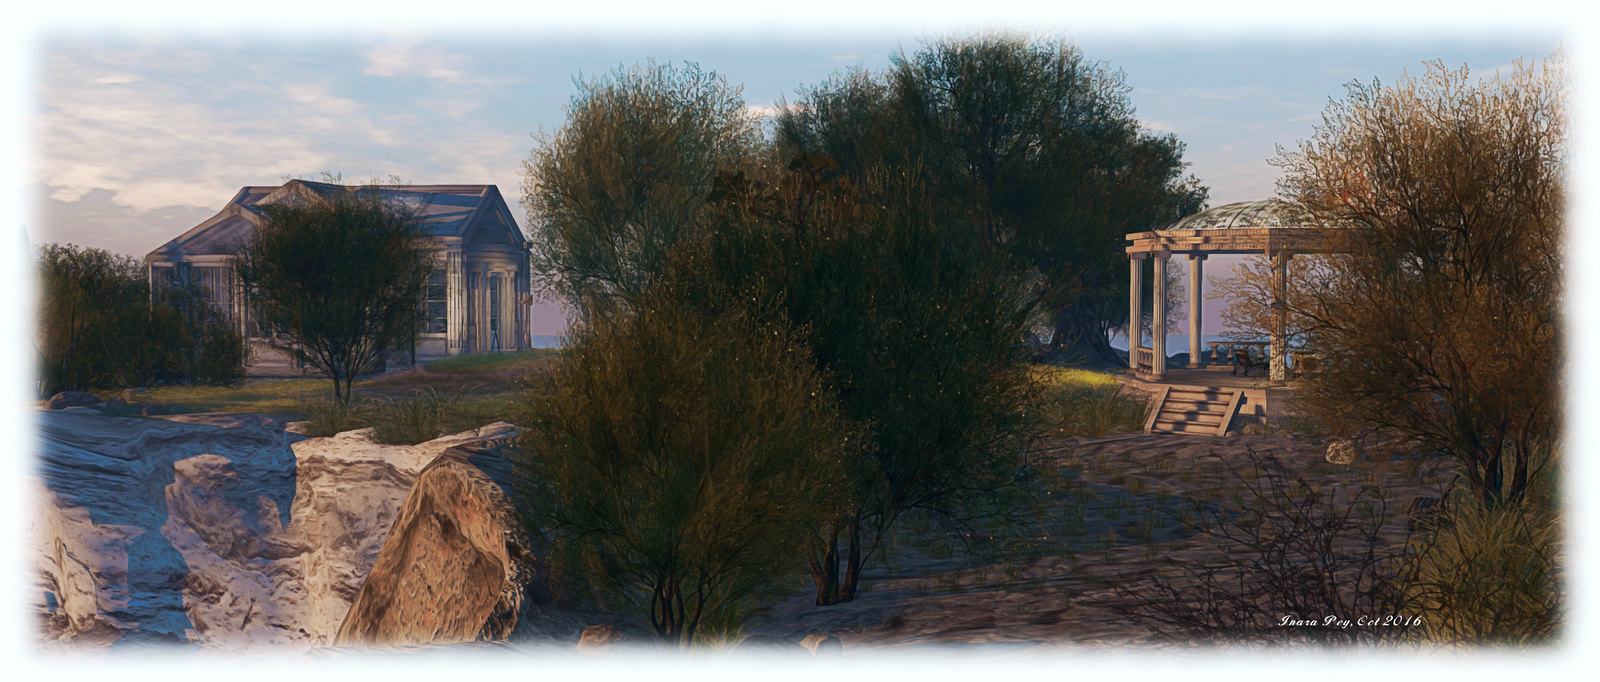
Both of these regions – a full sim and a homestead respectively – have been designed by Mexi Lane, of MIC- Imagin@rium art region fame, together with mesh specialists. MIC- Imagin@rium may have passed into history, but the influences of Mexi’s Greco-Roman design there are clearly evidenced in Summer Wind, which offers a mix of public, residential and commercial facilities in what can only be described as a stunning landscape, beautifully and imaginatively put together to present a location which is quite unique among Second Life regions.
The landing point is located towards the centre of the region, nestled between the vertical shoulders of huge, grass-topped mesas, the ground feeling like narrow canyons running between them. A well is close to hand, as is a bicycle rack for those who fancy riding through the region – although using your pedal extremities for walking is by far the best way to find your way around; bikes and stairs often don’t mix!
Those familiar with MIC- Imagin@rium will immediately feel a sense of familiarity here: the windlight offers a similar just-before-dusk setting Sun, the rocks and vegetation all have a faintly familiar feel, while a quick glance down along the canyons will reveal hints of Greco-Roman architecture marking the fronts of commercial premises hewn out of the huge bulk of the mesas. For a more direct homage, see the name of the conference centre sitting atop one of the mesas.
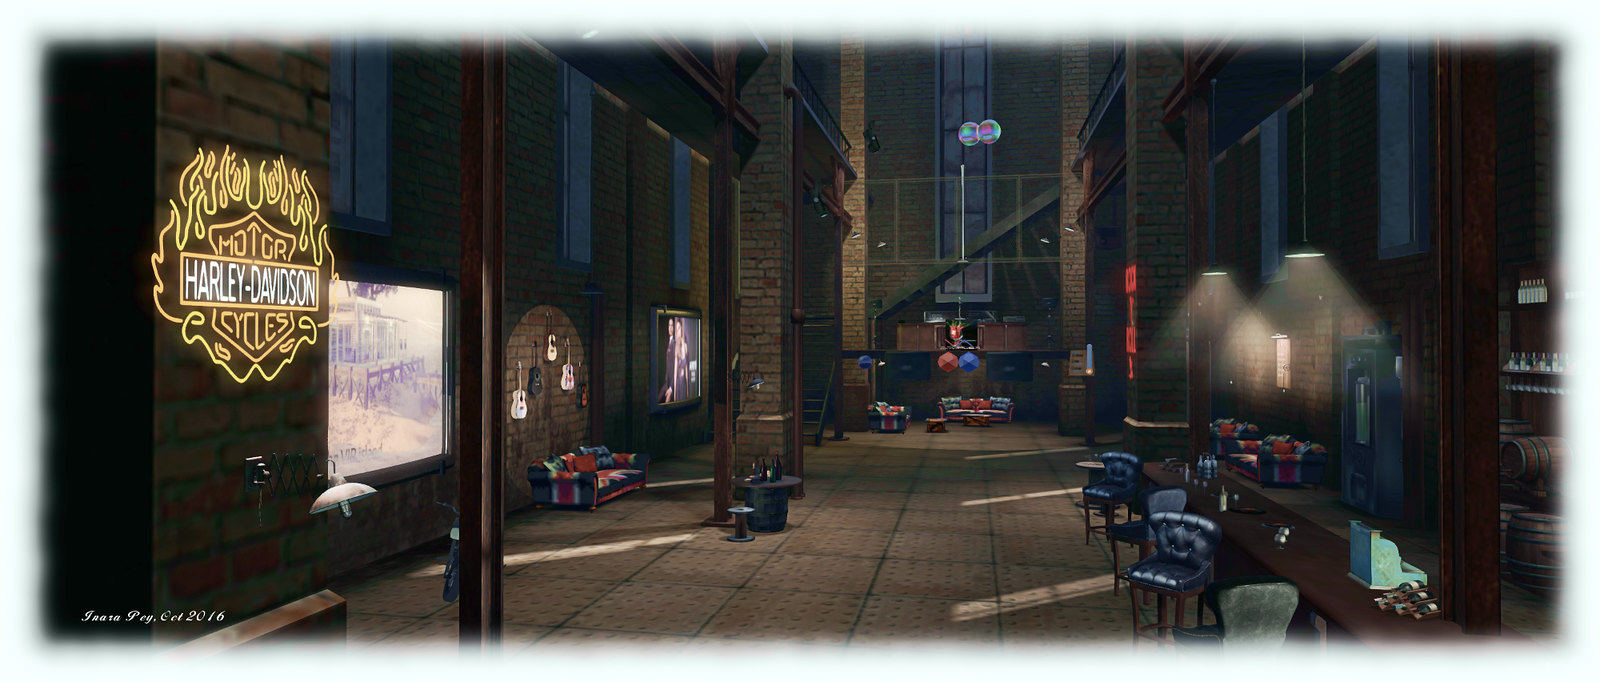
Close to the landing point is the entrance to the Peperonico Club: a narrow tunnel mouth which gives little away as to what lay within; the rocks of the mesa have been beautifully custom-made to surround the steampunk factory by Hattie Panacek (Hatris Panacek), its interior made into a very cosy club in which Caitlyn and I felt completely at home, thanks to the roaring fireplace on the upper mezzanine, and the ample use of the Union flag in the design :).
Tunnels, steps and paths are the secret to finding your way around Summers Wind. Ground level paths wind between the tall cliffs and eventually to the low-lying coastal areas with shingle beaches, grassy paths and rich foliage. Private residences occupy the western curve of the region, facing out to sea and screened from the public paths by trees and bushes. To the east, at the foot of the cliffs lie more caves and places to relax, including a waterfall-fed spa in a broad cavern.
More residences lie to the north – so take care to avoid encroaching on privacy there as well, where a stone bridge leading to Winters Wind can be found. This forms a spur of land curving northwards to cup the waters of a bay, with smaller islands sitting just off of it. Houses and cabins are scattered among the tress and on the sands, when a single footpath through the middle and the arc of a beach offering the only public areas here.
The beauty of Summer Wind lies in the almost entirely custom nature of the landscape: the cliffs and mesas, with their steps and arches, tunnels and grassy footpaths, have been specifically designed to fit the region. The result is a place that is both unique to Second Life, yet delightfully Mediterranean in look and feel; a place which might be found on a remote part of the Spanish or Italian coast, or equally somewhere on the Aegean coastal regions. The design means there is plenty to see, so if you tire of walking, keep an eye out for the teleport network of urns lying half-buried in the ground to whisk you around.
And the link to Mercer’s song? Well, that comes not only from the strong Italian flavour in the design of Summers Wind and Winters Wind, but also because the original Der Sommerwind was a song about the changing seasons, using the Sirocco wind of the Mediterranean as a metaphor; so using the song as a metaphor for the beauty of these regions seems entirely appropriate.
The following notes and audio were taken from the weekly Bento User Group meeting, held on Thursday, October 20th at 13:00 SLT at the the Hippotropolis Campfire Circle. and chaired by Vir Linden. For details on the meeting agenda, please refer to the Bento User Group wiki page.
Note that this update is not intended to offer a full transcript of the meeting, nor does it present the discussion points in chronological order. Rather, it represents the core points of discussion, grouped together by subject matter were relevant / possible, whilst maintaining the overall context of the meeting.
Bento Viewer Status
The 4th iteration of the Bento RC viewer appeared on Thursday, October 20th, ahead of the meeting. Version 5.0.0.320815 is primarily an update to keep the viewer on a par with the release viewer code (VLC Media plug-in for Windows), although it does include a rendering bug fix.
The fix including in the new RC version is for some existing Haste Coy assets, which were reported on BUG-40672 (the deformed werewolf issue noted in my previous Bento update).
There has been no decision on what to do about the werewolf deformation issue itself (the result of a change in viewer behaviour – see my previous update, linked to above). It’s not clear how widespread this issue is – at the moment it appears to be somewhat limited. The problem here is whether the viewer behaviour is maintained for Bento or rolled back to how it was, it will mean some content will have to be re-worked and re-uploaded. Thus, a deciding factor for the Lab in determining what to do will be discovering exactly how much existing content is actually impacted.
The focus is now on bug fixing with the viewer. There is no date being considered for promoting Bento to release status; as previously indications, this will depend on bugs and fixes, the viewer’s crash rate, and the relative priority it has when compared with other viewers in the release channel (there being only one at the time from writing).
Reported Issues
Scale Locking Bug
A bug was reported just prior to the previous Bento meeting about an issue with the new scale locking capability. This allows creators to disable shape sliders from having any influence over joint positions when uploading their models. However, it had been reported as working intermittently, Vir has developed a fix for this issue, but it will not be available until the next RC update for the viewer.
Skin Weight Viewer Crash
BUG-40725 reports that checking the Skin Weights option when previewing joint positions will crash the viewer (Bento RC 5.0.0.320160). This has yet to be investigated. This is actually one of two places where skin weights can be checked, the other being in the upload option, so the preview doesn’t have to be used. However, the Lab will be looking into the issue.
Feet Resizing
There was some confusion as to whether feet on models could be resized or not using the sliders. It appears that they can, providing the model is rigged to the L_FOOT and R_FOOT collision volumes for the feet.
MayaStar
Cathy Foil reports that MayaStar has been updated completely to Bento. Those using it should rez their update Checker to get the latest version. Report are that it handles sliders really well. This represents the culmination of several long months of work for Cathy in updating her product to be fully Bento compliant – congratulations to her!
Following my reviews of the Illiastra Panoramic HUD and the Camera Panoramic system (see links below), I was handed a further HUD system to look at.
The VR Creations 360o Photosphere HUD is a system that does exactly what it says on the packet: produces a set of images (26 in all) suitable for stitching together into a 360o spherical images suitable for uploading to the likes of Facebook, VRchive and Flickr. It falls between the Camera Panoramic and the Illiastra HUD in price, and is quite possibly the easiest of the three to use to take a set of shots.
The system comes in a basic package of the HUD, sufficient notes to get you going, and a link to a video overview.
The HUD
The VR Photosphere HUD comprises ten buttons, as shown below, with the key buttons highlighted.
The VR Creations 360 Photosphere HUD
The HUD cannot be minimised, but can be positioned off to one side or the other of the screen to keep it out-of-the-way.
Of particular note with the HUD is the top set of six buttons, which are related to positioning your camera to capture images. You can effectively position your camera anywhere you like using ALT-zoom or flycamming, and use the Add button to save the camera’s location as the centre of your sphere of photographs.This also allows you to take “seflies” through careful positioning of the camera close to you.
Saved camera positions can then be paged through using the left and right arrow buttons either side of the Release Camera button – so if you return to a location and wish to re-capture a set of images, you can do so easily, while the Delete button will delete the current camera position from the HUD.
Taking Your Shots
This is very much a point-and-shoot HUD system, requiring minimal set-up. However, prior to taking your shots, there are some things you need to do:
Set your preferred windlight and daytime settings.
Make sure you freeze the clouds – you’ll be taking up to 26 images which will need to be stitched together, and moving clouds could make that a bit of a bugger to do. Use Menu > World > Environment Editor >Sky Presets > Edit Presets or PhotoTools > Clouds and check the scroll lock check boxes
Make sure the viewer’s camera is set to the default view angle, FOV and focal length.
Once you’ve done this:
Position your camera at the centre point for your image capture – remember, you will be capturing 26 images in a sphere around this point, so you should have the camera view set to about a couple of metres off the ground.
Click Add on the HUD to set the camera position.
Press Esc on your keyboard to set your camera under HUD control.
Click on Begin Photosphere. Your camera will move to the nadir (lowest point) of the image set (generally pointing at the ground) ready for you to start capturing frames.
Press CTRL-~ (tilde), the snapshot shortcut, on your keyboard. You will be prompted for a location where you wish to save your first image. Select the folder and give a file name for the image.
Click the right arrow next to Done on the HUD to advance the camera to the next frame. Press CTRL-~ to save this shot automatically to the same location as the first.
Continue on round the photo a frame at a time using the right arrow button at the bottom of the HUD, saving each shot in turn via CTRL-~.
When you have captured all 26 frames, the camera will once more be pointing to the nadir point (generally the ground). Click Done to return the camera to the start position.
If you are satisfied with your frame captures, click Release Camera on the HUD to free the camera back to default control.
Producing your Image
Once you have taken your shots in-world, you need to “stitch” them together to produce your final image. There are several software tools you can use for this. My preferred choice is the Hugin Panorama Stitcher available through Sourceforge.net, as I’ve found it to be fast and efficient.
With Hugin installed and launched, proceed as follows:
In the Assistant tab, click on Load Images… Navigate to where your images are locally saved and select all 26 in the set, then click Open.
Loading and aligning your images in Hugin
The Camera and Lens Data dialogue box is displayed. Enter 90 in the HFOV field and click OK. You images will load in the editing panel.
Once your images are loaded, use the Align button to arrange them. This may take a few minutes, just keep an eye on the processing window that opens.
When Align has completed, click on the Move/Drag tab and click Straighten. If your shots are displayed upside down, enter 180 in the Roll text box and click Apply to flick them the right way up.
Straighten and correct an inverted image (if required)
Click on the Crop tab in Hugin and adjust the values to ensure your entire images is selected – set Left and Top to 0; Right and Bottom to 9999 – note the latter two will snap to the maximum size of your image.
Click on the Assistant tab once more and click Create Panorama. A dialogue box will open:
Set the image format to JPG and set the quality to 100%
Click OK to run the output process.
You’ll be asked to give a file name for the Hugin .PTO batch process file and the rendered image file. Enter a name for both, confirming each in turn.
Image processing will start, and could take several minutes.
Once completed, you’ll have an image ready to upload to Facebook, VRchive, Flickr, etc.
Do be aware that Hugin can be sensitive in handling images, particularly those with poor contrast / brightness, or which feature a lot of water, and this can lead to problems during the alignment process or in production of the finished image.
 Join Caledonia Skytower as she reads selections from Neil Gaiman’s 2009 Newbery Medal winning children’s fantasy novel, simultaneously published in Britain and America during 2008, which also collected the annual Hugo Award for Best Novel from the World Science Fiction Convention and the Locus Award for Best Young Adult Book selected by Locus magazine subscribers.
 Gyro Muggins opens the covers of Michael Moorcock’s 1982 supernatural novel.