Sansar: recent updates and the Sansar Training Grounds

The revamped Sansar log-in screen shares the same image with the installer and updater, giving a more cohesive look to the product

It’s been a while since I poked my head into Sansar; I’ve been watching the events page to see what is going on and the COMETS – users engaged on the platform – have been doing a sterling job in trying to provide a nucleus of a community and running events among themselves. Product Meetings have been few – two since Wookey took over things, one of which I could attend, and one since then; hopefully more will come along as the Wookey Team settle in to remote working – something that was still being set-up at the meeting I did made.

However, a comment passed at the meeting I did make has come to pass: as of June, Monstercat, the Canadian electronic dance music (EDM) is back to running events in Sansar, with their Call of the Wild events now scheduled on a weekly basis. It’ll be interesting to see how these pick up again; prior to the hiatus, they were (on a, I believe, monthly basis) generating around 1,300-1,500 “interested” responses.

May and June have seen a couple of platform updates – release notes here and here. Both offer continuing support for events, with the most recent also featuring a revamped Nexus and updates to the user on-boarding process. Other updates among the recent pair of of releases include new events-oriented templates creators can use for their own events, ability for world owners to mute all voice users in their environments, additional shaders and bug fixes, but I’ll be focusing here on the Nexus and on-boarding.

The Nexus Reloaded

The Nexus has received a significant overhaul whilst also retaining much of its look and feel. Major changes lay in the removal of Agent Prime and any hint of Sansar Quests (although Agent Forma remains in club Forma (she’ll just politely tell you to bugger off when touched).

The Updated Nexus

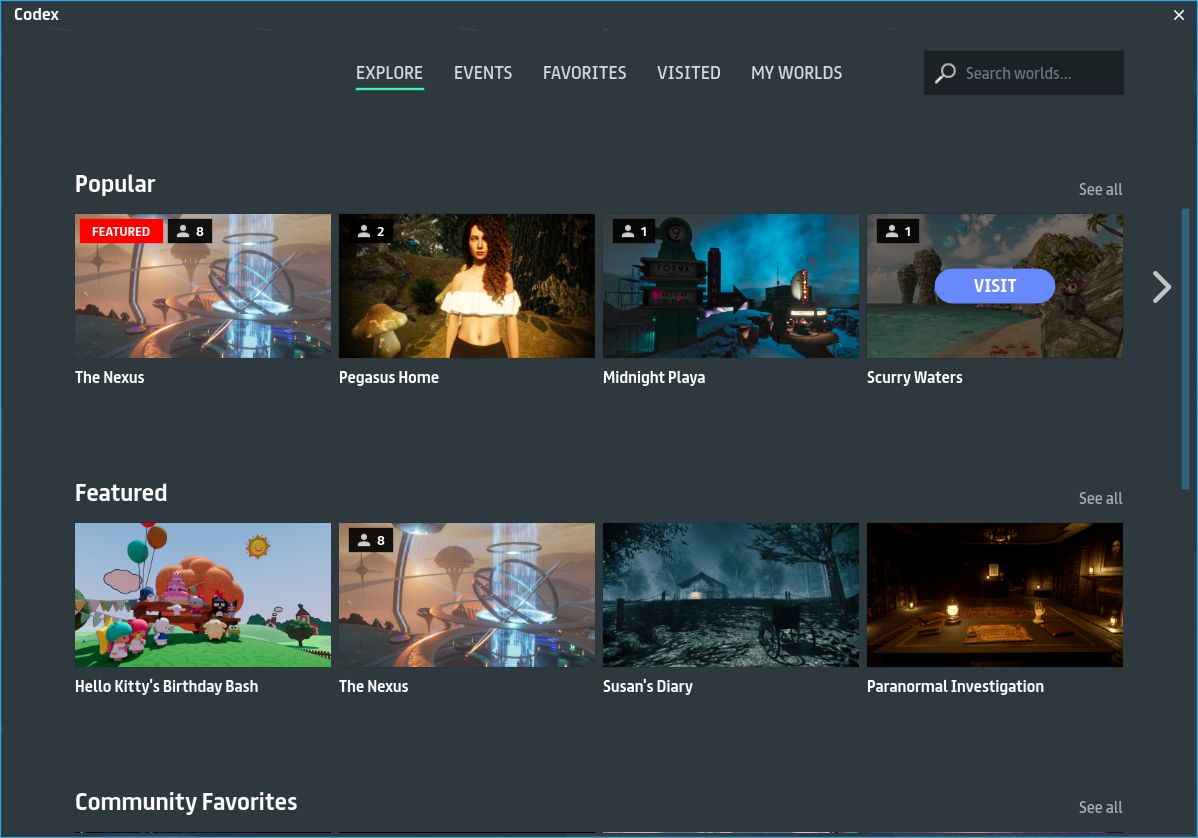
The Prime Portal central area remains, again with a new look, while the portal itself is gone, as is the lounge area above it. Replacing the Prime Portal is a new event-focused portal that leads to the currently-promoted major event or, if the event is not currently live, provides the option for people to register their interest in attending and to have it added to their calendar. At the time of my visit, this was promoting the Lost Horizon event Sansar is hosting with Glastonbury Shangri-La (read more about this in Glastonbury comes to Sansar for 2020).

Searchlights swing back and forth from the central portal area to illuminate the four major portals  around the outer walkway. These remain pretty much as before: Monstercat, Sanrio World (Hello Kitty) and a link to open the Popular Places section of the Codex (if you’re a Second Life user, Codex = Destination Guide with added functionality), with the forth offering a teaser for Bootshaus (which might be some kind of virtual tie-in with Bootshaus.tv?).

To further encourage general exploration, the Nexus now features an outer “portal wall”. This features a ring of portals leading to the more popular user-created Sansar Experiences. I’m unclear as to how worlds are selected for these portals – I assume there is a process in place – or how / when the destinations to which they point might be refreshed.

The revamped Nexus offers more portals to user-created worlds

On-Boarding Process

The revamped on-boarding process is stills 4-step affair: download the client, create and account and verify e-mail, select an avatar, get dropped into the Nexus. With a notable exception, the majority of the changes in the latest release appear to be cosmetic: the installer, updater and log-in screen all now share the same graphic that appears to have been largely inspired by the cinematic version of Ready Player One.

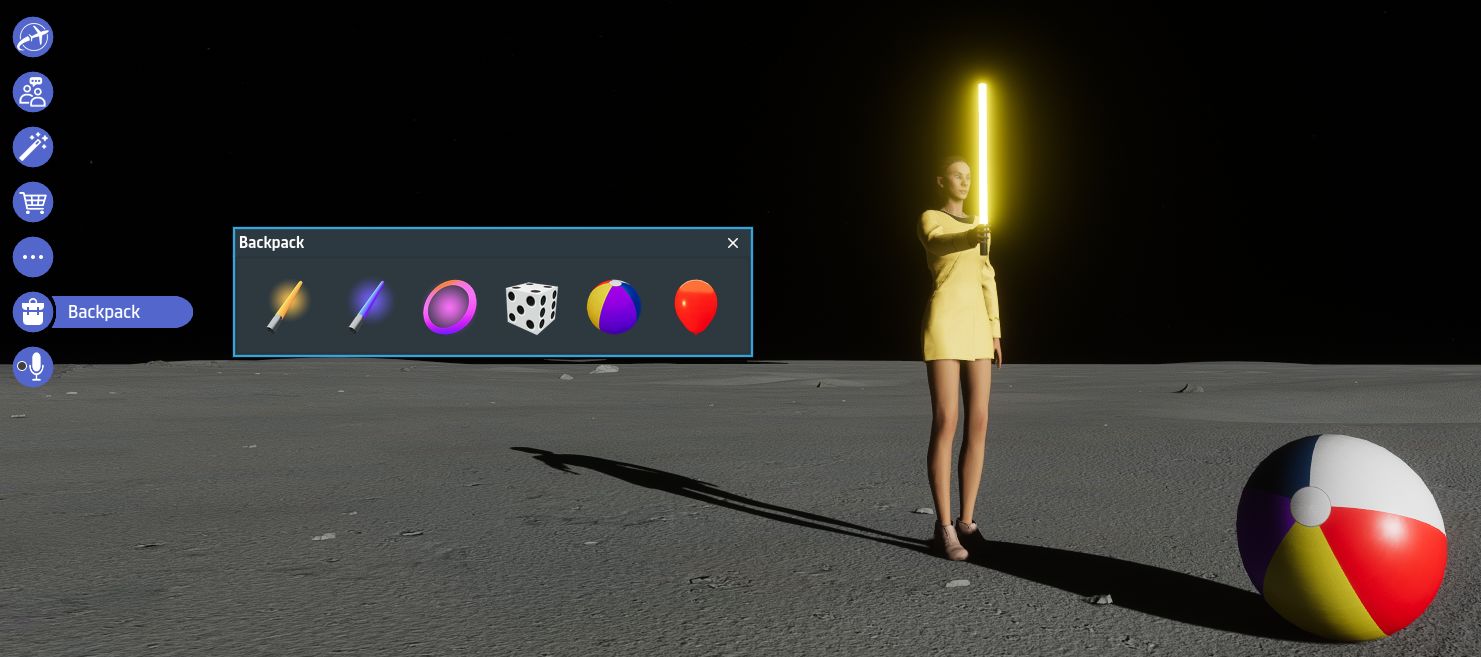
That exception is the avatar carousel, which sees a new set of seven avatars for new users. Unsurprisingly, the focus is on human avatars with three male and three female in casual / clubbing garb. They are rounded-out by one non-human (but humanoid) robot. I’ve no idea if these are purely Sansar Studios created avatars or if some have been selected from the work of creators (as has been the case in the past).

Four of the seven new starter avatars. Inall there are three male and three female avatars, plus the humanoid robot seen above

Additionally, it would appear that the “getting started” pop-ups have been overhauled to look a little brighter. These are again minimal; all I’ve encountered is how to move and how to emote (play animations) – which is fine for getting around and bopping on a dance floor – but what about things like text chat for those who don’t have a microphone (the latter is at least intuitive, having its own UI button)?

And how about at least giving new users a clear hint that they have a home space? If nothing else, a pointer to the latter might pique the curiosity of some coming into Sansar for an event and get them to come back and have a look at what it is, and so help kick-start them into wider exploration.

New User Experience – Digital University

While not an official undertaking by the Sansar team, when it comes to user on-boarding, the Sansar Training Grounds 101, created by experienced Sansar User ZeroCheese for the Digital University, does offer a more rounded opportunity for new users to more fully get to grips with the client.

Available through the Codex and (currently) featured at the Nexus, this experience offers a guided walk-through of core aspects of using Sansar – movement, manipulating objects, sitting, using emotes (animations) – which includes an introduction to the idea of using the Sansar Store, using voice and text chat, and using the UI. True, not absolutely everything is shown – but frankly, it doesn’t need to be; what is there is sufficient to allow a new user to get on in Sansar, with the rest open to being learned / discovered in time.

Sansar Training Grounds 101

This latter aspect of gaining familiarity with a platform over time is something that often gets overlooked in discussions about the “new user experience”. All too often it seems people get too caught-up in believing everything must be laid before the new user – regardless of the fact that it likely took them weeks or months to understand all that they now want to push onto the new user in a single serving. That it might actually make things harder for said user, and add to the belief that a platform has a “steep” initial learning curve, is often overlooked.

As it is, Training Ground does a pretty good job of covering the vital basics whilst also pointing the way for the user to poke at the client UI and discover / learn about it on their own. One or two aspects could perhaps be a little better: the initial walk training seems excessive, whilst the need to land fruit in the basket is required in order for the next lesson to be reached could be better emphasised. However, what is provided is more than enough to allow a novice user to be able to  more fully enjoy Sansar. If only it were more front-and-centre at the Nexus to encourage interested new users to give it a go.

General Observations

The new look Nexus does what it says on the tin – and by offering more in the way of portals to experiences, it appears to have overcome something of the past critique that it was too much of a bottleneck that stopped incoming users filtering through to other locations on the platform. Certainly, during all of my most recent visits over the last few days, the number of avatars within the Nexus have been nowhere near as lose as they were in the back-end of 2019.

The new avatars are, I would suspect, bland when it comes to those familiar with platforms like Second Life. However, they do fulfil the need to offer events-oriented avatars to incoming attendees, and this should be borne in mind. Hopefully, more will be added to the mix; seven is a very small number, and were an event like Lost Horizon to generate a lot of interest and engagement from newcomers, then leaving the choice of avatar to just those seven could lead to such an event looking something like a clone fest.

Overall use of Sansar currently appears to remain somewhat below pre-sales levels with most activity being driven by the COMETS, as noted above. It’ll be interesting to see how much impact on peak levels of activity the renewed Monstercat events have, and what the upcoming Lost Horizon event does for Sansar’s visibility.

Sansar R39 release overview

Sansar: Hollywood Art Museum

On Tuesday, February 4th, Linden Lab deployed the Sansar R39 release, entitled “Sweet Emote-tions”. It’s again something of a comparatively small update. Key updates within it that are covered in this article comprise:

  • New emotes system.
  • Instance picker.
  • New avatars.

As always, please refer to the formal release notes for full details of all the updates in R39, notably fixes with the release.

New Emotes System

The first pass of the emotes system sees the old system completely replaced, with the ability to use short-cut keys to trigger assigned emotes and obtain and assign emotes to short cut keys without having to go to the Look Book.

Emotes are now access via the Emote button in the client or by pressing CTRL-E (as before). This opens a new, compact menu that lists the default emotes and the keys (1-0 of the number row keys) they have been assigned to.

  • To activate an emote, left-click on its name in the menu or press the assigned number key (e.g. 1 for “wave”).
  • To deactivate a playing emote, either left click the emote name on the menu or move your avatar.

To obtain an emote from the store:

  • Open the Emotes menu.
  • Click the shopping cart in the top right of the Emotes menu.
  • The Store panel will open with the Emotes category selected by default.
  • Refine your search as required using the drop-downs (gender and order).
  • Make a purchase of an emote.
  • The emote is added to your menu and flagged as New, and is ready for use.
The emotes menu and shopping cart button for obtaining further emotes from the Sansar Store

To assign an emote to a short cut key (1-0 on the number row):

  • Open the Emotes menu.
  • Highlight the emote you wish to assign to a key.
  • Hover the mouse over the emote to which to assign to a short-cut key.
    • If the emote is not already assigned to a key, the Assign Shortcut button is displayed.
    • If the emote is already assigned to a short-cut key, hover the mouse of the number button, which will toggle to the Assign Shortcut button.
    • In either case, click on Assign Shortcut.
  • The display will switch to display a list of short cut numbers and the emotes currently assigned to them, or will be labelled “Unassigned”.
  • Click on the number to which you want to assign your selected emote.
    • The menu will update so the selected emote is displayed with its selected short-cut, and end emote previously assigned to the short-cut key will appear at the bottom of the menu.
Assigning emotes to short cut keys

Instance Picker

Where there is more than one instance of a world or event running, users can now see available instances and visit the instance of their choice (subject to avatar capacity. In addition, user can:

  • See a list of all available instances of a world.
  • Copy a link or drop a portal to a specific instance.

New Player Avatars

A new line of electronic dance music (EDM) inspired avatars have been added to the new player avatar carousel. These have been developed by by the Sansar studio team and by selected Sansar creators.

The updated Sansar starter avatars

Backpack Updates

The Backpack functionality has been updated:

  • Sound effects volumes have been reduced
  • Physics properties of some props have been improved so they behave more like their physical world counterparts.
  • Grab point locations on the backpack objects have been improved to fit into hands better

Feedback

A modest update, but one again steered towards live events – the new starter avatars are biased to “EDM looks”, while the new emote system (for now) is dance-heavy, with the original sit animations now gone from it.

The Sansar team have already indicated the instance picker will be enhanced in future updates, but the functionality here does exactly what it says on the tin – although it is hard to test as there are not that many Sansar worlds that require more than one instance at any given time.

Other than that, not a lot to report, having only spent limited time using the update and in Sansar.

Sansar R38 release overview

A Victorian Christmas

On Tuesday, December 10th, Linden Lab deployed the Sansar R38 release, entitled “Rediscover the Party” release. It’s again something of a comparatively small update, but brings with it changes that have been requested by users and creators.

Key updates with this release that are covered in this article comprise:

  • Changes on logging-in.
  • Codex improvements to help world discovery.
  • Events changes.

As always, please refer to the formal release notes for full details of all the updates in R38.

Changes on Logging-In

With this update, existing users are no longer channelled to the Nexus by default (forcing them to cancel the world launch in order to reach their Home Space or Go Home from the Nexus). Instead, existing users are delivered to their Home Space directly on logging-in.

Also, with this release, the Quest Log is closed by default when logging in (as per multiple user requests). It will open automatically on accepting a new quest or can be re-opened manually via Go → Quests.

The Codex and Discovering Worlds

Since the introduction of the Nexus and Prime Portal with the R36 release (see: Sansar: R36 – Avatar 2.0 the Nexus, the Codex and more) there has been concern that forcing users to go to the Nexus and visit the Prime Portal in order to discover new worlds was causing a bottleneck on users willingness to discover new worlds and explore, and simply stick to those within their Codex.

At the time of the R36 release, Linden Lab stated they would monitor the situation and make changes as and when they felt it necessary. With this release, and following the voiced concern and their own tracking of user behaviour, the functionality found in the client version of the Codex has been updated to shift the Prime Portal functionality to the Codex with the Lab noting:

We (and you) found that after the change to make the Prime Portal in the Nexus the hub of all travel we noticed that it was actually much more difficult and confusing, especially for newer players, to find new interesting and populated Worlds to explore.

We’re bringing back the old view which we used to call the Atlas; where all published Worlds were always available from the Explore menu. There’s no longer a requirement to travel to the Nexus and interact with the Prime Portal in order to find new Worlds to explore and people to meet.

The new-look Codex – avoids the need for users to go to the Nexus and the Prime Portal to discover new worlds

As such, the updated Codex now resembles the Prime Portal panel. By default, it will open on the Explore tabs that offers:

  • A list of events ordered by time and date, with the most recent first.
    • Hovering the mouse over a thumbnail will bring up the Interested button (adds the event to your calendar) or transfer you to the event if it is about to start.
    • Alternatively, clicking on an event thumbnail will display more information about it.
  • Worlds ordered in terms of Popular (visitors at the time the Codex was opened); Featured (those selected by the Sansar team for special highlighting); Community Favourites (worlds that have previously enjoyed a high level of activity by users); New (worlds recently published) Recently Updated (self-explanatory).

Further:

  • In all cases of the above, a full list of events or worlds in each category can be accessed by clicking the See All buttons associated with each category.
    • Note that clicking See All from the Popular list will open a page of ALL published worlds.
  • Tabs at the top of the Codex allow for easy movement between the Explore page and those for Events, and worlds the users has: marked as a favourite; visited; or created.
  • The search and sort options from the Codex remain as per R36.

These changes have been welcomed by users and creators on Sansar Discord.

Events Update

Users can now see the level of interest in an event (web Atlas event page shown)

One of the problem with events – in terms of getting together with other users – is actually seeing how popular an event might be with others ahead of time, rather than on arrival.

To help with this, Sansar R38 introduces a count of those who have registered an interest in an event. This is displayed on the event detail page on the web Atlas or within the Codex / Prime Portal.

However, there is a slight issue with this in the initial release: the number of those interested in attending an event is not registering / updating in the Codex or Prime Portal event details pages.

Feedback

Another small updated compared to R36, but one that responds to multiple requests from users and creators, and which hopefully encourage exploration of worlds by users. I admit that since the introduction of the Prime Portal as the means for discovering worlds, I’ve actually been using the web version of the Atlas in preference to going to the Nexus / Prime Portal, so I’ll be interested to see how the new Codex changes my behaviour in future.  Hopefully the events interest indicator on the Codex  / Prime Portal will be fixed in an upcoming point release.

Sansar: of backpacks and vehicles

Playing with the Backpack in Sansar

On Tuesday, November 19th, the second Sansar R37 point release was made (oddly dated “November 11th” in the release notes), containing the first pass of a much-requested capability. Also on the same day, a short video was dropped on Twitter previewing the first cut towards providing another oft-requested feature at some point in the future.

R37 Release Update 2 – The Backpack

Critiques levelled at Sansar by users and creators is the lack of the ability for using items from their inventory in-world, or to have a means of conveniently carrying multiple items they can then call upon when needed without necessarily having them attached to their avatar all the time.

These requests have typically revolved around the idea of a “backpack” that can be used to store such items (perhaps even collected from within a world, during the course of a quest for example), and from which they can be drawn and used when needed.

The R37 Release Update 2 offers the first pass at trying to address at least some of the functionality for such a “backpack”. However, rather than being an item worn directly by the avatar, the Backpack takes the form of a new UI element that is only active in worlds where its use has been allowed. With this initial release, the Backpack comes with 6 items:

  • 3 items that automatically attach to the avatar (right hand): two light wands and a light disc / frisbee
  • 3 dynamic objects that can be dropped in-world, picked up, pushed around, etc: a die, a beach ball, a balloon.

It is used by clicking on the UI button, then clicking on the the required item’s image. Those that can be worn are attached directly to the avatar; those that can be dropped in-world spawn directly in front of the avatar. All six items can be be thrown, pushed, dropped or picked up, and can also (with this release at least) be “shared” between avatars: if avatar A drops a ball in world, Avatar B can push it around or pick it up.

The Sansar Backpack UI element and the initial 6 default items within it

These objects are perhaps not intended to be useful (although the light wands and disc would likely find use when dancing), but appear to be geared more towards simple demonstrations of what the Backpack can initially do.

Further key points with the Backpack are:

  • With this initial release, the Backpack has been enabled throughout all public worlds in Sansar by default. World creators can opt to disable (or re-enable) it via Scene Settings → Backpack → Item Source setting.
  • There is currently no means to “return” an item to the Backpack – items can only be spawned / dropped in a world.
  • Concerns have been raised over the impact (visual / performance) in having Backpack items littering a scene. However, a time-out of approximately 4 minutes is enforced on items spawn (either in-world or held by an avatar) is enforced.
  • As per the week #46 Product Meeting, a future iteration on the Back will allow world creators to define a list of objects that can be spawned within their world(s).

Other Items in the Update

In addition to the Backpack, the R37 Update 2 introduces Valve Index Headset and Controller tracking (finger tracking is not yet supported). There has also been a minor tweak the to Nexus teleport portal seen in the Home Space, and a number of bug fixes – see the release notes for more.

Vehicles in Sansar

Another long-time request for Sansar has been the ability for avatars to correctly operate (“drive”, etc.) vehicles. Again, it is a capability that Linden Lab has indicated it is a capability they would like to introduce to Sansar at some point.

During the week #46 Sansar Product Meeting, it was indicated that the Sansar team were experimenting with the idea of “jointing” or “sticking” avatars to dynamic objects such as vehicles, and on November 19th, a video showing some of this experimentation was tweeted via the @SansarOfficial Twitter feed, and is reproduced below (note that this video is looped).

This doesn’t necessarily mean the drivable vehicles are about to become a “thing” with Sansar – the video seems to indicate the system is still very rough around the edges and in need of further refinement – but it does show that vehicles (at least land vehicles) could be something Sansar may be on the way to getting.

The R37 Update 2 point release and the video might go some small way to countering some of the perception that, as a result of the switch in focus to live events, LL are “pausing” Sansar development in other areas – although admittedly, it will only be through the course of further major releases to the platform that we’ll really have insight into how LL will continue to enhance the platform with significant capabilities and options beyond supporting “live” virtual events.

Sansar R37 release overview

The Sansar Space Squad Shooting Gallery

On Thursday, November 7th, Linden Lab deployed the Sansar R37 release, entitled “The Party Won’t Stop Release”. This is a smaller release than the October R36, but includes a series of much-requested updates, including:

  • Improvements to events management.
  • Avatar system updates.
  • Scene creation improvements.

As always, full details of the update can be found in the official release notes. The following is just a summary.

Events Updates

Events are no longer linked to scenes, but to published worlds. When creating an event, a copy of the selected published world and which is visited by those attending the event. However, the original version of the world is added to addendees Codex, allowing them the re-visit the world after the event has concluded and the event version is no longer available, while traffic for the event is added to the original world’s traffic numbers.

In addition:

  • R37 adds a new event notification capability to the client. This sends notices to those who have expressed an interest in the event when access is possible to the event version of the world, and when the event starts.
  • Creators can now link to specific spawn point coordinates – see below for more.

Avatar Updates

R37 provides support for uploading custom avatars with premorphed skeletons. This allows creators to adjust the bones of the reference base skeleton to make taller or shorter avatars with different bone structures. For best results, the avatar should be in the A pose when modifying. Note that these updates do not include bone rotation or scaling.

The avatar Axis Aligned Bounding Box (AABB) limits have been adjusted:

  • Max AABB – 2.3m tall, .05m below the ground plane, 1.2m left and right, .4m front, 1.1m back
  • Min AABB – .9m tall, .25m left and right, .06m front to back

Avatar Editing Freecam

It is now possible to freecam within the Avatar Editor (Look Book). Pressing F4 or clicking the Camera button in the bottom left of the Avatar Editor screen. When active, zooming in/out and panning up / down is possible using the standard camera control keys.

The Avatar Editor camera button

Avatar texture LOD

R37 includes the first release of a new avatar texture LOD system which will adjust avatar visual quality based on certain parameters to maintain product performance.

This will load up to 100MB of texture data per avatar. Any texture data in excess of 100MB will be down-sampled until it falls to 100MB. This means that the visual quality of an avatar may be reduced on some occasions. The limit may be adjusted for large events, which may affect the visual quality of an avatar further.

Scene Editing Improvements

Custom Spawn Points

It is now possible to add spawn points as a component on objects in a scene. This means that specific spawn points within scene other than the primary spawn point can be assigned (so, for example, if a portal is set within a scene to transport avatars to another scene, and can return to that portal rather than the main spawn point in a world when “returning”).

Defined spawn points can also be specified in the URL for a world using the #, allowing users to be directed to a specific spawn point within a world from a web page. For example: atlas.sansar.com/experiences/[creatorname]/[experience]#spawnpointname. See Object Editing for more.

Camera Object Component

The camera can also be added as a component on objects, which can be activated and controlled by scripts. They can be positioned and oriented like any other object in the scene, and can be copied as a reference and pasted on a camera script parameter.

Other Scene Editing Updates

  • New Grid section under Scene Settings that allows you to enable Snap to Grid on/off and set the snapping distance coordinates. This works with move, rotate, and planar tools.
  • Texture memory counter added to the Object stats Tool.
  • The colour picker panel can now be moved around the editor to any desired location on the screen.
  • Desktop aim improvements: a new “aim at cursor” property (optional) for the Grab Point component. When set, the avatar will hold the object so that it points towards the direction or object the mouse cursor is hovering over. In mouse-look mode, it will point towards wherever the reticle is pointed at.

In-Client Store Updates

The in-client store has been updated to include:

  • New filters to allow avatar clothing and accessories to filtered by male, female or all genders and / or by Marvelous Designer, Rigged or Static (Accessories).
The in-client store now includes new filters for avatar clothing and accessories (e.g. filter clothing by gender – shown)
  • Clickable item tags, allowing you to look at a filtered list based on that tag.
  • Creator names are now clickable and will take you to the creator’s store.
In-client updates: clicking a creator’s name will display their store (1); the copy URL button (2) allows you to copy the URL for a specific item and share in it chat in the client (as a clickable link) use in a web page, etc.
  • New copy URL button on the item details page to enables you to share direct URLs to specific store items.
    • This option is not available in the client for items that are hidden. Creators who are interested in grabbing a hidden item’s link may do so on web from the manage listings page.
    • Pasting item links in nearby or direct chat will open the item in the store.
  • Resale information and price are now exposed in the item details page.
  • Hyperlinks within store listing description will resolve into clickable links. [IN CLIENT ONLY].
    • Valid experience links can be visited to and from within the description itself.
    • Product listing links will open within client itself.
    • External links will open in browser.

Other updates

  • R37 includes an extensive list of script system updates, including the camera and spawn point updates noted above. Please refer to the release notes for details.
  • With R37, it is now possible to abandon quests you are no longer interested in.
    • Open the Quest panel.
    • Click on the quest you wish to abandon.
    • Click the Abandon Quest button on the Quest Info tab of the panel.

Sansar: R36 – Avatar 2.0 the Nexus, the Codex and more

Levelling up: the R36 Sansar release with the Nexus and Prime Portal (background) and the new Avatar 2.0 (I went Trek for this shot). Also to be seen is Agent Primus (to the right) the “guide” to the Nexus and some of the associated quests, and a Core Portal (on the left), where Sansar events can be viewed / attended

Introduction

On Tuesday, September 3rd, Linden Lab released a major update to Sansar, which has seen the introduction of a number of new features and updated capabilities. It represents potentially the biggest single update to Sansar since the public opening of the beta two years ago. The chief updates comprise:

The all-new avatar 2.0, which comprises:

  • An entirely new avatar skeleton, designed to be more “unisex” between male and female, to allow easier swapping of clothes
  • A new range of default avatars.
  • New means of styling / customising the avatar, including new facial deformation capabilities (full body deformation to follow), and a set of modifiable facial “presets”.

The Nexus: a new landing point that all users will / can go to when logging-in to Sansar, and which includes:

  • Agent Primus.
  • New user tutorials.
  • Portals for exploring Sansar.
  • Social Spaces.

The Codex: a new UI element to allow users record and manage and quickly return to places they have previously visited while in Sansar.

Table of Contents


Experience points (XP): which include titles and levels, and which are gained through participating in Sansar, and depending on how they engage within the platform.

Such is the size of the release, I’ve split this article into a series of parts, all of which can be reached via the table of contents, above right. These sections are not intended as complete tutorials / guides, but rather to provide a general introduction and overview, particularly for those who may wish to try Sansar as a result of the R36 update.

R36 Official Documentation

For detailed information on the various aspects of R36, it is recommended you also refer to the official documentation, comprising:

Avatar 2.0

Introduction

Avatar 2.0 is the new all-singing, all dancing avatar for Sansar. In particular, it provides a new set of deformation tools and updated sliders designed to make customising an avatar’s face more intuitive, as well as offering a series of “preset” looks which can be used as a baseline facial shapes and edited and saved.

Also provided within the Look Book is a Transform tool, designed to help adjust Marvelous Designer clothing developed for Avatar 1.0 fit Avatar 2.0.

Note: this is not an in-depth look at editing avatar 2.0 or carrying out Marvelous Designer clothing adjustments. These are documented in detail on the Sansar website. The following is only intended as a general overview.

Avatar Picker

The Sansar avatar picker is displayed the first time a user logs-in to Sansar (or the first time an existing user logs-in following the R36 update)

New users logging-in for the first time (or existing users logging-in for the first time since this release was deployed) will immediately be presented with the new avatar picker. This broadly comprises two options:

  • Selecting one of ten default avatar styles. These attempt to offer a range of ethic looks, with two leaning towards science-fiction / fantasy (with the de rigueur pointy ears and pale eyes).
    • Some are of somewhat androgynous facial looks, so the clothing colours indicate gender: green = female; purple = male.
    • Scroll arrows enable  moving back and forth between the options, and a selection is made by clicking on the desired portrait and then on the Continue button.
    • This will load the avatar and drop the user directly into the Nexus – see The Nexus for more details on this.
  • Clicking on the Create New button. This will randomly select one of the default avatars and load the character editor.
The ten default avatars

The Avatars

LL have stated that they have sought a more “stylised” avatar form between male and female in order to make some clothing elements more “unisex” in nature. This sound fine – until you see the default female avatars. “Androgynous” might be the kindest way to describe them, “elongated” might be another.

On the surface, the body proportions are around right: her height is 8 “heads” (the distance from top of head to chin) and most women are around 7-8 heads tall; her shoulder width is roughly 2.5 heads (measured from ear to ear), and the average woman’s shoulder width is around 2-2.5 “heads”. Similarly, the male avatar is in the proportions you might expect: an average 7.5 “heads” tall and 2.5 “heads” across the shoulder.

The problem is that of height. According to average height, women’s heights average between 4ft 10in and 5ft 6 in globally. By comparison, men average between 5ft 4in and 6ft – with a bias around the 5ft 7in-5ft 9in range. However, given there is little differentiation in the overall height of the male and female avatars, the result is a female look is painfully thin, hipless, and which sits uneasy on the eye.

Avatar proportions. Both male and female body proportions are roughly in keeping with the “norms” – but the female appears to have been vertically stretched (head and body) in order to match the male avatar, resulting in an odd, thin and hipless look

Of course, this can potentially be solved over time – providing full body deformation, allowing custom avatars into the starter picker, and so on. But it’s possible that for some coming into Sansar from other virtual environments, the female avatar is going to appear less than attractive. Or as I’ve heard it referred to already in the Nexus, “bleah!”

Editing and Styling Tools

R36 brings an updated set of avatar editing and styling tools / options. These can either be accessed when selecting an avatar for the first time (see above), or via the familiar Create button > Style My Avatar > Customise option.

The basic Look Book  / Editor still layout comprises 4 parts:

  • Worn items panel: the clothing and attachments currently worn. If the clothing has been created using Marvelous Designer, buttons for adjusting and transforming the clothing will also be displayed.
  • The avatar on a pose stand: which can be rotated with and right-click drag (desktop mode). Remember the free rotation button is available in the bottom left corner of the inventory panel. Note this view can change when editing an avatar, such as zooming on the head during facial editing.
  • The inventory panel: for accessing hair, clothing, accessories, etc for wearing / editing.
  • Buttons along the bottom of the screen for undoing / redoing changes, discarding / saving changes going back to your last location (Home Space or world spawn point.
The basic avatar editor window. Note the buttons for adjusting Marvelous Designer clothing (highlighted) on the left.

Those who have used the right-side inventory panel will be familiar with the tabs displayed (from top to bottom):

  • Avatar: pick the gender of the avatar.
  • Hair (comb tab): select the hairstyle.
  • Face (head icon): customise the facial features.
  • Clothing (coat hanger icon): select clothing to wear – note that any rigged clothing existing users may have had is no longer listed as it is incompatible with Avatar 2.0 (creators have a means to provide an update when / if available), so only Marevelous Designer items remain.
  • Accessories: (visor icon) available accessories – again, note that accessories specifically rigged for avatar 1.0 will have been removed from existing user’s inventory.
  • Animations (running icon): set-up emotes.
Hair
The six new female hairstyles. The male styles are pretty bland as well.

Provides twelve default hairstyles (6 female, 6 male), with colouring / tinting options, and buttons to obtain additional hair through the Sansar Store or to import your own custom hair.

The Lab were said to be “excited” by the new default hair options. I have to be honest, the most enthusiasm I could sum-up for them was “meh”.

Face and Facial Deformation

The facial deformation capabilities are perhaps the most extensive “visible” changes with the new avatar, outside of the overall shapes. These, and options to colour skin and eyes, are found on the Face tab, which contains a number of sections, some of them new or extended, as outlined below.

The facial customisation options – see notes below

The most obvious aspects of the facial editing options are the two colour pickers to select skin and eye colour – just click to apply the required tone / colour. The remaining options are:

  1. Presets: six slots for different head shapes / facial features. Defaults are supplied for each, and clicking on any of them will apply them to the avatar in edit mode. The presets can be modified, or the user can work from the original base avatar to make changes to the face, which can then be saved back to any one of the slots.
  2. Sliders: an extended set of sliders for modifying facial features: cheeks, chin, ears, eyes, jaw, mouth and nose.  These are designed for more subtle fine-tuning of features, rather than significant changes.
  3. Head deformation buttons: four options that allow the head / facial features to be modified directly. These are intended for major changes to the head / face / features and comprise (from left to right):
    • Head: allows the entire head to be modified.
    • Major Sections: allows large parts of the head / face to be selected and modified (e.g. forehead, forehead and top of head, lower cheeks and jaw, cheeks, nose and jaw, etc).
    • Feature: allows specific features – nose, , mouth, cheeks, chin, etc – to be adjusted.
    • Part: allows fine-tuning and adjustment of specific parts of facial features  – the corners of lips or eyes, the flair of nostrils, the shape of nose or ear tips, etc – to be modified.
  4. The adjustment tools: a set of the tools that work with each of the head deformation buttons, comprising:
    • Translate: allows the selected area to be moved up, down, front, back, left and right. Also enabled by tapping W on the keyboard.
    • Rotate: allows the selected area to be rotated, if appropriate. Also enabled by tapping E on the keyboard.
    • Scale: allows the selected area to be resized. Also enabled by tapping R on the keyboard.

When an area of the face / head is selected, it will be highlighted in white. Once the required tool has been enabled, a left click (in desktop mode) will allow you to modify the selected and highlighted area.

These options are intended for significant changes to the head / face. They can be used in concert with the sliders, which as noted above are intended more for fine-tuning changes. The gif to the right, courtesy of Linden Lab, demonstrates the use of the deformation buttons and tools.

For those used to working purely with sliders, this approach is liable to come across as complicated, and it does take time and practice to actually work out how to balance things and achieve a satisfactory result. However, there is no denying the system is potentially very powerful, offering almost infinite opportunities to develop a unique look.

Accessories

The default set of avatar accessories retains the sunglasses and Christmas / festive “deer antler” headgear strung with lights (popular among early adopters at holiday time, so a nod to the past). To these have been added a set of sci fi-ish hair clips and pieces.

Adjusting Clothing

One of the major concerns with Avatar 2.0 was that of clothing and fitting. All rigged clothing had to go by way of the dinosaur, but the Lab indicated that a set of transform tools would be included for Marvelous Designer (MD) clothing that would help them to fit Avatar 2.0, and be available to users for making necessary adjustments. These tools have been delivered, and they are both impressive and slightly frustrating.

The tools comprise two elements: and auto-adjust option and a set of manual transform tools.

Auto-Adjustment

This does exactly what the name implies: it automatically adjusts an item of MD clothing to fit an avatar as best as possible. It is accessed in one of two ways:

  • Via inventory:
    • Click and wear the item of clothing to be adjusted.
    • The cloth simulator will start.
    • Right-click on the thumbnail for the item in inventory.
    • Select Adjust from the drop-down menu.
  • Via the Worn Items panel:
    • Click and wear the item of clothing to be adjusted.
    • The cloth simulator will start.
    • Click the large Adjust button at the bottom of the Worn Items panel.

In both cases note:

  • It can take a while for the clothing to fully adjust – give the tool time to work.
  • It’s not always 100% accurate – clippings and gaps may need manual adjustment.
  • When it is clear no further adjustments are being made, click the Done Adjusting button below the avatar to make sure the updates are dully applied. You can then use the manual tools to make further adjustments, if required.
  • If you are happy with the results, make sure you save the updated appearance to a look in order to preserve the updates.
Manual Adjustments

Manual adjustments can be achieved using the Adjust and Transform tools in the Worn Items panel.

  • The Adjust tool can be used to make fine adjustments to MD clothing – adding natural folds, creases, etc. It can also be used to overcome issues of clipping – the avatar or underlying clothing showing through.
  • The Transform tools reside in a separate panel and offer options to move, rotate and resize clothing. These can be used individually using three buttons on the panel, or combined into a single gizmo-type tool (the “all” button).
The manual adjustment tools for MD clothing

Depending on the garment, manual adjustment can be relatively simple or annoying frustrating and time-consuming. I personally recommend using auto-adjustment first and then, wherever possible, the Adjust tool. Particular frustrationsI found include:

  • What you see when making adjustments doesn’t always match how the garment will look when updates are finished – it’s best to periodically click the Done Adjusting button and then free rotating the avatar to check results, than in trying to do everything in a single pass.
  • The Transform tools only work on the cardinal points relative to the avatar – up, down, left, right. There are no diagonal handles on the resize option, which can made a simple job of adjustment into something far more complicated.
  • Time really is needed to get things right.
Manually adjusting can take time. Top: as the sweater should look. Bottom: when first worn (l); after auto-adjust (c) mid-way through manual adjustments (r) with neck line still to sort.

As with the auto-adjust option, it is important finished work is saved to a look in order to be retained.

Continue to the Nexus, Codex and XP System