
Within Second Life there have been numerous ways to produce reflective floors within buildings – the most popular being to build a near-duplicate of what is in a room / building and inverting it “below” a textured, semi-transparent floor, allowing the duplicate to act as a reflection.
It’s a clever means of achieving the idea of reflections in polished floors, and has the advantage of being relatively “efficient” performance-wise (if a little hard on land impact, depending on the degree to which a person goes with the “reflected” items under the floor), as it means re-use of loaded textures and avoids rendering avatar reflections and mirroring movement. Although that said, the fact that the technique doesn’t show avatar reflections can spoil the effect.

As has long been known, Linden Water can also be used as a means of producing reflective floorsthat can reflect avatars as well as objects. However, under Windlight, it has tended to suffer from a couple of observable weaknesses: if applied at the region level, it meant all water viewed from the region with produce the mirror effect – which could be a problem when outdoors (e.g. a mirror-flat surrounding sea); while to use it at parcel level meant using a viewer that accepted viewer-side parcel Windlight support – so anyone not using such a viewer would see a building / room with “flooded” floors.
EPP, with its simulator support for for parcel-level environment settings, means that is now possible to use Linden Water to create reflective floor effects within ground-level building that can more easily been seen by anyone entering the building, regardless of the viewer they are using. There are some pre-requisites involved, both it terms of creating the effect and viewing it, but even so, it is relatively easy to implement for anyone who wishes to do so.
Those prerequisites are:
- As the approach uses Linden Water, it can only bee used at ground level (and on ground-level rooms of such buildings).
- Some skill with terraforming is required, in particular:
- Lowering / levelling land – this is important as the “reflective” floors must be at water level.
- Ability to sub-divide land into parcel – this is particularly important if there is Linden Water is visible from outside the building with reflective floors, as you’ll be making changes to how Linden Water appears.
- For parcels, you’ll need to have permission to set the environment at parcel level – if you do not own the region, and parcel level EEP support has been disabled via the region level controls, you will have to discuss the matter with the region holder / owner.
- Those visiting the building must have Preferences → Graphics → Water Reflections set to All Avatars and Objects or Everything in order to see the water reflecting everything, including avatars.
The approach works best with your own builds, but can be used with pre-fab builds if they are modifiable, and can have floors modifed / replaced.
1 Prepare Your Land and Building
The first thing you need to do, is determine the shape of the floor space you wish to has as a reflective space and prepare the part of your land where it is to go.
- Make a simple prim template of the shape of the room / building.
- Place the template on your land where the room is to be positioned.
- Keep in mind that depending on your location, you may want to sub-divide your land (if you have the necessary permission) so you can see natural-looking Linden Water when outside your house.
- Use the terrafrorming tools in the Build / Edit floater to carefully lower the land under the template to expose the Linden Water.
- Note that the “reflective floor” will, when the work is finished, need to sit just below the level of Linden Water. This means you may have to set it lower than the floors in other rooms on the ground floor of the building, or have the building itself surrounded by a mesh / prim surround to blend it with the ground level.
- When you’re set, position the building and if necessary sub-divide your parcel.
- Edit the building and:
- Sset each of the floors you wish to be reflective to around 80% transparent – note that you may have to experiment with this setting, depending on the floor texture you use.
- Apply a suitable texture for the reflective floor(s) (e.g. a wood texture for a polished wooden floor, or a marble effect for a public building).
2. Set the Water Environment
As noted above, you’ll need a suitable normal map to replace the one used for Linden Water.
- The easiest way to do this is to use the Mirror Water environment asset that is included in the viewer under Library → Environments → Water.
- You will need to copy this asset from its default Library location to your inventory (e.g. to the Settings folder – or a sub-folder within Settings, if you organise your EEP assets in sub-folders).
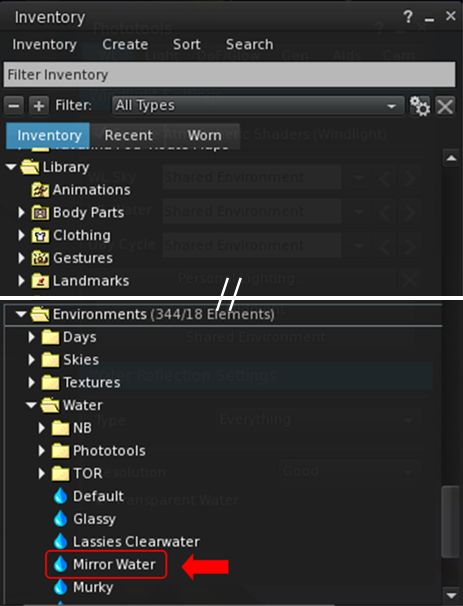
- With the Mirror Water environment asset copied to your inventory, double-click on it to edit it. This will open the Fixed Environment – Water panel.
- Within the panel, make the following changes (see the image below for reference):
- Set the water fog colour to white (note that depending on things like ambient lighting, the floor texture you use, etc., you may need to adjust this towards a more grey colour).
- Set all of the following to 0.0:
- Fog Density Exponent and Underwater Multiplier.
- Fresnel Scale.
- X, Y, Z Reflection Wavelet Scale.
- Large and Small Wave Speed.
- Refraction Scale (Above) and (Below).
- Set Fresnel Offset to 0.50 (note that depending on things like ambient lighting, the floor texture you use, etc., you may want to adjust this up or down).
- Set Blur Multiplier to 0.80 (note that depending on things like ambient lighting, the floor texture you use, etc., you may want to adjust this up or down).
- From the Save / Apply Drop-down, select Save As and save your updated environment asset under a new name (e.g. “Reflective Floor”).

- Once saved, Select Apply to Parcel from the Save / Apply drop down to apply the environment to the parcel.
3. See How It Looks / Fine Tuning
You should now have a nicely reflective floor to your building, as shown below.
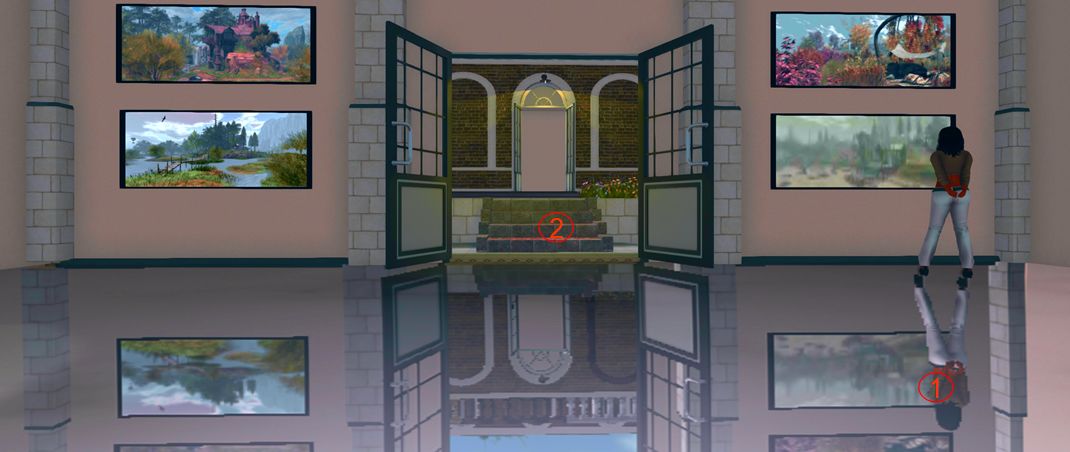
What’s more, if the building is sitting within its own parcel, when you leave the building, any visible Linden Water should look like natural water / waves (although if you cam into the building or glimpse the “reflective floor” from outside of the parcel, it might look a trifle odd until you actually enter the parcel).
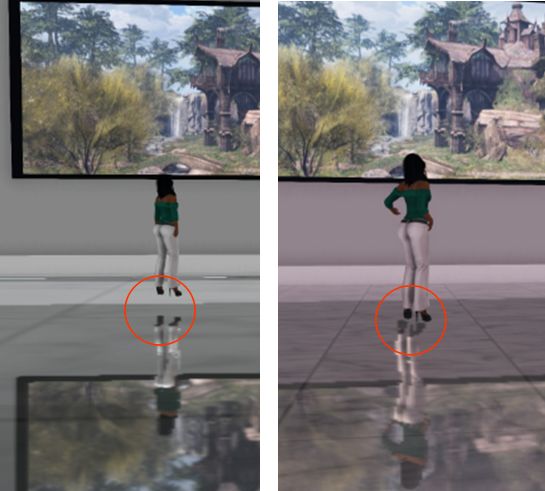
You might find that some additional “fine tuning” of the build is required to achieve a perfect result. If you’ve placed your floor a little above the level of Linden Water, for example, you may find your avatar “floats” over its reflection (below left), or if the floor is set a little too far below the level of Linden Water, the avatar and reflection may appear to “merge” at feet / ankles. But errors can be corrected with careful adjustment of your floor either down or up.
Conclusion
There are still some limitations on the effectiveness of this approach: as noted above, it can only be used for ground-level interiors, and the effect does require visitors to have their graphics preferences set to reflect avatars in Linden Water. However, once set-up, it can add a certain edge to places like stores and galleries.
I’m not sure how much of a performance hit would occur in viewers trying to render a lot of avatars and their moving reflections in a ballroom or other dance venue, so these might require greater consideration. But if you do want to have a different ground-level flooring for your building, and you can meet the prerequisites noted above, it might well be worth giving it a go.
