Note: As I’ve had a number of Firestorm users directed here from the Firestorm Team’s EEP Beta release blog post who have commented directly to me about that release, please note that I am aware of it, and in fact blogged it at the time it was made available – see Firestorm 6.4.5 Beta: EEP and Camera Presets – which highlights some of the additional EEP / Phototools integration work the Firestorm team has carried out.
EEP, the Environment Enhancement Project, is a set of environmental enhancements designed to replace windlight XML settings to control the water and sky environments seen in Second Life, and provide a wide range of additional capabilities for region holders, parcel holders and general users. It represents a fundamental shift in how environment settings are used and applied
In brief EEP:
Uses environment objects that you can keep in your inventory and / or share with others – including selling (subject to the SL permissions system) via in-world stores and on the Marketplace.
Provides parcel-level control of environments.
Allows up to four different, independently controlled sky layers.
Allows the Sun, Moon and Cloud textures to be replaced with custom textures uploaded to the viewer.
Provides an extended day cycle of up to 168 hours (thus allowing a 7-day, 24-hour day / night cycle to be defined, for example).
Allows users to override region / parcel settings as seen within their own viewer for the purposes of photography, etc.
Provides new LSL functions to allow scripts to interact with parcel environments.
In addition, key aspects of EEP are:
Estate / region / parcel settings are simulator-side, and so by default are automatically seen by anyone using any EEP enabled viewer on entering the region / estate / parcel.
Provision of a Personal Lighting capability that allows photographers, etc., to make rapid / temporary changes to an region / parcel’s environment visible only in their viewer.
Allows environments settings to be applied to your own avatar, allowing you to see the same environment (sky, clouds, Sun / Moon position, etc.) wherever you go in-world – useful for vehicle drivers travelling across multiple regions.
This tutorial is designed to walk you through the essentials of EEP, including the terminology used. It is split into a number of sections:
Terminology and Concepts – key terminology and concepts with EEP.
The viewer UI elements associated with EEP.
An overview of creating and editing EEP assets.
An overview of applying EEP settings
Breakdowns of the floaters used to create Sky, Water and Day Cycles in EEP.
An overview of importing windlight XML files into the viewer and saving them as EEP settings / assets.
A summary of EEP LSL resources with links.
Some of these sections are self-contained, other can be used together (e.g. creating assets, using the Sky, Water and Day Cycle floaters, and applying EEP settings). To further assist referencing, major topics appear on their own page – please make sure you use either the table of contents or the page numbers at the foot of each page for ease of navigation.
Note: at the time of writing this piece, the official Second Life viewer – version 6.4.0.540188, dated April 15th (or later) to see / use EEP capabilities. However, TPVs will be releasing version supporting EEP in due course. Check their websites, listed in the panel on the right, for updates that may not be covered in these pages.
My sincere thanks to Rider Linden, EEP maestro, for his assistance in the writing of this tutorial.
As well as bringing a range of new environment capabilities, EEP also lets you use custom textures for the Sun and Moon (and clouds). So Isla Pey can appear with Earth slowly setting, and Jupiter and one of the Galilean Moons also strangely in the sky! Note that both the size of the “sun” and “moon” textures can also be adjusted
Terminology and Concepts
EEP uses some key terminology that should be understood.
Settings: used to define the environment you see. There are three settings types:
Sky: define the atmosphere and lighting for a day (or night); the movement, density, etc., of the clouds; and the appearance of the Sun and / or the Moon (which remain in a fixed point in the sky).
Water: define the appearance of Linden Water (prim or mesh animated water is not affected): water colour and reflection; wave movement; amount of light refraction, etc.
Day Cycles: collections of Sky and Water settings that are combined to present a dynamically changing environment over a user-defined time period representative of a “day” (by default this is set to the legacy Second Life day / night cycle of 4 hours, but can be extended out to represent physical world time periods of up to one week).
Note that Sky and Water settings are referred to as Fixed Environments.
EEP assets: physical “containers” for storing EEP settings. These are inventory items that by default, are stored in the new Settings folder in your inventory (see below), they are split into three types:
Sky – Sky settings. Icon: a blue sky with clouds.
Water – Water settings. Icon: a water droplet.
Day Cycle – for Day Cycles. Icon: a split Sun / Moon.
EEP assets (permissions allowing) can be exchanged, given away, and / or sold through a store or via the Marketplace.
Note that EEP settings are:
Created or edited using their corresponding EEP asset (e.g. to create Sky settings, you use the Sky asset type).
New EEP assets can be created directly from inventory, just like any other system inventory asset type (notecard, clothing item, gesture, script, body part).
Creating / editing EEP assets and settings is covered in depth in my EEP tutorial.
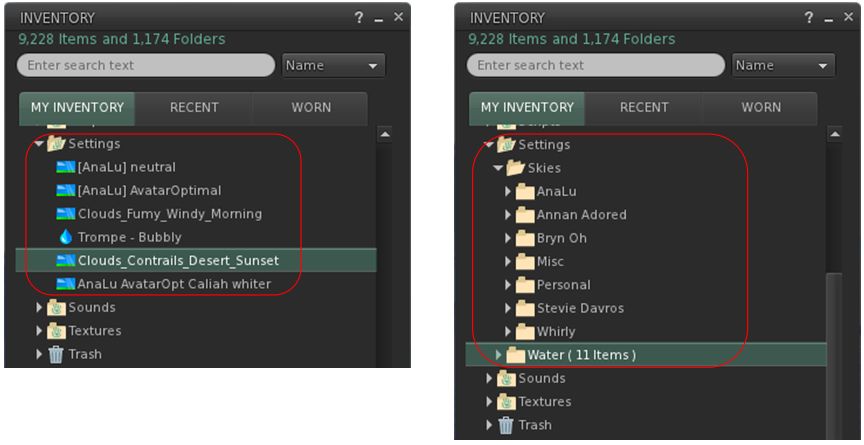
By default stored within a new system folder in inventory – the Settings folder. This folder may be hidden until such time as an EEP asset is created.
By default, EEP assets are stored and created in the Settings folder in your inventory (l). If you want, you can manually sub-divide your settings into suitable folders for easier tracking (r)
EEP Permissions
There are a few notes on permissions associated with EEP settings / assets.
Copy/no-copy: EEP settings assets may never be marked no-copy. A person who owns a setting object may always make a copy of it in their inventory.
Transfer/no-transfer: the no-transfer permission is persistent. If you import any no-transfer day or water setting into a day cycle, that day cycle will also become no-transfer. Once saved, this change can not be undone.
Modify/no-modify: these permissions behave as normal.
EEP Library Assets
EEP includes a collection of around 200 Sky, Water and Day Cycles, together with a set of textures that can be used for clouds and / or to replace the Sun and Moon, etc.
These are located in Inventory (CTRL-I) → Library → Environments.
They can be used in once of two ways:
Unmodified, directly from Library → Environments.
By copying them to your inventory (e.g. to your own Settings folder, if it is visible through the creation of an EEP asset; if not, any other folder can be used), where they will become modifiable, allowing you to adjust them / use them to create your own settings.
See my EEP Tutorial for editing / modifying EEP assets and settings.
Differences to Windlight
EEP settings are stored in inventory assets, not as XML files saved to your computer.
Because they are server-side, EEP settings are by default seen by any viewer affected by the. This can mean:
Parcel owners using a specific set of environment settings no longer have to request visitors manually switch to them.
Settings are no longer dependent on visitors to a parcel with a custom environment having the precise Windlight XML file stored on their computer.
EEP setting do not require any external storage (e.g. Dropbox) in order to be shared with other users, if they are to be given away.
Second Life offers Premium Account holders the opportunity to change the the first name, the last name or both the first and last names of their account at any time, or to revert to any name they name have used in the past (again, first name, last name or both).
This Tutorial is intended to provide an overview of using the Name Change capability.
Important Points
First some points to note:
Premium members may change their first name or their last name or both their first and last name whenever they wish.
First names are free-form.
Last names are selected from a list, with the available names updated periodically.
There is a fee applicable each time the capability is used. This fee is displayed as a part of the Name Change process.
VAT at applicable rates will be added to accounts in VAT-paying countries.
Once a first name+ last name combination has been applied to an avatar account, it cannot be used by any other account (so “Josephine Bloggs” cannot use Name Change to become “Inara Pey”).
It is possible for you to revert back to any previously-used name assigned to your account.
If you are Premium and use the Name Change capability, then subsequently downgrade to Basic, you will retain whatever avatar / account name you have at the time you downgrade. You will not not “revert” to any past name you may have had, and you won’t be able to change you name again until such time as you re-up to Premium.
Name Changes is not replacing Display Names – these will remain available at no charge to all who wish to use them.
Name changes are made via the Second Life dashboard, and you must be logged-out of Second Life in order to make sure any Name Change you make is correctly applied to your account.
Changing Your Name
Note: It is possible (and based on some feedback received), that a name change might take a little time to propagate through SL’s various services, which may have some impact on things like scripted objects such as security systems.
Premium Members can change their names as follows:
Log out of the viewer if you are currently in-world.
Log on to your dashboard at secondlife.com.
Click Account on the left-menu.
Click on Change Name.
The Change Your Account Name page is displayed. This comprises:
The account availability of Name Changes (including a link for Basic account holders to upgrade to Premium.
The fee that will be applied to your account, including and VAT that may be added.
A reminder than you can change your first name, your last name or both.
An option to go ahead and change your account name.
The Change Your Account Name page
Click the Next Step button to proceed.
The Choose a New Name page is displayed. This comprises three parts:
The Change First Name option.
The Change Last Name option with a list of currently available last names names.
A list of previous last names you have used – if you have not previously used Name Changes, only your current last name is displayed.
The Choose a New Name page, showing the three options for changing your first name (1); selecting an new last name from a list of currently available names (3), and for any previously-used last names (if available – 3)
Change Your First Name Only
Leave the Change First Name option checked.
Use the text input field to enter your desired first name.
Uncheck the Change Last Name option.
Change Your Last Name Only
Uncheck the Change First Name option.
Leave the Change Last Name option checked.
Click the radio button next to last name you would like to use.
Change Both Your First and Last Names
Keep both the Change First Name option and the Change Last Name option checked.
Enter your desired first name in the text input field under Change First Name
Click the radio button next to last name you would like to use.
Reverting to a Previously Used Name
If you have previously used Name Changes, and would like to change back to an “old” name:
Enter the first name in the Choose a First Name text input field (if required).
Click on the require last name from the list of your previously used Last Names (if available).
Completing the Change
When you are happy with the name(s) you have set / selected, click the Review Changes button.
A summary of your changes is displayed (if you have made no changes, you’ll be taken back to the Change Your Account Name page).
The Name Change summary – use it to make sure you are happy with the name(s) you have selected
Make sure the details are as you want them, or use the Go Back link to change your selection(s).
If you are certain of the changes:
Log out of the viewer if you have not already done so.
Click on Continue to Checkout.
On the check-out page, you are presented with your payment options:
Via an US dollar balance on your Tilia account.
Requires acceptance of the Tilia Terms of Service, if you have not already done so.
If you have a sufficient US dollar balance on your Tilia account, but do not with to use it, click the Don’t Use button.
Via any credit / debit card already tied you your Second Life Account.
By clicking the More Payment Options… and making a selection (e.g. assigning another credit / debit card to your account).
When you have selected your preferred payment method, click the blue Buy Now button to complete your Name Change.
Updated with an overview of “Bakes on Mesh appliers” for Mesh bodies and head yet to be updated to support BoM.
Monday, August 26th, 2019 saw the formal release of Bakes on Mesh (BoM) for Second Life, and with it, an attempt to make system wearables (skins, tattoo and clothing layers) usable on modern mesh avatar bodies, utilising the avatar Bake Service and without the need for a dedicated applier system.
While Bakes on Mesh has been in development for over years, and much of it is known to many users, this article has been written to provide something of an introduction / overview of BoM, covering things like system wearables, the Bake Service, that changes that have been made, where to find information on using BoM, and what it may mean for Second Life users in the future, depending upon how well the capability is received by creators.
Some Basics
System Wearables and the Bake Service
System wearables as they appear in inventory
Without going too deeply into specifics for those unfamiliar with them, system wearables are a special kind of inventory asset (some of which are shown on the right) that can be directly worn / added to the system avatar to produce a “dressed” look.
These wearables come in a number of “layers”- skin (which must always be worn on the system avatar), tattoo, undershirt, shirt, and jacket.
The naming of the layers isn’t that important – a creator could be assign a bra or a shirt or a pair of pants to any one of the tattoo, undershirt, shirt and jacket layers, depending on how flexible they want their clothing to be. What is important is that the always follow an hierarchy: skin is always at the bottom and so “covered” by the other layers, which are in turn “covered” by the next (so undershirt wearables always apply “over” tattoo wearables; “shirt layers “over” undershirt wearables, etc), with the avatar able to wear up to 62 wearables in any combination of layers at one time.
This might sound very complex, but for those familiar with the system, it is very easy to grasp; however, what is important is what comes next. When an avatar’s look is complete, the information about all these wearables are sent to the simulator and then to a back-end set of servers called the Bake Service over a series of channels called the “bake channels”, which define where the layers appear on the avatar. These channels are:
BAKE_HEAD, which defines all the wearable elements that have been applied to the head (e.g. skin, and tattoo layers used for make-up)
BAKE_UPPER, which defines all the wearable elements – skin plus any tattoo, undershirt, shirt and / or jacket layer(s) that have been applied to the avatar body above the waist and below the neck (with the left arm mirrored from the right).
BAKE_LOWER, which defines all the wearable elements – skin plus any tattoo, undershirt, shirt and / or jacket layer(s) that have been applied to the avatar body from the waist to the feet (with the left leg mirrored from the right).
BAKE_EYES and BAKE_HAIR (both pretty self-explanatory).
BAKE_SKIRT, which defines skirt / dress style wearables.
The Bake Service then composites (bakes) the layers received on each of these bake channels into a single texture, and sends the results out to every viewer able to “see” the avatar. So, for example, facial / head skin and any make-up tattoo(s) received via the BAKE_HEAD channel are baked to become a texture seen on the avatar’s head, while the layers received over the Bake_Upper channel are baked into a texture seen on the avatar’s upper body, and so on, ensuring the avatar consistently appears to everyone dressed at the user intended, while also removing the need for individual viewers to manage the complex layering and rendering of all the individual wearable layers on other people’s avatars.
Mesh Bodies and Complexity
Since their introduction, mesh bodies have not been able to leverage this approach. Instead, they require a dedicated “applier” mechanism to achieve the same ends, together with the use of an alpha layer to hide the system avatar.
Further, to enable clothing items to be layered – so you can have an applied shirt / blouse appearing to be “under” a jacket, for a example, mesh bodies have had to be constructed in a complex manner, with several layers closely packed together (colloquially called “onion layers”) that effectively mimic the system wearable layers. This actually makes the avatar a lot more complex than they otherwise might be, resulting in their relatively high rendering costs.
Enter Bakes on Mesh
So, Bakes on Mesh has been developed to allow system wearable to be applied directly from inventory to worn mesh faces (e.g. avatar bodies and wearables) that have been correctly flagged by the creator to support Bakes on Mesh. Through Bakes on Mesh, Linden Lab hopes:
Users can avoid the need to use appliers, but can add wearables to their mesh avatar directly from inventory.
Creators will be able to simplify avatar mesh bodies and heads by removing the need for some of the “onion” layers. This should – if done – reduce the rendering complexity for bodies and heads, thus hopefully improving people’s SL experience (as avatars won’t be quite so resource intensive or require quite so much “assembly time” when encountering them on logging-on or after teleporting somewhere).
Notes:
As with all new features, use of Bakes on Mesh will only be apparent to those actually using viewers running the Bakes on Mesh code; anyone not on such a viewer will likely see something of a mess.And as with new features, it will take time for the Bakes on Mesh code to be implemented by all TPVs.
Bakes on Mesh does not mean user “have” to go back to using system wearables nor does it mean that applier systems can no longer be used. It is simply a means of making system wearables work with mesh bodies and heads, hopefully with the benefits given above. Those who wish to can continue to use applier-based clothing as they always have.
Bakes on Mesh adds new options for applying suitable textures to the baking channels for application on a mesh body by the Bake Service
An introduction to using BoM can be found in the Bakes on Mesh Knowledge Base article. This includes information on trying BOM using a test mesh body – the best way to do this is to use Aditi, the beta grid. I’m not going to go into specifics here, simply because there are multiple resources available to assist users and creators – some of which are noted at the end of this article, and I want to keep this as a more general, easy-to-understand primer.
When considering Bakes on Mesh it is important to remember it is not necessarily intended as an outright replacement for appliers and current mesh bodies from the get-go. Rather, it is initially an alternative – although if the popularity / take-up among creators and users are sufficient, then over time it could obviously become the system of choice over appliers and more complex mesh bodies. However, existing mesh bodies / heads and applier systems will continue to work as they always have.
Key Points of Bakes on Mesh
This list is not exhaustive, but is intended to give a feel for Bakes on Mesh and its use:
System skin layers, tattoo layers, clothing layers and alpha layers all work – the mesh just needs to be flagged by its creator as supporting Bakes on Mesh and correctly set-up for alpha layers to work as intended.
As an alternative, there are assorted “BoM appliers” designed to work with mesh bodies / heads that have not (yet) been updated with Bakes on Mesh support – see below for more.
You do not need a full body alpha to wear a Bakes on Mesh flagged mesh. If the flag is present when you wear the mesh, the body section it is flagged for disappears. So, if you wear a lower body “Bakes on Mesh ready” avatar part, then entire lower body of the system avatar will disappear.
The Bake Service has been updated to support 1024×1024 resolution textures, so it offers the same texture resolution for wearables as offered through applier systems (prior to Bakes on Mesh the maximum resolution for wearables was 512×512).
Obviously, the wearable must be made at this resolution in order to utilise it; a 512×512 wearable will not magically appear to be 1024×1024 resolution when applied.
In order to be fully effective, mesh bodies using BoM and BoM wearables should match the system avatar UV map as closely as possible.
Fortunately, most of the current range of avatar bodies sold under brands such as Maitreya, Slink etc., do tend to stay close to the system avatar UV map. So any new BoM-specific versions / updates should continue to do so.
Alpha support means that layers means that mesh bodies should no longer need to be split into multiple pieces for individual alpha-masking to prevent a body clipping through clothes. Alpha requirements are back in the hands of the clothing creator, and should be made alongside the clothing, so that when used and providing the body is correctly set-up they should just “work”. In addition, clothing makers may not longer need to include auto alpha scripts.
Changing mesh body parts should be easier, providing both bodies are flagged to use Bakes on Mesh. The body takes whatever is worn on the system body – skin and make-up instantly appear on each change of head, for example.
Skin makers will be able to offer more options by including tattoos with their skins, allowing for a variety of make-up options, whilst there will no longer be any limitation on the use of tattoos (one per zone).
Applier support will still be required for the following: nails; eyelashes; standalone ears, hands, feet, lips, bust implants, etc.; lip gloss; materials finishes (see Some Possible Points of Contention, below); neck blenders, anything not intended to look “painted” on.
New with Bakes On Mesh
To provide full “wearables” support, Bakes on Mesh introduces some new elements that will be of key import to creators:
The introduction of 5 new bake channels – LEFT_ARM_BAKED, LEFT_LEG_BAKED, AUX1_BAKED, AUX2_BAKED, AUX3_BAKED:
These can only be used with Bakes on Mesh, and are not available to the system avatar.
LEFT_ARM_BAKED and LEFT_LEG_BAKED are intended to help with making mesh avatars where the left and right limbs have different textures (and so can be asymmetric, as can currently be achieved with applier systems).
The AUX channels are general purpose, and could be used for body regions not possessed by system avatars (such as wings) or for other purposes.
This means BoM has 11 possible channels for wearables to use for textures, and for the baking service to produce.
However, the new channels listed above do not have alpha support like the other channels, and so cannot have “holes” cutting through the mesh face they are worn against.
BOM also adds a new wearable type called Universal.
While specifically added to allow the wearing items that use the new channels described above, the Universal wearable has slots corresponding to all 11 of the bake channels, offering extensive flexibility of use. In layering order, universal wearables go between the tattoo and body layers.
Note that for others to see your avatar correctly when you are using Bakes on Mesh they must also be using a Bakes on Mesh viewer. If they are not, they will see your avatar as a mesh of red, blue and yellow colours showing through your mesh parts.
Left: Bakes on Mesh when seen via a non Bakes on Mesh viewer: the system avatar will show through the mesh body parts, covered by default system-supplied BoM marker textures. Centre and Right: using a “Bakes on Mesh applier” on a non-BoM body and head and via a Bakes on Mesh capable viewer. The centre image shows the “before” avatar state: the system layer skin and clothing are worn, but do not conform to the mesh body and head (which must be worn without their corresponding alphas for this type of applier to work), and so “poke through” (highlighted in places by the red circles). The right image shows how things look after the”Bakes on Mesh” appliers have been used – the system layer clothing and skin now mostly conform to the mesh head / body, with the exception of fingers and toes (highlighted) which will generally require an additional “glove” or “mask” fix.
“Bakes on Mesh Appliers”
During the testing of Bakes on Mesh, at least two experimental applier systems were produced to allow BoM to be tested on non-BoM flagged bodies and heads. For example, Omega produced an experimental BoM applier system, with instructions here.
Since then, and given that several mesh body and head creators have yet to produce BoM flagged updates to their bodies / heads, several more such “BoM appliers” have been produced, some of which are available for free, some are provided by the mesh head / body creator, and others are available at a nominal cost, and may be for specific purposes (e.g. the Bakes on Mesh skin applier (Omega) by Conor Shostakovich at L$125).
These essentially work by allowing you to dress your system avatar with the required system wearables, then wearing your mesh body / head without their alpha masks, and then using the applier to apply the system layers to the mesh body / head in a similar manner to “traditional” appliers – but again, as a single composite layer when baked.
How effective these systems are can be variable.
Due to differences in the way skin skin textures / UV maps work and the way mesh bodies tend to be put together, such appliers may not work particularly well around feet and hands.
Note: links to products does not constitute endorsement. Always check the Marketplace for products and reviews.
Such appliers are intended as an interim “fix” for using Bakes on Mesh until such time as the major head and body creators provided full Bakes on Mesh support.
Some Possible Points of Contention
However, there are what might be regarded by some as “negatives” around Bakes on Mesh, a couple of the more prominent ones being:
The Bakes Service – and thus Bakes on Mesh – does not support materials (normal and specular maps). How much this impacts people’s acceptance of BoM is open to debate. However, when needed, materials still can be added manually (if the mesh / mesh face in question is editable) or via a suitable applier.
Appliers are convenient, as they are an all-in-one solution requiring only one or two items in inventory – the outfit applier HUD and possibly an intermediary relay tool like Omega.
With Bakes on mesh, wearables are all individual inventory assets, which could lead to inventory growth, some of which might be quite extensive as a result of creators providing multiple options / layers (although in fairness, some applier systems can be like this – I have seen a Hugo’s Design outfit with no fewer the 40 individual items, both system layer clothing and multiple applier options).
Some of the inventory “bloat” BoM might cause can potentially be managed via the use of the viewer’s Outfits capability (although this obviously also adds to bloat with inventory links) or via a new form of applier system that utilises system wearables created at 1024×1024 resolution.
How much these may impinge on consumer’s willingness to adopt BoM remains to be seen.
Closing Remarks
Like all new capabilities, Bakes on Mesh will take time to gain understanding and traction. Also like all new features, it has its outright fans, and those who have – even before really getting to work with it in earnest – decided its is bad / wrong / pointless / a step back, etc.
I’m personally sitting in the middle. If it does what is claimed on the tin, and if it gains traction among mesh body and head creators (and several have been working on BoM for the 12+ months its been in development) and clothing creators, then it could do its own little bit towards a better “optimisation” (quotes used intentionally, as there is still a lot more than can be done in terms of optimisations cross SL), and make things a little better for everyone.
But it will take time for Bakes on Mesh to mature in terms of general use – creators need to update their heads / bodies (although Slink is apparently ahead of the curve, and their new bodies are said to work with existing appliers, and other creators may also be providing products / updates, I’ve just not encountered any as yet). Those making system wearables are going to need time to update to the 1024×1024 where preferred (if they haven’t already, and so on. And, most obviously, it will take a little time for the Bakes on Mesh code to percolate out to all TPVs.
Robin Wood (Robin Sojourner in SL) is a well-known content creator in Second Life who has been turning her hand to mesh items. As a result she has produced an excellent 3-part video tutorial on mesh, which she has kindly allowed me to display here.
Visit Livingtree and all of Robin’s excellent stores, where she supplies everything from avatars and skins through to clothing, scripts and tutorials.
Update 30th August
Robin has now added the videos to her own blog as well, and can also now be found on the Livingtree blog – enjoy!