On Tuesday, July 25th, I received an e-mail from Nicky Perian, lead developer for the Kokua viewer. Sent to the Kokua Dev mailing list, the notice was also later posted to the Kokua website.
In short, Nicky will, in October – and for very good reason – be stepping back from a direct, hands-on leadership role in maintaining Kokua, and he is hoping that those in the community who are able to support viewer development will step forward to fill the void and take responsibility for helping to ensure the viewer continues into the future.
The notice – which I’m sure Nicky will have no problems in seeing reproduced here reads in full:
Hello all,
This coming October I will turn 75 years old. I intend to have minimal (consulting only) involvement with Kokua after that. Hopefully, someone will take over the project or it will fade away.
Between now and then I intend to cut some routine building and updating. The first cut will be the RLV build of Kokua OpenSim followed by RLV build of Kokua Second Life then NoRLV build of Kokua OpenSim.
That will leave The NoRLV build of Kokua Second Life version.
I want to thank all who have contributed to Kokua including other third-party viewer project developers and those that work for Linden Lab.
I will try to complete the Alex Ivy integration. Kokua Project Alex Ivy Windows versions can be built and tested now.
Nicky has worked tirelessly to develop and maintain Kokua, and other, the viewer has been one of the first v5 style viewers to update with features and code from Linden Lab, as well as maintaining strong support and parity with Marine Kelley’s RLV. While Kokua hasn’t been my primary viewer, I have always found it to be stable, reliable and straightforward to test as updates have been released. As such, I’d like to thank Nicky for all of his work in keeping the viewer and the project going.
Should anyone fancy taking on the work with Kokua, individually or as a team, as well as following the links to the repositories as Nicky has provided, do please contact him and discuss opportunities and intentions with him so that if more than one person does step forward, you can all be put in proper contact with one another.
I’ll of course continue to cover the updates Nicky is planning, and will cover any future updates and releases of the viewer and the project hopefully rolls into the future.
Updated July 7th: to include information on easy embedding in WordPress.
Linden Lab has recently made two updates to the 360-degree snapshot project viewer, which I’ve been meaning to review for the last couple of weeks.
On June 19th, version 5.1.0.506488 of the viewer was issued, which included image processing updates, and which included offering the viewer in both 32-bit and 64-bit Windows flavours. Then, on June 29th, the viewer was further updated to version 5.1.0.506743 (at the time of writing the current version), which largely saw the viewer brought up to parity with the current release viewer.
The core functional changes to the viewer in both of these updates is the removal of the need for manual post-processing via zip file download and a web back-end provided by the Lab (see my original hands-on of the initial release of the viewer for more). Instead, the viewer is intended to process the image and provide the necessary meta-date to allow automatic playback on most 360-degree image sharing sites.
I’ve so far tested the viewer on Flickr and a number of 360-degree photo sharing sites such as VRchive. The latter appear to work as expected, Flickr requires 360-images uploaded from the viewer to be manually tagged from within Flickr in order to work. This is a minor inconvenience – but would be smarter if the metadata allowed for auto-tagging of the images as equirectangular, as can be done with other 360-imaging tools. A JIRA has been raised on this.
In the meantime, here’s a look at taking photos with the viewer, and getting them working on Flickr.
The 360-degree photo option is fully integrated into the snapshot floater, and when selected will disable all other options and will only allow you to save images to your local hard drive. Note that if you set any other options (e.g. check the Interface option or setting a filter) prior to checking the 360-degree snapshot option, this will result either in the viewer reverting to taking a “normal” snapshot, or ignoring the filter when processing as a 360-degree image.
The 360-degree option enabled in the snapshot floater
Before taking a shot, you should do a little preparation first:
Position your avatar / camera at the centre point of the image you wish to capture (you can “hide” your avatar using a full body alpha or something like a “vanish” animation if you don’t want it appearing in the shot). Use ALT-cam or flycamming to position the camera if you want your avatar to appear in the image, but not at its centre.
Use Menu > World > Environment Editor >Sky Presets > Edit Presets to set your desired Windlight and use the Clouds tab to freeze the clouds. Avoid the use of Depth of Field.
Turn your camera / avatar slowly around in a circle to see everything in the snapshot field of view, allowing everything to render as you do so.
When you’re ready to take your shot, click on Save to Disk on the snapshot floater and set your preferred image size:
Small – 1024×512
Medium – 2048×1024
Large – 4096×2048
Save your snapshot to the location of your choice on your hard drive. You can now upload it to your preferred 360-degree image sharing website.
Displaying In Flickr
If you are uploading to Flickr, remember to manually set the equirectangular tag in the image page, and then refresh the page. The image should reload and display in 360-degree format.
To get snapshots to display as 360-degree images in Flickr, click the Add Tag option and enter “equirectangular” (without the quotes) and press ENTER. Refresh the page and the image should start to auto-scroll once the page has reloaded
Displaying in WordPress
WordPress has a beta 360 photo and video processor allowing users to embed 360-degree images into their posts. However, in the case of images, this requires the .JPG file extension to be used. Currently the snapshot viewer uses .JPEG. However, once the extension has been changed, images should work fine.
To embed a 360 image, upload it to your WordPress media library (or similar on-line storage – but not a photo sharing website), making sure it has the .JPG extension. Then within your blog post, add the following shortcode between square braces (i.e. [ and ]) in either the Visual or Text editor:
vr url=path-to-photo.jpg view=360
This should result in the image being displayed so that it can be clicked on an manually scrolled, as per the image below:
As noted, 360-degree snapshots should auto-play on any photo sharing sites such as VRchive which parse uploads to ensure they are in the required equirectangular ratio (information on using VRchive can be found in this blog here).
Whether or not the viewer can be set so that the metadata allows Flickr to auto-recognise the 360-degree images as such, and simply play them without manual tagging remains to be seen. But as noted, it’s not a major inconvenience of not (after all, who of us here doesn’t fiddle with images post upload to Flickr?). As it is, this is a definite step up for the viewer in managing 360-degree images, and I’d certainly be interested in hearing from anyone as to how it works with Facebook.
One other point to note as well is that at the moment, the 360-degree snapshot project viewer is not compatible with format used for 360-degree images on SL Places Pages. However, the latter will be revised to support displaying images captured by the viewer at some point in the future.
On Tuesday, June 20th, the Firestorm team released Firestorm 5.0.7.52912.
This is something of a maintenance update than a major feature release, covering as it does the more recent updates from Linden Lab – the improved region and parcel access controls, updated Trash behaviour to try to help control risks of inventory loss, custom folders for uploads, the avatar complexity updates, and a host of smaller fixes and tweaks.
Most of these have been adopted directly from the Lab’s code, others – such as the avatar complexity updates – have been folded-in to existing capabilities in Firestorm. There are also numerous updates and improvements from the Firestorm team as well.
In keeping with my usual approach to Firestorm releases, what follows is not an in-depth review of everything new / updated in version 5.0.7.52912, but rather an overview, highlighting some of the more significant / interesting changes, updates and fixes, which I feel will be of most interest to users.
For details of all changes, and all due credits to contributors, etc., please refer to the official release notes.
The Before We Begin
There is no need to perform a clean install with this release if you do not wish to.
Do, however, make sure you back-up all your settings safely so you can restore them after installing 5.0.7.
Major Lab Derived Updates
Firestorm 5.0.7 brings the viewer up to parity with the Lab’s 5.0.5 code base. So, as noted, this release supports the updated region and parcel access controls, the latest avatar rendering updates, custom upload folders, etc..
Updated Region / Parcel Access Controls
The updated region / parcel access controls, introduced by Linden Lab in May 2017 mean that when a region holder / manager explicitly sets a region for open access to visitors (via the Region / Estate floater), parcel holders on the region can no longer override the setting at the parcel level and create ban lines around their parcel (although they can still use the parcel ban list and scripted security systems if they wish and subject to any covenant).
These updates mean that both the Estate tab in the Region / Estate floater has been updated, and the behaviour of the Access tab in the About Land floater has changed.
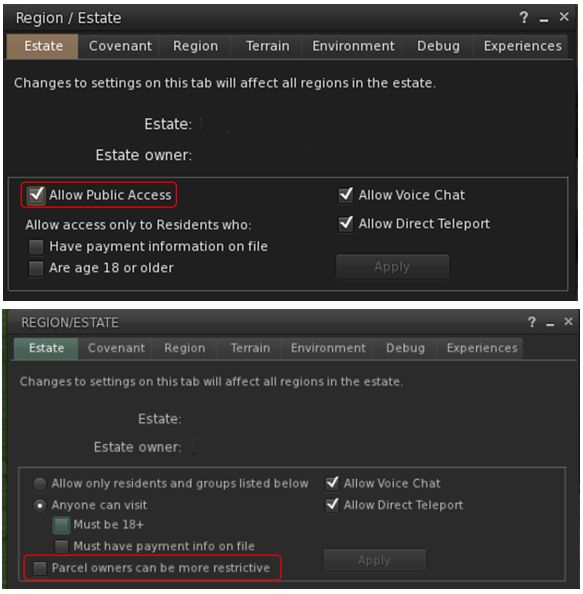
In the case of the Estate tab in the Region / Estate floater, the check box Allow Public Access has been removed, and a new option, Parcel Owners Can Be More Restrictive, has been added (see below).
The new Parcel Owners Can Be More Restrictive option on the Region / Estate > Estate tab and its Apply button. Used to determine whether or not parcel owners can set parcel access restrictions through the About Land floater
By default, Parcel Owners Can Be More Restrictive is checked, which means that parcel owners should see no difference in behaviour for their parcels unless an estate holder / manager opts to make changes at the estate level.
Should the option be unchecked, the estate holder / manager making the change will receive a warning that they are about to make a change that could affect parcel settings in the estate:
The new warning estate holder / managers will see when changing the new access settings
To set the change, the region holder / manager must then clear the warning (OK) and click the Apply button on the Region / Estate floater – failure to do so will leave the option unchanged.
UNCHECKING the option will result in two things happening at the parcel level:
Parcel owners will receive a new system notification for every parcel in the region they hold which has been affected by the change:
The new system notification displayed to parcel holders for every parcel in the region they hold which has been affected by a change to the region’s access settings at Estate level
Any previously active banlines around affected parcel will be removed, and parcel owners will no longer be able to set parcel access restrictions via About Land > Access, as the options to do so will be greyed out:
When the Parcel Owners Can Be More Restrictive option is checked, the parcel-level access options in the About Land floater will be greyed out for parcel holders, preventing them from overriding the region-level access
If a region which previously allowed parcel holders to set their own access restrictions is set to public access (by unchecking Parcel Owners Can Be More Restrictive and clicking APPLY), and then is reverted again (by checking Parcel Owners Can Be More Restrictive and clicking APPLY), all parcels on the region will revert to the access settings applied to them before any changes to region access were made at the estate level.
Trash Behaviour Changes
To try to help with inventory losses through accidental deletion of objects which have mistakenly been moved to Trash, the Maintenance RC viewer has the following Trash related behaviour changes:
The prompt displayed when you have over 5K items in Trash is amended to show the trash folder when you’re ready to purge it, and before you can purge it.
Backspace will now only delete on Mac systems (as it’s the only option available), it will no longer delete on windows.
The purging Trash notification now gives a count of items in Trash.
The Trash purging warning now gives a count of the items about to be permanently deleted from the Trash folder – one of the new behaviours in the Maintenance RC viewer designed to help combat accidental inventory loss through Trash deletions
The “Are you sure you want to delete this thing” warning will be seen at least once per session.
Note: Firestorm have included a debug setting to disable the trash purging warning – FSDontNagWhenPurging. This is set to FALSE by default (the warning will be displayed). It is recommended you do not change this setting unless you have complete confidence that you are unlikely to accidentally purge wanted items from trash / you viewer is unlikely to incorrectly move folders to your Trash.
In week #21, both the Kokua viewer for Second Life and the Restrained Love viewer updated to achieve parity with the current SL viewer release (version 5.0.5.326444 at the time of writing).
Kokua for Second Life updated to version 5.0.6.41208 (release notes) on Friday, May 26th, 2017, while the Restrained Love updating to version 2.9.21.3 (release notes) on Thursday, May 25th.
As the core changes to both viewers are more-or-less the same in terms of their parity with the official viewer, this review provides a combined recap of these updates for both viewers, from the oldest to most recent. Kokua users please note that the documented changes do not necessarily apply to the Kokua OpenSim version.
Custom Folders for Uploads
Kokua 5.0.6.41208 for Second Life and Restrained Love 2.9.21.3 users can now select the inventory folders into which uploads – images / textures, sounds, animations and mesh models – are saved by default (rather than having all textures + images go to Textures for example).
To set a custom folder for an upload type:
Go to Inventory and right-click on the desired folder.
Select Use As Default For. This opens a sub-menu of upload types (shown on the right).
Click on the type of upload you wish to always save to that folder.
Note that this only applies to uploads: images / textures, mesh models, etc., received via transfer or will still go to the their “default” system folders (so a texture received via transfer will still go to Textures, for example).
The folders set for uploads can be reviewed via the new Preferences > Uploads tab.
The new options shown for selecting a default destination folder for uploads (left), and the new Upload panel in Preferences, which lists the locations (right) – via Kokua, click for full size, if required
Block List Tally and Grid Status Button
Kokua 5.0.6.41208 and Restrained Love 2.9.21.3 now have display a tally of those blocked in the viewer (People Floater > Blocked), and include the Grid Status button which can be added to any toolbar position in the viewer window, providing direct access to Second Life grid status updates, which are displayed in the viewer’s built-in browser.
The Options for how another avatar is rendered are now Default (i.e. in accordance with your avatar complexity threshold setting); Always (i.e. always render the selected avatar) or Never (i.e. permanently render them as a grey imposter). These options have also been moved to a sub-menu on the right-click Avatar context menu.
Following Firestorm’s lead, adjusted settings for avatar rendering will now persist across log-ins for the viewer, until either reset or your settings are cleared by a clean install or similar.
There are two new options for Avatar Complexity, located on the Preferences > Graphics tab.
The first is a check box, Always Render Friends, which is pretty much self-explanatory: when checked, friends will always fully render, regardless of the viewer’s Avatar Complexity threshold.
The second is an Exceptions button, which adds a further level of control for how other avatars – including friends – are rendered by the viewer.
Left: the new render options sub-menu in the Avatar context menu (seen when right-clicking on another avatar). Right: the new Preferences > Graphics tab options for avatar rendering (see below for the exceptions button). Images via Kokua – click for full size, if required
Note that Kokua’s pie menu does not display the “Default” option correctly when used on other avatars. Instead, the option is labelled as “>”. As per Nicky’s comment below, this is now fixed.
Rendering Exceptions
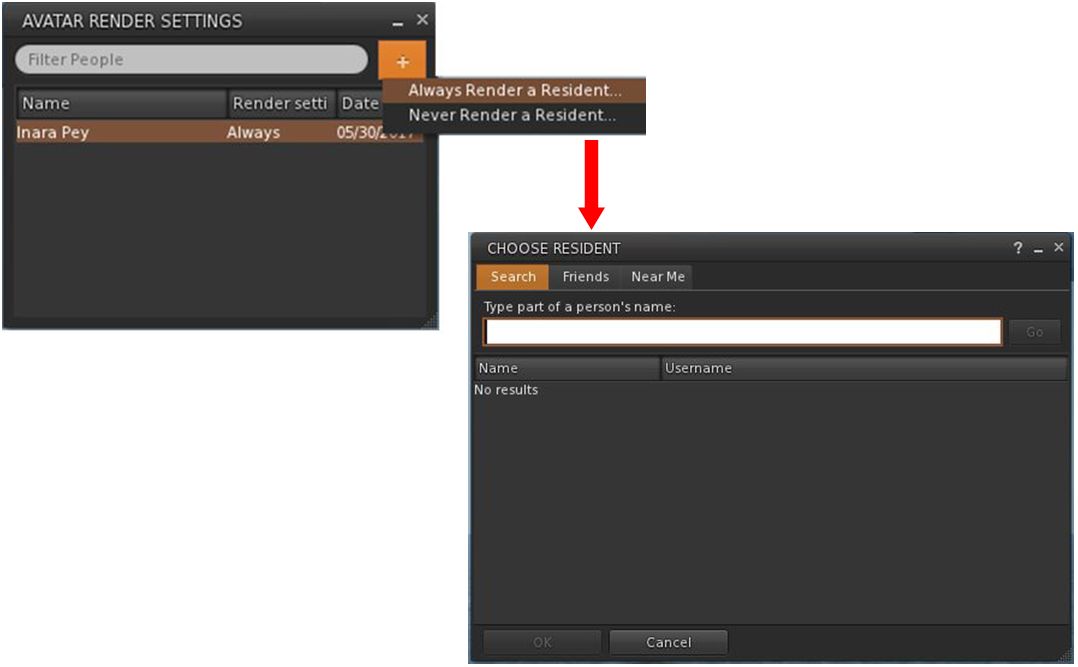
The Exceptions button described above enables named avatars to be either fully or never rendered by the viewer, regardless of any other avatar rendering settings. It comprises two new floaters: the exceptions list (Avatar Render Settings, below left) and the search floater (Choose Resident, below right), accessed by clicking the “+” button on the exceptions list and then selecting whether you want to always or never render the avatar you’re about to choose.
Rendering Exceptions allows you to select individual avatars (e.g. from those close to you or your friends list or via search) you always / never want to render, regardless of your other avatar complexity settings. Via Restrained Love Viewer.
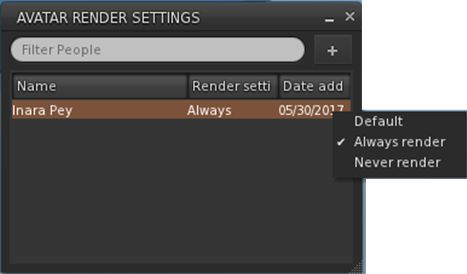
It is possible to update how an avatar in the exceptions list is displayed by right-clicking on the avatar’s name and selecting the required option (Default, Always, Never) from the displayed drop-down list. Note that “Default” will remove the avatar’s name for your exceptions list and display them in-world in accordance with your overall Avatar Rendering Complexity setting.
Changing how an avatar in the exceptions list is rendered. Via Restrained Love Viewer
Update, May 23rd: version 5.0.5.326444 of this viewer is now the release version of the official viewer.
On Friday, May 12th, 2017, Linden Lab issued a new Maintenance release candidate viewer – now version – 5.0.5.326444 – featuring a number of bug fixes and improvements.
In particular the viewer includes updates to reflect the revised region / parcel access controls now deployed to the main grid. It also includes improvements to inventory management and purging Trash, and a range of other improvements and updates as well as numerous bug fixes.
As per usual, this is not intended to be an in-depth review of the viewer, but rather to highlight some of the new / updated features and an overview based on the release notes.
Region / Parcel Access Controls
The new region / parcel access controls are paired with a server-side update first announced in April, and the first part of which was deployed to the LeTigre server RC channel on Wednesday, May 17th. Until these server-side updates are deployed grid-wide, this particular set of changes in the view may not function on all regions.
In short, the new controls mean that when a region holder / manager explicitly set a region for open access by visitors (via the Region / Estate floater), parcel holders on the region will no longer be able to override the setting at the parcel level and create ban lines around their parcel. They will, however, still be able to use their parcel ban list or deploy security orbs or similar (assuming the use of the latter is allowed under any covering covenant).
This means that with this viewer, both the Estate tab in the Region / Estate floater has been updated, and the behaviour of the Access tab in the About Land floater has changed.
In the case of the Estate tab in the Region / Estate floater, the check box Allow Public Access has been removed, and a new option, Parcel Owners Can Be More Restrictive, has been added (see below).
With the new parcel access overrides, the old setting to Allow Public Access (top) has been replaced by a new setting, Parcel Owners Can Be More Restrictive (bottom), as found in the current Maintenance RC viewer
By default, Parcel Owners Can Be More Restrictive is checked, which means that as the updated settings are deployed server-side, parcel owners should see no difference in behaviour for their parcels unless an estate holder / manager opts to make changes at the estate level (as shown in the image above).
Should the option be unchecked, the estate holder / manager making the change will receive a model warning that they are about to make a change that could affect parcel settings in the estate.
The new modal warning estate holder / managers will see when changing the new access settings
Should they go ahead and APPLY the change, two further things will happen:
Parcel owners will receive a new system notification for every parcel in the region they hold which has been affected by the change (below).
The new system notification displayed to parcel holders for every parcel in the region they hold which has been affected by a change to the region’s access settings at Estate level
Any previously active banlines around affected parcel will be removed, and parcel owners will no longer be able to set parcel access restrictions via About Land > Access, as the options to do so will be greyed out (as shown below).
When the Parcel Owners Can Be More Restrictive option is checked, the parcel-level access options in the About Land floater will be greyed out for parcel holders, preventing them from overriding the region-level access
If a region which previously allowed parcel holders to set their own access restrictions is set to public access (by unchecking Parcel Owners Can Be More Restrictive and clicking APPLY), and then is reverted again (by checking Parcel Owners Can Be More Restrictive and clicking APPLY), all parcels on the region will revert to the access settings applied to them before any changes to region access were made at the estate level.
I recently received an IM from Kitty Barnett recently, asking me if I’d be interested in taking a look at some new features she’s been working on for the upcoming Catznip R12 release which is Coming Soon™.
Obviously as someone who has followed (and uses) Catznip (although not as frequently as I use Firestorm, admittedly), I was delighted to take a look. Nor was I alone, Kitty also put together a couple of articles on the features on the Catznip blog, (which you can find under the titles Three Days of Teasers Day #1 and Day #2 – a third part was planned but that pesky thing called the physical world got in the way of Kitty’s plans), and invited Catznip users to have a look.
With Kitty’s approval, I’ve summarised those two articles here – and if you are a Catznip user already, and haven’t seen Kitty’s original documents – please hop over to the Catznip blog, have a read & offer feedback.
Inventory Management
Catznip has tended to position itself as the viewer for shoppers, and with the upcoming R12, Kitty offers some enticing new features to make shopping and inventory management a lost more pleasant. She introduces the basic concept thus:
Whenever you buy or grab something you have to click that “Buy”/’Pay”/”Keep” button anyway so wouldn’t it be great if we could just do some pre-sorting right then and there?! It wouldn’t really interrupt the flow of going to an event and hovering up demos or buying things you’re sure you want since you don’t actually have to go to your inventory while you’re at the event and you’d be able to teleport home with an inventory no worse off then when you arrived.
And so with this in mind, Kitty has revised the Buy / Pay floater and the Accept Inventory floater so that they offer you the ability to select where incoming items are going to be stored in your inventory.
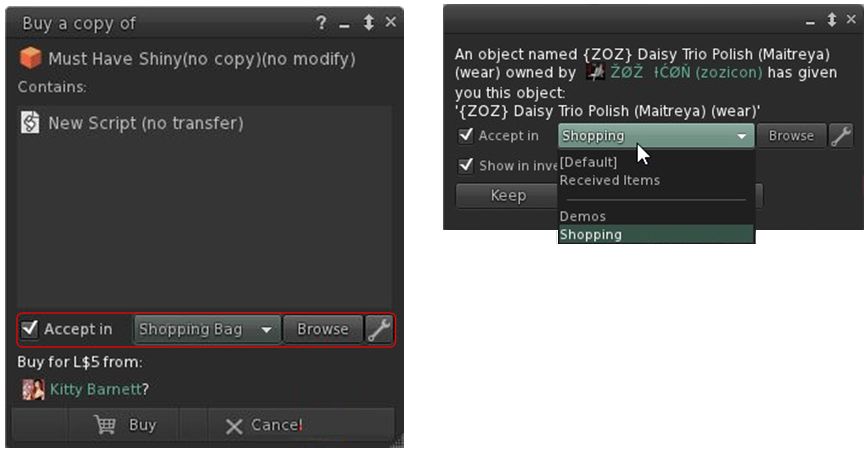
Catznip R12’s upcoming options to select where items your buy / receive go in your inventory. Credit Kiity Barnett / Inara Pey
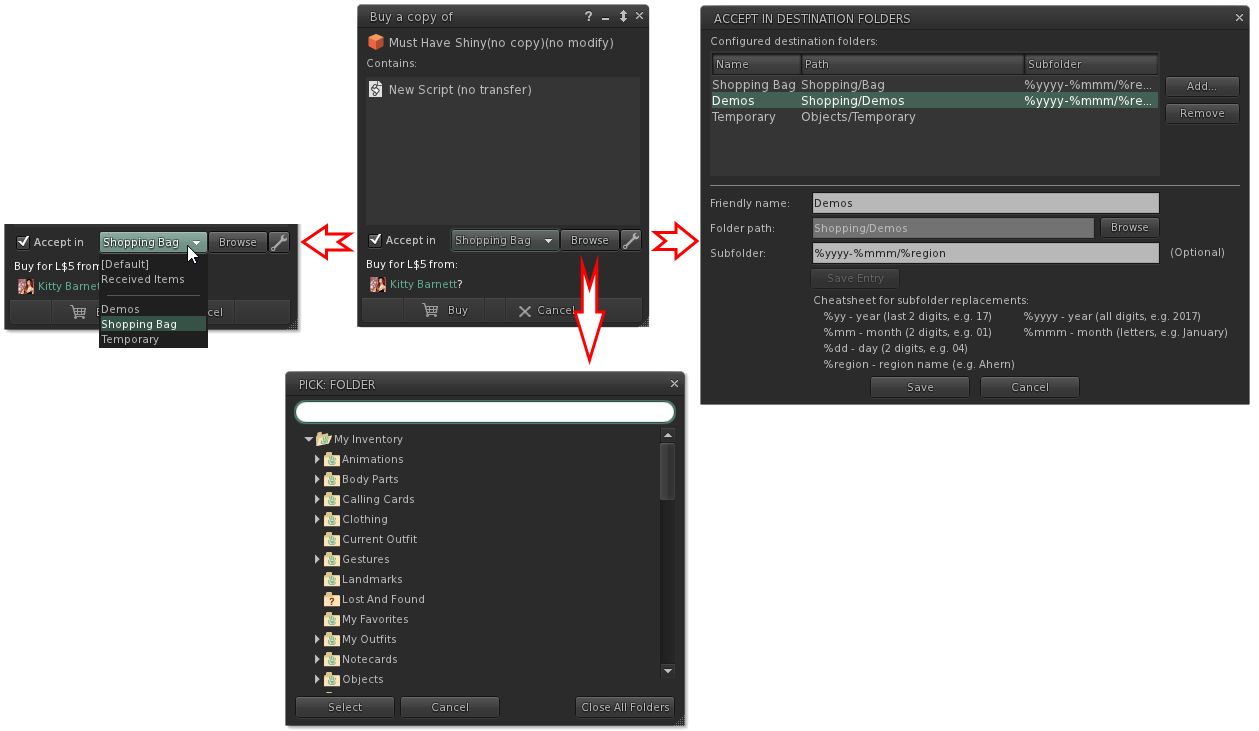
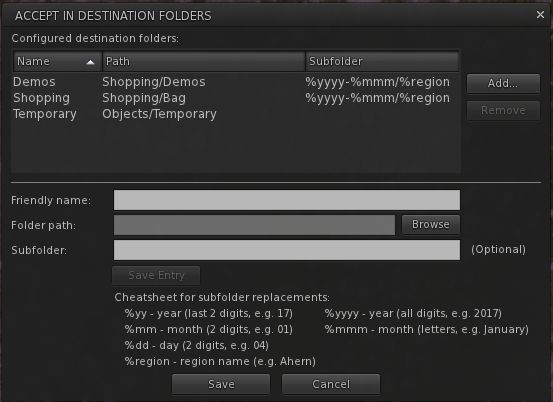
The options should be fairly self-explanatory. Check Accept in and the remaining options are activated. The drop-down will display a list of folders you have opted to allow incoming items to be delivered (show in the image on the right), the browse button allows alternative from you list of folders in the drop-down to be selected, and the spanner button allows you to establish your list of destination folders. The roadmap of these various options is shown below.
What the options do. Note they are available in both the expanded floater view (centre) and the collapsed view (left) – click for full size, if required. Credit: Kitty Barnett
Note only can you select the folders into which you want incoming purchases to go, you can also set Catznip R12 to dynamically create new folders in which to place incoming items. This means, for example, that if you got to a big shopping event at one location, you can set the viewer to deliver all the demo you obtain / items you purchase into folders define by – say – the month in which you got them, and the location where they were obtained.
So, for example, if in April you go to shopping event X on region YYYY, and grab a load of demos, and then later in the month go to event A on region BBBB and grab more demos, you can have them delivered to sub-folders in your “Demos” folder, respectively labelled “April 2017 YYYY” and “April 2017 BBBB” – both of which are dynamically created by Catznip as they are needed. So even if you don’t get around to trying them for days after your visit, you can quickly and easily locate the demo items without have for fiddle around searching for folders and objects.
The panel for setting folders into which incoming purchases can be received, and the option for setting dynamically created sub-folders within that folder. Credit: Kitty Barnett
Inventory Searching
Inventory searches can be a pain. Even with the search filters, things are hardly ideal. To help improve things, Kitty has in the past added additional search options to Catznip such as Open Folder In, which considerably eases the pain for further refining searches / making items visible in folder which might otherwise remain hidden as a result of the search term / filters initially used to try to find things.
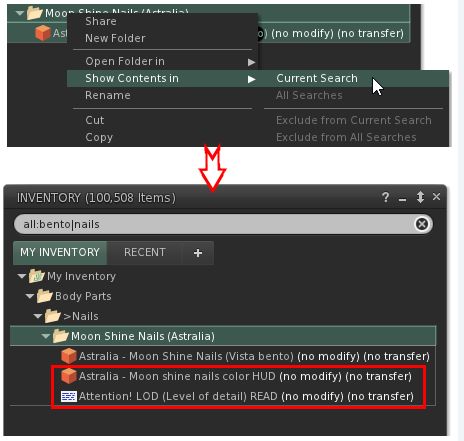
With Catznip R12, she further improves things by adding a new Contents In capability. Rather than displaying the results of a search in a separate tab, this option displays the folder(s) matching your search criteria with all of the contents visible, rather than just the items which might match your search criteria, making it much easier to see if the folder(s) contain what you are looking for (particularly where some / all of the items in the folder might not be consistently named, and so might otherwise be masked from view after a search).
The New Show Contents In presents a more refined way to see all of the contents in a folder when they might otherwise be masked by the search criteria / filter you have set. Credit: Kitty Barnett.
Finally – and not a part of the two articles by Kitty linked-to above – Catznip R12 will see further refinements to the inventory search features themselves, and highlighted in the set of images below. I’ll have more on this when the viewer is ready for release.
The Advanced Inventory filter floater for Catznip R12 in its expanded and tabbed forms.
Feedback
I’m not the world’s greatest shopper in many respects. In the physical world, I’ve reach that point in life where I know what I like to wear and am happy wearing it; shopping for fashion or trends passes me by. This is reflected in my SL time as well; I don’t go to the major shopping events, be they fashion or the gacha events. I tend to be targeted in what I’m buying.
But, that said, there are times when I can hit a store and go demo-mad, and I find it annoying that depending on how they are delivered, demos can end up anywhere in the top-level of my inventory when delivered as a folder, or get rudely shoved in Objects. I’m also slightly OCD in my inventory management and ordering.
Both of these being the case, I’ve long wanted to have the means by which I could better control what goes where when entering my inventory, rather than having to set aside time after (say) an infrequent demo splurge shunting folders and boxes around my inventory. So the new destinations options get a big thumbs up from me. Similarly, inventory filtering and searching has long been in need of refinement, so I’m looking forward to having a play with kitty’s updates in more detail when R12 surfaces.
And when might that be? Well, there is still some work to be done before the viewer is ready for a full release – but there is a chance that a preview version might be available on a limited basis in the next few days.
In the meantime, Kitty welcomes constructive input on these ideas, so again, if you have any suggestions, comments, additions, or obvious things that could be added (keeping in mind that if you’re not a Catznip user then there are already quite a few inventory/appearance features that you might not be used to) – she’d like to hear from you. Drop your comments here or – better – on the Catznip blog posts, which I’ll again linking to below to save scrolling.