Update, March10th: Two new versions of Kokua are available for 64-bit Windows (RLV – version 5.1.3.42936 – and non-RLV – version 5.1.3.42935). These build on recent updates to Kokua using the Lab’s 5.1.3 code base, and feature internal code refactors. They can be downloaded from Kokua’s Sourceforge repository.
In October 2017, Nicky Perian announced he would be stepping back from a direct, hands-on leadership role in maintaining Kokua to enjoy a well-deserved retirement. He put out a call for members of the Kokua community to step forward and help maintain Kokua, although he has maintained a role working on the Mac and Linux versions of the viewer.
On Friday, March 9th, Chorazin Allen – perhaps best known as the creator of Chorazin Creations, a range of RLV-enabled cages and cells for the BDSM community, and the Chain of Command range of scripted plug-ins for the Real Restraints range of products by Marine Kelley- issued a Kokua group notice indicating he would be joining the team, taking directly responsibility for:
The Windows builds of Kokua
RLV updates
Release management and general administration.
In a separate group notice, Chorazin also notes:
You can check on the latest Win64 versions of Kokua by visiting Sourceforge here:
You may also set up notifications from Sourceforge when new versions are added.
RLV users should update to 42932 to get a fix for the garbage collector failing to remove restrictions from vanished objects.
Chorazin notes that – understandably – it will take a little time for the re-organisation within the Kokua team to be completed, and Kokua users are asked to keep an eye on group notices – which will become more frequent as a new version is readied for release – and on the Sourceforge repositories for updates to forthcoming versions.
In the meantime, news that Kokua is to be moving forward will likely be welcomed by the Kokua community, and kudos to Chorazin for taking up the request to help manage the viewer and carry it forward. I’ll continue to cover updates as they are released.
Update: The 360 snapshot viewer was updated to version 5.1.6.515934 on June 6th.
On Thursday, February 22nd, Linden Lab issued a further update to the 360-degree snapshot project viewer. While version 5.1.2.512774 brings with it some updates and changes, it still fair to say this is more an interim update than the set of improvements and capabilities some of us had been hoping for.
As with the previous update, released in June 2017 – see my Hands-on II review here – this viewer:
Uses the Alex Ivy viewer code base (only the release code, this time, obviously), and so is available for Windows (32-/64-bit) and Mac OSX; there is no Linux version at present.
Handles the “stitching” of a captured set of images into a single equirectangular 360-degree image ready for upload to suitable suites supporting 360-degree images.
However, what’s new with this viewer is that it:
Moves the 360-degree photo option from the snapshot floater to its own floater.
Sets the 360-mage resolution to 4096×2048 (no more “small”, “medium” or “large”).
Includes the required meta data for images to auto-display in Flickr’s 360-degree viewing mode, so you no longer have to manually set the equirectangular tag
So, how does it stack-up?
On the positive side, the new capture UI does a credible job of easing the capture process and in offering preview of the 360-degree image. Hopefully there will be some further options added to it in the future – such as image size.
On the negative side the current 4096×2048 resolution could still do with improvement – Alexa Linden informed me that this work is in-hand – as it can exhibit a very definite fuzziness.
Taking the Shot
Position your camera at the centre point of your 360 shot.
While it is not specified, I would suggest camera in a circle to encourage the scene to load before capture.
Use Menu > World > Environment Editor > Sky Presets > Edit Presets to set your desired Windlight and use the Clouds tab to freeze cloud movement. Avoid the use of Depth of Field.
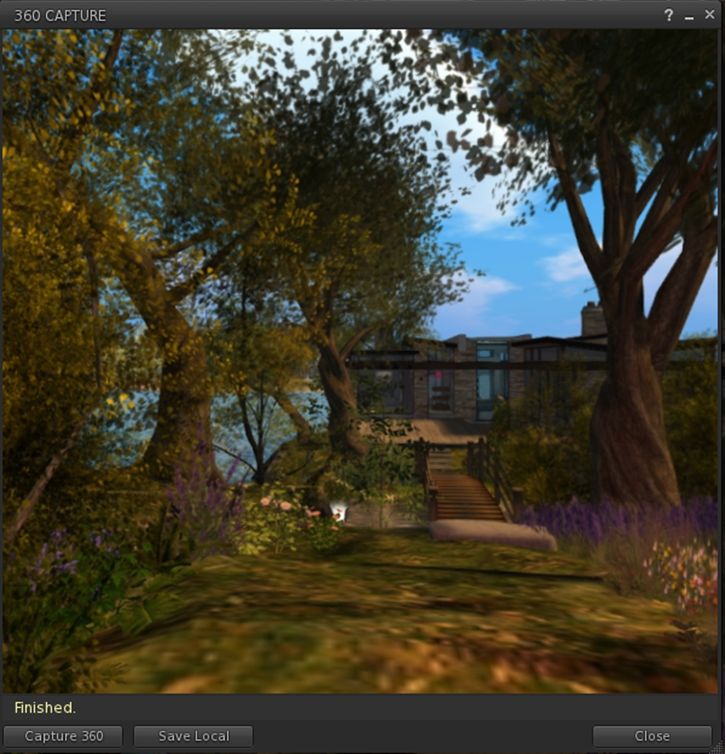
Press CTRL-SHIFT-C to display the 360-image capture floater.
The new 360 snapshot floater – default mode
Click Capture 360 to commence the capture process.
The floater will display some basic messages as the images are being captured and process, and the Lab have indicated these may be improved, depending upon feedback.
Once image processing is complete, the floater will expanding to show an auto-rotating previewing of the captured image. As with any 360-degree image, you can press and hold the left mouse button while over the image and scroll around it.
The 360-degree image preview
Note that there is currently an issue with the preview on Mac systems which can leave it black. If this happens, click Save Local and then Cancel. This should force the preview to displayed correctly.
If you’re unhappy with the preview, you can re-start the process by clicking Capture 360 again, or you can save the image using the Save Local button. This will save the image in equirectangular format to a location of your choice on your computer, from where yo can upload it to photo sites supporting 360-degree equirectangular images.
As noted above, images captured in this version of the viewer should automatically display in 360-degree viewing mode in Flickr without the need to meta tag them manually. They also should display in the WordPress “VR” shortcode, placed within square braces (“[“, “]”) and in the format:
vr url=path-to-photo.jpg view=360
This should yield a result like this:
Feedback
A welcome update to a project viewer that was a little long-in-the-tooth: obviously, as well as the 360 snapshot changes, this version also brings the viewer up to par with all of the most recent viewer releases.
I was a little disappointed that there’s no support for uploads to Second Life Place Pages with this iteration of the viewer – something that had been indicated as being on the horizon in some recent user group meetings; apparently, and like the overall image resolution, it requires further work. As the 360 image captures now has its own floater, I’d also personally like to see it gain a dedicated toolbar button as well. CTRL-SHIFT-C isn’t a taxing short cut to remember, but buttons can make for convenience.
That said, the thing to remember here is that this is still only a project viewer – it still has a good way to go before being ready for prime-time use, which is something the Lab fully acknowledges. So, while it is worth taking it for a drive and having a play, expect to see further improvements and added functionality appearing in – hopefully not-too-distant – future updates.
On Wednesday, January 24th, 2018, the Firestorm team released Firestorm 5.0.11.53634. This is a significant update to the viewer, incorporating code updates from a number of recent viewer releases from Linden Lab, as well as some major updates from the Firestorm team and a number of important new features and updates, as well as a range of bugs fixes and improvements.
Given the extent of the updates in this release, and in keeping with my usual approach to Firestorm releases, what follows is not an in-depth review of everything new / updated in version 5.0.11.53579, but rather an overview, highlighting some of the more significant changes and updates I feel will be of most interest to users.
For full details of all changes, and all due credits to contributors, etc., please refer to the official release notes.
The Before We Begin
There is no need to perform a clean install with this release if you do not wish to.
Do, however, make sure you back-up all your settings safely so you can restore them after installing 5.0.11.
Major Lab Derived Updates
Firestorm 5.0.11 brings the viewer up to parity with the Lab’s 5.0.9 code base. It includes the following major updates from the Lab.
Asset-HTTP Project: Firestorm now fetches the majority of inventory assets (landmarks, wearables – system layer clothing and body parts), sounds, gestures and animations) the same way as textures, mesh and avatar baking information: via the Content Delivery Network (CDN), rather than through the simulator. This should make loading of such content both faster and more reliable.
64-bit Havok sub-libraries: the 64-bit version of Firestorm now uses Havok physics with the mesh uploader , and can now visualise the pathfinding navmesh.
Group ability Always Allow ‘Create Landmark’: this was accidentally removed from the viewer, and has now been returned. When enabled on a group role, it allows members of that role to override the teleport routing (e.g. right-click >teleport to) on the parcel if a landing point is set, as long as Direct Teleport is enabled on the region (BUG-100719).
Incorporation of the Martini (November 2017), Moonshine (September 2017) and Margarita (August 2017) viewer updates.
Note: while Firestorm 5.0.11.53634 includes the 64-bit Havok sub-libraries for Second Life, it is not using Linden Lab’s Alex Ivy 64-bit code base. That will be for the next FS release.
Firestorm Updates and Additions
Viewer Performance: Mesh Rendering Information Features and Updates
Key among the updates to this release of Firestorm are new features and updates to a number of floaters intended to help users make better judgement calls on how content in Second Life might be affecting their viewer performance, and potentially make more informed choices about the goods they purchase in-world.
Build Floater – Physics View
The Show Physics Shape icon (Build Floater > Features tab) – disabled (top); enabled (bottom)
Firestorm now includes an option to viewing the physics shape of objects you can edit. Among other things, this can help avoid having items you drag from inventory fail to appear in-world, with the message “Failed to place object at specified location. Please try again.” appearing in the top right corner of the viewer window.
The option is on the Features tab of the Build floater, and takes the form of an eye icon to the right of the Physics Shape drop-down.
If displayed with a red line through it (default): show physics shape is disabled
If shown without a red line through it: show physics shape is enabled.
When enabled, the selected object’s physical shape is shown in blue. Sometimes this will match the shape of the object itself (below left); other times, it may not (below right). Any attempt to rez another item on the part of the object covered by the blue will succeed; any attempt to rez on the part of an object not covered by the blue will likely result in the “Failure to place object” message.
The show physics shape option: Build floater > Features > eye icon next to Physics Shape Type drop-down. When enabled, it shows the physics shape of an object, which may (l) or may not (r) match the physical shape of the object. Click for full size, if required
Showing the physics shape of surfaces reveals why some may be walkable and why avatars may have problems with others – such as colliding with “something” while apparently not standing close to an object, or being unable to pass through a gap or open doorway.
Notes:
Show Physics Shape can also be accessed via the Build Menu > Options > Show Physics Shape When Editing.
Once enabled, Show Physics Shape remains active until manually disabled, or until you log-out of Second Life (it will be automatically disabled on your next log-in).
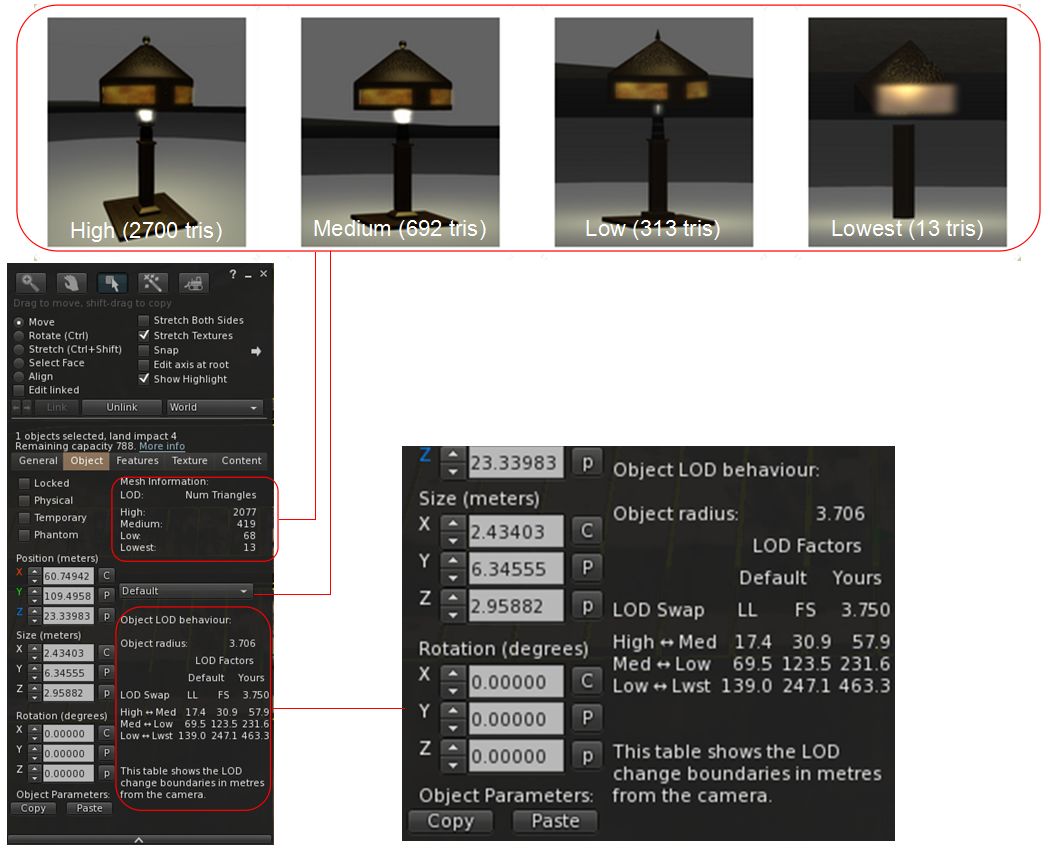
The Build floater also provides a range of new information specific to mesh objects and their level of detail (LOD). This can be seen on the Object tab of the floater when a mesh object is selected. For prim objects, the tab is unchanged and will display the “old” information (Path Cut, Hollow, Twist, Taper, etc.).
For a detailed examination of LOD please refer to For LOD’s sake stop! by Beq Janus. The following is intended to provide a brief overview of the mesh object information.
Mesh objects can comprise up to four different versions, as defined by the creator a very High detailed model, with a high count of triangles, displayed with the object is being viewed up close, and then up to three models with progressively less detail (fewer triangles), designed to be used the further away the camera is from the object (Medium, Low and Lowest). These are collectively referred to as level of detail models, and are designed to improve the rendering of scenes. In essence, the further away (or smaller) and object is, the less detail can be seen and so the less detailed versions can be under when rendering it, easing the overall rendering load.
The first two parts of the mesh information related to these models when a mesh object is selected:
Mesh Information: lists the number of triangles used in each of the LOD models the creator has provided (note that if two ore more of the model types has the same triangle count, it indicates the same model is being used (so if Low and Lowest both show 3, or example, the same 3-triangle model is being used for both)
Default Drop-down: allows you to preview each of the different LOD models for the object (make sure Default is selected after use).
Up to four LOD models can be defined for SL – from a highly detailed, high triangle count version to a very low detail / low triangle count version (top). The Mesh information display allows the triangle count for the available LOD models of an object to be checked (Mesh Information section), and the actual models themselves previewed (Default drop-down). It also provides information on when the models will be swapped, one to the next, according to your viewer’s LOD Factor and the distance of your camera from the object (shown enlarged on the right) – click for full size
The Object LOD behaviour section defines the distances from your camera at which the different LOD model will be swapped one for the next, as defined by the Linden Lab (LL) default LOD Factor (1.250), the Firestorm (FS) default LOD Factor (2.000) and your current LOD factor setting.
Monday, January 1st, 2018 saw the long-await release of Catnzip R12 – the release coming a little over a years since the last update – and slightly earlier than planned, thanks to the auto-update!
As one might expect, this update brings a large number of user-facing updates, which are quite comprehensively documented in the accompanying release notes, and rings Catznip up to parity with the current LL released viewer code base 5.0.9. It is currently only available for Windows, in 32-bit and 64-bit versions, the latter conforming to the Lab’s Alex Ivy 64-bit build.
Given the depth of the release notes, I’m providing an overviews of just some of the updates here:
Quick Preferences updates.
Inventory Management improvements.
Chat / group chat updates.
For the rest of the changes, please refer to the release notes.
Quick Preferences Updates
Main Quick Preferences Panel
The main Quick Preference panel sees a number of small updates and improvements:
The short cut CTRL-SHIFT-P no longer conflicts with Print Selected Object Info (the latter now ALT-SHIFT-P).
The panel can now be minimised via a button (item 1 in the image below)
The Other Section of avatar rendering now includes a button to open the Exceptions panel for listing exceptions to your avatar rendering settings (item 2 in the image below)
The worn items tab button (item 3 in the image below) now displays a tab with button to display sort options for the items listed in it (item 4 in the image).
The revised Catznip Quick Preferences
Quick Inventory
We all use HUDS – HUDS for AOs, HUDs for mesh bodies, HUDs for mesh heads, HUDs for appliers, etc.). However, wearing the all, all the time not only clutters the viewer’s window, it actually eats texture memory. We also have certain things we like to wear all the time. However, even if you dump all of your HUDs into a single folder in inventory, finding the one you want can be a pain.
Catznip R12 helps ease some of this pain through the provision of a Quick Inventory function. Used via Quick Preferences, this can afford faster, cleaner access to your HUDs, etc. To use it:
Create a folder anywhere in your inventory (if you don’t already have one ready to go).
Drag and drop your HUDs an bits (or links to them ) into it.
Open Quick Prefs and click on the inventory button (item 1 in the image below).
Click on the Folder <click to select> button (item 2 in the image below) to open a folder picker.
Click on the folder with your HUDs and bits to select it.
The contents of the folder will be displayed in the inventory tab of Quick Preferences each time it is opened, allowing you to easily Wear / Add items from it (right-hand picture in the image below).
The folder can be changed at any time by clicking on the folder button in the inventory tab.
Quick Preferences: Quick Inventory
Inventory Management
Inventory management updates make up the core of the R12 changes, and these come in a number of improvements, from how you chose to receive goods purchased in-world in your inventory or passed to you by others, through searching inventory to where boxed items are unpacked and stored in your inventory.
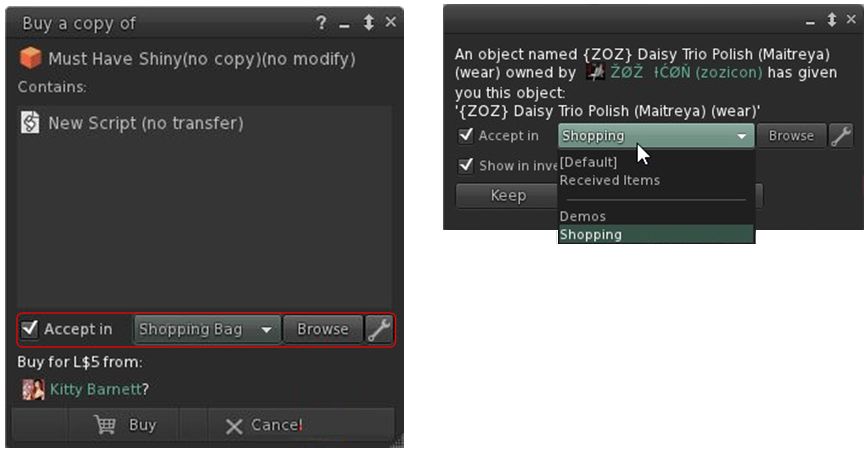
Accepting In-World Purchases and Inventory Offers
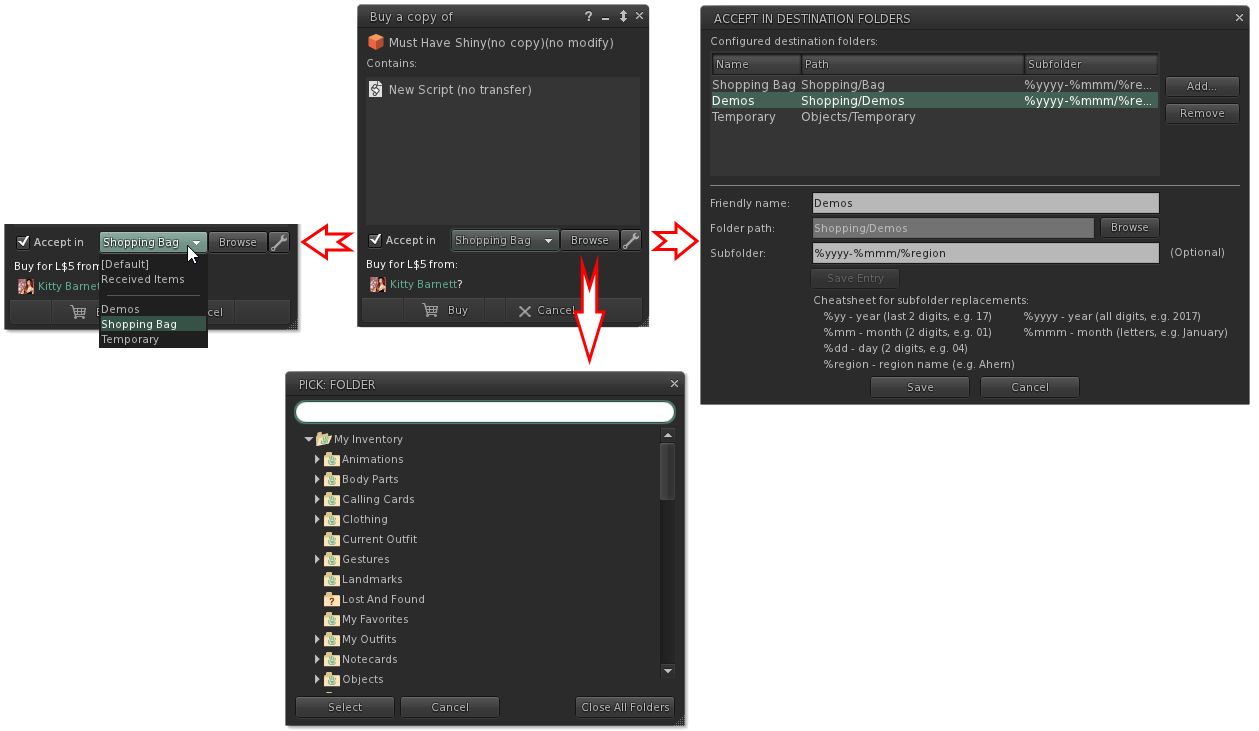
With Catznip R12 you can now designate where the items you purchase in-world or are given by others, are stored within your inventory. So, for example, you could opt to receive all your in-world purchases in a folder you call “Shopping Bag”, any demos you grab in a folder called “Demos”, anything your offered by friends in “From Friends”, and so on. How you organise things is entirely up to you. This means both the Pay and Buy floaters in Catznip R12, together with the Accept Inventory floater now offer you the ability to select where incoming items are going to be stored in your inventory.
Catznio R12’s options to select where items you buy / receive go in your inventory
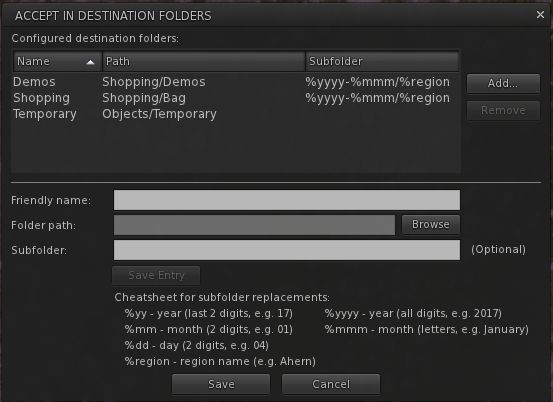
The options should be fairly self-explanatory. Check Accept in and the remaining options are activated. The drop-down will display a list of folders you have opted to allow incoming items to be delivered (show in the image on the right), the browse button allows an alternative to you list of folders in the drop-down to be selected, and the spanner button allows you to establish your list of destination folders. The roadmap of these various options is shown below.
What the options do. Note they are available in both the expanded floater view (centre) and the collapsed view (left)
Not only can you select the folders into which you want incoming purchases to go, you can also set Catznip R12 to dynamically create new folders in which to place incoming items. This means, for example, that if you got to a big shopping event at one location, you can set the viewer to deliver all the demo you obtain / items you purchase into folders define by – say – the month in which you got them, and the location where they were obtained.
So, for example, if in April you go to shopping event X on region YYYY, and grab a load of demos, and then later in the month go to event A on region BBBB and grab more demos, you can have them delivered to sub-folders in your “Demos” folder, respectively labelled “April 2017 YYYY” and “April 2017 BBBB” – both of which are dynamically created by Catznip as they are needed. So even if you don’t get around to trying them for days after your visit, you can quickly and easily locate the demo items without have for fiddle around searching for folders and objects.
The panel for setting folders into which incoming purchases can be received, and the option for setting dynamically created sub-folders within that folder
On Tuesday, November 14th, 2017, the Alchemy viewer updated to version 5.0.7.41341. The majority of the update appears to address issues and bug fixes, with the high-level summary in the release notes given as:
Re-Enabled HTTP Pipelining.
Fixes to IME for Japanese language input.
Numerous fixes to crashes and various other bugs.
Please refer to the release notes for a table of fixes.
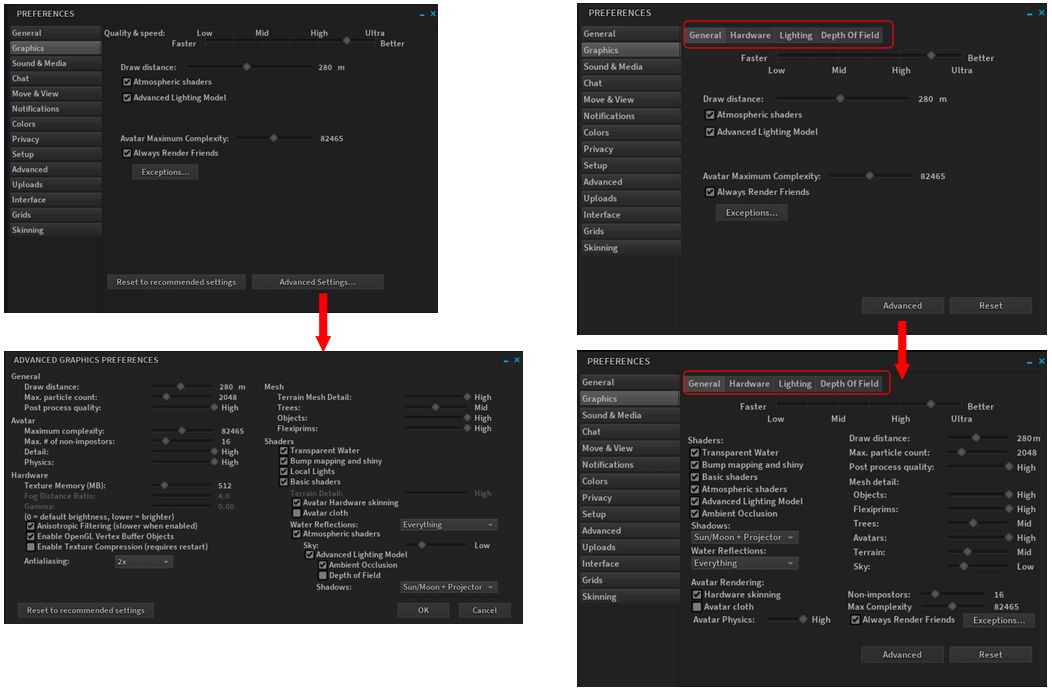
The two significant updates to the viewer take the form of a revised Graphics tab in Preferences, and the adoption of the hypergrid currency extensions.
Graphics Preferences Update
This updates reverts Alchemy to displaying the Advanced graphics options within the Graphics tab of Preferences, rather than breaking them out to a separate floater, as per the official viewer. It also re-introduces the sub-tabs for General, Hardware, Lighting and Depth of Field, all of which makes the graphics option less screen real estate consuming.
Alchemy 5.0.7 does away with splitting the Advanced graphics options into a separate floater, as per the 5.0.6 release (l) & the official viewer, and instead re-integrates them into the main Preferences > Graphics tab (r), with sub tabs to logically split options.
Hypergrid Currency Extensions
Currently, if an OpenSim user log-in to one grid and then hypergrids to another, the currency symbol (displayed in the top-right of the viewer window) do not update to the new grid. With this extension, the currency symbol will be automatically updated, and the currency helper-uri should also update. Thus, the buy currency / insufficient-funds / buy land processes should all continue to work correctly, and without the need for the user to manually update the grid info in their viewer and without any need to have specific currency.php, landtool.php files or an xml-rpc server.
The extension has been developed by Chris Colosi, founder and CEO of Gloebit, a multi-platform digital currency web service which has been adopted by a number of OpenSim grids (see here for a list of Gloebit partners). It was contributed as a patch for the Firestorm viewer in October (with the assistance of Ansariel Hiller from Firestorm), and is being adopted by both Alchemy and (hopefully) Singularity. Colosi was, from November 2010 through September 2011, the Monetisation Manager at Linden Lab, responsible for the Linden Dollar virtual currency product. In 2011 he left Linden Lab to set-up Gloebit, and you can read more about the extension via his article on Medium, posted on September 26th, 2017.
Feedback
I’ve not had the time to drive this release hard, but it appears stable and didn’t give me any significant issues when playing with it over the last several days. The graphics panel update is appreciated – I’ve always tended to find the Advanced Graphics break-out panel in the official viewer a waste of screen real estate which offers few, if any, advantages for users. I don’t really drop into OpenSim any more, so cannot comment on the currency extensions capability, other than it appears to be a good and useful feature to have.
On Friday, October 13th, the Lab promoted their “Moonshine” release viewer, version 5.0.8.329115 to de facto release status. This viewer brings some new options to the official viewer, as well as including a range of improvements and bug fixes.
The code name for the viewer is described thus: “Moonshine was originally a slang term used to describe high-proof distilled spirits usually produced illicitly, without government authorisation. In recent years, however, moonshine has been legalized in various countries and has become a term of art. Legal in the United States since 2010, moonshine is defined as ‘clear, unaged whiskey’. This deploy is filled with a jigger of crash fixes, a splash of translation fixes and a kick that will make you say ‘I can’t feel my face any more!'”
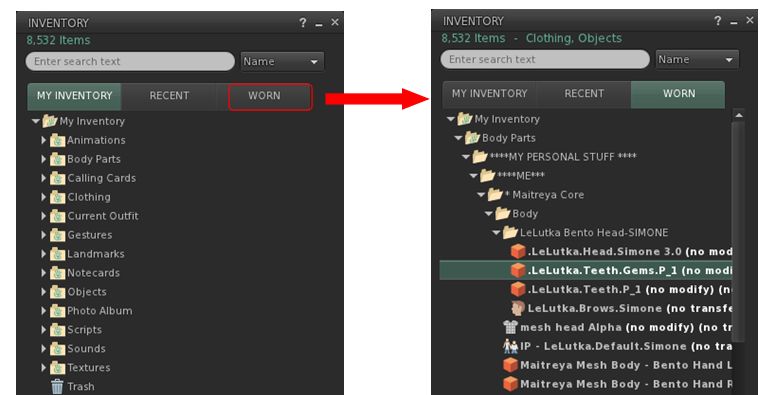
In terms of the updates, probably the most visible is the new Worn tab within the Inventory floater. Those who have used third-party viewers like Firestorm will be familiar with this: it presents a list of items your avatar is currently wearing, defined by the folders in which the items are located.
The new Worn tab on the updated SL viewer
In addition, the scroll zone associated with the inventory floater (and the Marketplace floater) has been improved, and the inventory filter options (My Inventory > Gear menu > Show filters) have two new options:
Created by me, Created by others
Search by Name, Description, Creator, UUID.
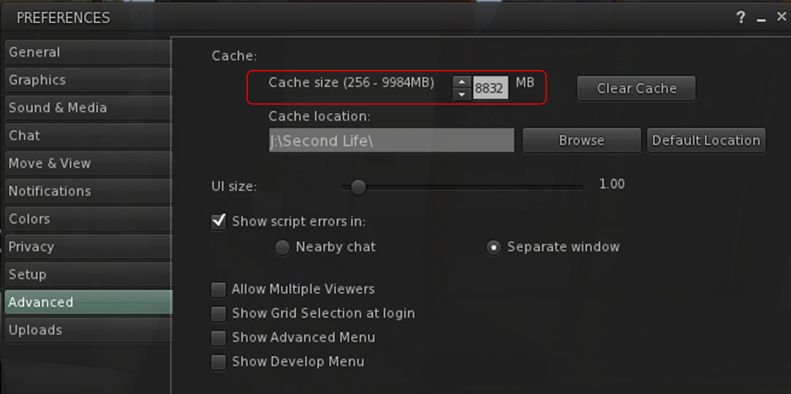
The viewer includes the ability to increase the cache size to up to 9.75 GB in size, and cache performance has been improved. This work is all part of on-going viewer infrastructure work, which with this viewer includes changes to reduce the rate at which log-in retries are attempted.
As I’ve reported in my weekly SL project updates, the rate at which these login retries were being carried out could cause a detrimental impact on services when the grid was experiencing issues; it is an update TPVs have been asked to adopt as soon as they can.
Users of the official viewer can now set the size of their local cache (up to 9.75GB)
Also included in this release as a part of the infrastructure updates is a general clean-up of the log-in code.
In addition to the above, the viewer includes a range of UI behaviour improvements and bug fixes, all of which are listed in the release notes.
Feedback
I’ve not had the opportunity to use this viewer extensively, but performance-wise and in terms of the length of time I have been using it, the performance easily matches previous releases when running on my main system. In terms of the updates, the increased cache size could prove beneficial to those able to take advantage of it, and who use either an SSD or who can make use of a RAM drive on their system.
Overall, another useful viewer update from the Lab, with a good range of resolved issues and fixed bugs.