Second Life Discord Server open to all & how to join

via Linden Lab

Following the announcement made during the March community Round Table (summarised here with video), the official Second Life Discord server has now been opened up to access by any Second Life users wishing to join it.

Whilst also being YACTF (yet another channel to follow) which comes on top of the blogs, forums, social media feeds etc., that Linden Lab tends to variously (and at times inconsistently) use for communications, the Discord server also presents broader means for SL users to connect with one another, share information, and keep abreast with events and activities (official or otherwise) within Second Life / at Linden Lab.

In particular, the Lab’s official blog post on the opening up of the server gives the following reasons for participating on it:

  • Stay Updated: get the latest news, updates, and announcements directly from Linden Lab.
  • Community Interaction: join discussions, participate in events, and meet other residents from around the virtual world.
  • Exclusive Channels: access dedicated channels for various interests including channels for creators, bloggers, newcomers, and more!
  • Community Support: seek assistance and advice from other Second Life users.

To gain complete access to the server you will need to:

  • Have a Discord account – you can set this up when accessing the Second Life server if you do not already have one.
  • Join the Second Life server.
  • (Optionally) link the Server with your Second Life account for access to all the available channels on the server.

Accessing the Second Life Discord Server

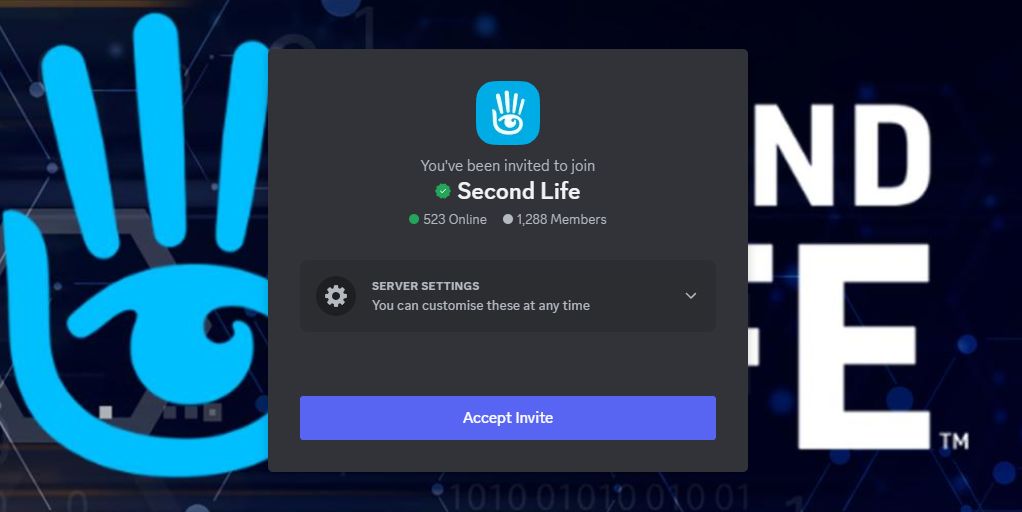
  1. Follow the https://discord.gg/secondlifeofficial link.
  2. If you do have a Discord account, skip to Step 3. Otherwise, follow the steps to create one:
    • Provide a Display Name at the pop-up (user name) and accept the Discord Terms of Service / Privacy Policy (follow the links to read both!).
    • Verify you are not a robot.
    • Provide a birthday.
    • Enter a valid e-mail address and create a password for your account.
    • Respond to the verification e-mail to confirm your e-mail address.
    • If required, get and install the Discord Desktop app (or just access Discord through your browser).
  3. You will be invited to join the Second Life Discord Server.
Accept the invite to join the Second Life Discord Server
  1. Specify (or skip for now):
    • Your preferred language.
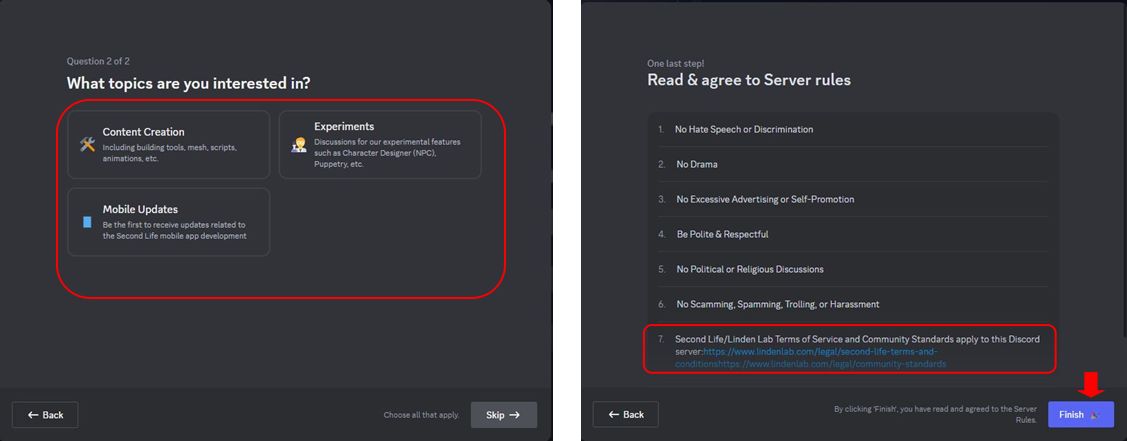
    • Your Second Life interests (you can select some / all of the available options).
Joining the Second Life Discord Server: interest options selection and rules and requirements pop-up
  1. Access the server on clicking Finish.
The Second Life Discord Server

Linking Your Second Life Account with Discord

  1. Click on the Second Life Server name in the top left corner of the Discord window to open a drop-down menu.
  2. Click on Linked Roles in the menu to open the Connect Your Accounts pop-up.
Linking your Second Life account to your Discord account (1)
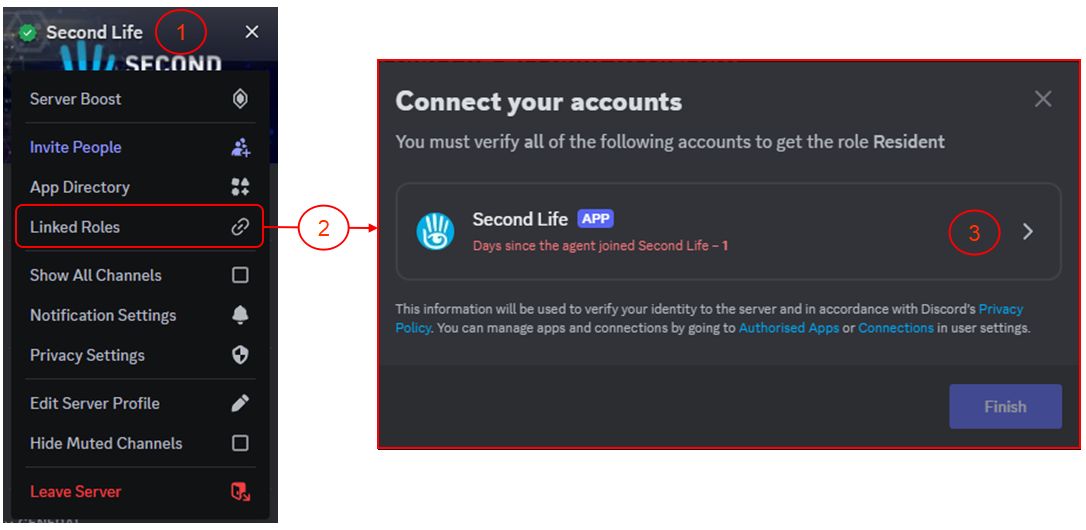
  1. Click on the Second Life APP link.
  2. A pop-up will be displayed indicating you are leaving the Second Life Discord Server using the link support-dot-secondlife-dot-com with the option to trust the link which you can optionally check.
  3. Click on Visit Site to open a pop-up with the Second Life web log-in (and note the URL at the top of the pop-up to ensure it is genuine).
Linking your Second Life account to your Discord account (2)
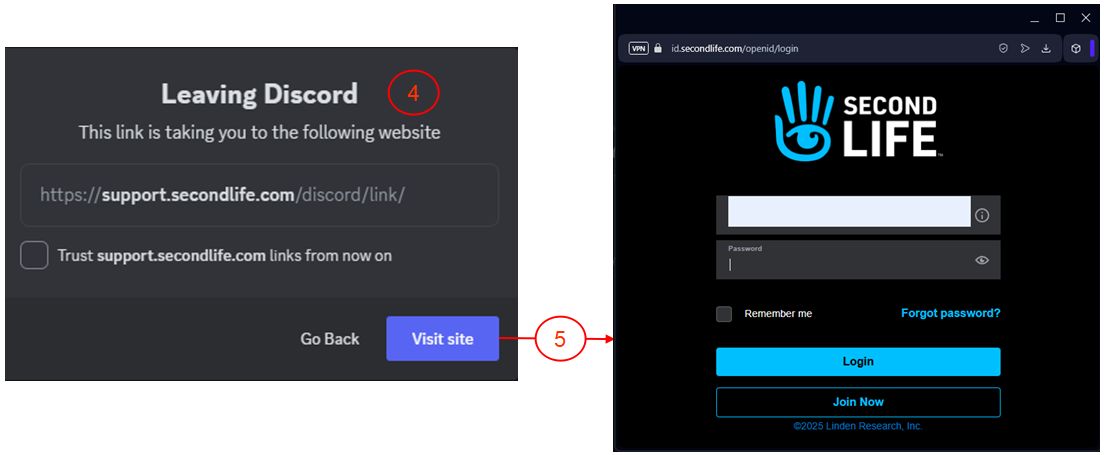
  1. Enter your Second Life log-in credentials (note: if you use MFA, you might be asked to provide an authenticator  Token).
  2. You will be asked to authorize linking your Discord account with your Second Life account – note you must scroll down the request in order for the Authorise button to activate.
  3. A message is displayed, indicating the link has been successful, and you can close the pop-up.
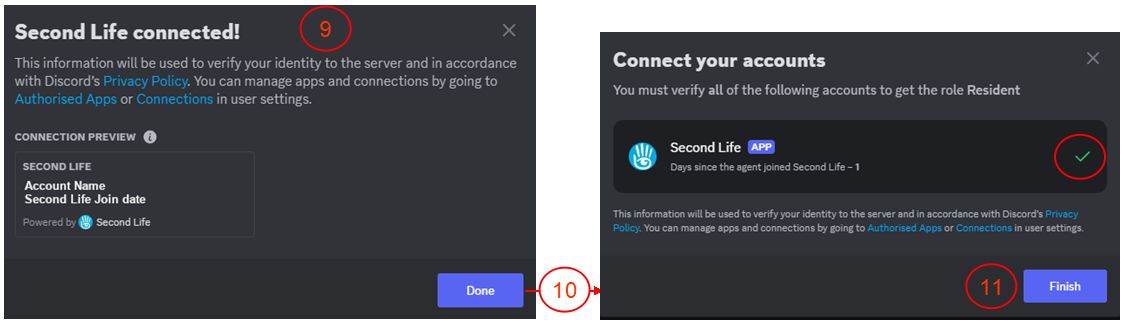
  4. A further pop-up will be displayed, confirming the connection is successful, as well as containing additional useful links.
  5. When you have finished with this pop-up, click Done to be taken back to the Connect Your Accounts pop-up, which has been updated with a tick to indicate the connection.
  6. Click Finish to close the connection.
Linking your Second Life account to your Discord account (3)

Unlinking your Accounts

To Unlink your accounts:

  • Make sure Show All Channels is checked in the Server drop-down menu.
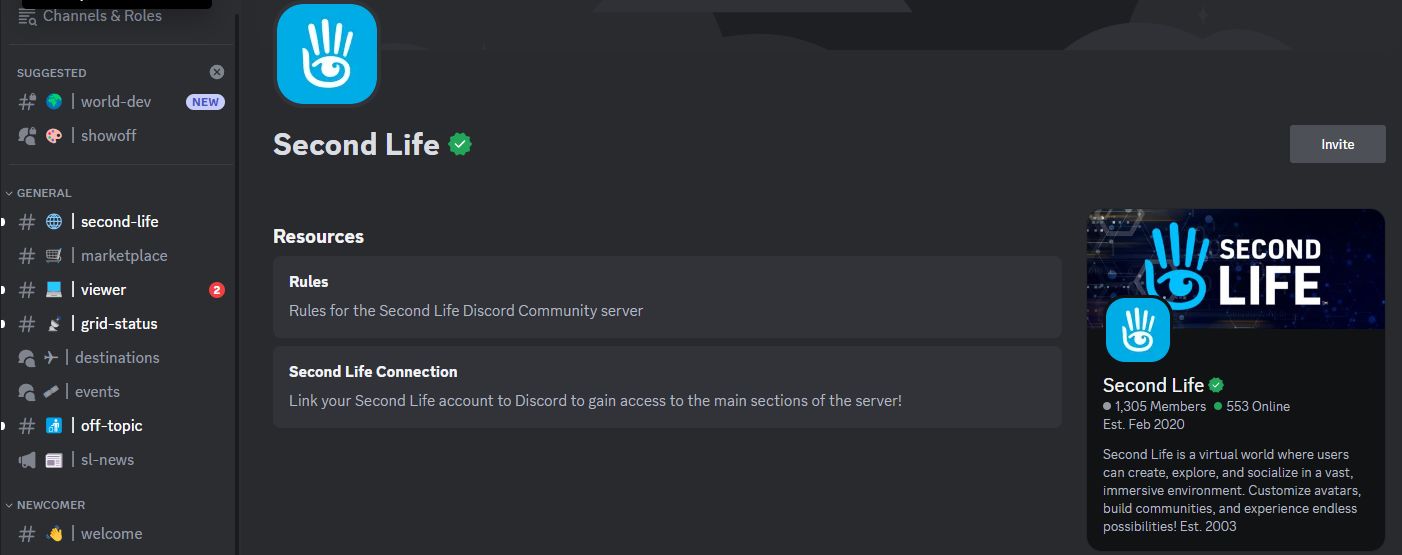
  • Click on sl-connection under the Resources heading in the left side channel list.
  • Scroll to the bottom of the page and the section How to Disconnect Your Second Life Account from Discord.
  • Click on the specified URL to unlink your accounts.
  • The accounts will be unlinked and a message displayed (in a new browser tab if accessing Discord via your browser) indicating your Discord and Second Life accounts have been unlinked.

Tutorial: creating a simple (prim) mirror with Firestorm

Background notes: this tutorial is provided as a *basic* guide to making a simple mirror in-world using prims and the Firestorm PBR release (7.1.9.74746), reviewed here. As such:

  • Is offered alongside my other simple mirror tutorial, which more directly applies to the official viewer and other TPVs.
  • Specifically addresses the use of the Firestorm Build / Edit floater, which is substantially different in information presentation compared to the official viewer.
Table of Contents

Please note:

  • If you have never created PBR mirrors before, it is recommended you read the entire tutorial including (Please) Read Me and Setting Viewer Preferences.
  • If you wish to know how to set your viewer so you can see PBR mirror effects, you only need to read  (Please) Read Me and Setting Viewer Preferences.
  • This tutorial assumes the use of the Firestorm Texture layout within the Build / Edit Floater. If you prefer using the the more traditional Texture layout in that floater, then this tutorial might be more appropriate: Creating a simple (prim) mirror in Second Life.

(Please) Read Me

  • Mirrors comprise two elements:
    • The actual object that forms the mirror. The can be a prim, a mesh face, a single object, part of a more complex (e.g. a mirror face in a frame).
    • A PBR reflection probe: a special kind of object new to Second Life under glTF / PBR which, for the purposes of this tutorial, actually generates the “reflections” on the mirror. As such, it is a object linked to the mirror object, above.
    • Creation of both of these is covered in this tutorial.
  • Mirrors:
    • Are planar (or flat surface mirrors), they don’t work particularly well on curved surfaces (like car bodies).
    • Are not designed to be worn as avatar attachments, and will not function correctly if used as such.
    • Come in two forms:
      • Static – meaning they will create reflections of just about everything within their sphere of influence except avatars.
      • Dynamic – meaning they will create reflections of just about everything within their sphere of influence including avatars.
    • Can have a performance impact – so should be used in moderation and with consideration of the effect you are trying to achieve, and the impact it may have on viewers close to them.
      • Example: it might sound cool to have a dynamic mirror as the floor or along one wall of a dance club, reflecting all the dancers – but it will likely kill viewer performance for all the dancers on the floor / dancing close to the wall. So if you must do either, use a Static mirror so avatars are not reflected.
  • To help reduce the performance impact generated by mirrors, only one will ever be active at a time in any given viewer. This will generally be the mirror closest the the viewer’s camera position; all others will simply appear shiny.
    • If you place two mirrors, each with its own reflection probe, too close to one another, you may find you get strange results in both of them.
    • For this reason, if you want to make a wall of mirrors, better to make multiple mirror objects and have a single reflection probe aligned with them to generate reflections in all of them.

This Tutorial

This tutorial breaks mirror creation down into four core steps:

  1. Setting your viewer preferences.
    • Some of these steps may only have to be down once; others may require setting each time you work with PBR reflection probes.
  2. Creating the mirror object using a prim & setting its surface material.
    • The required material can be made using either Blinn-Phong (aka “legacy” or “classic” materials) or the new PBR materials capabilities in the viewer.
    • This tutorial provides guidance on both.
  3. Creating the mirror reflection probe.
  4. Finishing touches – positioning the probe relative to the mirror object, and completing the mirror.

Notes:

  • All of the images in the sections below can be opened in their own tab(s) for greater clarity, if required.
  • Important: be aware that if you place a mirror within a room that contains its own reflection probe already, you may get some very odd results, as the mirror surface can also show “reflections” from the room’s reflection probe.

Step 1: Setting Your Viewer Preferences

Setting your viewer to work with mirrors requires two steps:

  • Ensuring the viewer’s Graphic Preferences is set to view mirrors correctly.
    • This generally only needs to be done once, as the setting will persist between log-in sessions.
    • Must be done by anyone wishing to simply view mirror in-world or who wishes to create them.
  • Enabling the ability to select reflection probes so they can be edited and manipulated.
    • This is intentionally a non-persistent setting, and must be enabled once per log-in session whenever reflection probes are to be directly selected / edited.

Graphics Preferences for Mirrors

Note: as per the notes above, these settings need to be active any in viewer that is to interact with mirrors.

  • Open up Preferences → Graphics and:
    1. Make sure the Mirrors option is checked. (otherwise PBR mirrors will only appear as shiny surfaces).
    2. Reflection Detail:
      • If you wish to view everything a mirror is designed to reflect, whether it is static or dynamic, set this drop-down to Static + Dynamic.
      • If your system struggles with performance as a result of mirrors, set this to Static, so no avatar reflections will be rendered.
    3. Reflection Coverage: make sure this is set to Full Screen.
    4. Mirror Resolution: set the resolution your viewer will use to display mirror reflections. Higher resolutions will obviously be sharper, but may have an increased impact on performance when rendering mirror reflections.
    5. Mirror Update Rate: set the frequency with which you wish you update to update rendered mirror reflections. Again, the more frequent the updates, the more realistic the reflections – and the potential for greater impact on viewer performance.
Setting your viewer’s Graphic Preferences to see / create mirrors

Setting the Viewer so You Can Select Reflection Probes

Reminder: You only need to do this if you are going to be selection and editing / moving any reflection probe. It is a non-persistent setting, so must be performed once each log-in session when you wish to select and edit a reflection probe of any description.

Setting the viewer can be done in one of two ways:

  • Via the Build menu:
    1. Go to the Build menu at the top of the viewer window.
    2. Click the menu to open it, scroll down to Option to open that sub-menu.
    3. Locate the option Select Reflection Probes and click it to check it.
  • Via the Select Reflection Probes in the top section of the Build / Edit floater.
When creating / editing reflection probes, you must ensure you can select them for ease of manipulation, by check the Select Reflection Probes option via the Build → Options sub-menu (l), or directly in the upper section of the build / Edit floater (r)

Step 2: Making the Mirror & Setting the Surface Material

Using Blinn-Phong

If you intend to create a mirror using PBR materials, you can skip to here.

    • Create a cube prim and size it as required. Keep the Build / Edit floater open after creating and sizing your prim.
    • Click the Select Face radio button and click on the side of the object you want to be the mirror surface.
    • Click on the Texture tab in the Edit floater and complete the following steps using the image below as a guide:
      1. Click on the Click on the Blinn-Phong tab (if not already selected). This will display texture / materials options similar to pre-PBR.
      2. Click on the Texture swatch to open the Pick: Texture floater.
      3. In the Pick: Texture floater, click the Blank button.
      4. This will cause the texture swatch in the Texture picker to turn white (and the mirror object itself).
      5. Click OK to close Pick: Texture.
      6. Click on the “empty” Specular swatch to open the Pick: Texture floater. Repeat steps 2 through 5 above.
      7. In the updated Build / Edit floater, locate the Glossiness and Environment spinner and set both to 255.
    • Your mirror object should now have a shiny face (most likely the one facing you).
    • Continue with Creating the Reflection Probe (below).
Creating a mirror object and setting the surface material using Blinn-Phong materials

Using PBR

  • Create a cube prim and size it as required. Keep the Build / Edit floater open after creating and sizing your prim.
  • Click the Select Face radio button and click on the side of the object you want to be the mirror surface.
  • Click on the Texture tab in the Edit floater and complete the following steps using the image below as a guide:
    1. Make sure the PBR tab is selected, or click on it if is is not.
    2. Click the Materials Texture swatch to open the Pick: Texture floater.
    3. Click Blank in the Pick: Texture floater.
    4. This will cause the texture swatch in the Texture picker to turn white (and the mirror object itself).
    5. Click OK to close Pick: Texture.
    6. The Roughness spinner in the Build / Edit floater will now be enabled. Set this to 0.0.
  • Your mirror object should now have a shiny face (most likely the one facing you).
  • Continue with Creating the Reflection Probe (below).
Creating a mirror object and setting the surface material using PBR materials

Step 3: Making the Reflection Probe

Reminder: When creating / editing reflection probes, always make sure you have enabled Build Menu → Options → Select Reflection Probes. Failure to do so will leave you unable to properly edit any reflection probes you create.

  • Create a cube prim.
  • Important:
    • Rotate the prim so that the TOP face of the cube is facing the same direction as the surface of your mirror (that is, the blue arrow of the gizmo tool is pointing away from the face of the mirror object).
    • Make sure it is perfectly at right angles once rotated.
  • Click on the Features tab of the Build / Edit floater:
    1. At the bottom of the tab, check the box labelled Reflection Probe.
    2. A pop-up will generally be displayed, read and understand it.
      • You can check the Don’t Show box if you do not want to see this warning in future
      • Click OK to convert the prim to a reflection probe – this will enable the Probe Update options at the bottom of the Build / Edit floater.
    3. Click on the Static drop down and:
      • If you wish the mirror to only reflect the objects in front of it, and not avatars as well, select Mirror (Environment).
      • If you wish the mirror to reflect avatars as well, select Mirror (Everything).
Setting the reflection probe properties (click to enlarge in new tab, if required)

Step 4: Finishing Touches

Positioning and sizing the mirror probe to give the required reflections on the mirror object.
  • With the reflection probe selected, make sure the Move radio button at the top left of the Edit floater is enabled.
  • Position the reflection probe so it is overlapping the mirror such that the red arrow / line of the gizmo move tool is just in front of the mirror object.
  • Click the Stretch Radio button in the top of the Edit floater and stretch the reflection probe to fit the mirror object, giving you a mirror-like reflection.
    • Note: The exact size of the reflection probe and its position / depth relative to the front of the mirror might require a little juggling to get right.
  • When done correctly, you should have a basic mirror reflecting the space around you.
  • Finally, link the mirror components together as a single object – but make sure the reflection probe is not the root of the linkset for ease of future moving / editing the mirror.
  • Name the mirror and Take it (or a copy) back to inventory for future use (if required) and / or place the original where you wish to use it.

Notes:

  • Because the reflection probe will be deeper than the mirror, anything shiny that is also encompassed by it and in the same plane will also act as a mirrored surface.
  • Similarly, if you have several “mirror” surfaces in the same plane as the reflection probe (e.g. several mirrors on the same wall), you can extend the mirror’s size to encompass all of them, thus use as single reflection probe for multiple mirrors.

Video and Final Words

For those who prefer to watch, the video below – courtesy of Zi Ree from the Firestorm team – goes through all of the above steps for creating a mirror object and its reflection probe.

Again, this is a basic (if wordy!) tutorial. There is a lot more that can be done when creating mirror objects. and I’m not attempting to cover everything here; this is simply to get people started. Remember that mirrors do have limitations imposed, and can impact viewer performance – so use them wisely!

Finally, note that mirrors are a specialised use for reflection probes – the latter can be quite intrinsic to general reflections and lighting in Second Life. To get a feel for how they can be used, I recommend taking a read of Reflection Probes and You by Kristy Aurelia.

Tutorial: creating a simple (prim) mirror in Second Life

Background notes: this tutorial is provided as a *basic* guide to making a simple mirror in-world using prims, following the release of the Graphics Features viewer. Further:

  • It has been written using the official Second Life Viewer (SLV) from Linden Lab.
  • The steps outlined should apply pretty much to any third-party viewer currently supporting PBR rendering, allowing for differences in UI and menu option presentation.
  • As Firestorm has more extensive changes to some of the UI elements used, I’ll likely provide a dedicated tutorial for that viewer when it releases with PBR support.
Table of Contents

Please note:

  • If you have never created PBR mirrors before, it is recommended you read the entire tutorial including (Please) Read Me and Setting Viewer Preferences.
  • If you wish to know how to set your viewer so you can see PBR mirror effects, you only need to read  (Please) Read Me and Setting Viewer Preferences.

(Please) Read Me

  • Mirrors comprise two elements:
    • The actual object that forms the mirror. The can be a prim, a mesh face, a single object, part of a more complex (e.g. a mirror face in a frame).
    • A PBR reflection probe: a special kind of object new to Second Life under glTF / PBR which, for the purposes of this tutorial, actually generates the “reflections” on the mirror. As such, it is a object linked to the mirror object, above.
    • Creation of both of these is covered in this tutorial.
  • PBR mirrors:
    • Are planar (or flat surface mirrors), they don’t work particularly well on curved surfaces (like car bodies).
    • Are not designed to be worn as avatar attachments, and will not function correctly if used as such.
    • Come in two forms:
      • Static – meaning they will create reflections of just about everything within their sphere of influence except avatars.
      • Dynamic – meaning they will create reflections of just about everything within their sphere of influence including avatars.
    • Can have a performance impact – so should be used in moderation and with consideration of the effect you are trying to achieve, and the impact it may have on viewers close to them.
      • Example: it might sound cool to have a dynamic mirror as the floor or along one wall of a dance club, reflecting all the dancers – but it will likely kill viewer performance for all the dancers on the floor / dancing close to the wall. So if you must do either, use a Static mirror so avatars are not reflected.
  • To help reduce the performance impact generated by mirrors, only one will ever be active at a time in any given viewer. This will generally be the mirror closest the the viewer’s camera position; all others will simply appear shiny.
    • If you place two mirrors, each with its own reflection probe, too close to one another, you may find you get strange results in both of them.
    • For this reason, if you want to make a wall of mirrors, better to make multiple mirror objects and have a single reflection probe aligned with them to generate reflections in all of them.

This Tutorial

This tutorial breaks mirror creation down into four core steps:

  1. Setting your viewer preferences.
    • Some of these steps may only have to be down once; others may require setting each time you work with PBR reflection probes.
  2. Creating the mirror object using a prim & setting its surface material.
    • The required material can be made using either Blinn-Phong (aka “legacy” or “classic” materials) or the new PBR materials capabilities in the viewer.
    • This tutorial provides guidance on both.
  3. Creating the mirror reflection probe.
  4. Finishing touches – positioning the probe relative to the mirror object, and completing the mirror.

Notes:

  • All of the images in the sections below can be opened in their own tab(s) for greater clarity, if required.
  • Important: be aware that if you place a mirror within a room that contains its own reflection probe already, you may get some very odd results, as the mirror surface can also show “reflections” from the room’s reflection probe.

Step 1: Setting Your Viewer Preferences

Setting your viewer to work with mirrors requires two steps:

  • Ensuring the viewer’s Graphic Preferences is set to view mirrors correctly.
    • This generally only needs to be done once, as the setting will persist between log-in sessions.
    • Must be done by anyone wishing to simply view mirror in-world or who wishes to create them.
  • Enabling the ability to select reflection probes so they can be edited and manipulated.
    • This is intentionally a non-persistent setting, and must be enabled once per log-in session whenever reflection probes are to be directly selected / edited.

Graphics Preferences for Mirrors

Note: as per the notes above, these settings need to be active any in viewer that is to interact with to PBR mirrors.

  • Open up Preferences → Graphics.
  • Click the Advanced Settings button to open the Advanced Settings Preferences Floater. Now locate and set the following:
    • Mirrors checkbox – make sure it is checked, otherwise PBR mirrors will only appear as shiny surfaces.
    • Reflection Detail:
      • If you wish to view everything a mirror is designed to reflect, whether it is static or dynamic, set this drop-down to Static + Dynamic.
      • If your system struggles with performance as a result of mirrors, set this to Static, so no avatar reflections will be rendered.
    • Reflection Coverage: make sure this is set to Full Screen.
    • Mirror Resolution set the resolution your viewer will use to display mirror reflections. Higher resolutions will obviously be sharper, but may have an increased impact on performance when rendering mirror reflections.
    • Mirror Update Rate: set the frequency with which you wish you update to update rendered mirror reflections. Again, the more frequent the updates, the more realistic the reflections – and the potential for greater impact on viewer performance.
 Setting your viewer’s Graphic Preferences to see / create mirrors

Setting the Viewer so You Can Select Reflection Probes

Reminder: You only need to do this if you are going to be selection and editing / moving any reflection probe. It is a non-persistent setting, so must be performed once each log-in session when you wish to select and edit a reflection probe of any description.

  1. Go to the Build menu at the top of the viewer window.
  2. Click the menu to open it, scroll down to Option to open that sub-menu.
  3. Locate the option Select Reflections Probes and click it to check it.

Step 2: Making the Mirror & Setting the Surface Material

Creating the Mirror Object

  • Create a cube prim and size it as required. Keep the Build / Edit floater open after creating and sizing your prim.
  • Click on the Texture tab in the Build / Edit floater, and (also see image, below):
    1. Click on the texture swatch to open the Pick: Texture floater.
    2. In the Pick: Texture floater, click the Blank button.
    3. This will cause the texture swatch in the Texture picker to turn white (and the mirror object itself).
    4. Click the OK button in the Pick Texture floater to close it.
  • You now need to set the object’s surface materials either by using Blinn-Phong (“legacy”) materials (below) or by using PBR materials.
Setting the mirror object to a blank white face / object

Setting the Surface Material Using Blinn-Phong

  • Edit the mirror object just created and select the front face. Click on the Texture Tab of the Edit floater.
  • In the Texture tab of the Edit floater, click on the Shininess (Specular) radio button (arrowed in the image below).
  • Now (as per the image below):
    1. Click on the texture swatch to open the Pick: Texture floater.
    2. In the Pick Texture floater, click the Blank button.
    3. This will cause the texture swatch in the Texture picker to turn white.
    4. Click the OK button in the Pick Texture floater to close it.
    5. This will update the Texture tab to display new options: Glossiness, Environment and Color.
  • Set Glossiness and Environment each to 255 and ignore Color.
  • Your mirror object should now be shiny – don’t worry about the appearance, it will soon improve.
  • Close the Edit floater.
  • Continue with Making the Reflection Probe.
Setting the mirror object to have a shiny surface using Blinn-Phong (aka “legacy” or “classic”) materials (click to enlarge in new tab, if required)

Setting the Surface Material Using PBR

Refer to the image below when following these instructions.

  • Edit the mirror object just created and select the front face. Click on the Texture Tab of the Edit floater.
    1. Click on the Material drop-down.
    2. Select PBR Metallic Roughness from the drop-down.
  • The Texture Tab display will update. Now take the following steps:
    1.  Click on the empty texture swatch or click on Choose from Inventory to open the Pick: Texture floater.
    2. Click the Blank button in the Pick: Texture floater this will update the texture swatch in the floater (and in the Texture tab).
    3. Click the OK button in the Pick: Texture to close the floater.
    4. The Edit Selected button in the Texture tab will now be enabled.
    5. Click Edit Selected to open the Editing Materials floater.
    6. In the Editing Materials floater, change the value of Roughness Factor to 0.0.
  • Your mirror object should now be shiny – don’t worry about the appearance, it will soon improve.
  • Close the Edit floater.
  • Continue with Creating the Reflection Probe (below).
Setting the mirror object to have a shiny surface using PBR materials (click to enlarge in new tab, if required)

Step 3: Making the Reflection Probe

Reminder: When creating / editing reflection probes, always make sure you have enabled Build Menu → Options → Select Reflection Probes. Failure to do so will leave you unable to properly edit any reflection probes you create.

  • Create a cube prim.
  • Important:
    • Rotate the prim so that the TOP face of the cube is facing the same direction as the surface of your mirror (that is, the blue arrow of the gizmo tool is pointing away from the face of the mirror object).
    • Make sure it is perfectly at right angles once rotated.
  • Click on the Features tab of the Build / Edit floater:
    1. At the bottom of the tab, check the box labelled Reflection Probe.
    2. A pop-up will generally be displayed, read and understand it (you can check the Don’t Show box if you do not want to see this warning in future), then click OK to convert the prim to a reflection probe.
    3. This will enable the options at the bottom of the Features tab.
    4. Click on the Sphere drop-down and change it to Box.
    5. Click on the Static drop down and:
      • If you wish the mirror to only reflect the objects in front of it, and not avatars as well, select Mirror (Environment).
      • If you wish the mirror to reflect avatars as well, select Mirror (Everything).
Setting the reflection probe properties (click to enlarge in new tab, if required)

Step 4: Finishing Touches

Positioning and sizing the mirror probe to give the required reflections on the mirror object.
  • With the reflection probe selected, make sure the Move radio button at the top left of the Edit floater is enabled.
  • Position the reflection probe so it is overlapping the mirror such that the red arrow / line of the gizmo move tool is just in front of the mirror object.
  • Click the Stretch Radio button in the top of the Edit floater and stretch the reflection probe to fit the mirror object, giving you a mirror-like reflection.
    • Note: The exact size of the reflection probe and its position / depth relative to the front of the mirror might require a little juggling to get right.
  • When done correctly, you should have a basic mirror reflecting the space around you.
  • Finally, link the mirror components together as a single object – but make sure the reflection probe is not the root of the linkset for ease of future moving / editing the mirror.
  • Name the mirror and Take it (or a copy) back to inventory for future use (if required) and / or place the original where you wish to use it.

Note:

  • Because the reflection probe will be deeper than the mirror, anything shiny that is also encompassed by it and in the same plane will also act as a mirrored surface.
  • Similarly, if you have several “mirror” surfaces in the same plane as the reflection probe (e.g. several mirrors on the same wall), you can extend the mirror’s size to encompass all of them, thus use as single reflection probe for multiple mirrors.

Video and Final Words

For those who prefer to watch, the video below – courtesy of Ascension Media and Lighting (You Tube) – goes through all of the above steps for creating a mirror object and its reflection probe. Other videos are available, but I felt this one was very easy to follow, especially given it does not rely on Voice or text (but best to make it full screen to see everything).

Again, this is a basic (if wordy!) tutorial. There is a lot more that can be done when creating mirror objects. and I’m not attempting to cover everything here; this is simply to get people started. Remember that mirrors do have limitations imposed, and can impact viewer performance – so use them wisely!

Finally, note that mirrors are a specialised use for reflection probes – the latter can be quite intrinsic to general reflections and lighting in Second Life. To get a feel for how they can be used, I recommend taking a read of Reflection Probes and You by Kristy Aurelia.

Tutorial: Using EEP for reflective floors

With EEP, it is now possible to have reflective floors at the parcel level that everyone can see, and contained within the parcel

Within Second Life there have been numerous ways to produce reflective floors within buildings – the most popular being to build a near-duplicate of what is in a room / building and inverting it “below” a textured, semi-transparent floor, allowing the duplicate to act as a reflection.

It’s a clever means of achieving the idea of reflections in polished floors, and has the advantage of being relatively “efficient” performance-wise (if a little hard on land impact, depending on the degree to which a person goes with the “reflected” items under the floor), as it means re-use of loaded textures and avoids rendering avatar reflections and mirroring movement. Although that said, the fact that the technique doesn’t show avatar reflections can spoil the effect.

Nitroglobus Roof Gallery provides an excellent demonstration of using a duplicate build to create the illusion of a reflective floor (although note the lack of any avatar shadow)

As has long been known, Linden Water can also be used as a means of producing reflective floorsthat can reflect avatars as well as objects. However, under Windlight, it has tended to suffer from a couple of observable weaknesses: if applied at the region level, it meant all water viewed from the region with produce the mirror effect – which could be a problem when outdoors (e.g. a mirror-flat surrounding sea); while to use it at parcel level meant using a viewer that accepted viewer-side parcel Windlight support – so anyone not using such a viewer would see a building / room with “flooded” floors.

EPP, with its simulator support for for parcel-level environment settings, means that is now possible to use Linden Water to create reflective floor effects within ground-level building that can more easily been seen by anyone entering the building, regardless of the viewer they are using. There are some pre-requisites involved, both it terms of creating the effect and viewing it, but even so, it is relatively easy to implement for anyone who wishes to do so.

Those prerequisites are:

  • As the approach uses Linden Water, it can only bee used at ground level (and on ground-level rooms of such buildings).
  • Some skill with terraforming is required, in particular:
    • Lowering / levelling land – this is important as the “reflective” floors must be at water level.
    • Ability to sub-divide land into parcel – this is particularly important if there is Linden Water is visible from outside the building with reflective floors, as you’ll be making changes to how Linden Water appears.
  • For parcels, you’ll need to have permission to set the environment at parcel level – if you do not own the region, and parcel level EEP support has been disabled via the region level controls, you will have to discuss the matter with the region holder / owner.
  • Those visiting the building must have Preferences → Graphics → Water Reflections set to All Avatars and Objects or Everything in order to see the water reflecting everything, including avatars.

The approach works best with your own builds, but can be used with pre-fab builds if they are modifiable, and can have floors modifed / replaced.

1 Prepare Your Land and Building

The first thing you need to do, is determine the shape of the floor space you wish to has as a reflective space and prepare the part of your land where it is to go.

  • Make a simple prim template of the shape of the room / building.
  • Place the template on your land where the room is to be positioned.
  • Keep in mind that depending on your location, you may want to sub-divide your land (if you have the necessary permission) so you can see natural-looking Linden Water when outside your house.
  • Use the terrafrorming tools in the Build / Edit floater to carefully lower the land under the template to expose the Linden Water.
  • Note that the “reflective floor” will, when the work is finished, need to sit just below the level of Linden Water. This means you may have to set it lower than the floors in other rooms on the ground floor of the building, or have the building itself surrounded by a mesh / prim surround to blend it with the ground level.
  • When you’re set, position the building and if necessary sub-divide your parcel.
  • Edit the building and:
    • Sset each of the floors you wish to be reflective to around 80% transparent – note that you may have to experiment with this setting, depending on the floor texture you use.
    • Apply a suitable texture for the reflective floor(s) (e.g. a wood texture for a polished wooden floor, or a marble effect for a public building).

2. Set the Water Environment

As noted above, you’ll need a suitable normal map to replace the one used for Linden Water.

  • The easiest way to do this is to use the Mirror Water environment asset that is included in the viewer under Library → Environments → Water.
  • You will need to copy this asset from its default Library location to your inventory (e.g. to the Settings folder – or a sub-folder within Settings, if you organise your EEP assets in sub-folders).
You can use the Mirror Water environment asset to help create your reflective floor. Make sure you copy it (e.g. via drag-and-drop) to your Settings folder
  • With the Mirror Water environment asset copied to your inventory, double-click on it to edit it. This will open the Fixed Environment – Water panel.
  • Within the panel, make the following changes (see the image below for reference):
    1. Set the water fog colour to white (note that depending on things like ambient lighting, the floor texture you use, etc., you may need to adjust this towards a more grey colour).
    2. Set all of the following to 0.0:
      • Fog Density Exponent and Underwater Multiplier.
      • Fresnel Scale.
      • X, Y, Z Reflection Wavelet Scale.
      • Large and Small Wave Speed.
      • Refraction Scale (Above) and (Below).
    3. Set Fresnel Offset to 0.50 (note that depending on things like ambient lighting, the floor texture you use, etc., you may want to adjust this up or down).
    4. Set Blur Multiplier to 0.80 (note that depending on things like ambient lighting, the floor texture you use, etc., you may want to adjust this up or down).
    5. From the Save / Apply Drop-down, select Save As and save your updated environment asset under a new name (e.g. “Reflective Floor”).
Adjusting the water settings for a reflective floor effect
  • Once saved, Select Apply to Parcel from the Save / Apply drop down to apply the environment to the parcel.

3. See How It Looks / Fine Tuning

You should now have a nicely reflective floor to your building, as shown below.

The finished product again, as per the banner image, note the avatar reflection and well as the reflections of in-world objects (1), and also the use of steps to access the low-set floor of the gallery from the outside “ground level” (2)

What’s more, if the building is sitting within its own parcel, when you leave the building, any visible Linden Water should look like natural water  / waves (although if you cam into the building or glimpse the “reflective floor” from outside of the parcel, it might look a trifle odd until you actually enter the parcel).

You might find that some additional “fine tuning” of the build is required to achieve a perfect result. If you’ve placed your floor a little above the level of Linden Water, for example, you may find your avatar “floats” over its reflection (below left), or if the floor is set a little too far below the level of Linden Water, the avatar and reflection may appear to “merge” at feet / ankles. But errors can be corrected with careful adjustment of your floor either down or up.

You may have to adjust the floor level relative to the Linden Water level to prevent avatar reflections giving the impression avatars are floating above the floor (l) – or standing with feet embedded in it – and actually standing on the floor (r).

Conclusion

There are still some limitations on the effectiveness of this approach: as noted above, it can only be used for ground-level interiors, and the effect does require visitors to have their graphics preferences set to reflect avatars in Linden Water. However, once set-up, it can add a certain edge to places like stores and galleries.

I’m not sure how much of a performance hit would occur in viewers trying to render a lot of avatars and their moving reflections in a ballroom or other dance venue, so these might require greater consideration. But if you do want to have a different ground-level flooring for your building, and you can meet the prerequisites noted above, it might well be worth giving it a go.

Tutorial: Viewer Camera Presets

The default viewer camera placement has long been the bane of the Second Life viewer. Placing the camera well above and behind the avatar, it gives an awkward over-the-head view of the world, rather than the more intuitive over-the-shoulder view seen in many video games.

While the camera’s debug settings have allowed a custom camera preset to be set-up, it has never really been possible to easily create, save, and swap between presets according to need.

Table of Contents

The Camera Presets controls, developed and contributed by Jonathan Yap, the developer responsible for the graphics presets options in the viewer (see Avatar Complexity and Graphics Presets in Second Life for more), changes this. It is a capability that allow users to create one more more custom camera presets within the viewer to suit particular needs and then save them. This means, for example, you can now have a camera position for general exploring, another suitable for combat games, another for building, etc., all of which can easily be accessed and used at any time.

This tutorial explains how to create and use presets via Camera Presets options.

Note: at the time of writing, the camera presets options are only available in the official viewer, version 6.4.2.541639 or later.

UI Elements

There are five UI elements associated with creating and using camera presets:

  • The Camera Presets icon and drop-down – presenting the means to quickly access and use created camera offsets.
The Camera Presets icon, found in the top right of the viewer window, and a populated version of the drop-down that can be displays on clicking on it.
  • The Camera Controls floater. This provides access to provides access to the following:
    • The familiar “on the fly” controls for positioning the camera / selecting any of the pre-set camera positions, setting the camera focus or switching to Mouselook. These can also now be used to create a custom camera preset.
    • Camera Position floater for creating new camera presets numerically.
    • Save Camera Preset floater – save any preset you have created or replace an existing preset with new values.
    • My Camera Presets floater – allows you select and delete any preset you have created, or reset your camera to one of the viewer’s default front, side or rear camera positions.
    • In addition, the Camera Controls floater includes a drop-drop menu to provide quick access to any custom camera presets you have created.
The Camera Controls and camera presets floaters – click for full size, if required

Creating a Custom Camera Preset

Using the Camera Controls

  1. Open the Camera Control floater by:
    • Hovering the mouse over the Custom Preset icon at the top right of the viewer window to open the drop-down and then clicking the Open Camera Floater button OR.
    • Clicking on the Camera Controls (Eye) button in your viewer’s tool bar, OR
    • Selecting Me→Camera Controls… from the viewer menu bar.
  2. With the Camera Control floater open, clicked the required view button (Front, Side, Rear) if required.
  3. Use the camera orbit, slide and zoom controls on the left of the camera floater to position your camera as you would like it to be relative to your avatar.
  4. When you are satisfied with the camera position and angle, click Save As Preset button in the floater, and:
    • Either make sure the Save As New Preset radio button is selected and type a name for the preset in the text box.
    • Or click the radio button for Replace a Preset, then click the button to display a list of current presets and highlight the one you wish to replace (including one of the three default positions, shown in italics).
  5. When you have entered a name or made your choice, click Save.
Using the camera controls to create a camera preset

Using the Precise Controls

If you have a numeric set of camera and focus offsets you use (e.g. such as those provided by Penny Patton, or use the table below to set your camera to some typical view points):

  1. Open the Camera Control floater by:
    • Hovering the mouse over the Custom Preset icon at the top right of the viewer window to open the drop-down and then clicking the Open Camera Floater button OR.
    • Clicking on the Camera Controls (Eye) button in your viewer’s tool bar, OR
    • Selecting Me→Camera Controls… from the viewer menu bar.
  2. In the Camera Controls floater, click on Use Precise Controls.
  3. In the Camera Position floater:
    • Enter the X, Y and Z figures for the camera offset position.
    • Enter the X, Y, Z figures for the focus offset position,
    • Use the slider to set how near / far the camera is to be positioned from your avatar.
  4. When you are satisfied with the camera position and focus, click Save As Preset button in the floater, and:
    • Either make sure the Save As New Preset radio button is selected and type a name for the preset in the text box.
    • Or click the radio button for Replace a Preset, then click the button to display a list of current presets and highlight the one you wish to replace (including one of the three default positions, shown in italics).
  5. When you have entered a name or made your choice, click Save.
Setting a precise position for a camera preset

The following table offers Penny Patton’s recommended positions for over-the-shoulder camera presets.

Over the Left Shoulder
Centre
Over the Right Shoulder
Camera Offset
X= -2.0
Y= 0.4
Z= -0.2
X= -2.0
Y= 0.0
Z= -0.2
X= -2.0
Y= -0.4
Z= -0.2
Focus Offset
X= 0.9
Y= 0.7
Z= 0.2
X= 0.9
Y= 0.0
Z= 0.2
X= 0.9
Y= -0.7
Z= 0.2
Offset Scale Slider
1.5 1.5 1.5

Using Your Custom Presets

From the Presets Icon

  1. Hover the mouse over the Custom Preset icon at the top right of the viewer window to open the drop-down.
  2. Click on the required preset name to select it.

From the Camera Controls Floater

  1. Click on the Use Preset button in the Camera Controls floater.
  2. A drop-down of custom camera presets is displayed.
  3. Click on the required preset name.
  4. The preset is selected, and the button updates to display the preset’s name.
Using a custom camera preset

Deleting or Resetting Default Presets

Notes:

  • You can only delete custom presets and reset default presets.
  • No confirmation is requested: actions will be immediately implemented – so if you have overwritten one of front, side or rear camera position presets, your custom version of that preset will be lost when reset.
  1. Display the Camera Controls floater.
  2. Click the gear icon.
  3. The My Camera Presets panel opens (may default to the top left of your screen).
  4. Hover the mouse over the preset you wish to delete or reset.
    • Custom presets will display a trash can. Click it to delete the preset.
    • Default presets will display a reset icon. Click it to return the preset to its original values.

Environment Enhancement Project: a primer

The Environment Enhancement Project (EEP) is a set of environmental enhancements designed to replace windlight XML settings to control the water and sky environments seen in Second Life, and provides a wide range of additional / new capabilities for region holders, parcel holders and general users. It represents a fundamental shift in how environment settings are used and applied.

In brief EEP:

  • Uses environment objects that you can keep in your inventory and / or share with others.
  • Provides parcel-level control of environments.
  • Allows up to four different, independently controlled sky layers.
  • Allows the Sun, Moon and Cloud textures to be replaced with custom textures uploaded to the viewer.
Table of Contents
  • Provides an extended day cycle of up to 168 hours (thus allowing a 7-day, 24-hour day / night cycle to be defined, for example).
  • Allows users to override region / parcel settings as seen within their own viewer, by either attaching EEP settings to their avatar or through the Personal Lighting floater.
  • Provides new LSL functions to allow scripts to interact with parcel environments.
EEP allows you to have a little fun, if you wish. Credit: Bellimora

Many have already gained familiarity with EEP whilst it has been in development, using both the original project viewer and iterations of the release candidate viewer. However, given it is such a fundamental shift in how environment settings are created and used, I have attempted to break things down into more easily digestible pieces through the use of this EEP primer, and a more comprehensive EEP tutorial.

  • This primer is designed to provide an overview of the basic EEP capabilities and options from the point-of user of someone wishing to use them.
  • The EEP Tutorial is intended to provide a comprehensive breakdown of EEP capabilities, including how to create new EEP sky, water and day settings for personal use or which can be given or sold to others.

You can use either this primer or the tutorial to better understand EEP (the information here is also presented in the tutorial, which also explores the various floaters and options in greater depth).

For official information on EEP, please refer to the Environment Enhancement Project SL wiki page.

EEP Basic Concepts and Terminology

In brief EEP:

  • Uses environment objects that you can keep in your inventory and / or share with others – including selling (subject to the SL permissions system) via in-world stores and on the Marketplace.
  • Provides parcel-level control of environments.
  • Allows up to four different, independently controlled sky layers.
  • Allows custom textures for the Sun, Moon and clouds.
  • Provides an extended day cycle of up to 168 hours (thus allowing a 7-day, 24-hour day / night cycle to be defined, for example).
  • Means that as environments settings are simulator-side, and so by default are automatically seen by anyone using any EEP enabled viewer on entering the region / estate / parcel.
  • Still allows the use of “personal” settings seen only be the use applying them, for the purposes of photography, machinima, etc.

Terminology

EEP uses some key terminology that should be understood.

  • Settings: used to define the environment you see. There are three settings types:
    • Sky: define the atmosphere and lighting for a day (or night); the movement, density, etc., of the clouds; and the appearance of the Sun and / or the Moon (which remain in a fixed point in the sky).
    • Water: define the appearance of Linden Water (prim or mesh animated water is not affected): water colour and reflection; wave movement; amount of light refraction, etc.
    • Day Cycles: collections of Sky and Water settings that are combined to present a dynamically changing environment over a user-defined time period representative of a “day” (by default this is set to the legacy Second Life day / night cycle of 4 hours, but can be extended out to represent physical world time periods of up to one week).
    • Note that Sky and Water settings are referred to as Fixed Environments.
  • EEP assets: physical “containers” for storing EEP settings. These are inventory items that by default, are stored in the new Settings folder in your inventory (see below), they are split into three types:
    • Sky – Sky settings. Icon: a blue sky with clouds.
    • Water – Water settings. Icon: a water droplet.
    • Day Cycle – for Day Cycles. Icon: a split Sun / Moon.
    • EEP assets (permissions allowing) can be exchanged, given away, and / or sold through a store or via the Marketplace.

Note that EEP settings are:

  • Created or edited using their corresponding EEP asset (e.g. to create Sky settings, you use the Sky asset type).
    • New EEP assets can be created directly from inventory, just like any other system inventory asset type (notecard, clothing item, gesture, script, body part).
    • Creating / editing EEP assets and settings is covered in depth in my EEP tutorial.
  • By default stored within a new system folder in inventory – the Settings folder. This folder may be hidden until such time as an EEP asset is created.
By default, EEP assets are stored and created in the Settings folder in your inventory (l). If you want, you can manually sub-divide your settings into suitable folders for easier tracking (r)

EEP Permissions

There are a few notes on permissions associated with EEP settings / assets.

  • Copy/no-copy: EEP settings assets may never be marked no-copy. A person who owns a setting object may always make a copy of it in their inventory.
  • Transfer/no-transfer: the no-transfer permission is persistent. If you import any no-transfer day or water setting into a day cycle, that day cycle will also become no-transfer. Once saved, this change cannot be undone.
  • Modify/no-modify: these permissions behave as normal.

EEP Library Assets

EEP includes a collection of Sky, Water and Day Cycles, together with a set of textures that can be used for clouds and / or to replace the Sun and Moon, etc.

  • These are located in Inventory (CTRL-I) → Library → Environments.
  • They can be used in one of two ways:
    • Unmodified, directly from Library → Environments.
    • By copying them to your inventory (e.g. to your own Settings folder, if it is visible through the creation of an EEP asset; if not, any other folder can be used), where they will become modifiable, allowing you to adjust them / use them to create your own settings.
    • See my EEP Tutorial for editing / modifying EEP assets and settings.

Differences to Windlight

Some of the key differences between EEP and windlight are:

  • EEP settings are stored in inventory assets, not as XML files saved to your computer.
  • Because they are server-side, EEP settings are by default seen by any viewer affected by the. This can mean:
    • Parcel owners using a specific set of environment settings no longer have to request visitors manually switch to them.
    • Settings are no longer dependent on visitors to a parcel with a custom environment having the precise windlight XML file stored on their computer.
  • EEP setting do not require any external storage (e.g. Dropbox) in order to be shared with other users, if they are to be given away.