| Following the unprecedented demand for Firestorm 5.0.1 (see here for details), formal mirror sites are now available. When downloading Firestorm 5.0.1, please ensure you use with either the Firestorm download page or one of the mirror site links. Please do not source your copy of Firestorm from elsewhere. The mirror site download links are available here. |
![]() On Tuesday, December 13th, the Firestorm team released Firestorm 5.0.1.52150 – the new version number both reflecting the inclusion of the Lab’s Project Bento code and also bringing Firestorm more into line with the Lab’s own viewer version numbering, which the latter has been gently requesting for some time now.
On Tuesday, December 13th, the Firestorm team released Firestorm 5.0.1.52150 – the new version number both reflecting the inclusion of the Lab’s Project Bento code and also bringing Firestorm more into line with the Lab’s own viewer version numbering, which the latter has been gently requesting for some time now.
As well as Bento, the release includes almost all the latest code updates and improvements from Linden Lab, and a lot of new nips and tucks from the Firestorm team and via contributions from other parties.
In keeping with my usual approach to Firestorm releases, what follows is not an in-depth review of version 5.0.1.52150, but rather an overview, highlighting some of the more significant / interesting changes, updates and fixes, which I feel will be of most interest to users.
For full details of all changes, and all due credits to contributors, etc., please refer to the official release notes. Note that this release means that Firestorm version 4.7.5 will be blocked in around three weeks time.
The Before We Begin
- There is no need to perform a clean install with this release if you do not wish to.
- You should, however, remove your existing version of Firestorm before installing 5.0.1.
- Before removing your current version, make sure you back-up all your settings safely so you can restore them after installing 5.0.1.
Lab Derived Updates
Firestorm 5.0.1 brings the viewer up to parity with the Lab’s 5.0 code base, which means this release supports the new Bento skeleton enhancements plus VLC media capabilities, the Visual Outfits Browser (VOB), a range of fixes and improvements and some upstream additions from the most recent Maintenance RC.
Bento Avatar Skeleton Enhancements
As most people are aware, Project Bento is a collaborative project between the Lab and content creators to improve and enhance the Second Life avatar skeleton in order to better support mesh avatars (Bento does not work with the Second Life system avatar). It adds numerous new bones to the avatar skeleton, allowing easier creation and animation of things like additional wings and limbs, and offers the opportunity for greater facial animations with mesh heads and faces, and even finger manipulation on mesh hands.
In addition, Bento provides a set of new attachment points to work with the new joints – however, the overall limit of the number of attachments you can wear at any one time remains 38 (including HUDs).
Most of all of this work is entirely under-the-hood. However, there are two additions to the avatar right-click context menu for both your own and other avatars: Reset Skeleton and Reset Skeleton And Animations, which should be noted.
These options have been added because sometimes, when changing between one mesh avatar and another, the basic SL avatar can become deformed, resulting in it looking squished, stretched, caught between two looks, or something else. This problem is generally the result of race conditions when the avatar’s appearance is being updated, and both of these buttons are intended to correct the problem – the option to reset animations being intended to fix deformations which may be due to animations also kicking-in incorrectly / at the wrong time as well, which may cause an avatar to deform.

Note than anyone not using a Bento-capable viewer will see Bento avatars “deformed” or “melted” and will also see any attachments using the new Bento attach points rendered in the avatar’s chest.
Further information on Bento can be found via the following links:
- Lab post introducing Bento
- Second Life Knowledge Base on the Enhanced Skeleton
- Avatar body size wiki page
- Bento updates in this blog
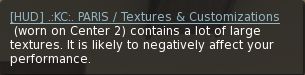
HUD Complexity Warning
If you attach a HUD which makes heavy / excessive use of large textures and which, as a result, can impact your system’s performance, the viewer will display a warning to indicate the problem and which names the HUD. It will naturally fade after a set time has passed.
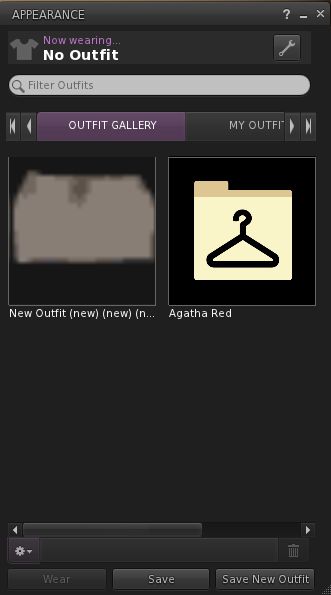
Visual Outfits Browser
The Visual Outfits Browser (VOB) allows you to use the Appearance floater to capture / upload / select images of your outfits and save them against the outfits in a new Outfit Gallery tab within the floater. It can be accessed by either right-clicking your avatar and selecting Change Outfit or Edit Outfit > Click the left arrow at the top of the floater or via Avatar > Appearance / CTRL-O, then
The tab displays all of your created outfits as a series of folder icons, each one with the name of the outfit beneath it. You can replace these icons with an image of the outfit quickly and easily in one of three ways:
- You can wear the outfit, then right-click on its associated folder icon and select Take a Snapshot. This will open the snapshot floater with save to inventory selected by default, allowing you to photograph yourself wearing the outfit and upload the image to SL, where it automatically replaces the folder icon for the outfit
- You can use Upload Photo to upload an image of the outfit your previously saved to your hard drive, and have it replace the folder icon
- You can use Select Photo to select any image previously saved to your inventory (including any image supplied with the outfit in question, if appropriate), and use that to replace the folder icon for the outfit.
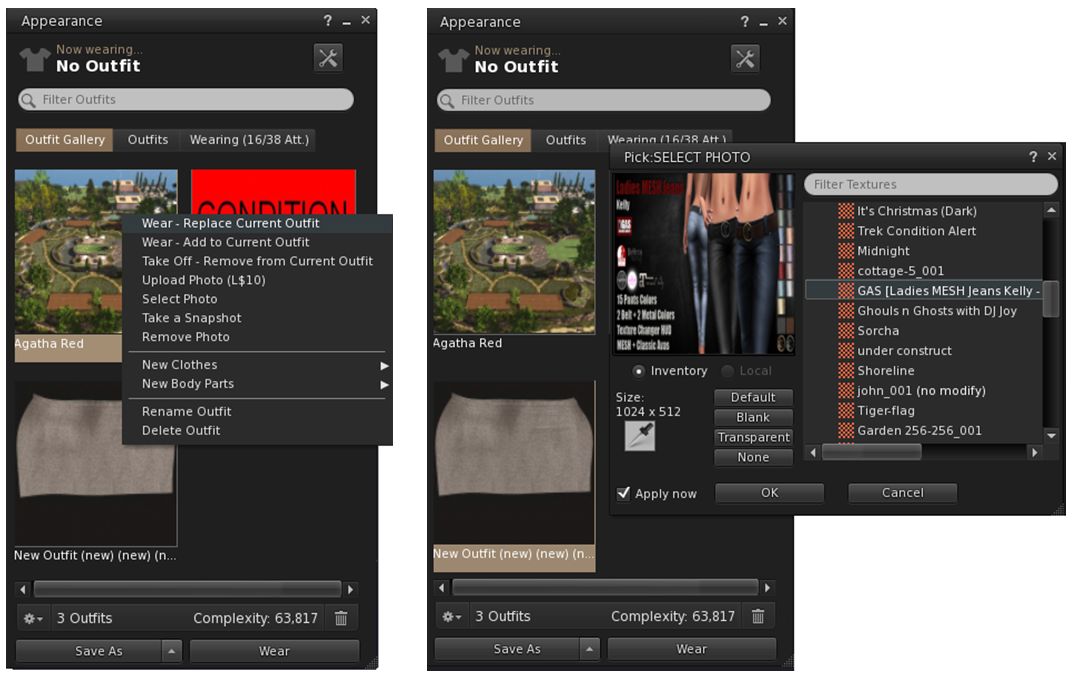
Any outfit within the gallery can be worn (Add to or Replace current outfit) and removed via the right-click context menu, which also includes options to create / delete new outfits, and to create new system clothing items / body parts.
When using the capability there are a number of points to keep in mind:
- Both the Take a Snapshot and the Upload Photo options will incur the L$10 upload fee, with the images themselves saved in your Textures folder
- In all three cases, link to the original images are placed in the outfit folder
- VOB only works for outfits you’ve created using the Appearance floater / the Outfits tab. It doesn’t work for any other folders where you might have outfits – such is the Clothing folder.
You can find out more on the VOB via the Visual Outfits Browser Knowledge Base article.
VLC Media Support
QuickTime has been replaced with LibVLC support for the Windows and Linux versions of the viewer. This is due to Apple discontinuing QuickTime for Windows while leaving vulnerabilities unpatched. see QuickTime for Windows: “uninstall today”.
Other Lab Updates of Note
- The viewer is now DPI aware on Windows 8.1+. This fixes the problems with tiny font size & user interface size on high-resolution monitors on Windows 8.1 and above. The UI Scaling is now be automatically set to the correct value for the system at viewer launch. The maximum UI scaling setting has also been raised as follows:
- Windows 7: 2.0.
- Windows 8.1: 2.5.
- Windows 10: 4.5.
- Improvements to the region “Object Bonus” setting – see BUG-11913.
- A time stamp has been added to Help > About floater.
- A fix to prevent editing marketplace listings before inventory has fully fetched causing listings to be unlisted – see BUG-11804.
- A fix for resetting scripts via the build menu no longer works on many scripted objects – see BUG-20086.
- A new alert has been added, warning if too much inventory is in coalesced objects.
- A fix for incorrect radius calculation in the viewer – see Beq Janus’ blog post – Bug hunting – Fixing an ancient LOD issue and also FIRE-20192 / STORM-2138
- PERMISSION_DEBIT notification now defaults to Deny, to to help prevent accidental granting of debit permissions (see below).

Firestorm Updates
Preferences
Notable Preferences updates are:
- Move and View: new option to re-render temporary derendered objects after teleport or after end of session/manual re-rendering via the asset blacklist floater: Re-Render Temporary Derendered Objects After Teleport (see also Asset Blacklist Updates, below).
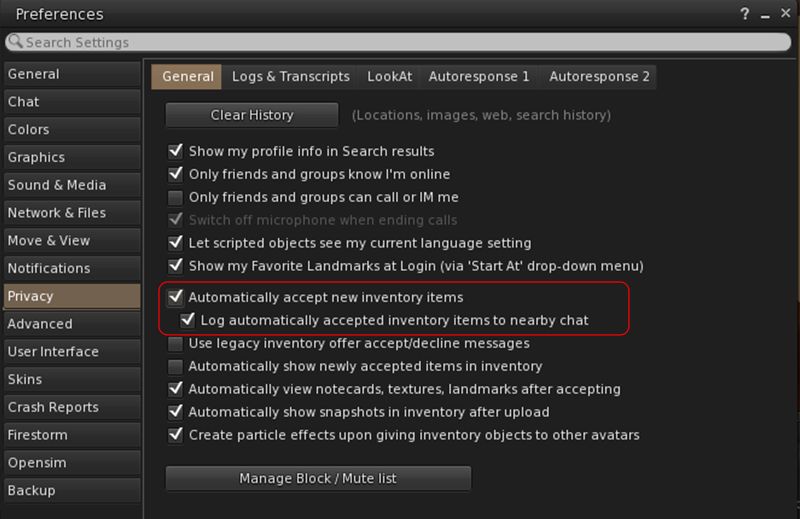
- Privacy > General: New option to log auto-accepted inventory to nearby chat (requires Automatically Accept New Inventory Items to be enabled).
- User Interface > Font: new font option: Noto.
Avatar Render Settings
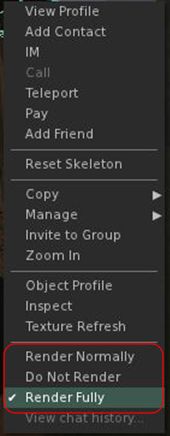
Unlike the official viewer, the avatar render settings you apply to individual avatars will persist across log-ins, so if you set an avatar to Do Not Render, that avatar will only render as a grey imposter until such time as you right-click on them again and select either Render Normally (e.g. fully or as a Jelly Doll, depending on your Complexity Setting), or Render Fully, so they will always render in your view, no matter what your Maximum Complexity setting.
With Firestorm 5.0.1 you can track those avatars you’ve set to either always render fully or to never render (other than as a grey imposter) using World > Avatar Render Settings. This displays a floater listing all the avatars you’ve applied a render setting to as either Fully or Never. Right-clicking on an avatar’s name (or using SHIFT-click / CTRL-click for multiple selections) will display a pop-up menu, allowing you to change the current setting for the selected avatar(s). You can also right-click on an avatar’s name and then click the information icon just to the left of their render setting to display their profile.

Asset Blacklist Updates
The Asset Blacklist (World > Asset Blacklist) has a number of improvements:
-
Temporarily blocked objects are now shown in the blacklist floater so they can be removed.
-
A fix has been added to prevent crashing when leaving an area where many objects were blacklisted.
-
A Preferences option has been added to re-render temporary derendered objects after teleport or after end of session/manual re-rendering via the asset blacklist floater: Preferences > Move & View > View > Re-Render Temporary Derendered Objects after Teleport.
-
A Clear Temporary button has been added to the blacklist floater to clear all temporary derendered objects.
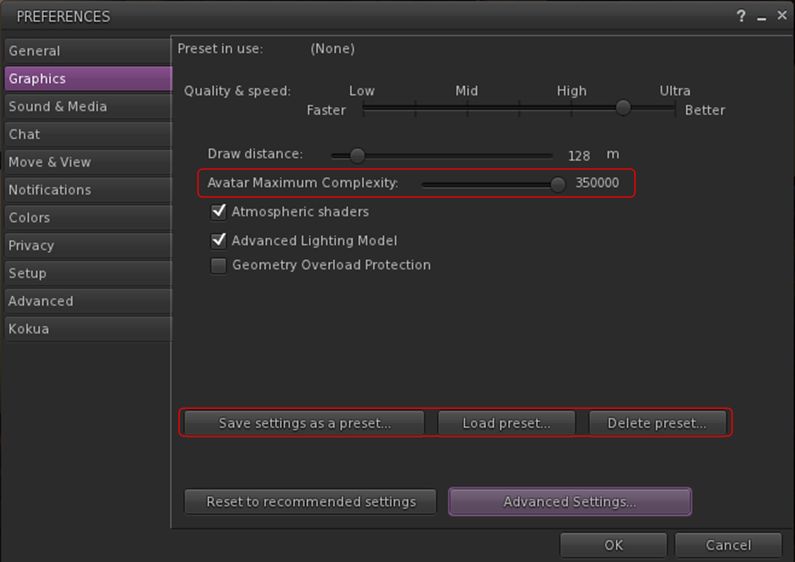
Graphics Presets Now Global
Graphics presets (a Linden Lab capability introduced into Firestorm with the 4.7.9 release) are now treated as a Global setting, rather than a Per-Account setting. This means that presets can be set from the log-in splash screen without actually logging-in to the viewer, and helps ensures consistent presentation of the current preset setting. However, it also means that any existing presets either have to be re-created, or need to be manually copied from the per-account settings folder to the global user_settings folder. See FIRE-19810.
FSExperimentalLostAttachmentsFix
There is currently (at the time of writing) an issue in messaging between the simulator and the viewer during region crossings (physical or teleports), which can result in attachments being detached or, harder to detect, attachments being removed server-side, but remaining visible (but effectively ghosted) in your view, and which cannot be individually removed, as the simulator doesn’t recognise them as being there.
A common cause for this problem is multiple items using the same attachment point – which can be a major issue with things like rigged meshes, which then to be set to attach to something like the right hand. Thus, a way to solve this is to move multiple attachments using the same point elsewhere – in the case of rigged mesh, this should be relatively simple, as it will retain its orientation and position relative to your body no matter where it is attached.
The Lab is still investigating this problem. However, in an attempt to help mitigate it, Firestorm have implemented two new debug settings in Firestorm 5.0.1:
- FSExperimentalLostAttachmentsFix: enabled by default, this triggers an attempt by the viewer to correctly resync what it believes to be your attachments with the simulator’s understanding of what you have attached, and either prevent items being unexpected removed, or items being removed, but remaining ghosted in your view, etc.
- FSExperimentalLostAttachmentsFixReport: this option is disabled be default to prevent message spamming on your screen. When enabled, it reports any attachments which the simulator attempted to incorrectly detach during a teleport or region crossing to nearby chat.
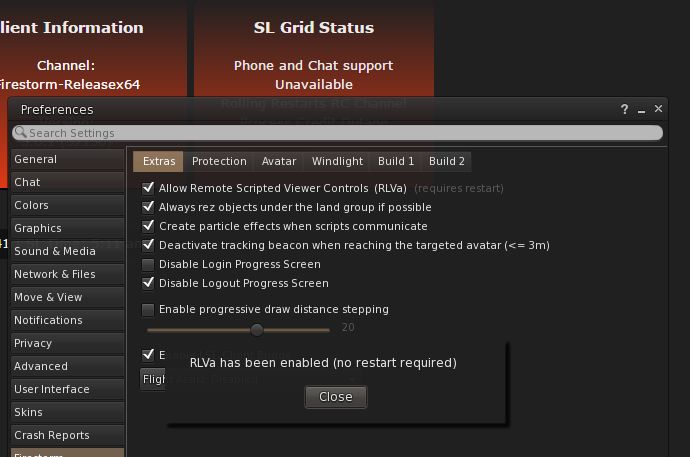
RLVa (Restrained Love) Updates
For the full list of RLVa updates, please refer to the release notes. However, the following are worth highlighting:
- RLVa restrictions can be sorted in ascending / descending order via RLVa > Restrictions and clicking on the Restrictions header
-
RLVa can be toggled on / off from the viewer log-in splash screen without the need to re-start the viewer on doing so.
Building and Scripting
Mesh uploads should no longer fail from a folder with Unicode characters in the name (FIRE-19806 and BUG-37632), and clicking on a link in a script dialogue should no longer open it as a SLurl rather than launching a web browser (FIRE-20054).
In addition, the LSL preprocessor has the following improvements:
- The “Preprocessed” text window of the preprocessor is no longer editable.
- Line and column are now shown on the “Preprocessed” tab.
- Context menu items and button which are unavailable are properly disabled.
- Actions for context menu items and for buttons are performed on the active tab (if action is available) instead of always on the possibly hidden editor tab.
- The Search / Replace and Goto Line floaters now work on the active tab instead of always on the possibly hidden editor tab.
Other Updates of Note
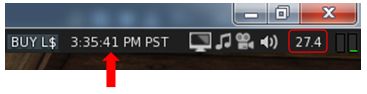
- An FPS meter has been added to the viewer status bar, with a seconds count also added to the status bar clock (top right corner of the viewer
- 64-bit CEF for Windows x64 in now built as native 64-bit plug-in; no more QuickTime
- The custom payment message is now also sent in-world with the payment instead of only being visible in transaction history
- Sort order and column widths of the region tracker now persist between sessions (FIRE-20025)
- Your own avatar’s attachments should now appear in the correct locations when in Mouselook (FIRE-10574 and BUG-1408)
CTRL-F will now focus the local search editor of a window if available – can be disabled through the Debug setting FSSelectLocalSearchEditorOnShortcut to FALSE- Comma separators added to the avatar complexity notification (so 1,456,897 appears as such, rather than 1456897)
- A refresh button has been added to the texture preview window when viewing people’s profile pictures, group insignia, textures in inventory, etc, to overcome issues of the image failing to render in the preview (FIRE-20150)

- Group updates:
- A Copy SLurl to Clipboard option has been added to the right-click context menu when clicking on a group name – this copies the group’s URI to the clipboard (FIRE-20146)
- Clicking a group URI should now put focus on an already open and maximised group profile.
- Flickr upload fixes:
- Direct snapshot uploads to Flickr should no longer upload multiple copies (FIRE-20026)
- Flickr upload time-out increased to 5 minutes
- Uploader now checks std:string.max_size() before appending image data to avoid buffer overrun (FIRE-20094)
OpenSimulator Updates
- Setting Home location should no longer fail on OpenSim grids (FIRE-19894)
- Legacy search results list items should now be selectable under all circumstances in Inworldz (FIRE-19912).
General Observations
Firestorm 5.0.1.52150 brings Firestorm bang-slap up-to-date with the Lab’s own viewer, something the Firestorm team have been striving to achieve for the past couple of years, so kudos to all concerned.
With the inclusion of Bento, this release now means all those making use of the most recent releases of all currently maintained viewers can now correctly render Bento products – so it will be interesting to see how the Bento market for mesh avatars (human or otherwise) now develops.
A side benefit with Bento is that during testing, a good number of preview and beta testers reported an overall improvement in viewer performance – potentially more than can be put down to a purely placebo effect. I run a reasonably high-end system, but have witnessed a step up in average frame rates on our home island / region when compared to 4.7.9 (which also brought something of an improvement for me), and have found some regions I’ve traditionally had problems with (FPS down in the teens with the bells and whistles on) also behaving better.
5.0.1 has, for me, so far been the most stable of all the recent Firestorm releases – not that I tend to have major issues (just oddball ones!). So, as Christmas presents go, this release certainly fills the stocking nicely!
Related Links
- Firestorm 5.0.1.52150 release announcement – Firestorm
- Firestorm 5.0.1.52150 release notes – Firestorm
- Firestorm download page – Firestorm
- Firestorm reviews in this blog