OK, I admit I wasn’t expect this until next week, but on Wednesday, September 14th, the Lab announced that Project Bento is now officially available as a release candidate viewer – version 5.0.0.319688 – which can be obtained through the Alternate Viewers wiki page.
And just in case anyone has missed all the Project Bento news, the best way is to catch-up through the official video. In short, Bento adds a wealth of new bones to the basic avatar skeleton (30+ to heads / faces and to hands alone!), making a wealth of new avatars (humans and non-human) and mesh wearables possible.
The reason I wasn’t expecting the viewer to get promoted just year is that the Lab also has a proof-of-concept viewer being tested, so I assumed any push to RC would come after a decision had been made on incorporating those changes (if they are to be adopted). So, not for the first time, I’m been wrong 🙂 .
The move to release candidate status doesn’t mean the project is at an end. There is still further work to be done as remaining bugs are fixed, etc (so updates such as the slider locking in the proof-of-concept might yet arrive in the viewer). What it does do is three things:
Makes the viewer available to a wider audience through the Lab’s RC distribution mechanism, thus allowing any unforeseen issues in merging the Bento code into the current release viewer code (and which may be outside of direct Bento testing) to be identified and fixed
Potentially makes the viewer more widely available to content creators who may not have so far tried the viewer
Means that TPVs can now officially start incorporating the Bento code into their viewers (in fact, Cool VL Viewer has had Bento in its Experimental branch from some time, and Firestorm have also been working to merge the Bento code as well – but this shouldn’t be taken to mean there will be a new release of the latter in the near future).
In keeping with the status of the Bento code, the Lab do ask people – particularly avatar content creators – to give the viewer a go, and to file a JIRA against any issues found.
As noted above, Bento offers a range of opportunities for mesh wearable and avatar creators – you can see a couple of video exploring the AK and Catwa preview Bento mesh heads in my SL project update. Also, back in August, Vista Animations produced a video illustrating the potential of finger animations:
Then, of course, there is a huge range of non-human avatars: centaurs, “rideables”, winged creatures – all of which can be achieved a lot more efficiently through Bento than has previously been the case.
Hitomi Tiponi’s Starlight set provides a total of 10 different skinning options for the official viewer, together with a range of additional UI tweaks and options (Starlight Silver Blue skin shown on viewer 4.0.6.315555) – Click any image for full size, if required
Reader Wolf Baginski posted a comment on the subject of alternative skins for the official LL viewer, prompting me to think about Starlight. This is a set of alternative UI skins and additional options available for the official viewer (and for some TPVs, although they are outside the scope of this article), which I last wrote about in these pages page back in 2010/11 when I was using it with viewer 2.x.
So, given I haven’t written about Starlight for a good while, and given there may be users of the official viewer who haven’t previously come across it, I thought it might be a good idea to take a look at Starlight as it is today, and offer something of an introduction for those unfamiliar with it.
Overview
Produced and maintained by Hitomi Tiponi, Starlight has been available for the English language version of the viewer for a good few years, as noted above. Today, it includes no fewer than 10 alternative UI skins and a range of other UI updates and tweaks which may appeal to users. The ten skins comprise:
Original Orange: a dark theme with a touch of orange
Nostalgia Blue: features buttons and some layout changes to remind you of Viewer 1.x
Silver Blue: a ‘dark on light’ theme using a cool blue
Silver Pink: as above, but with a hint of pink
Mono Teal: a high-definition black on grey / white & teal green buttons
Orb Red: designed to make the interface seem less one-dimensional
Orb Blue: as above, but a deep shade of blue
Original Teal: The Lab’s original viewer 2.x colour scheme with slightly improved contrast
Custom Dark: for using with a backdrop of a black, navy blue, dark red etc.
Custom Light: for a brighter, vibrant look, ideal for integrating black text with a lighter theme.
The additional UI items offered within Starlight include, but are not limited to:
Top bar Draw Distance slider (between 32 and 992 metres)
Revised Preferences panels
Additional Toolbar buttons
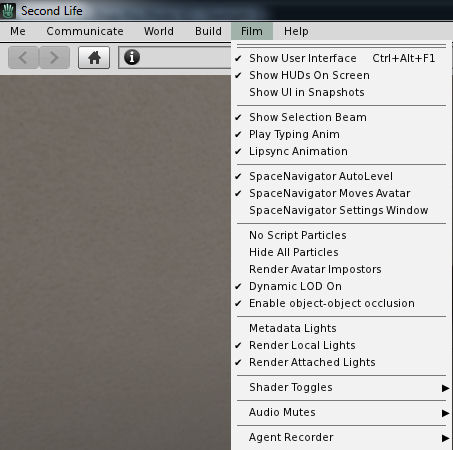
Film menu, for photography and machinima fans
Inclusion of a “lite” version of PhotoTools
Comprehensive Shadows, Rendering, Depth of Field and Local Lights settings in Preferences > Graphics
Assorted UI layout improvements / updates.
For a full list of such options and updates, please refer to the Starlight wiki page.
Starlight also offers a range of UI options, including updated floater layouts, new floaters, additional toolbar buttons, easy access Draw Distance slider and more. Click for full size, if required
Installing Starlight
Note that while available for the official viewer, Starlight is a third-party product, and isn’t supported by Linden Lab.
Read the notes on downloading the correct version.
If you download the .ZIP file (suitable for Windows, OS X and Linux) following the manual installation instructions on the wiki page.
If you download the Windows Easy Installer:
Launch the installer and follow the on-screen instructions
Make sure you install Starlight to the installation location of the viewer with which it is to be used
If you use different RC and project viewers, and wish to have Starlight available for all of them, you must install it for each one.
Note that if a new version of the viewer is subsequently installed to the same location used with Starlight, the Starlight files will be removed as a part of the installation process. You’ll therefore need to re-install the latest version of Starlight in order to keep using it. However, as the Second Life settings files are not removed during viewer updates / installations (they are only removed if you manually carry out a completely clean installation), the viewer should revert to the last active Starlight skin once you have re-installed your Starlight files.
For photographers and machinima makers, Starlight adds the Film menu to the viewer’s menu options (Starlight Mono Teal skin shown)
Running Starlight
Launch the viewer.
Select a Starlight skin from the drop-down displayed below the log-in button.
Re-start the viewer and log-in.
Repeat these steps should you wish to change skins.
Selecting a new Starlight Skin
Additional Notes
Well documented and supported, Hitomi generally has an updated version within hours of any new official viewer de facto release, offering a good cross-section of UI skins and some excellent UI additions, Starlight remains the add-on for the official viewer.
Monday, August 8th saw Firestorm release version 4.7.9.50527 of their viewer. Coming a little over four months since the last release, 4.7.9 brings with it a lot of important changes from the Lab – perhaps most visible Avatar Complexity and graphics pre-sets – as well as a large number of nips, tucks, fixes and improvements from the Firestorm team and open source / TPV contributors.
As per my usual MO, what follows is not an in-depth review of the release, but rather an overview, highlighting some of the more significant / interesting changes, updates and fixes, which I feel will be of most interest to users.
For full details of all changes, and all due credits to contributors, etc., please refer to the official release notes.
When installing this release, uninstall the existing version and then install the new 4.7.9 release – no need for a clean install.
Available Downloads
Prior to getting stuck into the details, please note that with this release:
There is no 32-bit Havok version for OS X, due to incompatibilities with the RLVa update
Firestorm have discontinued producing a 32-bit Havok version of the viewer for Linux, due to the relatively low demand for it.
Firestorm is and willcontinue to be available as a 64-bit non-Havok (“OpenSim”) version for OS X and in both 32-bit and 64-bit non-Havok (“OpenSim”) versions for Linux. These versions can obviously be used with Second Life, and are available for the 4.7.9.50527 release.
This means it is unlikely there will be any Firestorm Havok support for either Max OS X or linux until Linden Lab release the 64-bit versions of the Havok library alongside their own upcoming 64-bit viewers. In the meantime, the Firestorm team offer their apologies for any inconvenience caused, and ask that those on either OS X or Linux who require Havok functionality (e.g. for mesh uploads reliant on Havok physics or for pathfinding purposes) to briefly switch to the LL viewer.
Log-in Credentials Display Update
The first noticeable aspect in this release is the log-in credentials area at the bottom of the splash / log-in screen have been revised, offering a slightly more Viewer 4 style look and bringing all the options together alongside of a single, obvious log-in button.
The revised log-in credentials area of the splash / log-in screen
Note that if you prefer the old login screen layout, you can set the debug setting FSUseLegacyLoginPanel to TRUE.
Another change with this update is that opening Preferences from the log-in screen should no longer cause splash screen layout problems, thus fixing FIRE-17518.
Lab Derived Updates
Firestorm 4.7.9 brings the viewer up to parity with the Lab’s 4.0.6 code base, and so includes the Avatar Complexity (aka “Jelly Dolls”) and graphics presets, as noted above, and includes many maintenance fixes, things like Voice updates and the most recent HTTP updates.
Avatar Complexity – or “Why is everyone I’m looking at an odd colour?”
Avatars can often be the biggest single rendering load on our computers. Hence why the bottom falls out of your viewer performance in a crowded place. Avatar Complexity is a means to offset this impact by allowing you to set a “complexity limit” for avatar rendering. Any avatar (including their attachments) exceeding this limit will be rendered as a solid colour – a “Jelly Doll” – putting a lot less load on your computer. You can adjust the limit according to your needs, and you can also override the setting for individual avatars around you. Do note as well that the setting only applies to other avatars in your view; your own avatar will always be rendered fully.
When first installed, a viewer with Avatar Complexity will set a default limit for you based on your current viewer graphics settings. Hence why you might see a lot of solid colour avatars around you when logging-on for the first time with Firestorm 4.7.9. These default limits are:
Low: 35,000
Low-Mid: 100,000
Mid: 200,000
Mid-High: 250,000
High: 300,000
High-Ultra / Ultra: 350,000
You can adjust you Maximum Complexity setting at any time in Firestorm in one of two ways either via Preferences > Graphics or via your Quick Preferences.
In both cases, moving the Max(imum) Complexity slider to the right increases your threshold, allowing more avatars around you to be fully rendered, while moving it to the left decreases your threshold, increasing the number of avatars liable to be rendered as solid colours.
Note that you can set the Max(imum) Complexity slider to No Limit (all the way to the right). However, this isn’t recommended simply because it leaves your viewer vulnerable to any graphics crashers some inconsiderates still occasionally try to use. It’s far better to simply set your viewer to a high limit (e.g. 350,000) if you don’t want to be bothered by seeing Jelly Dolls
Displaying Avatar Complexity Information
You can display Avatar Complexity information for all avatars (including your own) in Firestorm in one of two ways, depending on your preference (or both can be active at the same time, if you so wish):
By going to the Advanced menu (CTRL-ALT-D if not visible) > Performance Tools > Avatar Complexity Information (previously Show Render Weight for Avatars). This displays three items of information over the heads of all avatars Including yours):
The render complexity for each avatar
A ranking of the avatar’s distance from your camera (1=closest)
The attachment surface area for an avatar, expressed in square metres
Or by going to Preferences > General and checking Show Avatar Complexity (if not already enabled). This will display the render complexity for each avatar in their name tag, and includes two sub-options, which are pretty self-explanatory:
Only [show avatar complexity, when enabled] If Too Complex
Show Own Complexity.
The Firestorm options for displaying Avatar Complexity information in the viewer
On Saturday, June 26th, the Alchemy team announced the official release of Alchemy 4.0.0.37571, which essentially moves the recent Beta releases to release status, together with some tweaks and tucks.
As Alchemy beta users will know, 4.0.0 brings Alchemy up to parity with the Lab’s 4.0.0 code base, and also adds some upstream fixes from 4.0.1. This means the viewer includes the Chromium Embedded Framework (CEF) for media handling.
Given I have provided a couple of overviews for the February and April beta releases of the viewer, the following is a quick bullet-point list of major updates in the viewer:
Automatic update capability (matching the official viewer update capability) – Preferences > Setup
Alchemy 4.0.0 includes auto-update options to help with maintaining parity with latest releases / receiving beta version updates
Enhanced environmental tools
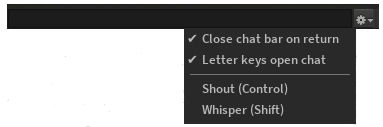
In a change introduced on the April Beta, the local chat bar (see my February Beta release overview) no longer has a chat check-box to activate the option (Preferences > Chat). Instead, the chat bar will open automatically if your mouse focus is in-world (e.g. not already focused on the conversation floater or another floater) and Preferences > General > Pressing Letter Keys is set to Starts Local Chat.
The Alchemy local chat bar and options, as it appears in the 4.0.0. release version of the viewer
At the time of writing, the full release notes were reported as “will be generated soon”, so users are referred to the Alchemy web site for these and a detailed breakdown of updates.
Avatar Complexity is a means to help people who may suffer from performance issues in crowd areas
On Wednesday, May 18th, Linden Lab promoted the long-awaited Quick Graphics viewer to de factorelease status. This viewer includes two important new features:
The updated Avatar Complexity settings
The ability to create, save and load different groups of graphics settings quickly and easily.
Avatar Complexity
As avatars can often be the single biggest impact on the viewer in terms of rendering, particularly in crowded places, so Avatar Complexity adds a new slider to the viewer which can be used to set a level above which avatars requiring a lot of processing will appear as a solid colour – the casual term to refer to them being “Jelly Dolls” – greatly reducing the load placed on a system compared to having to render them in detail, so improving performance.
The idea is that you can adjust the setting according to circumstance, so that when in a crowded area with lots of avatars, you can dial down the Avatar Complexity setting, found in Preferences > Graphics (and in the Advanced Settings floater), with the result that more of the avatars around you are rendered as solid colours, reducing the load on your graphics card and system, thus improving performance. Then, in quieter areas, the setting can be dialled back up, allowing more avatars to fully render in your view.
Note: this only applies to other avatars in your world view: your own avatar will always fully render in your view.
The Avatar Maximum Complexity slider sets a threshold on avatar rendering by your viewer. Any avatars in your view exceeding this value will be rendered as a “Jelly Doll”, sans attachments
If you have a good system with a high-end graphics car, you can set the value on the slider quite high and thus ensure all avatars render fully for you wherever you are.
Note: You can sett the Avatar Maximum Complexity to “No Limit”. However, this is not entirely recommended. some irritants in Second Life still use worn graphics crashers to overload GPUs and crash the viewer. If you set Avatar Maximum complexity to “No Limit”, then such tools, should you ever encounter an irritant using one, will still be effective; so it’s better to set a reasonable high value, leaving your viewer with a cut-off point which should defeat their efforts in crashing you.
There are a few other points to note with Avatar Complexity:
You can opt to always render or to not render avatars around you, regardless of your Avatar Maximum Complexity setting by right-clicking on them and selecting your desired action from the context menu
To help you understand how complex you own avatar is, every time you change your appearance, each time you change the appearance of your avatar, a small notice with your new complexity value will appear in the upper right of your display for a few seconds
The complexity value of your avatar is transmitted to each simulator as you travel around Second Life. In return, you’ll get a brief notice in the upper right of your screen telling you approximately how many of those around you are (or are not) rendering you because of your complexity
If you have a friend or friend you wish to see fully rendered no matter how low you dial Avatar Maximum Complexity (while out at a club, for example, where it may be beneficial to set a lower complexity threshold), you can right-click on those individuals and select “Render Fully” from the context menu
Similarly, and if you prefer, you can selectivity render avatars in your view as grey imposters, by right-clicking on them and selecting “Do Not Render” from the context menu.
Note: Both “Render Fully” and “Do Not Render” will only apply during your current log-in session; the options are not persistent between re-logs.
To help people understand Avatar Complexity, the Lab has produced the following:
A blog post to accompany the promotion of the Quick Graphics viewer to release status
Alchemy viewer updated to version 4.0.0.37561 (Beta) on April 16th. This is another progressive update, containing a lot of under-the-hood improvements and fixes – notably around rendering – and a new visible update in the form of a client-side animation override capability, modelled after the one most popularity seen in Firestorm.
The update also sees a Linux 64-bit release as well, although going by the comments following the release notes blog post, there appear to be log-in issues associated with the Linux version.
This, and the previous “beta” release are intended to get the team’s own updates in front of users ahead of some major updates which will be forthcoming as Alchemy (as with all other viewers) merge with some significant releases coming down the pipe from Linden Lab (including the Avatar Complexity capabilities and – eventually – the Project Bento updates).
As the AO update is the most visible change with this release, and given I am not a regular Alchemy user (although I find it possibly the best viewer for video capture), the rest of this article focuses on the AO aspect of the update.
The client-side animation override (AO), is intended to replace he need for HUD-based scripted animation overrides, instead driving animations – walks-sits-standing poses, etc – directly through the viewer, thus freeing-up simulator resources. Using one does require a little work in setting-up (but so can HUD-based systems), but you can run multiple animation sets directly from the viewer.
Essentially, the AO system comprises three parts:
The animations you wish to use, which you will need to copy / move from any associated HUD system to your inventory – placing them in a folder within your Animations system folder is often a good way to do this
A configuration note card defining the animation you wish to use. Like configuration note cards found in many ZHAO -based animation overrides (so simply using the note card found within your scripted AO system should work OK), this defines animations by type: stand, walk, sit, etc (you can also manually create an animation set if no configuration note card is available)
The viewer UI elements.
To use the client-side AO, you’ll need to have the animations you wish to used stored within your inventory (not within another AO system) (l), and a suitable note card defining the animations you wish to use with the AO (r)
Once you have done this, you’re ready to set-up the client-side AO system. You can access the AO floater in one of two ways:
By adding the AO button to your viewer toolbar and then clicking on it to open the AO floater
By hovering the mouse over the AO icon at the top right of your screen to display a minimised AO floater.
The latter is actually the easiest, given the way Alchemy have implemented to AO system. Assuming you take this approach, click on the spanner icon in the minimised AO floater to expand it.
The client-side AO floater – minimised (l) and expanded (r)
Now, simply drag and drop the configured animation note card from your inventory to the AO floater. This will cause Alchemy to configure the AO system ready for use, and result in a list of your animations appearing in the floater. At the same time, a set of links will be created in the Animation Override folder in your inventory – do not delete these!
Alternatively, if you don’t have a configuration note card for an animation set, click the + button on the AO system floater, type in a name for your animation set, then drag and drop all of the animations you want to use in the set from your inventory into the AO system floater.
The AO floater with the loaded animation set (l) and the associated links in the Animation Overrides folder in your inventory (r)