Tutorial: creating a simple (prim) mirror with Firestorm

Background notes: this tutorial is provided as a *basic* guide to making a simple mirror in-world using prims and the Firestorm PBR release (7.1.9.74745), reviewed here. As such:

  • Is offered alongside my other simple mirror tutorial, which more directly applies to the official viewer and other TPVs.
  • Specifically addresses the use of the Firestorm Build / Edit floater, which is substantially different in information presentation compared to the official viewer.
Table of Contents

Please note:

  • If you have never created PBR mirrors before, it is recommended you read the entire tutorial including (Please) Read Me and Setting Viewer Preferences.
  • If you wish to know how to set your viewer so you can see PBR mirror effects, you only need to read  (Please) Read Me and Setting Viewer Preferences.
  • This tutorial assumes the use of the Firestorm Texture layout within the Build / Edit Floater. If you prefer using the the more traditional Texture layout in that floater, then this tutorial might be more appropriate: Creating a simple (prim) mirror in Second Life.

(Please) Read Me

  • Mirrors comprise two elements:
    • The actual object that forms the mirror. The can be a prim, a mesh face, a single object, part of a more complex (e.g. a mirror face in a frame).
    • A PBR reflection probe: a special kind of object new to Second Life under glTF / PBR which, for the purposes of this tutorial, actually generates the “reflections” on the mirror. As such, it is a object linked to the mirror object, above.
    • Creation of both of these is covered in this tutorial.
  • Mirrors:
    • Are planar (or flat surface mirrors), they don’t work particularly well on curved surfaces (like car bodies).
    • Are not designed to be worn as avatar attachments, and will not function correctly if used as such.
    • Come in two forms:
      • Static – meaning they will create reflections of just about everything within their sphere of influence except avatars.
      • Dynamic – meaning they will create reflections of just about everything within their sphere of influence including avatars.
    • Can have a performance impact – so should be used in moderation and with consideration of the effect you are trying to achieve, and the impact it may have on viewers close to them.
      • Example: it might sound cool to have a dynamic mirror as the floor or along one wall of a dance club, reflecting all the dancers – but it will likely kill viewer performance for all the dancers on the floor / dancing close to the wall. So if you must do either, use a Static mirror so avatars are not reflected.
  • To help reduce the performance impact generated by mirrors, only one will ever be active at a time in any given viewer. This will generally be the mirror closest the the viewer’s camera position; all others will simply appear shiny.
    • If you place two mirrors, each with its own reflection probe, too close to one another, you may find you get strange results in both of them.
    • For this reason, if you want to make a wall of mirrors, better to make multiple mirror objects and have a single reflection probe aligned with them to generate reflections in all of them.

This Tutorial

This tutorial breaks mirror creation down into four core steps:

  1. Setting your viewer preferences.
    • Some of these steps may only have to be down once; others may require setting each time you work with PBR reflection probes.
  2. Creating the mirror object using a prim & setting its surface material.
    • The required material can be made using either Blinn-Phong (aka “legacy” or “classic” materials) or the new PBR materials capabilities in the viewer.
    • This tutorial provides guidance on both.
  3. Creating the mirror reflection probe.
  4. Finishing touches – positioning the probe relative to the mirror object, and completing the mirror.

Notes:

  • All of the images in the sections below can be opened in their own tab(s) for greater clarity, if required.
  • Important: be aware that if you place a mirror within a room that contains its own reflection probe already, you may get some very odd results, as the mirror surface can also show “reflections” from the room’s reflection probe.

Step 1: Setting Your Viewer Preferences

Setting your viewer to work with mirrors requires two steps:

  • Ensuring the viewer’s Graphic Preferences is set to view mirrors correctly.
    • This generally only needs to be done once, as the setting will persist between log-in sessions.
    • Must be done by anyone wishing to simply view mirror in-world or who wishes to create them.
  • Enabling the ability to select reflection probes so they can be edited and manipulated.
    • This is intentionally a non-persistent setting, and must be enabled once per log-in session whenever reflection probes are to be directly selected / edited.

Graphics Preferences for Mirrors

Note: as per the notes above, these settings need to be active any in viewer that is to interact with mirrors.

  • Open up Preferences → Graphics and:
    1. Make sure the Mirrors option is checked. (otherwise PBR mirrors will only appear as shiny surfaces).
    2. Reflection Detail:
      • If you wish to view everything a mirror is designed to reflect, whether it is static or dynamic, set this drop-down to Static + Dynamic.
      • If your system struggles with performance as a result of mirrors, set this to Static, so no avatar reflections will be rendered.
    3. Reflection Coverage: make sure this is set to Full Screen.
    4. Mirror Resolution: set the resolution your viewer will use to display mirror reflections. Higher resolutions will obviously be sharper, but may have an increased impact on performance when rendering mirror reflections.
    5. Mirror Update Rate: set the frequency with which you wish you update to update rendered mirror reflections. Again, the more frequent the updates, the more realistic the reflections – and the potential for greater impact on viewer performance.
Setting your viewer’s Graphic Preferences to see / create mirrors

Setting the Viewer so You Can Select Reflection Probes

Reminder: You only need to do this if you are going to be selection and editing / moving any reflection probe. It is a non-persistent setting, so must be performed once each log-in session when you wish to select and edit a reflection probe of any description.

Setting the viewer can be done in one of two ways:

  • Via the Build menu:
    1. Go to the Build menu at the top of the viewer window.
    2. Click the menu to open it, scroll down to Option to open that sub-menu.
    3. Locate the option Select Reflection Probes and click it to check it.
  • Via the Select Reflection Probes in the top section of the Build / Edit floater.
When creating / editing reflection probes, you must ensure you can select them for ease of manipulation, by check the Select Reflection Probes option via the Build → Options sub-menu (l), or directly in the upper section of the build / Edit floater (r)

Step 2: Making the Mirror & Setting the Surface Material

Using Blinn-Phong

If you intend to create a mirror using PBR materials, you can skip to here.

    • Create a cube prim and size it as required. Keep the Build / Edit floater open after creating and sizing your prim.
    • Click the Select Face radio button and click on the side of the object you want to be the mirror surface.
    • Click on the Texture tab in the Edit floater and complete the following steps using the image below as a guide:
      1. Click on the Click on the Blinn-Phong tab (if not already selected). This will display texture / materials options similar to pre-PBR.
      2. Click on the Texture swatch to open the Pick: Texture floater.
      3. In the Pick: Texture floater, click the Blank button.
      4. This will cause the texture swatch in the Texture picker to turn white (and the mirror object itself).
      5. Click OK to close Pick: Texture.
      6. Click on the “empty” Specular swatch to open the Pick: Texture floater. Repeat steps 2 through 5 above.
      7. In the updated Build / Edit floater, locate the Glossiness and Environment spinner and set both to 255.
    • Your mirror object should now have a shiny face (most likely the one facing you).
    • Continue with Creating the Reflection Probe (below).
Creating a mirror object and setting the surface material using Blinn-Phong materials

Using PBR

  • Create a cube prim and size it as required. Keep the Build / Edit floater open after creating and sizing your prim.
  • Click the Select Face radio button and click on the side of the object you want to be the mirror surface.
  • Click on the Texture tab in the Edit floater and complete the following steps using the image below as a guide:
    1. Make sure the PBR tab is selected, or click on it if is is not.
    2. Click the Materials Texture swatch to open the Pick: Texture floater.
    3. Click Blank in the Pick: Texture floater.
    4. This will cause the texture swatch in the Texture picker to turn white (and the mirror object itself).
    5. Click OK to close Pick: Texture.
    6. The Roughness spinner in the Build / Edit floater will now be enabled. Set this to 0.0.
  • Your mirror object should now have a shiny face (most likely the one facing you).
  • Continue with Creating the Reflection Probe (below).
Creating a mirror object and setting the surface material using PBR materials

Step 3: Making the Reflection Probe

Reminder: When creating / editing reflection probes, always make sure you have enabled Build Menu → Options → Select Reflection Probes. Failure to do so will leave you unable to properly edit any reflection probes you create.

  • Create a cube prim.
  • Important:
    • Rotate the prim so that the TOP face of the cube is facing the same direction as the surface of your mirror (that is, the blue arrow of the gizmo tool is pointing away from the face of the mirror object).
    • Make sure it is perfectly at right angles once rotated.
  • Click on the Features tab of the Build / Edit floater:
    1. At the bottom of the tab, check the box labelled Reflection Probe.
    2. A pop-up will generally be displayed, read and understand it.
      • You can check the Don’t Show box if you do not want to see this warning in future
      • Click OK to convert the prim to a reflection probe – this will enable the Probe Update options at the bottom of the Build / Edit floater.
    3. Click on the Static drop down and:
      • If you wish the mirror to only reflect the objects in front of it, and not avatars as well, select Mirror (Environment).
      • If you wish the mirror to reflect avatars as well, select Mirror (Everything).
Setting the reflection probe properties (click to enlarge in new tab, if required)

Step 4: Finishing Touches

Positioning and sizing the mirror probe to give the required reflections on the mirror object.
  • With the reflection probe selected, make sure the Move radio button at the top left of the Edit floater is enabled.
  • Position the reflection probe so it is overlapping the mirror such that the red arrow / line of the gizmo move tool is just in front of the mirror object.
  • Click the Stretch Radio button in the top of the Edit floater and stretch the reflection probe to fit the mirror object, giving you a mirror-like reflection.
    • Note: The exact size of the reflection probe and its position / depth relative to the front of the mirror might require a little juggling to get right.
  • When done correctly, you should have a basic mirror reflecting the space around you.
  • Finally, link the mirror components together as a single object – but make sure the reflection probe is not the root of the linkset for ease of future moving / editing the mirror.
  • Name the mirror and Take it (or a copy) back to inventory for future use (if required) and / or place the original where you wish to use it.

Notes:

  • Because the reflection probe will be deeper than the mirror, anything shiny that is also encompassed by it and in the same plane will also act as a mirrored surface.
  • Similarly, if you have several “mirror” surfaces in the same plane as the reflection probe (e.g. several mirrors on the same wall), you can extend the mirror’s size to encompass all of them, thus use as single reflection probe for multiple mirrors.

Video and Final Words

For those who prefer to watch, the video below – courtesy of Zi Ree from the Firestorm team – goes through all of the above steps for creating a mirror object and its reflection probe.

Again, this is a basic (if wordy!) tutorial. There is a lot more that can be done when creating mirror objects. and I’m not attempting to cover everything here; this is simply to get people started. Remember that mirrors do have limitations imposed, and can impact viewer performance – so use them wisely!

Finally, note that mirrors are a specialised use for reflection probes – the latter can be quite intrinsic to general reflections and lighting in Second Life. To get a feel for how they can be used, I recommend taking a read of Reflection Probes and You by Kristy Aurelia.

Firestorm 7.1.9: PBR, emojis and mirrors, oh my!

On Thursday, June 20th (SLT), Firestorm released version 7.1.9.74745 of their viewer.

As indicated by the change in major version number (7), this is a significant release of Firestorm, one that brings it largely up to parity, in terms of core functionality, with the official Second Life Viewer SLV). Included in this release, as hinted at by the title of this article, are the following:

  • PBR support – including all updates and enhancements released by the Lab.
  • 2K Texture support.
  • PBR Terrain.
  • Mirrors.
  • Emojis support.
  • Assorted preferences, UI and menu updates.
Table of Contents

Note that the following is not a complete review of the 7.1.9 update, but focuses on the major updates, with additional notes as to why they have been made, and which may be helpful for those not familiar with the on-going updates being made the Second Life (glTF – see below). As far as I’m aware, there are no formal release notes accompanying 7.1.9.74745, just a brief timeline summary, so please excuse the lack of reference to same for additional information / credits.

General Notes

Installation

  • Only download Firestorm from the Firestorm website. Do not utilise and other third-party site purporting to offer the Firestorm viewer, and remember Firestorm will never ask for log-in credentials in order to download a release version of their viewer.
  • There is no need to perform a clean install with this release if you do not wish to.
  • Do, however, make sure you back-up all your settings safely so you can restore them after installing 7.1.9.

MacOS and Linux

  • Firestorm 7.1.9.74745 sees the viewer move to MacOS 12 with the deprecation of MacOS 11.
  • The Firestorm team has been working with the Lab and other TPVs to build up the Linden Linux repositories to enable a re-launch of official Linux support. Currently, the Firestorm team is in the process of migrating their Linux support to use the updated Linux build libraries maintained by LL.

Linden Lab Releases Reflected in Firestorm 7.1.9.74745

  • Graphics Featurette Viewer:
    • Viewer version 7.1.8.9375512768, June 2024.
    • Core features:
      •  2K texture uploads (with associated fees – see Possibly Useful Links, below right).
      • PBR materials terrain support.
      • Static and dynamic planar mirrors.
Remove locations from Teleport History
  • Maintenance Y/Z:
    • Viewer version 7.1.6.8745209917, April 2024.
    • Core features:
      • My Outfits folder improvements.
      • Ability to remove entries from landmark history.
  • Maintenance-W:
    • Viewer version 7.1.5.8443591509, March 2024.
    • Core features bug and crash fixes.
  • glTF PBR Materials Maintenance-2 Viewer:
    • Viewer version 7.1.4.8149792635, March 2024.
    • Core features: second round of improvements and bug fixes for the PBR viewer release.
  • Emoji Viewer:
  • glTF PBR Materials Maintenance-1 Viewer:
    • Viewer: version 7.1.2.7215179142, January 2024.
    • Core features: initial round of improvements and bug fixes for the PBR viewer release.
  • Maintenance V(ersatility) Viewer:
    • Viewer: version 7.1.1.7039128750, December 2023
    • Core feature: displaying user-customized keybindings in chat.
  • glTF / PBR Materials Viewer:
    • Viewer: version 7.0.1.6894459864, November 17 2023.
    • Core Feature: glTF PBR release (lighting, reflection probes, materials).

PBR: Physically Based Rendering

This is the most significant update with Firestorm 7.1.9, and represents some of the most clearly visible changes both in the viewer and how Second Life might appear. However, to provide some context on matters for those who may not be aware of all that is going on (and trying to keep things as concise as possible), some background notes.

The Story So Far (aka Skip This if You’ve Heard it Before)

  • Linden Lab has engaged on a project to extensively overhaul Second Life and bring in to parity with modern standards, specifically moving to compliance with the Khronos®  (graphics library Transmission Format) specification, regarded as the leading standard for sharing 3D and related assets (models, scenes, animations, etc.) across multiple tools and platforms.
  • The first phase of this project (November 2023) focused on a shift to support PBR (Physically Based Rendering). This introduced the likes of:
    • PBR materials, offered as an alternative to SL’s existing materials system (referred to as “Blinn-Phong” materials, rather than completely replacing them.
    • Reflection probes (for more realistic lighting / reflections in second life.
    • HDRI rendering for more realistic environmental rendering.
  • This was followed in January and March 2024 with two bug fix updates to PBR.
  • In June, LL released the Graphics Featurettes viewer, comprising:
    • Further bug fixes and improvements.
Possibly Useful Links
    • Support for the upload of 2048×20248 textures and materials without any down-sampling to 1024×1024 resolution.
    • Provision for using PBR textures on terrain.
    • The ability to create static and dynamic mirrors in Second Life.

But What Does it Mean?

Broadly speaking, the move to glTF compliance in Second Life should mean:

  • Deeper, richer environmental effects and lighting, with much improved reflections (including the ability to set reflection probes for better interior lighting and reflections – including planar “mirrors”).
    • However, some EEP settings can look darker due to the use of HDR.
    • Linden water can look very different – this is something Linden Lab will be addressing.
  • Some significant changes to viewer rendering. Perhaps most notably, you will not longer be able to disable Advanced Lighting Model (ALM).
    • This is because PBR sees the removal of the rendering pipe (called the “Forward Renderer” which was used as the “fallback” when ALM was turned off.
  • A potentially smoother, more straightforward workflow for mesh content creators, allowing them to use their tools (notably Substance Painter and, down the road, Blender), more efficiently and make the content they create more directly transferable between platforms.
  • The ability for content creators to:
    • Continue to use the existing materials system (Blinn-Phong) while they get up to speed with PBR.
    • Immediately swap to using PBR materials and leveraging the benefits thereof.
    • The option of, if they wish, providing content using both PBR materials and Blinn-Phong materials as a “fall back”. Note that this is not required, and creators are under no obligation to do so – it is simply possible at present, and a matter of individual choice.
  • However, there are some potential for viewer performance to be impacted, particularly if the settings for some of the new features are ramped-up and over-tax the computer running the viewer..
  • For Firestorm, some significant changes to familiar UI elements, as outlined in this review.

A Note on Reflection Probes

An important element to understand with PBR is that of reflection probes – what they are and what they are intended to do. The following notes are not exhaustive, but will hopefully assist those who might require some explanation.

  • Simply put, a reflection probe is a 360º degree image of the environment / setting within its physical volume which can be used to create approximate reflections of objects on suitably shiny surfaces, and can be used to add highlights or ambient light is defined spaces.
  • Reflection probes only generate images based on what is within their volumes. Similarly, they only affect objects within their volumes.
    • So, if you have a shiny box and a sofa inside a reflection probe, and another box outside of the probe, the reflection of the sofa should be visible on the box inside the probe, but not on the box outside of the probe.
  • Second Life uses two types of reflection probes: automatic and manual:
    • Every region has its own automatic probes – they are simply *there*, and cannot be directly manipulated.
    • Manual probes are users-created and can be used for specific effects (e.g. generating reflections of objects in a room on glossy /shiny surfaces within the same room. 
    • Manual probes always take precedence over automatic probes.   
  • Probes can be one of two forms: Sphere or Box.
    • Sphere probes tend to give the best results and blend better. SL’s automatic probes are of the sphere type. Sphere probes  are generally good enough for most outdoor scenes.
    • Box probes are handy for generating reflections within thins like rooms, due to their shape. They are also ideal for creating mirrors (see below). They can be rotated to adjust their influence.
  • When editing reflection probes:
    • You must enable Select Reflection Probes via the Build menu →  Options or within the Build / Edit floater so that you can right-click on them and select them for editing once created.
      • This is intentionally a non-persistent setting, as having it on all the time could prevent you from selecting objects inside a reflection probe’s volume. Therefore, you must do this once per log-in session when you intend to create / manipulate any reflection probe(s). 
    • The only parameters which can be used with an reflection probe are its position, rotation, scale, and specific settings assigned to it. All other parameters will be ignored. 
When creating / editing reflection probes, you must ensure you can select them for ease of manipulation, by check the Select Reflection Probes option via the Build → Options sub-menu (l), or directly in the upper section of the build / Edit floater (r)
  • Reflection probes use two ambient settings:
    • The EEP ambience set via Atmosphere & Lighting Reflection Probe Ambience (HDR) in the EEP Fixed Sky and Edit Day Cycle floaters. This is the “minimum” probe ambience.
    • The individual Ambience setting for a reflection probe, set via the build floater. This can be made to make the ambience of a probe more intense, if required (sometimes helpless when using probes in interior scenes.
Reflection probe ambience settings the “global minimum” set via the EEP settings (Fixed Sky or Day Cycle), and the per-probe setting within the Build / Edit floater

Again, for a more detailed exploration on reflection probes, see Reflection Probes and You by Kristy Aurelia.

2K Textures, PBR Terrain and Mirrors

2K Textures

  • Until now, texture resolution in Second Life has been limited to 1K (1024×1024) – however, it has been possible to upload 2048×2048 resolution textures but they would automatically be down-sampled to 1024×1024 for display.
  • With this release, it is now possible to upload 2048×2048 texture without any down-sampling.
  • This ability introduces new fees for uploading textures at 2K resolution:
    • Basic / Plus account: L$50 per texture.
    • Premium account: L$40 per texture.
    • Premium Plus: at the time of writing, L$10 per texture however, it is due to be reduced to L$0.
  • Important: these fees are currently implied for bulk 2K texture uploads, rather than explicitly warned about. If you are a Basic, Plus or Premium user who routinely uploads 2048×2048 textures to Second Life in the expectation they will be down-sampled to 1024×1024 and only incur the L$10 per texture fee – you will be automatically charged at one of the above rates when doing so.

PBR Terrain

This refers to applying 2K PBR materials directly to Second Life terrain (subject to you having region / estate rights in order for you to do so. It is not PBR terrain painting as seen in engines such as Unity or Unreal, but it should result in considerable improvement in the visual quality of terrain. However, note that currently terrain repeats are fixed, but a future update as a part of the ongoing work will enable custom texture repeats to be set, helping with Texel and reducing stretching when PBR materials are applied over changes in elevation.

PBR terrain. Credit: Linden Lab

Note: there is no provision for any legacy fallback when using PBR materials on Second Life terrain, so if used, those on non-PBR viewers will only see grey ground.

Mirrors

The PBR updates allow the creation of planar (flat) mirrors in SL, using reflection probes

The release of the Graphics Featurette viewer finally allows the long-requested desire for real-time / dynamic mirrors in Second Life which do not require tricks with Linden Water or the user of lighting projectors (which could not reflection avatars anyway) or other sleight-of-hand.

How useful mirrors actually are in SL is a subjective issue, and one outside the scope of this review – as is how to create them. However, the following general points on mirrors should be noted:

  • While there can be multiple mirrors within a scene  / room, only one will be properly active at a time – the one nearest the viewer’s camera. All others will generally only appear as shiny surfaces.
  • Mirrors are limited to planar (that is, flat) mirrors, and the capability is not well suited for use with curved shapes / forms (such as the body of a car).
  • Allowing mirror reflections in the mirror (set via options in Preferences → Graphics (see below) will have a performance impact.
  • Mirrors are not designed to be worn as avatar attachments, and will not function correctly if used as such.

For instructions on creating a mirror, using either the new PBR options or Blinn-Phong materials, please refer to Creating a simple (prim) mirror with Firestorm.

Emoji Support

Emoji support was added to the official viewer courtesy of a code contribution by Kitty Barnett, the lead Catznip developer, and is now adopted by Firestorm with the release of 7.1.9.74745.

  • Emojis are accessed through the Firestorm conversations floater, and are available for local chat, Group chat and IMs.
  • To use them, two new icons have been added to the floater, to the right of the text input field (see image below).
Firestorm’s implementation of Emojis
  • Clicking on the down-pointing arrow button will open a display of frequently-used emojis directly under the text input line (note: this will obviously be empty on first-time use).
    • Click on any of the listed emojis to and have them added at the current cursor position in the text field.
    • If you ish to close the display of emojis, click on the arrow button again.
  • Click on the Smiley icon to open a floater of all the available emojis.
  • The emoji floater includes a series of buttons to help with sorting / displaying emojis, as shown and described below, left-to-right.
Emoji floater button bar
    1. All (“Search”): a scrollable list of all available emojis, split by categories.
    2. Recently / Frequently used: displays those emojis used most recently as well as those you’ve used most frequently.
    3. People and body: smileys, emoticons, “gestures”, human emojis (running, cycling, etc.).
    4. Animals and Nature: as per the label.
    5. Food & Drink: as per the label.
    6. Travel & Places: globes, regions, places, vehicles, time zones, etc.
    7. Activities: as per the label.
    8. Object: light bulbs, books, packages, calendars, locks, etc.
    9. Symbols: symbols, button, etc.
    10. Flags: as per the label.
  • Emojis can be con figured using options on Preferences → User Interface → Fonts.

Firestorm UI Updates

Note: these are in addition to those already mentioned above.

Preferences → Graphics

PBR sees a number of changes to the Graphics tabs in Preferences. The following is intended to provide a brief outline of the changes, not an in-depth breakdown of their functionality.

General Tab
Firestorm 7.1.9.74745 Preferences → Graphics: General updates
  1. Revised shader check boxes, which sees:
    • The addition of a Screen Space Reflections check box (can impact performance when enabled).
    • The Mirror check box, must be checked to see mirrors working as such in Second Life (will impact performance when enabled).
    • The removal of the option to disable Advanced Lighting Model (ALM), as noted earlier in this review.
  2. Reflection Detail: the type of reflections generated by reflection probes. Can be set one of: Static Only – generates reflections for everything except avatars; Static & Dynamic: generates reflections for everything including avatars; and Realtime. Generally speaking, the first two options should be adequate, depending on whether or not you wish to see avatars in things like mirrors  (and Static & Dynamic will have a higher performance hit).
  3. Reflection Coverage: can be set to one of None, Manual, Manual and Terrain or Full Coverage.
  4. Mirror Resolution: the quality of planar mirror reflections rendered by the viewer  – for Firestorm, this can be one of 256×256; 512×512; 1024×1024; 2048×2048. Higher resolutions will have a greater impact on viewer performance.
  5. Mirror Update Rate: how frequently mirror reflections are updated. Higher rates will impact viewer performance.
  6. Exposure slider.
Hardware Settings Tab

Extensive revisions in line with the updated viewer rendering including:

  • Updated anti-aliasing from stepped options to the use of fast approximate anti-aliasing (FXAA).
  • Removal of the dynamic texture memory options and the addition of an option to Override VRAM detection with a slider to set the amount of dedicated GPU VRAM.
    • Generally speaking, these options should not be enabled / altered.
    • They are only intended for situations where VRAM detection is reporting incorrect values.
    • Because altering them, seek the advice of Firestorm Support.
Rendering Tab
  • Maximum texture resolution can now be set to either 512×512 or 1024×1024 rather than just 512×512.

Other Preferences Updates

  • Move & View → View: removal of the option to Disable Minimum Camera Zoom Distance.
  • Preferences → User Interface → Fonts: options to change the style of the Emojis and Emoji button.
  • Firestorm → Build 2: option to toggle the Firestorm Texture tab on the Build / Edit floater  between the Firestorm layout and one close to the official viewer’s layout (and which uses a separate Edit Materials floater) – see Build / Edit floater, below.
  • Firestorm → Uploads: new option to define the inventory folder into which uploaded PBR materials so be filed (default: Materials and altered by right-click on the desired folder in Inventory and using the Use As Default For submenu to select the asset type).

Build / Edit Floater – Texture Tab

  • The Build / Edit floater Texture tab has the most visually extensive updates within Firestorm’s UI, including two layout options:
    1. The Firestorm Layout (default) which presents both PBR materials options and Blinn-Phong (“classic”) materials as two separate sub-tabs. When using this layout, the separate Edit Materials floater found within the official viewer does not have to be used.
    2. A layout closer to the official viewer, which uses a drop-down to select whether Blinn-Phong materials (labelled as “Textures”) or PBR materials (“PBR Metallic”) are to be used, and which updates the rest of the panel based on the selection made. This layout also utilises the separate Edit Materials floater as found in the official viewer.
The Firestorm Build / Edit floater Texture tab: left: in pre-PBR versions of the viewer (for comparison); 1: the default Firestorm Layout; 2: the alternate layout (click image for full size, if required)
  • The two layouts can be switched via unchecking / checking Preferences → Firestorm → Build 2 → Use The New Firestorm Texture Panel in the Tools floater (requires restart).
The option to use either the Firestorm Texture layout in the Build / Edit floater (when checked) or a layout close to that of the official viewer (when unchecked).

Note: the Second Life object content menu will display an option to Edit PBR Material when right-clicking on an object using PBR materials. When selected, this will open both the Build / Edit floater and the Materials Edit floater regardless of which Firestorm Texture tab layout you opt to use.

Menu Updates

The following is a brief list of changes to the viewer menus. For ease of reference, it includes menu updates also mentioned earlier in this review.

  • Avatar:  new option: Remove Selected Attachments. When one or more worn attachments are selected, will be enabled, and clicking will remove those attachments.
  • World → Environment: new Midday (Legacy) day setting, using the non-HDR settings for midday (can make the day look brighter).
    • You can “disable” HDR sky rendering by setting the ambience in the Atmosphere & lighting tab of the EEP Fixed Sky and Day Cycle edit floaters to 0.
  • Build → Options:
    • Select Reflection Probes. When checked, will allow any reflection probes in a scene to be right-clicked selected.
    • Show Reflection Probe Volumes. When check will show the volumes of reflection probes in a yellow tint.
    • Highlight Transparent: use as an alternative for CTRL-ALT-T for highlighting objects using transparency and Include Rigged Transparent – both relocated from Advanced Highlighting and Visibility.
  • Help → Whitelist Advisor: a list of Firestorm folders / locations that should be whitelisted with anti-virus tools should that latter give problems when trying to run the viewer, together with guidance notes.
  • The following should only be toggled / used if you know what you are doing:
    • Advanced → Rendering Types: addition of the following toggles: Materials (ON), PBR (ON), Glow, Fullbright, Fullbright Alpha Mask (all OFF).
    • Developer → Force an Error: new option Force LLError, Message And Crash.
    • Developer → Render Tests: options for previewing HDRI skies and for glTF scene preview (this option for in-development work by LL).
    • Developer → Render Metadata: addition of toggles for: Reflection Probes, Probe Updates and glTF Nodes (this option for in-development work by LL); removal of Build Queue.
    • Developer → Rendering: removal of: the following toggles: Advanced Lighting Model; Automatic Alpha Mask (non-Deferred); Disable Ambient, Sunlight and Local Lights; Hover Glow Objects.
    • Developer → Rendering: new Dump Font toggles; new Debug Unicode and Camera Control toggles.

OpenSim Updates

  • A new grid selector
  • Improved teleport/hop handling.
  • PBR terrain fallback (as OS support fallback textures).

Primfeed: A dedicated social platform for Second Life

via Primfeed.com

Sharing your Second Life experience via social media can be something of a scattergun effort, utilising different platforms for different activities: Flickr or Deviant Art for photos, for example, Twitter or Bluesky or Discord, etc., for messaging and so on. But what if there was a single platform where these various needs could be met, one which – although independent from Second Life and Linden Lab – had been developed specifically for, and with input from, Second Life users and offered a degree of integration integration with Second Life, with the potential for more in the future?

Well, as of June 20th, 2024, there is: Primfeed. And this is its story so far.

First formally announced on May 26th, 2024, Primfeed is the brainchild of Luke Rowley, a Second Life resident and developer with over 17 years history on the platform. He is also the developer behind EasyBloggers, a blogger management system specifically designed to simplify the management of blogger teams by Second Life store owners and which has proven exceptionally popular and highly regarded among Second Life creators and bloggers alike since its launch in 2023.

About Luke

Primfeed developer Luke Rowley

Initially introduced to Second Life by his brother, Luke at first treated the platform as most of us do: as a means of fun and relaxation. However, he became fascinated by Linden Scripting language (LSL) and starting with objects scripted purely for fun, he quickly graduated to developing practical tools (including a complete combat meter system – something that also has relevance in 2024, as Rider Linden works to overhaul the Second Life Combat System (SLCS) and make it a more robust set of tools for combat system developers).

From here, Luke started developing web interfaces that could be used with Second Life, work which led him being engaged by one of the biggest hospitals in France developing a Second Life-based simulation to help train medical interns in providing support during disaster situations. Two years later, and still working in the healthcare sector, he started on a career as a web developer.

The main aspect of code I love is: Your code visually creates something. And with SL being this 3D world where the objects you script in-world directly interact with your avatar, I was sold.
While we can think SL looks outdated, I do feel that they are making huge progress, and trust me, it’s not easy when you have 21 years of legacy behind you, while maintaining what’s working now on the grid. What they are doing with PBR is awesome. It looks awesome, and it will save hours of work for every designer.

– Luke Rowley on the appeal of Second Life

Throughout all of this, Luke maintained his love of Second Life, looking for a means to combine his professional skills with the platform and develop something that would not only produce a useful service to Second Life users, but would actually raise the bar in how external websites can both support Second Life and offer a professional level of integration with the platform.

After much discussion with fellow SL users and creators, he came up with the idea for EasyBloggers, a platform which, at the time of writing and just 10 months after its launch, is used by over 400 designers and 2000 users. Part of this success is down to the fact that not only does EasyBloggers fill a much-needed gap in the Second Life creator / blogger ecosphere, it is exceptionally easy to use, feeling like a natural extension to SL. Another aspect with EasyBloggers is that Luke has not rested on his laurels: he has continued to develop and enhance the platform in response to user feedback. At the same time, he started looking at what else might be done to help support Second Life users, and his thinking quickly turned towards social media platforms.

Enter Primfeed

As anyone who has used any social media platform is aware, they can be difficult places for Second Life users, both directly, and Luke notes from his own experience. “You try to see what other SL users are doing and what’s going on but within second of scrolling on a traditional platform, about 90% of your timeline is flooded with ads and suggested content that have nothing to do with SL.”

This led him to thinking about a platform that might be specifically geared towards Second Life users and avoid the pitfalls of more generic options like Twitter/X et al. At the same time, he was aware of increasing frustrations within other spheres such as Flickr. Combining these two factors gave birth to the idea of a dedicated social media / photo sharing platform.

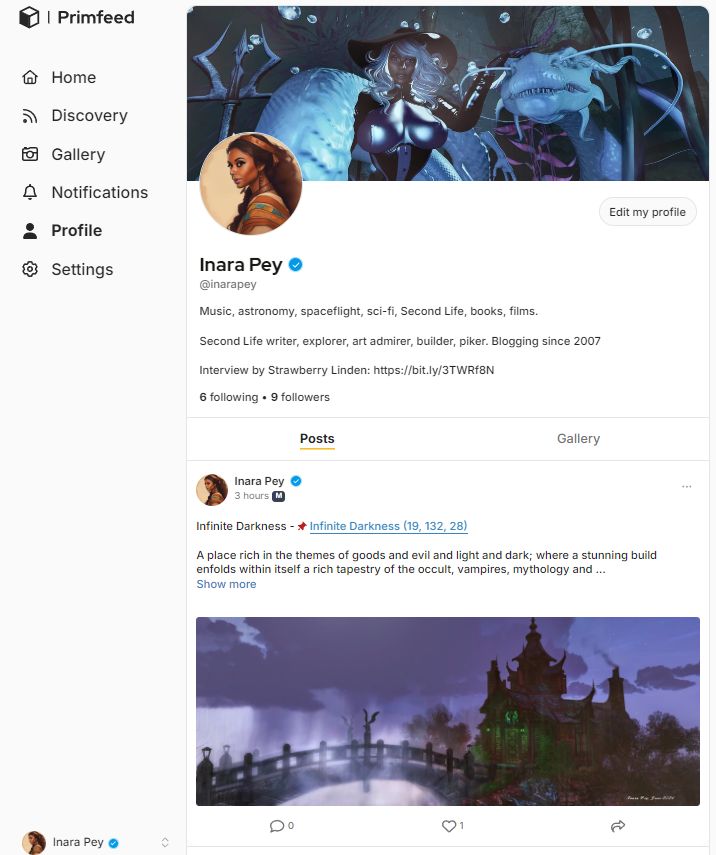
My personal timeline / feed on Primfeed

However, coming up with the idea for such a platform is not the same as developing one; as Luke noted, it’s another level of product management – one that would require some indication it would be welcomed if effort were to be put into it. As such, Luke initially thought it might be something to approach over time, starting with him testing the water first. “My original idea was to perhaps start work on it in 2025; but I was not sure residents were sharing my observations and frustrations,” he notes. “So I thought, ‘Well, let’s make a simple Google Form and see if people are interested’. I included some simple questions with the idea that if 30 to 50 people responded, I’d consider the idea as a future project.”

That questionnaire went live on May 16th, 2024 and the response was overwhelmingly positive, with people not only confirming they’ve love to see such a platform – but that they wanted it now. A message Luke received very clearly.

“I knew I’d have to start working on it as soon as possible,” he told me wryly, “So the next day I worked through the number of responses, looked at the realistic costs of building and running such a service, and quickly became convinced that yes, such a platform could be viable and supported by users. On the back of that, I made an informal announcement that I’d soon start work on the new platform – and the reaction was again overwhelmingly positive.

Over the next several days, Luke continued to refine the idea, looking at what he could initially achieve and how the service might be expanded. From the start, and like EasyBloggers, he wanted the platform to fulfil an identified need. He also wanted to make using it feel, as much as possible, as an extension to Second Life. By May 26th, he was ready to formally announce his new service, with his initial focus for its capabilities being to support the abilities to both upload photos in up to 4K resolution and share thoughts and ideas through simple Twitter/X-like posts.

Integration / Extension

Of course, Primfeed is not the first attempt as a dedicated Second Life centric social media platform – I’ve covered some past attempts in these pages. However, those services have tended towards the use of pre-existing software platforms and services. Primfeed, like EasyBloggers is being built as a dedicated service by Luke under his Kynno brand. This means he has the unique ability to directly engage with SL users and develop / tailor the platform in response to requests and feedback, thus helping to make the platform a genuine extension of people’s SL.

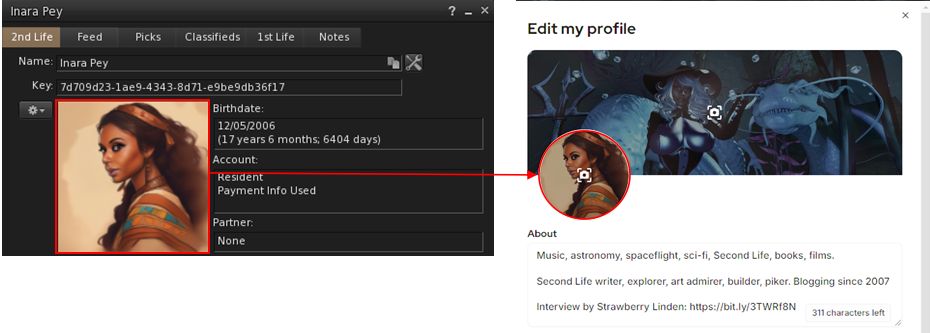
Already this is manifest in a number of ways. Take sign-up for example: Primfeed will automatically pull your Second Life profile photo across and use it as the default profile image there (although you can also change it if you wish).

An example of integration: when signing-up, Primfeed will automatically use your SL profile image for use with your Primfeed profile (which you can later change if you wish)

More particularly, Primfeed offers a set of maturity ratings that are remarkably similar to those found in Second Life and with similar icons and definitions, allowing Primfeed users to filter the content they see on the platform in a manner similar to that found on Second life, providing an instant sense of familiarity.

That said, Luke has taken things a step further than Second Life in this regard: as well as an Adult rating, he has provided an A+. The former indicates things like nudity are likely present, with the A+ indicating active sexual content, and others legal extreme content. Given the (incorrect) claim oft made by some that Adult always equates to “extreme content”, this is a useful distinction – art, for example, can include nudity, but is hardly “always” extreme content.

When you build your websites totally from scratch and you are not using a paid template, you can deeply and carefully add features that really matters and match what residents really want.

– Luke Rowley on designing Primfeed

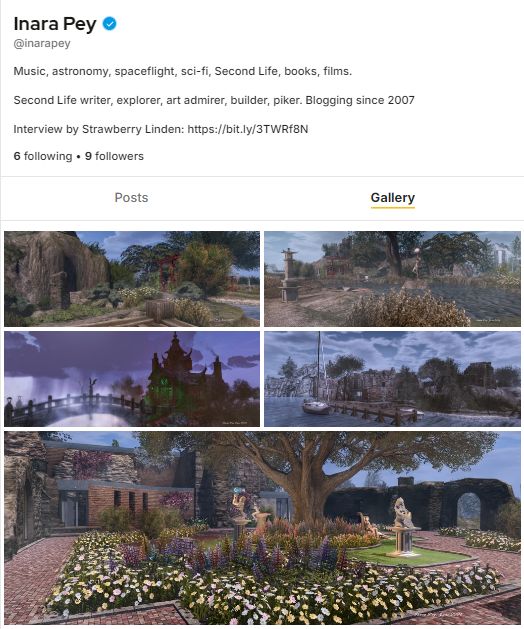
Primfeed leveraging popular approaches from social media platforms such as Twitter/X, with a left-side menu providing users with easy access to options, and a Flickr-like gallery display of images

Nor does it end there; for those familiar with using the likes of Twitter/X, Bluesky and so on, the Primfeed interface will be immediately feel comfortable, sharing a lot of similarities of approach and layout:

  • The left-side quick-access menu.
  • The ability to click on a user’s name in the timeline and open their timeline and / or hover the mouse over their name to see their profile summary.
  • When viewing a user’s profile, the option to view a gallery of their uploaded images.
  • The ability to access a timeline directly (subject to being logged-in to the platform) using the format “primfeed.com/user_name” (so you could add your own timeline to your SL profile, for example.

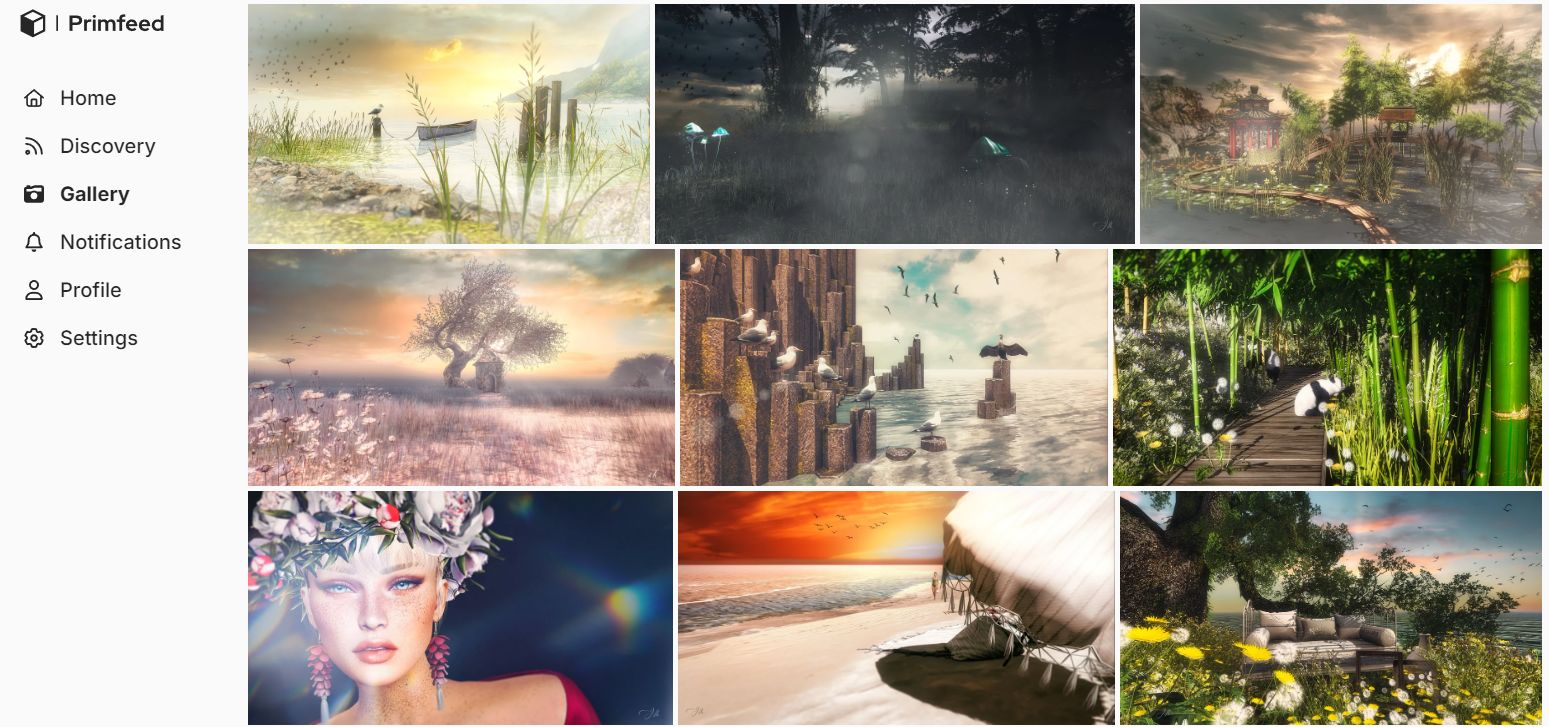
Similarly, and in response to requests from Beta users, Primfeed presents a Flickr-like Gallery option for display uploaded photographs from all users, as shown in the image above.

An example user Gallery display, in this case the gallery accessed from my timeline / feed

Another aspect of integration – so to speak – is the fact that Primfeed is mobile / tablet friendly, offering the same capabilities and design layout, making it exceptionally easy for used to be able to use it and keep in contact with one another wherever they are (Internet connectivity allowing, of course!).

Photos and Posts – But More to Come

The initial release of Primfeed focuses on the ability to upload photographs and post then directly or with accompanying text, and the option to send Twitter-style text posts, which also includes these capabilities:

  • Posts (text and / or image) can be deleted or be opened to have their text edited.
  • URLs are automatically converted to clickable links.
  • Clicking images will open a viewing overlay, allowing the image to be zoomed in on to be viewed in detail, with any text accompanying it (and any posted comments) displayed on the right, a-la Twitter/X, etc.

But there is more to come, including:

  • Two public feeds / timelines: the first featuring both text posts and images (as is currently the case) and one specifically for uploaded images.
  • Support for direct messaging between users.
  • The integration of EasySubscribers: residents will be able to follow subscribe to a given store’s newsletter from the store’s profile.
  • The ability for creators to create personal accounts and have “Store” pages for their products, and the ability to switch between the two.
While the initial focus appears to be photography, Primfeed is not just about photographers; it will be for every Second Life resident who wants to use it. There will be a lot of features coming as the platform grows and I receive feedback and people vote on ideas through the upcoming Feedback Portal. 

– Luke Rowley on expanding Primfeed’s capabilities

As Luke mentions, the Primfeed Feedback Portal will be an important element for helping to enhance Primfeed going forward. During the most recent period of development, Luke has relied on Discord and a group of Second Life users in a closed Beta phase of testing / feedback/ enhancement. However, he’s also recognised that when the platform is launched, he would need the mean for any and all users to have an easy, direct means of providing feedback, requesting features and – equally importantly – reporting issues.

This portal might also be said to be another aspect of trying to make using Primfeed as comfortable and familiar to users as possible: Luke has built it using the same software as Linden Lab now uses for its feedback portal, thus making filing and viewing requests, etc., as familiar as doing so for SL.

Costs and Payments

Obviously, running a service like Primfeed involves costs, both in terms of hosting and management and in development. As such, the platform will be based on a tiered / free / subscription model. At launch this will mean:

  • Those using free accounts will be limited to a maximum image resolution of 1500×1500.
  • Those opting to subscribe to the platform’s Pro option will be able to upload images up to 8196×8196 resolution.

As further features are added, so the Pro subscription will gain further benefits over free accounts, although these will be carefully weighed.  “I do want to provide more value to the Pro subscription, but I don’t want to paywall every feature on Primfeed,” Luke notes. “So my guiding principle is, “What can I give to people wanting to pay without making those on free accounts feel they are being penalised?”

One of the biggest aspects of Primfeed in this regarded is that right from launch it supports subscription payments in Linden Dollars. These can be made in-world at the Primfeed Payment Centre. At launch, a Pro subscription will be offered on a 4-week payment basis at L$1860 for 4 weeks or L$8870 for 24 weeks (representing a 12% saving of the 4-week rate).

Primfeed Pro subscriptions can be paid for in L$ through in-world terminals

“It’s important to me to offer a Linden Dollar payment service,” Luke told me. “Not only does it make Primfeed unique among social media platforms, but it does so at great convenience for SL users who might otherwise be put off by, or unable to make, payments in US dollar values. It also means that there is no requirement for users to have to provide personal payment data in order to use the service.”

How to Get Started

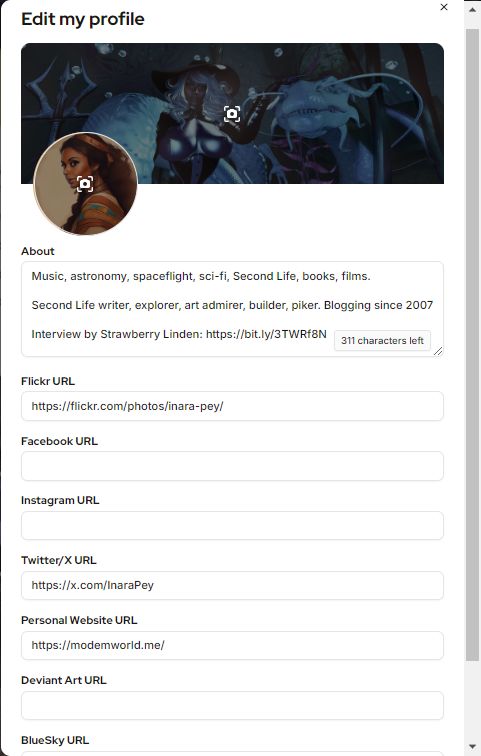
The Primfeed Profile edit pop-up

If all this sounds of interest to you, getting started with Primfeed couldn’t be easier:

  1. Go to the Primfeed website.
  2. Enter your Second Life avatar account name (not your Display name).
  3. A special code will be sent to you in-world via local chat.
  4. Enter this code into the sign-up page, accept the Primfeed Terms of Service, and you’re in!

Once your Primfeed account is established, you should go to the Settings option and add a password to your account. While this is not required, if you do not, you’ll have to repeat the steps above each time you want to log-in to Primfeed.

You can also use the Settings option to:

  • Set the maturity ratings you wish to be able to see when using Primfeed.
  • (If you are a Pro subscriber), see the time remaining on your subscription and use a button there to enabling teleporting to the in-world payment centre (by way of the SL World Map and launching your viewer, if required / enabled).

After this, you can update your Profile via the dedicated Profile link. In doing so, you can:

  • Update the profile photo and / or set the banner image displayed when viewing your Primfeed timeline / feed.
  • Provide a brief About bio.
  • Include links to any other popular social media and photo / art sharing platforms.

Closing Comments

Despite the rapidity of its initial development, Primfeed already has a lot to offer Second Life users, and it is clear Luke has a lot more planned in carrying the platform further. Even so, it is a service developed and operated by a Second Life user – which means that while it is developed by someone with an innate understanding of Second Life, its user base and what they would like to have, it also means it is a personal project, rather than a commercial offering – and thus lacks the weight and “assured” longevity of a platform like Twitter or Flickr. Thus, there are bound to be some concerns as to what might happen to Primfeed should Luke’s interests move elsewhere.

This is something Luke is all too aware of, as he noted to me. “It is always a gamble with any Second Life product or service; however, I have no intention to go somewhere else. Yes, I am a single developer and entrepreneur; but as long as residents continue to support Primfeed, EasyBloggers and EasySubscribers, I don’t see any reason to stop anything; all my products are very much a part of my work – so I’ll be staying in Second Life for as long as I possibly can!”

In proof of this, he’s not resting on his laurels but is already considering additional services for future development. “I will be working on a vendor system, again as a result of multiple requests from users of my current services. Can you imagine for a second what kind of integration could be done between Primfeed and EasyVendors? That’s exciting!”

And in case anyone is wondering why Primfeed doesn’t share the “Easy” naming convention with other products, the reply is simple, as Luke again explains.

I feel like my EasyApps are dedicated to creators/designers (EasyBloggers, EasySubscribers, EasyTextures, and so on), while Primfeed is for everyone, so it deserves distinction. It is also a reminder of where everything started in Second Life. Creating a prim is probably one of the first action you would do back in the days when you were playing Second Life, and I liked that element of nostalgia in the name.

– Luke Rowley

In closing, and with the launch of Primfeed, I would like to thank and congratulate Luke for his time and on the launch of the service, and I look forward to continuing to use it. I’ve enjoyed the past week’s opportunity to try Primfeed and discuss the platform with him. As we were drawing things to a close, I offered Luke the opportunity for a final word.

“I’d like to thank everyone who has supported my work, and who have directly contributed to Primfeed’s development by responding to my questionnaire, who helped with initial alpha tests and engaged in beta testing, who provided feedback, identified issues and helped spread the word about Primfeed through their own social media activity. Most of all, I’d like to thank my RL partner, who has been an insane support for me.

“I hope everyone enjoys Primfeed and helps to make it a success!”

Addendum

To mark the launch of Primfeed there will be a party in-world:

  • When: Thursday, June 20th 14:00-17:00 SLT.
  • Where: Burrow Coffee Co.
  • Featuring music by Semina Live! and DJ Lichi

Links