![]() On Sunday, December 18th, Alina Lyvette released Lumiya 3.3, the Second Life / OpenSim Android client for smartphones and tablets.
On Sunday, December 18th, Alina Lyvette released Lumiya 3.3, the Second Life / OpenSim Android client for smartphones and tablets.
The new update brings with it Voice chat via the built-in microphone on your device (or suitable Bluetooth unit connected to your device), the ability to upload images via your device, and additional VR support, including Google Daydream. The realise notes are available here.
Voice Chat
Voice chat for Lumiya 3.3 requires the download and installation of the free Voice plug-in app. Once you’ve downloaded and installed the plugin, the first step is to enable Voice:
- Log-in via Lumiya.
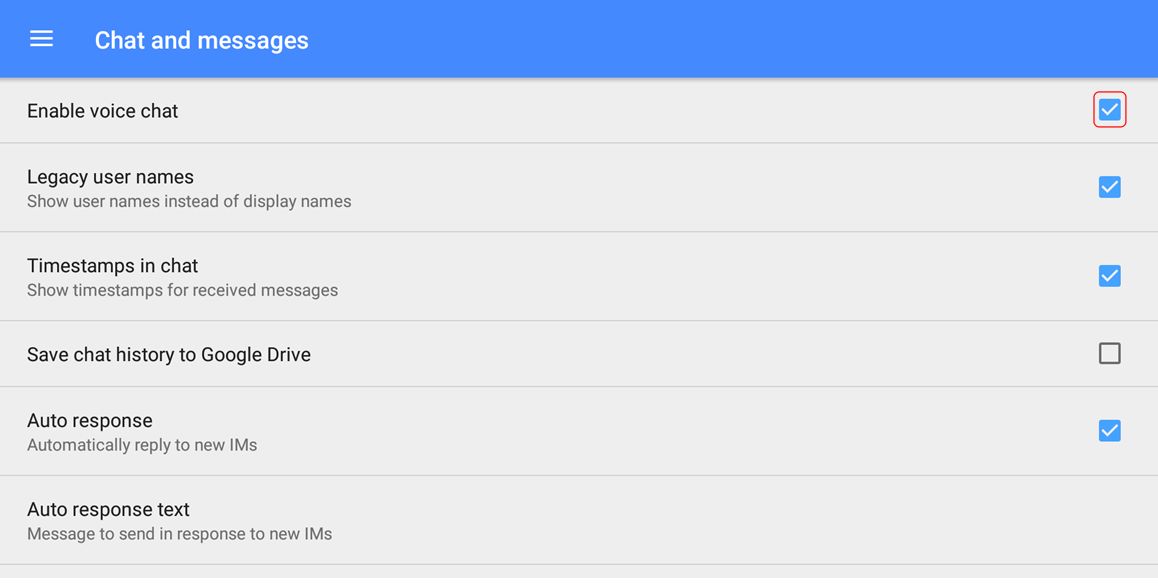
- Tap the menu icon (top left of the screen) and then tap Settings > Chat and Messages
- Tap Enable Voice Chat and make sure it is checked as enabled. To disable, tap the option again.
With Voice chat enabled you can use voice for open chat, IM calls and via the 3D World view.
Open Chat
To initiate Voice chat in open chat, tap on Local Chat in Lumiya. then tap the telephone handset icon in the top right of the screen. This will enable your device’s microphone and display the open / close microphone bar. Tap the microphone icon to activate your microphone; the icon will turn green, indicating the microphone on your device is hot, and the bar will display the instruction to Speak Now.
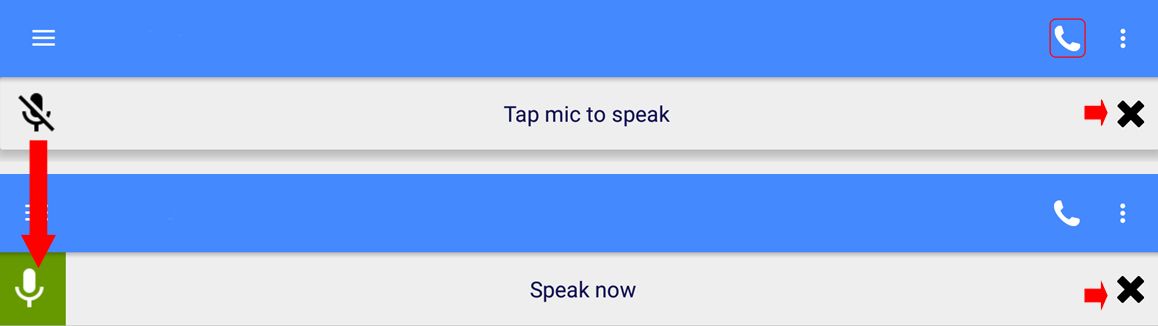
Remember to tap the bar again when you’ve finished speaking to prevent any extraneous noises around you from being picked-up and transmitted in-world. To close the current Voice chat session at any time, tap the X on the right of the chat bar (arrowed to the right, above).
IM Voice Calls
For an IM voice call, tap the name of the person you wish to IM (e.g. via the list of people nearby or your Friends list). When the IM window has opened, tap the telephone handset icon (top right.The microphone bar is displayed, with the message “Connecting…”. The person you are calling, assuming they are on a full viewer, will receive the usual Voice call message (shown inset, below).

- If they accept the call, the microphone icon on the left of the bar will turn green, indicating they’ve accepted the call, and your microphone is now hot. Remember to tap the bar when you’ve finished speaking to prevent any extraneous noises around you from being picked-up and transmitted in-world.
- If they reject the call, or opt to converse in IM via text, the microphone bar will vanish.
- If they do not answer the call before the Voice connection times out, the microphone bar will vanish.
- To end the call, tap the X on the right of the microphone bar.
- Note that you can restart the conversation from the IM window by tapping the Action menu icon (three vertical dots, top right of the screen) and selecting Voice Chat from the drop-down. This will initiate a fresh call.
Should you be in receipt of an IM Voice call when using Lumiya, a drop-down will appear at the top of the window you are using, and you can opt to accept or reject the call. If you reject the call, but wish to converse via IM text and are not in the IM chat window, you’ll have to manually switch to the IM window for the person who called you.

If you accept the call, the microphone bar will be displayed, and your microphone will be hot. Remember to tap the bar when you’ve finished speaking to prevent any extraneous noises around you from being picked-up and transmitted in-world.
Chat in the 3D World View
To use Voice in open chat in the 3D world view, tap the chat icon (top right of the world view) to display the chat window, then tap Local Chat, followed by the telephone handset button. Use your device’s Back button to return to the 3D world view. The microphone bar will be displayed at the top of the world view, tap it to open your microphone and chat. Again, remember to tap the bar when you’ve finished speaking to prevent any extraneous noises around you from being picked-up and transmitted in-world.
To start an IM voice call in the 3D world view, either:
- Tap the chat icon at the top right of the screen and then select the name of the person you wish to IM call via the Friends or Nearby option, or
- If the person is within our view, touch their avatar to display the avatar icons. Tap the IM icon, and then select Voice Chat from the drop-down actions list (displayed via the Action menu, top right of the screen – the three vertical dots).
Either way will initiate the voice call, and the recipient can accept or reject it, as noted in IM Voice Calls, above. If they accept the call, you can tap the Back button on your device to return to the 3D world view and use the microphone bar to converse with them in IM Voice.
Image Uploads
Lumiya 3.3 allows you to upload photos and textures to inventory:
- Use Menu > Inventory to open your Inventory, and navigate to the folder in which you want the image to be saved.
- Tap Create (“+”) and select Upload Picture.
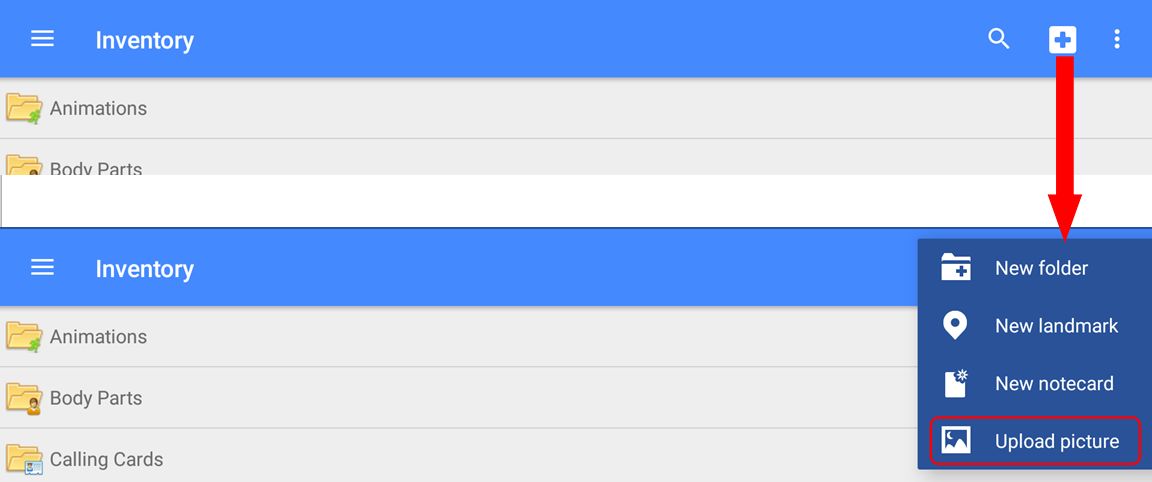
- The most recent images saved on your device are displayed as thumbnails. If the image you require is not among them, tap the menu button (top left) and navigate to the storage option where it is located.
- Identify the image in the thumbnails and tap it.
- The image is selected, you are returned to your Inventory view and informed Uploading Image Will Cost You L$10. Continue? Tap No to stop the upload or Yes to upload the image.
VR Support
Daydream and Daydream Controller Support
Lumiya 3.3 adds Google Daydream support to its VR capabilities. As I don’t have a Daydream compatible device, I’m reproducing the release note tips here for those who do:
- Enter VR mode first and then place your phone into Daydream headset.
- Use the controller’s touchpad controls for walking and turning.
- Use the controller’s “minus” button is an action button to activate on-screen controls.
(As a side note, be aware, this is only a first pass at Daydream support, carried out without benefit of full Daydream capabilities for testing.)
External Gamepad Support for Google Cardboard
Lumiya 3.3 adds external gamepad support with Google Cardboard mode. For a typical Bluetooth gamepad, control layout is as follows:
- The arrow buttons control walking and turning.
- The “A” button is an action button.
Bluetooth keyboards may also work as well, with the space bar doubling as an action button.
Feedback
While I cannot attest to the Google Daydream or gamepad controller use with Google Cardboard, not having the requisite hardware, I can say that Voice on Lumiya works spectacularly well, and adds a further dimension to that already outstanding client. Excellent work from Alina to get all of this into what is supposedly a “lightweight” client.
“Next up is Bento support,” she told me as we chatted about the 3.3 release. “Already working on it!”
But with the holiday almost upon us, I think we should let her enjoy the break first!

So, logically, it would seem that you could now get nearly all functionality of a regular viewer by downloading this on the Chromebooks that are designed to be able to handle Android apps ?
LikeLike
I’ve actually run Lumiya on a Windows system via Bluestacks (and there are better alternatives), as covered in Second Life on the go: Lumiya on Windows?!. I haven’t carried out further tests since that time (June 2016), and certainly haven’t re-tested with th new Voice capability.
There are some obvious caveats when doing so, compared to using a viewer: the 3D viewer obviously lacks oll of the bells and whistles of windlight a viewer can provide via beefier GPUs; Lumiya is predominantly designed for touch screen control, so there can be problems in translating some controls fully to keyboard / mouse control. None of these are actually show stoppers (the keyboard / touch screen issue can be overcome by using the mouse to “tap” the on-screen controls, for example).
LikeLike
I can confirm that it works with Bluetooth keyboards (arrow keys for movement, space bar for action) — which is a big advance for me given that my phone has hitherto resisted all attempts to connect to a game controller.
LikeLike