Group bans: an overview

On Tuesday June 17th, Linden Lab released the Group Ban project viewer (version 3.7.8.290887) which, as the name suggests, allows group owners (and those they nominate by role) to ban individuals from their group.

Group bans, which are enforced server-side, like parcel and estate bans, are intended to remove troublemakers from a group / prevent them from joining the group. This article will hopefully provide an overview of the group ban tools within the project viewer (and which will eventually progress to the release viewer).

The following general points with group bans should be noted:

  • By default, only a group’s Owners role has the Manage Ban List ability for banning other avatars from a group /removing avatars from the ban list
  • The ability can be granted to other roles, if required
  • Roles which are granted this ability are also granted the Eject Members from this Group and Remove Members from Roles abilities
  • The ban list for a group can store a maximum of 500 entries. When this limit is reached, some avatars must be removed before others can be added
  • Group Owners cannot be banned from a group (just as they cannot be ejected)
  • When a group member is banned from the group, they are automatically ejected and will receive the usual ejection notification, but will not receive any notice that they have also been banned
  • A user who is banned from a group cannot join it either directly or through an invitation
  • If a group member is banned while using group chat, they may be able to continue using it until they close the group chat window (this problem also exists when ejecting someone from a group when they have the group chat window open)
  • Any attempt to invite one or more banned avatars into a group, whether individually or as a part of a list, will generate the message:  Some residents have not been sent an invite due to being banned from the group.

The viewer itself includes the necessary options to allow a group owner (and those they nominate by role) to:

  • Add or remove avatars from the group ban list
  • View the group ban list
  • Add the ability to ban avatars from a group to any other roles within the group, if required.

Applying Group Bans

Avatars can be banned from a group in one of two ways:

  • By selecting them in the group members list if they are already a member of the group
  • By using the Group Ban Picker to ban one or more avatars from a group, whether or not they are already members.

Banning via the Members List

  • Display your groups list (CTRL-SHIFT-G), select the required group and open its profile
  • Click on Roles & Members to open it, and then click on the Members tab
  • Locate the first avatar you wish to ban and left-click on their name
  • If there is more than one avatar you wish to ban, press CTRL and left-click on each of the remaining names
  • Click on the Ban Member(s) button
  • The highlighted avatars will be ejected and banned from the group, and you should see the normal confirmatory notification(s) that they have been ejected.
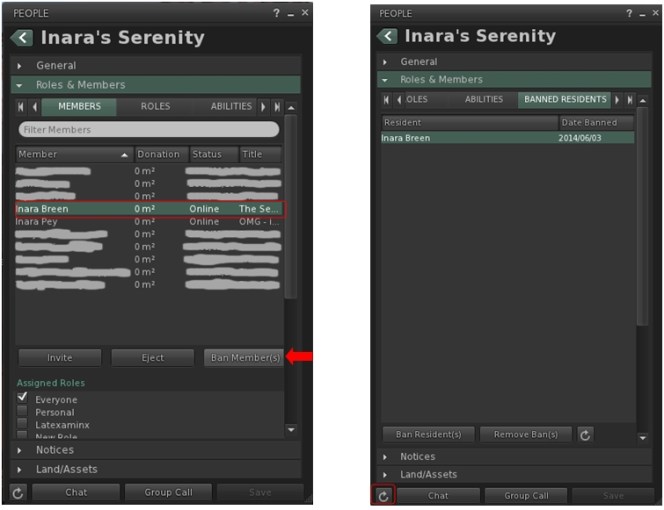
Banning someone from a public droup via the Members tab (l), and confirming they are listed as banned on the Banned Residents tab (r)
Banning someone from a public group via the Members tab (l), and confirming they are listed as banned on the Banned Residents tab (r)

To confirm the selected individuals have been ejected and banned, click the right scroll buttons at the top of the panel to scroll / jump to the Banned Residents tab. This should display the name of all avatars banned from the group. If the name(s) of the avatar(s) just banned do not appear to be listed, wait a minute or two and click the refresh button in the lower left corner of the panel. Continue reading “Group bans: an overview”
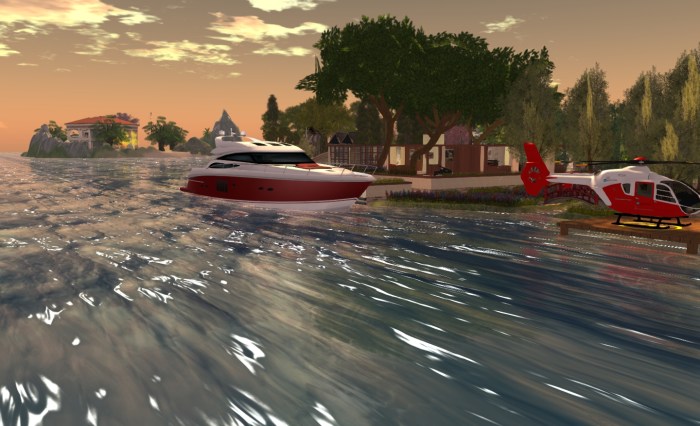
Cory Edo’s water maps add depth to SL water

Wave effect using the Trompe Loeil "Cresting" normal water map
Wave effect using the Trompe Loeil “Cresting” normal water map

I’m coming to this via a pointer from Honour, which directed me to Strawberry’s blog entry on the subject.

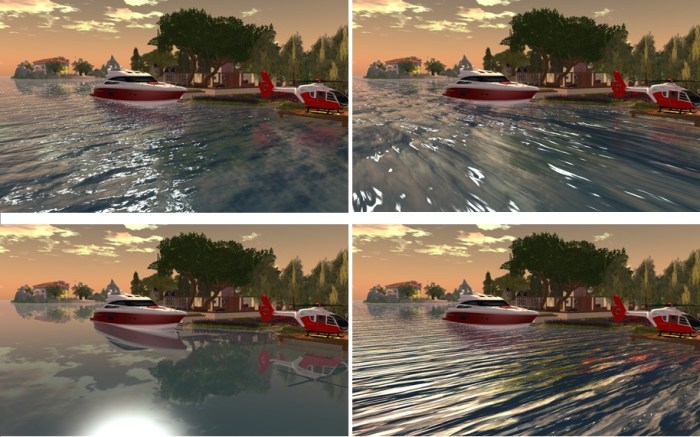
Cory Edo, of Trompe Loeil fame, has released a pack of 10 free water normal maps for use in Second Life. These present a range of different wave textures which make creating your own custom water windlights for use on Linden Water a breeze. The finished results can, as with other windlight settings, be used purely within your own viewer or, for region / estate owners, can be used a default water setting  for their region / estate.

Four presets compared under the same sky settings, clockwork from top left: Linden water default; Trompe Loeil "cresting"; Trompe Loeil "Long Ripple"; Trompe Loeil "Glass" (click for full size image)
Four presets compared under the same sky and water settings, clockwork from top left: Linden water default; Trompe Loeil “cresting”; Trompe Loeil “Long Ripple”; Trompe Loeil “Glass” (click for full size image)

Strawberry has provided a  nice video tutorial on using the maps to create new water presets using the SL viewer, which can also be used alongside most v3 TPVs.  Cory also provides some notes on using the maps with Firestorm, but I thought I’d provide an additional overview on using the maps with that viewer and Phototools here as well.

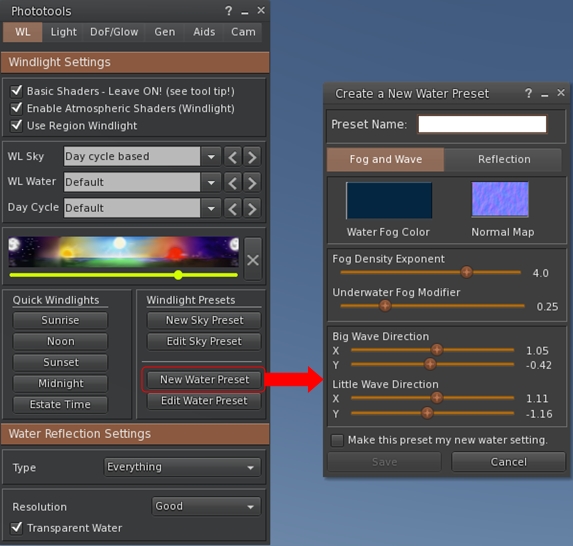
If you use the Phototools button in Firestorm, click it to open the Phototools floater, then click on the New Water Preset button in the WL tab. This will open the Create a Water Preset floater.

Accessing the
Accessing the Create a New Water Preset floater through the Phototools floater

If you’re not using the Phototools button, go to World > Environment Editor > Water Presets > New Preset …

With the Create a New Water Preset floater open, simply drag and drop one of the Trompe Loeil water maps into the Normal Map box, then enter a name for the preset in the text box at the top of the floater.

Creatting a new water preset using the Trompe Loeil maps is a simple matter of drag-and-drop and applying settings and a name
Creating a new water preset using the Trompe Loeil maps is a simple matter of drag-and-drop and applying settings and a name

If you want, you can then adjust the Fog and Wave sliders and the Reflection tab sliders to produce the effect you desire.

When you’re satisfied with the result, click the Save button to save the preset to your hard drive. This will also close the Create a New Water Preset floater, so repeat all the steps above to create further presets using any of the Trompe Loeil normal maps.

You'll need to restart Firestorm after creating your new water presets in order to see them listed in the WL Water drop-down
You’ll need to restart Firestorm after creating your new water presets in order to see them listed in the WL Water drop-down

The new presets will be immediately available via the Edit a Water Preset floater (Pototools > Edit Water Preset or World > Environment Editor > Water Presets > Edit Preset …).

However, to show them in the WL Water drop-down list in the Phototools WL tab (shown on the right), you will need to re-start Firestorm.

Also, remember that Firestorm also backs-up custom windlights for you (make sure you have the options to do so checked in Preferences > Backup), so make sure you take a fresh back-up of your settings after adding any new windlights. That way you avoid having to recreate them once more after a clean install.

Do please note that these normal maps are intended to work with Second Life windlight; they are not “traditional” water textures and they will not work to create prim-bases water effects for pools, hot tubs and so on.

A great addition to the tool box of any sim designer and / or SL photographer – many thanks to Cory for creating them and making them available.

Related Links

Firestorm video tutorials

firestorm-logoAhead of the upcoming Firestorm release – which will be available Real SoonTM, (sorry, I can’t say when as Jessica would douse me in catnip and set the moggies on me 🙂 ), Jessica has been busy on a new set of video tutorials for users.

Some of the videos are specific to the upcoming release, and one is for those still using Phoenix and who wish to make the switch to Firestorm. This is something which has been covered before in Firestorm tutorials (and something I’ve attempted to cover myself in the past), but as things have moved on somewhat since those days, the new video has been produced.

The Firestorm 4.4.0 video cover features which are both new to the upcoming release, and which are updated in the upcoming release in comparison with earlier releases of the viewer – such as with object de-rendering, as per the video  below.

The current list of updated videos comprises:

All of these are available on the Phoenix Firestorm You Tube channel, and Jessica informs me that more will be added as and when time permits.

A new TuTORial from Torley Linden!

So, I log on to my You Tube account, take a look at my subscriptions, and what do I find?

A video from Torley!

I don’t seem to have the old SL video links box appearing on my SL account dashboard, so no idea if that has gone or the page simply isn’t loading correctly & whether the video is listed there.

But a video TuTORial from Torley! Yay!

Is this a resumption of Torley’s excellent work? And if so, and assuming the lack of video lists on my Dashboard isn’t a glitch – can was have them back on the Dashboard page as well as on the YouTube channel, please, LL?

Mirror, mirror…

Update: I’ve add a link to Zonja’s excellent instructions to the my Tutorials Index Page

Last night, Chestnut Rau led me, by way of Whiskey Monday to a three-year-old post from Zonja Capalini on using Linden Water as a mirror. As old as the post may be, it has considerable relevance given how LL and TPVs are striving to improve the graphics capabilities of the Viewer – and it goes to show how easy it is to miss a highly informative blog post! My thanks to Chestnut and Whiskey for pointing me in the right direction, and to Zonja for documenting the process.

The technique isn’t new, per se, as a number of people have been using the idea for a while and produced some very clever effects, but Zonja’s instructions make it so easy to implement, they are a joy to follow and make trying things out for oneself as easy as 1-2-3.  And I mean easy – if I can get things sorted, then anyone can.

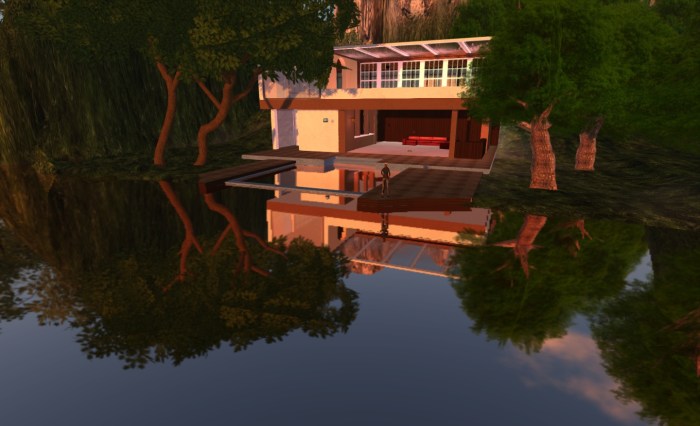
As well as clever visual effects, the technique can be used to produce some interesting shots as one travels SL – or even of one’s own home region.

Using the mirror water effect to capture one of the houses on my land (click to enlarge)
Black Spot, one of my favourite places in SL, gets the mirror water treatment (click to enlarge)

Of course, it is rare for real water to be so glassy-smooth, but the results are worth ignoring that fact. The effect can obviously be combined with other graphics effects – Windlight sky settings, lighting and shadows, etc., – although you can find your system getting pushed hard. Lighting and shadows in particular left me with very grainy pixelation on images…

The same shot, but with lighting and shadows active  – on my system, this does degrade the image quality somewhat

There is a slight difference between Zonja’s instructions and achieving the same result in V3-based Viewers, inasmuch as everything can be achieved from the one dialogue box when setting-up the water Windlight requirements. Just go to WORLD->ENVIRONMENT EDITOR->WATER PRESETS->NEW PRESET… Not exactly rocket science to find, but worth mentioning. Once there, set all options and sliders as Zonja defines in her article.

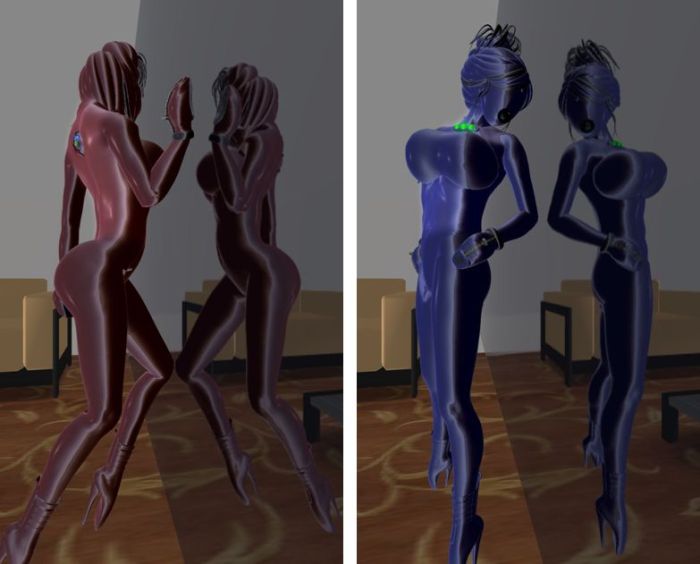
The most interesting use for the technique is that of self-portrait style pictures, where some fun can be had. Zonja and Whiskey has some stunning examples of these. I was a little reluctant to include any of myself, given my current fetish look – but “in for a penny”, as they say.

Reflections

Lighting projectors: adding depth to SL

Updated to reflect the arrival of ALM.

Projectors are a neat way to add lighting effects, reflections, etc., to your Second Life environment. Originally, the relied somewhat on shadow rendering, but then changes made to the rendering system made them easier to use – no active shadows required. With the advent of the Advanced Lighting Model over the more involved deferred rendering options, they became even more straightforward to use.

However, rather than burble on about things, here’s an image of a simple projector in action at my house:

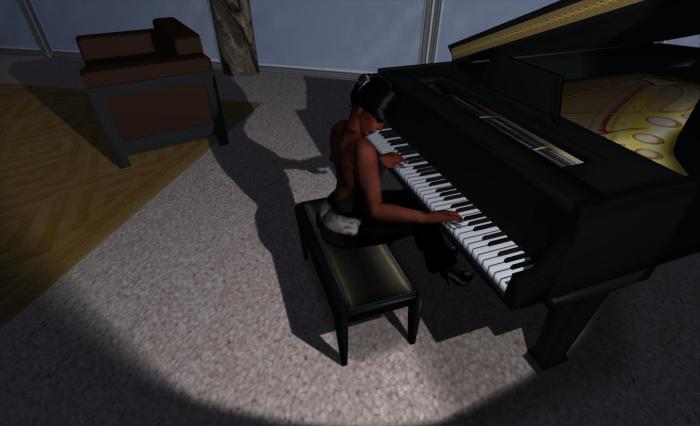
“That’s me in the corner / That’s me in the spotlight…”

So, how is this done? Pretty simply, actually.


First: Enable Advanced Lighting Model

You need to make sure Advanced Lighting Model (ALM) is enabled on your Viewer before actually setting-up your projector. If you don’t, you won’t see anything (nor will anyone viewing your scene – they’ll need ALM enabled).

  • Go to PREFERENCES->GRAPHICS
  • Find the Advanced Lighting Model option and check it, if it isn’t already checked.
  • You may also want to tweak your HARDWARE options – these may not be vital steps, but they may just boost your computer’s performance a little:
    • Turn off ANISTROPIC FILTERING
    • Turn down / turn off ANTIALIASING
  • Some systems may prefer it if you disable AVATAR IMPOSTERS and AVATAR CLOTH; I found that on older V3-base viewers, I actually get a slightly higher fps with AVATAR CLOTH off when shadows are enabled (around 5 fps), but notice no real change with AVATAR IMPOSTERS disabled than with them on.

Second: Create a Projector

I emphasise here that I’m only talking you through a very simple projector. How far you go with things is up to you.

  • Create a prim. Any prim will do – shape isn’t overly important.
  • Click on the FEATURES tab in the Build menu
    • You may have to click on MORE / v (at the bottom of the EDIT menu) to see the tabs
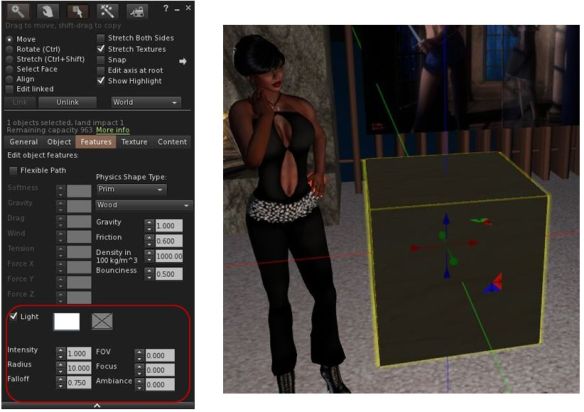
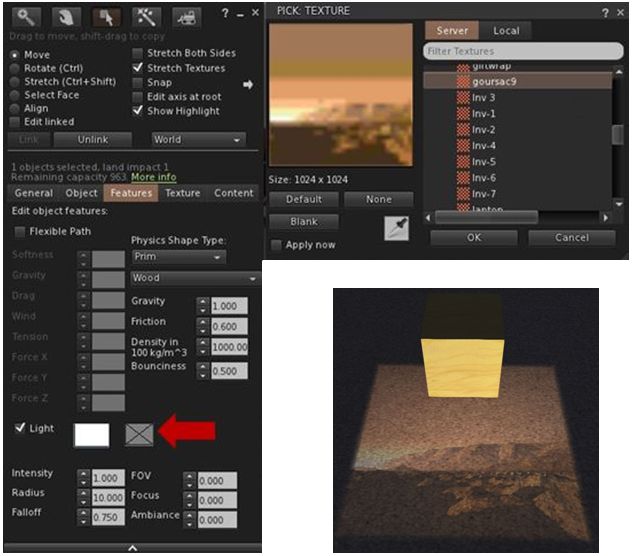
  • In the Features tab, there is an option called LIGHT (see below, left)
    • Note that this will only be displayed with all the options shown if you have ALM properly enabled.
  • Check the LIGHT option. You should immediately see the area around the prim passively illuminated (below, right). Nothing special here, this is normal behaviour.
So? It’s an illuminated prim…
  • Raise the prim off the ground and the spot effect will be apparent under the Z axis on he prim – projectors only work in one direction.
  • Rotate and position the prim for your desired effect and then make the whole thing transparent (and phantom, if it is at a height / location where it it liable to be walked into).
  • Done!

Projecting Textures

The projector option also allows you to project textures onto surfaces – this offers a range of opportunities, although a little thought on how you might use them needs to be consider.

To do this, select your projector prim and:

  • Click on the second box next to the LIGHT option and click on it to open your texture picker.
  • Navigate to the texture you wish to use and click OK to select it.
…It projects!
  • The texture will be projected by the prim.

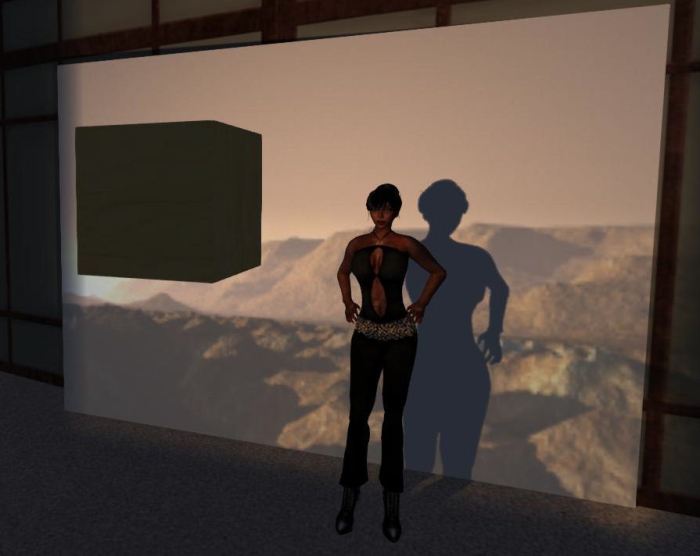
All that remains now is to rotate and position the prim. Here’s my finished example, rotated and projected against a temporary screen.

I cast a long shadow…even over Mars! 🙂

Additional notes:

  • You can change the colour tone for a projected texture by clicking the box closest to LIGHT to open your colour picker.
  • You can also modify the look of the projected image using:
    • Intensity: overall intensity of texture – range 0 to 1.
    • Falloff: relative brightness – range 0 (brightest) to 2.
    • FOV: size of the projected image – range 0 to 3 (largest projection) – also influenced by the projector prim’s distance from the surface(s) on which the image is being projected.
    • Focus: focus of the image (hardness / softness) – range -20 to +20.
    • Ambience: contrast of the image – range 0 to 1.


Summing-up

How you use projectors is down to your imagination: using rotation scripts, you can generate “spinning” lights and other effects suitable for discos and so on; you can make the prim transparent, you can reduce it in size, you can incorporate it into other items – the list is endless.

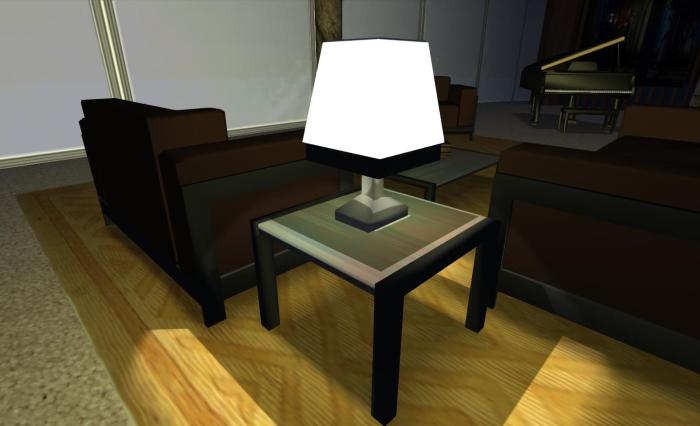
For my part, I combined a projector with a “lamp shade” prim and a little bit of scripting so that the table lamp that forms a part of my 1-prim PrimPossible lounge suite will not only turn itself on at dusk and remain on through the “night”, it’ll also cast a pool of comforting light:

Realistic table lamp

Again, remember this is a Viewer effect – so only those who have shadows enabled on their own system will actually see the results of your labours.

Happy playing!

Addendum: in this article I have shadows enabled (my usual mode of running SL. As Ayamo Nozaki note in the comments – remembering this piece was originally written at a time when activating some of the more advanced graphics options was a little more convoluted – shadows *do not* have to be enabled for effects like this.