IntroductionThis tutorial has been written as a guide to filing SL bug reports and feature requests using the Second Life Jira. It comprises two parts: Bug Reports (this section):
Feature Requests:
Both sections are self-contained and can be bookmarked / referenced independently of one another for ease of use. However, to further assist in finding information, the table of contents on the right can be found in both part of the tutorial, and can be used to reference specific sections of either one. |
Table of Contents
|
Acknowledgements and Thanks
I would like to express my thanks to the following people for their input into this tutorial and for sanity checking the contents: Alexa Linden, Grumpity Linden, Kyle Linden, Soft Linden and Whirly Fizzle.
What is the Jira For?
As noted above, the Jira is primarily for:
- Filing reports on bugs that impact Second Life (covering the viewer, the simulator and the web), and which in doing so adversely impact the user experience.
- Putting forward suggestions on features and capabilities that might enhance Second Life for users.
The Jira can also be used by third-party viewer (TPV) developers to have their viewer added to the TPV Directory, or for reporting TPVs that may be violating the TPV Policy / Second Life Terms of Service. Both of these options fall outside the scope of either part of this tutorial.
When using the Jira, please keep in mind:
- It should not be used to report problems which are specific to you or for general enquiries about things like log-in issues; tier payments; running Second Life on a specific hardware configuration, land issues, and so on.
- For these types of issues, please use the Second Life Support Portal and / or the forums.
- If you believe the bug presents a security risk (such as allowing griefing or exposing sensitive information), you should use the SEC bug report, details of which can be found in Security Exploits.
- When adding comments to a report / feature request (see Commenting on filed reports), these should focus on technical feedback / input pertinent to the issue/ request being made. Personal opinion or general discussions on a bug / feature request can be held through the Second Life forums.
What Makes a Good Bug Report?
Ideally, a good bug report should:
- Focus on a single issue.
- Even if problems appear to be related, resist the urge to incorporate multiple issues on a single report, as this can confuse matters when trying to triage a report.
- Instead, file multiple bug reports and cross-reference them. Those with authority to do so can then formally cross-link the reports as related issues.
- Be a set of directions, providing:
- A summary of the issue encountered that can form the title of the bug report.
- A clear description of what happened when the issue occurred.
- A set of step-by-step instructions on what you were doing when the issue occurred that allow someone else to follow them and (hopefully) encounter your issue, helping them understand it.
- A description of what you were expecting to happen had you not encountered the issue.
- Information on the viewer you were using, your location in Second Life at the time the problem was encountered, etc., all of which can easily be obtained from the viewer, as described in the instructions, below.
- Relevant supporting information. This might comprise one or more of: any error message which may have been displayed; a screen shot of the problem; the inclusion of relevant log files, if appropriate.
As a reminder: when filing a bug report please keep in mind that if the problem you’ve encountered doesn’t require Linden Lab to make a change that can affect all users, then it probably isn’t appropriate to file a bug report against it.
Before You File a Bug Report
Known Bugs
It is possible the issue you are encountering is already known, or the subject of an existing bug report. So before you file a new bug report please consider:
- Checking the viewer release notes to see if the bug is listed as a Known Issue. This can be done in one of two ways:
- From within the viewer you’re using via Help → About, and then clicking on the Release Notes link at the top of the panel.
- By checking the release notes for viewers listed on the Alternative Viewers pages to see if the issue is recorded among them.
- Using the Jira Search option to see if the issue has already been reported.
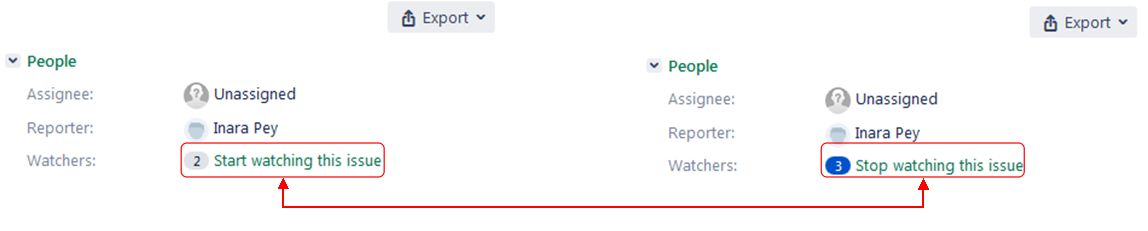
If you find that a bug report already exists for the issue, you can opt to click the Watch option (top right of a bug report, under People) to receive e-mail updates on the Jira (you can also uncheck Watch at any time to stop receiving updates).
A Note to Users of Third-Party Viewers
Third-party viewers (TPVs) surface options / include capabilities that may not be visible / available in the official viewer. Because of this:
- If you encounter a problem with a TPV that you think might affect users on other viewers, please check to see if it can be reproduced on the official SL viewer.
- If you can reproduce the bug on the official viewer, please file a bug report through the Second Life Jira using / referencing the official viewer, not your preferred TPV.
- If the bug only occurs with the TPV you are using, please file a bug report with the developers of the TPV through whatever means they provide. Bug reports filed on the Second Life Jira that only reference a TPV are subject to being closed without action.
Official SL Bug Report Information
Official information on the SL bug reporting is available at :
- Bug Tracker – Second Life Wiki.
- Bug Tracker / Status – Second Life Wiki.
Filing A Bug Report
Setting the Project and Issue Type
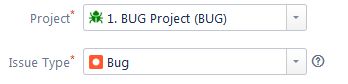
- Log-in to the Second Life Jira using your Second Life log-in credentials.
- Click on the blue Create button in the top menu bar.
- Check the top of the form and make sure:
Providing Details of the Bug
Required Fields
The following fields of a bug report are mandatory:
- Summary: provide a concise summary of the issue (also forms the report title).
- If the bug is related to a specific project (e.g. Animesh), please include the project name at the start of the summary in square braces (e.g. [Animesh]).
- What Just Happened?: provide a description of the actual behaviour you saw as a result of the bug.
- Be as clear and concise as possible – the more information of a clear nature you can give, the better the issue can be understood and the bug investigated.
- If you received an error message as a result of the bug, you can type or copy/paste it here.
- What Were You Doing When It Happened?: give step-by-step instructions on how to reproduce the problem.
- Treat this section of the form as if you are explaining the bug to someone who has never encountered it and / or has never used the function / capability being used when the issued occurred.
- Make sure you list all the necessary steps that are needed to reproduce the issue as you encountered it, no matter how obvious these steps might appear to be.
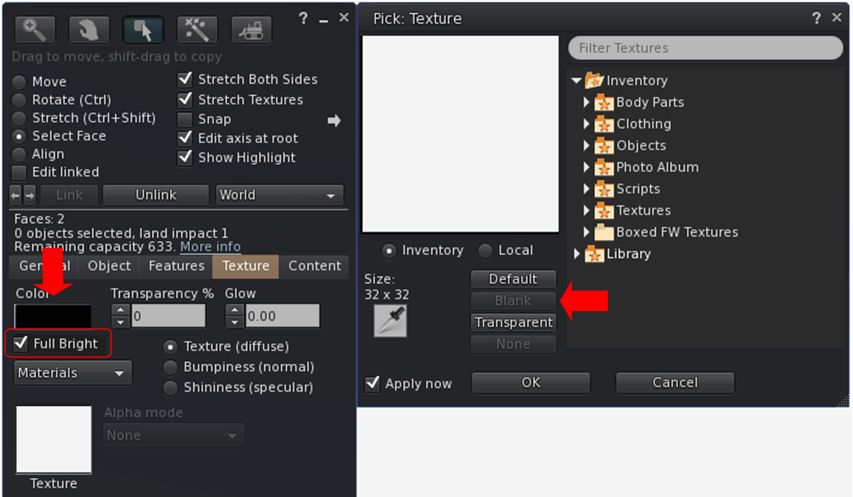
- Use the Attachment button (see below) to include any images of the issue as you saw it and which help to explain things. Make sure they are clearly annotated and cross-referenced in this section.
- What Were You Expecting To Happen Instead?: give a clear and concise description of what you were expecting to happen instead of the bug.
- If it helps, use step-by-step instructions here as well.
- Use the Attachment button (see below) to include any images of what you expected to happen, if required / possible. Make sure they are clearly annotated and cross-referenced in this section.
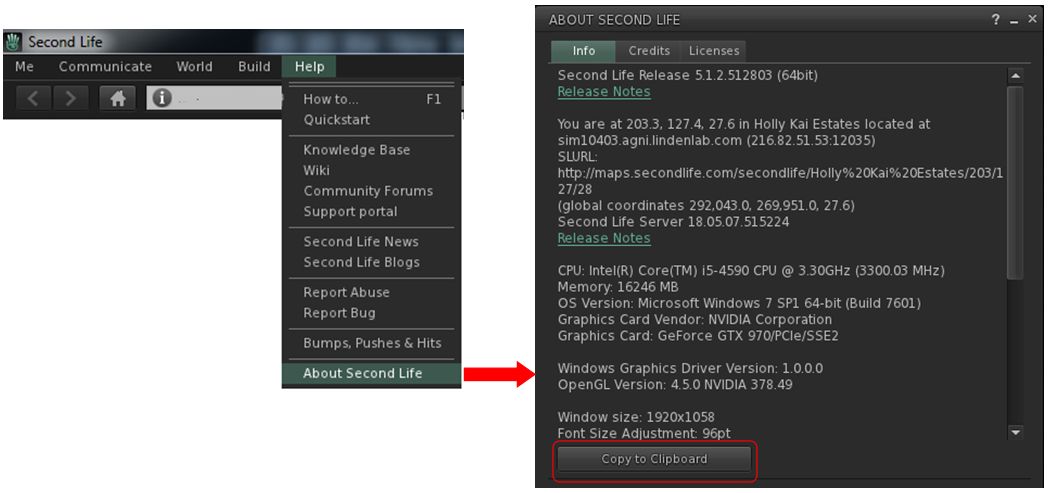
- Environment: use this section to provide information on the environment – viewer and simulator – in which you encountered the problem. This information can be obtained directly from the viewer as follows:
- Make sure you are in the region were you encountered the issue (this must be done when reporting possible simulator bugs).
- In the viewer, go to Help → About Second Life → Info tab.
- Click on the Copy to Clipboard button at the bottom of the tab.
- Paste the information into this field of your bug report.
Optional Fields
The following fields are optional, and can be used to provide any additional information you may feel is useful is helping to understand / reproduce / resolve a bug.
- Is There Anything You’d Like To Add? use this section to add any further information you think might be of value in assessing the bug – or leave blank if not required.
- Where: an additional field for entering the SLurl for the region where the issue was encountered (a Map link can also be used).
- System: two fields to help refine the nature of the issue.
- The first allows you to select the affected area of Second Life: viewer, simulator, SL website, Linden-made content in SL.
- The second offers a series of further options based on the first section.
- Attachment: use this option to add any suitable attachments to the report, such as images of the issue and / or of error messages or your viewer’s log files (see Log Files for more).
- Multiple images can be submitted, but ensure each is clearly labelled / annotated and properly referenced in the relevant text fields in the first part of the bug report form.
- Note that individual attachments can be no larger than 10 Mb.
- Security Level: a drop-down to select the security level to be assigned to the report. These are:
- Public – viewable to anyone logged-in to the Second Life Jira.
- Triagers and Reporter: only viewable by those with specific Jira access and the person raising the report – anyone else trying to view it once filed will receive a “permission violation” message.
- If you are unsure of which to set, leave this option as Public.
Log Files
One of the most useful aids for helping to deal with bug reports are Second Life log files. All viewer log files can generally be found in the following locations:
- Windows log files location: C:\Users\[user name]\AppData\Roaming\SecondLife\logs.
- Mac OS log files location: /Users/[user name]/Library/Application Support/SecondLife/logs.
The relevant log files you should include with your bug report are:
- SecondLife.log: stores status and debugging output from the Viewer during the current logged-in session.
- This file grows while the viewer is active. If it gets too large, it is trimmed by the crash logging application.
- SecondLife.old: when the viewer re-starts, it renames the existing SecondLife.log to SecondLife.old. SecondLife.old is used when the Viewer reports a freeze in the previous execution.
- SL_Launcher.log: stores status and debugging output of the launch and update processes that start the viewer or update it. This file is appended to, not overwritten, but will be trimmed over time.
- SL_Launcher.old: back up copy of SL_launcher.log created from the prior launch.
- SecondLife.start_marker: a marker file that should only live as long as the Viewer is running.
You can combine these log files into a compressed (ZIP) file for easier attachment to your bug report.
Submitting Your Bug Report
When you have confirmed the information is correct and as clear as possible, and any images / files you wish to include are attached, click the Create button at the bottom right of the form to file your bug report.
Refer to What Happens Next?, below, for information on what happens to a filed bug report.
Security Exploits (SEC)
A Security Exploit report is a special kind of bug report designed to deal with threats to Second Life, its Residents or content. Examples of Security Exploits include:
- Exposure of real life Resident identity without consent.
- Risk of destruction of content.
- Permitting unauthorised access to Second Life/Linden Lab resources.
- Compromising a client or server host, subjecting it to remote control, potential griefing vectors, etc.
There are two ways to file security exploits:
- Via a Second Life Security Exploit report, as described here. This is the preferred method of raising such issues.
- Via email to security-at-lindenlab.com.
Notes:
- By their very nature, SEC bug reports are not available for public viewing.
- SEC issues should be reported as soon as they are identified, together with all relevant viewer / simulator environment information.
- The SEC project (and security mailing list) is only for reporting security exploits that might compromise a Residents identity or the Second Life Grid. All other requests including account issues and account security will not be addressed – these should be reported directly via the Second Life Support Portal.
SEC Bounties
Linden Lab offer a L$10,000 (approx US $40) bounty for each previously unknown exploit that can be verified. These bounties are generally awarded after the reporter helps confirm that an issue has been fixed, and are contingent on not disclosing the issue prior to Linden Lab resolving the issue.
Filing A Security Exploit Report (SEC)
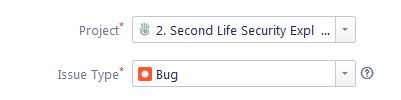
- Log-in to the Second Life Jira using your Second Life log-in credentials.
- Click on the blue Create button in the top menu bar.
- Check the top of the form an make sure Project is set to 2. Second Life Security Exploit (SEC). Use the drop-down to set it, if required.
- Note that Issue Type will automatically default to Bug.
Basic Tab
- Summary (required field): provide a concise summary of the exploit (also forms the report title).
- Environment (required field): use this section to provide information on the environment – viewer and simulator – in which you encountered the problem. This information can be obtained directly from the viewer as follows:
- Make sure you are in the region were you encountered the issue (this must be done when reporting possible simulator exploits).
- In the viewer, go to Help → About Second Life → Info tab.
- Click on the Copy to Clipboard button at the bottom of the tab.
- Paste this information into this report.
- Description (required field): provide a clear and unambiguous description of the exploit.
- Provide step-by-step instructions on how the exploit can be revealed / leveraged and to ensure a “solid reproduction” of the issue.
- Include information on all notable uses, events, indicators, outcomes, information exposed, etc., related to the exploit (and as relevant to the exploit).
- If the exploit is specific to a location in Second Life, supply a SLurl or map reference to that location.
- Attachment (optional): use this option to add any suitable attachments to the report, such as images showing how the exploit works and / or its outcome.
- Multiple images can be submitted, but ensure each is clearly labelled / annotated and properly referenced in the relevant sections described above.
- Note that individual attachments can be no larger than 10 Mb.
Advanced Tab
- Priority (optional): set your considered priority for the issue. Note that this may be adjusted when the SEC report is triaged.

Submitting Your SEC Report
When you have confirmed the information is correct and as clear as possible, and any images / files are attached, click the Create button at the bottom right of the form to submit your bug report.
Refer to What Happens Next?, below, for information on what happens to a filed SEC report.
Commenting on Filed Reports
Sometimes after filing a bug report, there may be additional information you wish to add. You can generally do this via the Comment button at the bottom of a bug report page.
- Who can comment on a bug report depends on a variety of factors, including general permissions, the security level for the report (Public or Triagers and Reporters), together with the current status of the report (Open, Needs More info, Accepted).
- If the Comment button is unavailable, you will need to request permission to make JIRA comments. Send an e-mail to letmein-at-lindenlab.com, giving your avatar name and a clear reason for requesting access.
- Note that you do not need comment rights in order to file bug reports or feature requests.
What Happens Next?
The Jira Workflow
A submitted bug report follows a set workflow, as shown in the diagram below.
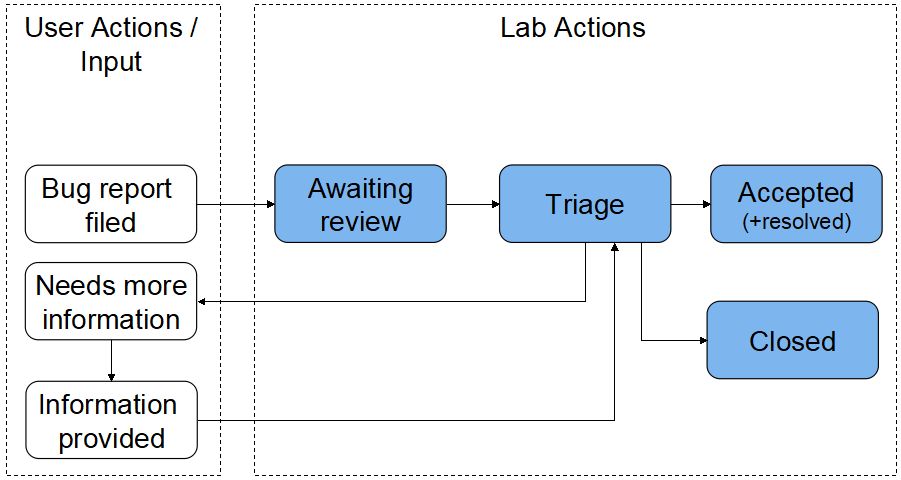
- Awaiting Review: when you submit a bug report, it enters a queue for review (triage) by the Lab’s QA and Product teams.
- Triage: incoming bug reports are triaged on a daily weekday basis. The outcome is generally one of the following, as indicated in the status area of the report:
- Needs More Information: if the report is vague or not easy to understand or doesn’t contain sufficient information needed to reproduce a bug, it will be flagged by the Lab as Needs More Information from the reporter.
- This sets the Needs More Info flag on the report. In addition, a comment is generally provided by the Lab as to what is required.
- The reporter should review the report and any comment(s) recorded by the Lab, and attempt to provide the missing information.
- Information provided: when additional information has been added to a report, it is essential the Info Provided button is clicked. This will update the bug report to inform the Lab that the information has been supplied. Note that a failure to click the button could result in a delay in the report being further actioned.
- Needs More Information: if the report is vague or not easy to understand or doesn’t contain sufficient information needed to reproduce a bug, it will be flagged by the Lab as Needs More Information from the reporter.

- Accepted: the report is accepted by the Lab and cloned into their internal Jira system for tracking. However:
- Accepted does not mean a bug report will acted upon immediately. There are a number of factors which may influence if / when it may be actioned, including things like the severity of a bug and work in progress which may help resolve a bug. As such, a bug report can remain as Accepted for an extended period of time. before any action is taken.
- Sometimes, on further reviewing a bug report internally, Linden Lab may request even more additional information, and will re-open the original report to comment / update to allow users to do so. Therefore, you should always maintain a watch on the bug reports you have filed.
- Once an accepted bug report has been actioned and the issue resolved, the originating report will be Closed with a status of Resolved.
- Closed: typically, a bug report will be closed and annotated with one of the following reasons:
- Contact Support: the issue is not a bug and should be handled through the Support Portal or Second Life Answers.
- Expected Behaviour: what has been reported is seen as “normal behaviour”, and so no further action will be taken.
- Duplicate: there’s another issue about the same problem.
- Cannot be reproduced: the bug, as described, cannot be reproduced, and therefore cannot be investigated / resolved.
- Unactionable: the described issue is not in a form that allows action to be taken (e.g. the report doesn’t define a bug / problem, etc.).
- Not Applicable: the reporter has decided to close the issue.
- Resolved: it is believed the issue has been fixed / resolved.