As I’ve noted several times in these pages, I’m a little partial to Ape Piaggio’s vehicle designs, and often get to help out with her designs in a small way. These treats occasionally lead me to offer a “sneak peek” at an upcoming design, although occasionally it can take longer than anticipated for the final product to appear – as has happened with the Airfish that I previewed over a year ago, and which subsequently hit a couple of hurdles that stalled final development.
The last 24 hours have given me the opportunity to try out and give feedback on Ape’s latest in-development craft: the WaveHopper. This is a craft that should, all things being equal, be commercially available in the next few weeks, but with Ape’s permission, I thought I’d whet a few appetites for it here.
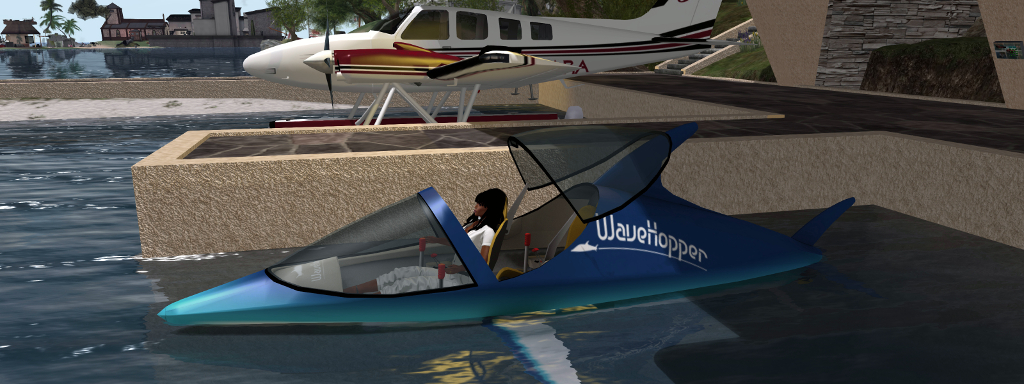
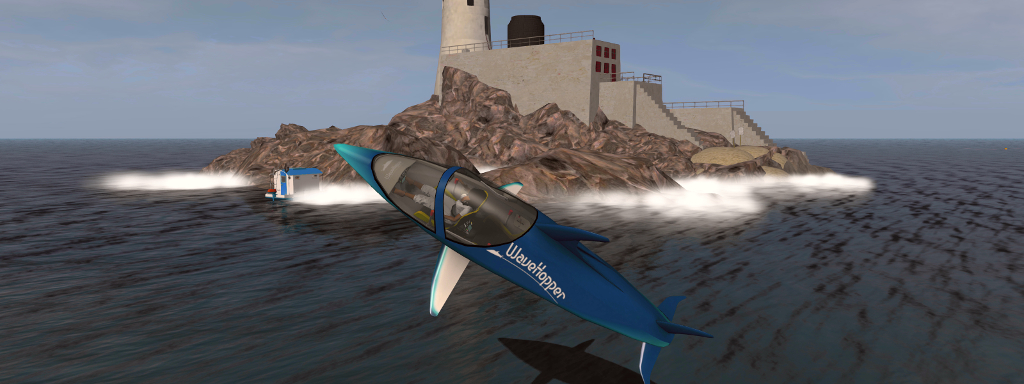
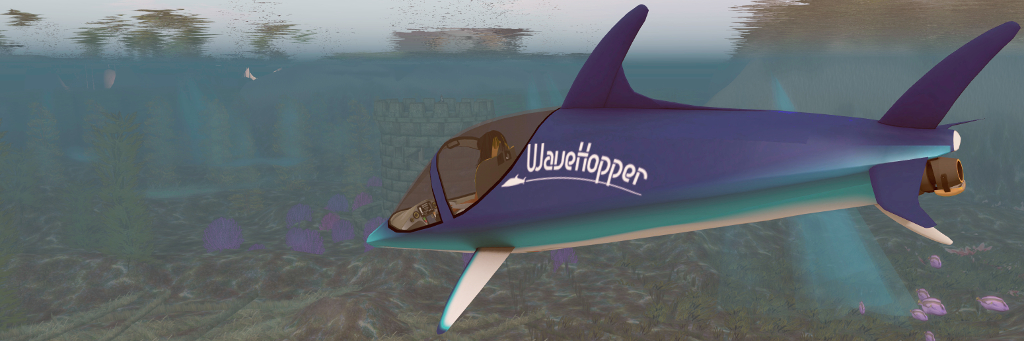
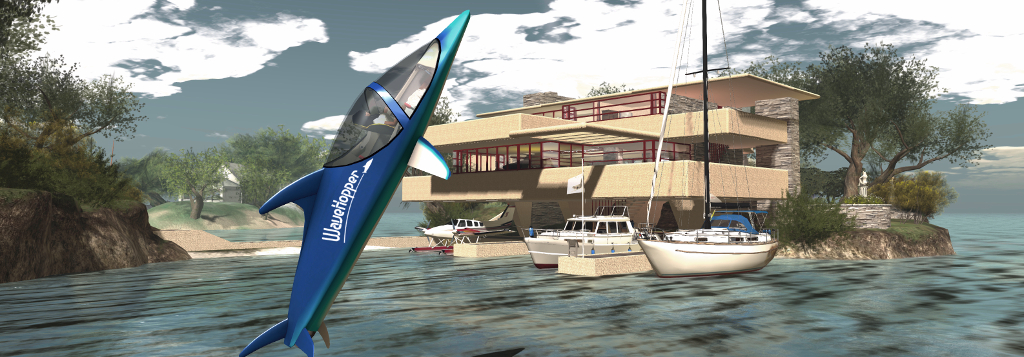
Ape Piaggio’s WaveHopper
Looking like a dolphin, the WaveHopper is a two-person craft that sits as a cross between a jet-ski (it is powered by a impeller mechanism in a similar manner to a jet-ski), a mini sub (it can operate submerged for up to a minute at a time), and an acrobatic craft. Its porpoise (see what I did there?) is to simply get out on the water and have fun – as I hope the accompanying photos demonstrate.
Once underway, the WaveHopper can travel on the surface of the water at a fair rate of knots (although handling at the upper end of the throttle can get some getting used to). Aircraft-like in its controls, tip the nose down and you’ll dive – but the idea is not to stay under water. Instead, pull back up on the controls, and the WaveHopper will accelerate upwards and breach the surface like a dolphin making a jump. What’s more, with a little practice, you can pull stunts with it, rolling as you jump or leaving the water inverted or even pulling a loop, part in / part out of the water can be managed.
Ape Piaggio’s WaveHopper
It’s really designed for fun in a single region rather than long travels across multiple regions. It has a rocking motion when moving on the surface, and the finished version will have more buoyancy, and there will be a timer to turn off the engine to prevent overheating if submerged too long.
– Ape Piaggio describing the WaveHopper
And just in case you think the idea is a bit kooky – WaveHopper is actually based on a real vehicle (which has also been reproduced by a couple of other creators, although Ape’s design was my first exposure to it). You can catch a video of the “real thing” below and get a feel for it.
Pricing for the WaveHopper has yet to be finalised, but I can say it’ll be packed with additional features, including working cockpit nav system for first-person operation, media system, boarding animations and a range of poses. Ape also noted she might offer some little extras to go with it so that owners can have even more fun. As such, I’ll be giving the WaveHopper a full review once it is available.
Ape Piaggio’s WaveHopper
And the Airfish? That’s apparently next on the list for completion!
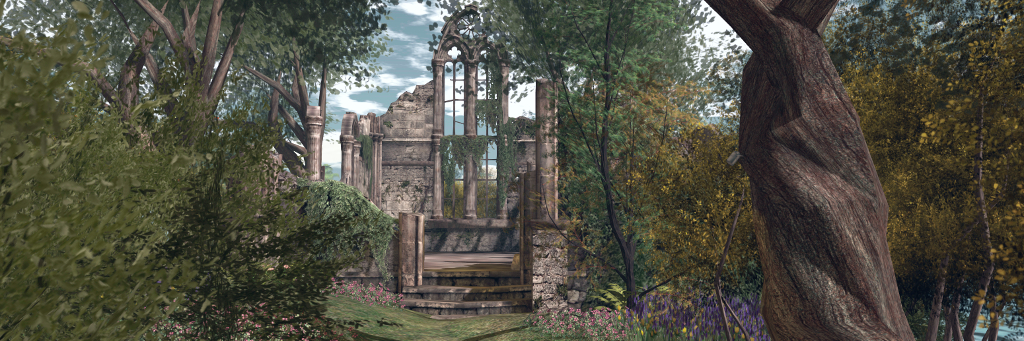
The Chapel Ruins by Marcus Inkpen of The Looking Glass, seated within our “southern island”
It’s been ten months since I bored you with writing about Isla Pey, and at that time I said there probably wouldn’t be any more major changes – and that’s largely been the case. However, over the last couple of months we’ve been re-adding one or two elements of old ruins to the place (a familiar theme with me) – although outside of a couple of walls slipped into the gardens behind the house, nothing really seemed to fit, despite the “south island” screaming to have something placed in it. The towers and walls of previous layouts just didn’t work.
However, a design I’ve admired since it was first released, and which has increasingly been finding its way as a “regular” prop for region designs, is The Looking Glass Chapel Ruins by Marcus Inkpen. Available through The Looking Glass in-world store, this is a truly magnificent piece – and thanks to a combination of size, depth of foundations and luck, it happened to be the *perfect* fit for the land with very little need for anything to be moved or altered – all that was really required was establishing a path to it and around one side of it.
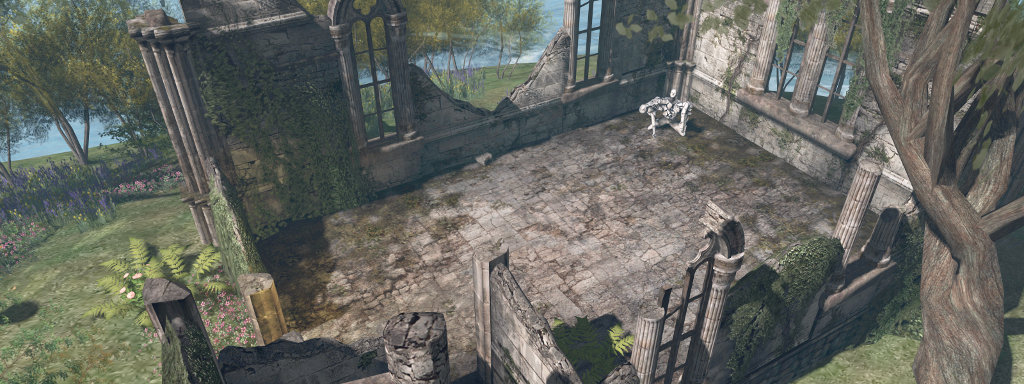
An overhead view of the chapel, with some of my modifications, and a sculpture from Mistero Hifeng
At 66 LI by default, the Chapel Ruins are finely detailed, offering the floor, and broken walls of a single room chapel with the broken square of a tower rising to one side of it, the walls and stairway of which abruptly end just above head height. The windows are without glass, the doors have long gone, and ivy is laying claims to the walls, with fallen stones scattered inside and out. It is, in a word, utterly eye-catching and a worthy centrepiece to any region requiring quality ruins.
Of course, me being who I am, I couldn’t leave it entirely untouched, so a couple of the walls saw some minor alterations (well, one fairly major in that an entire wall section was swapped for another). I also took the opportunity to install some decidedly non-period lighting, together with some additional foliage (pushing the LI to 70) – and then hit a problem.
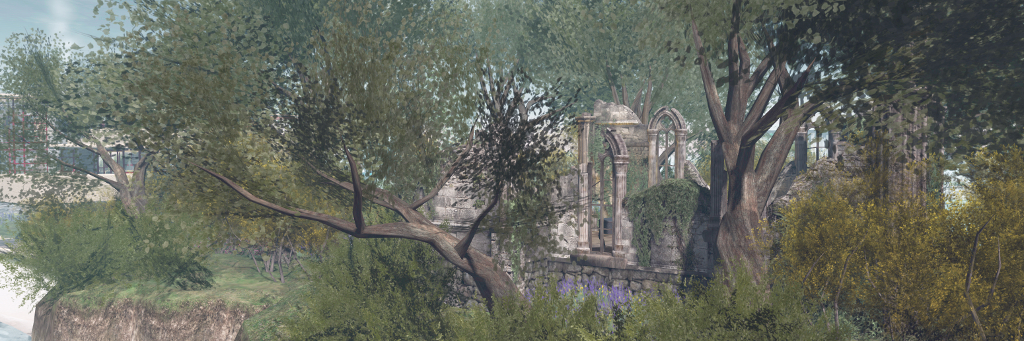
A view from off-shore
What to do with interior space? Having the ruins really – if I say so myself – set the southern island perfectly; but the rectangle of empty stone floor did look odd – and for over a week nothing came to mind, other than dropping an old piano into it. Which, to be honest, I wanted to shy away from, given such items have also seemed to become de rigueur in a lot of region designs (and I should know- they’ve tended to be de rigueur in my region snapshots of late!).
Fortunately, the answer came in another visit to The Looking Glass. Across the store hall from the vendor for the Chapel Ruins sits a collection called the Our Place To Dream collection, and elements of this collection – notably the wall and the blanket – looked like they might fit with the chapel. And they did.
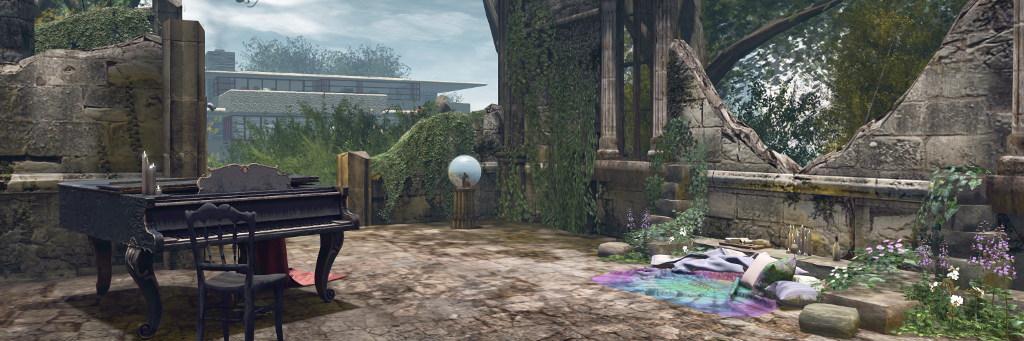
The “finished” space in the Chapel, with the Our Place to Dream Ruined Wall and Blanket (L) and the Nutmeg Distressed Grand Piano.
With a little modification, the wall offered a fitting suggesting of stonework from the broken wall of the chapel gathered together to form a cosy little space for the blanket, particularly when a DIGS cheeseboard together with some candles and wines glasses and bottle from various sources were added to make things even cosier. Which just left the rest of the floor space to deal with. A couple of statues by Mistero Hifeng and Silas Merlin helped; but in the end – well I had to give in to instinct and pick up the Nutmeg Distressed Grand Piano.
So, we now have our own ruined chapel, together with a little cosy spot for dancing, sitting and – with the aid of a picnic set, an outdoor corner to share with friends.
The chapel and the house in the background
The last couple of months have also seen some changes to the house itself – not too much, just some trimming and realignment here and there to give it more of its own look whilst also retaining most of the classic Fallingwater lines. Most of all, it’s given us space for a proper dining area – something I’ve never really seen the point of in SL until I moved into my Linden houseboat 🙂 .
I’m not going to wibble on about the house – but I will say that if you’re looking for a nice-looking, functional (as in animated) kitchen with plenty of options, you might want to take a look at the Olivia Kitchenby: Czikitka.
A while back Yasmin (YouAintSeenMe) mentioned to me that she was considering a rock climbing system for Second Life. Being one who doesn’t particularly handle looking over the edge of extreme tall / high things in the physical world, it struck me that a) rock climbing would not be my first recreational pursuit, and b) but why not have a go in Second Life where bones don’t get broken?
So, armed with a follow-up note card from Yasmin on the subject, I toddled off to try out a climb she’s set-up on the west face of Nitida Ridge, Heterocera.
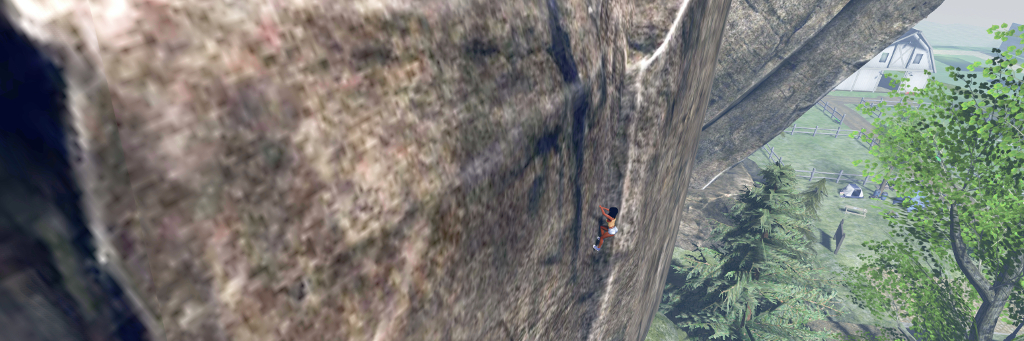
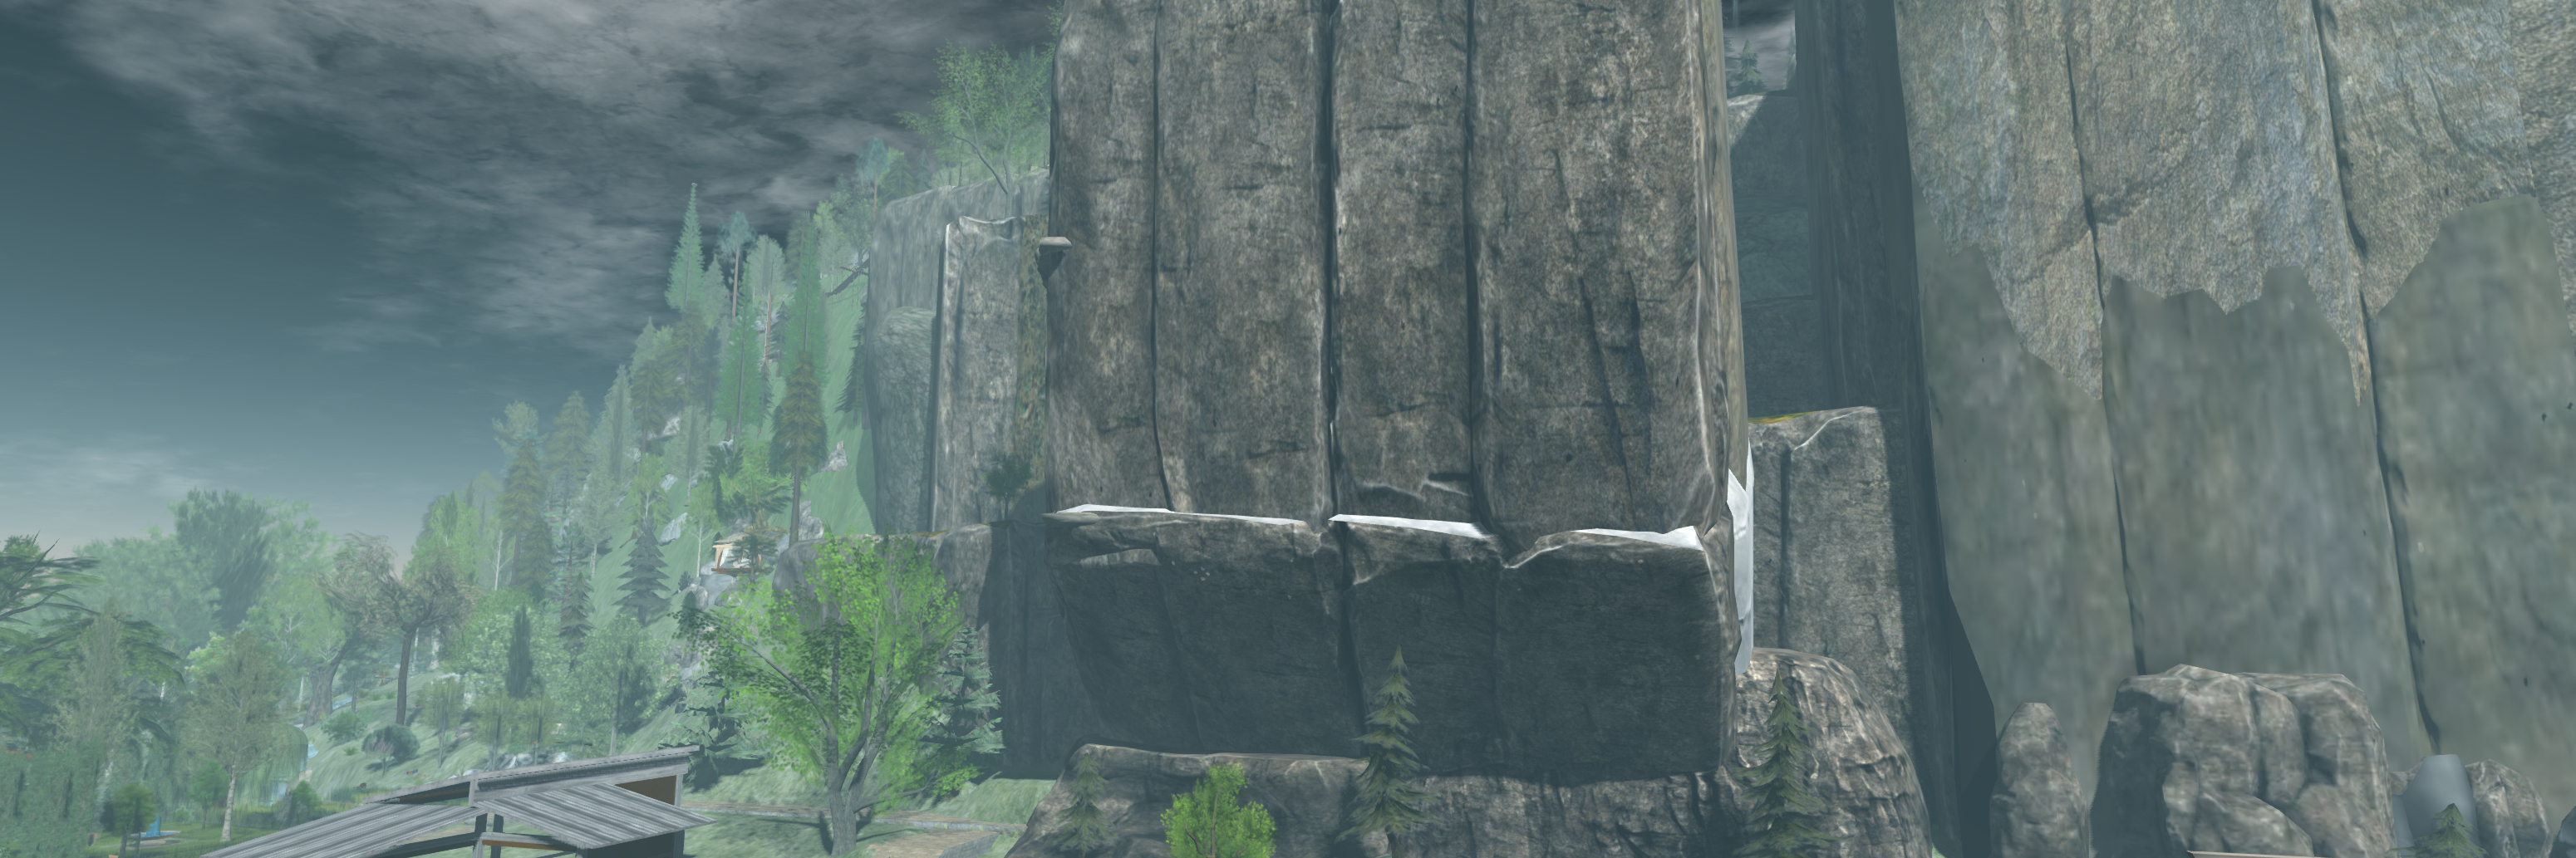
Nitida Ridge – 100m of cliffs to climb!
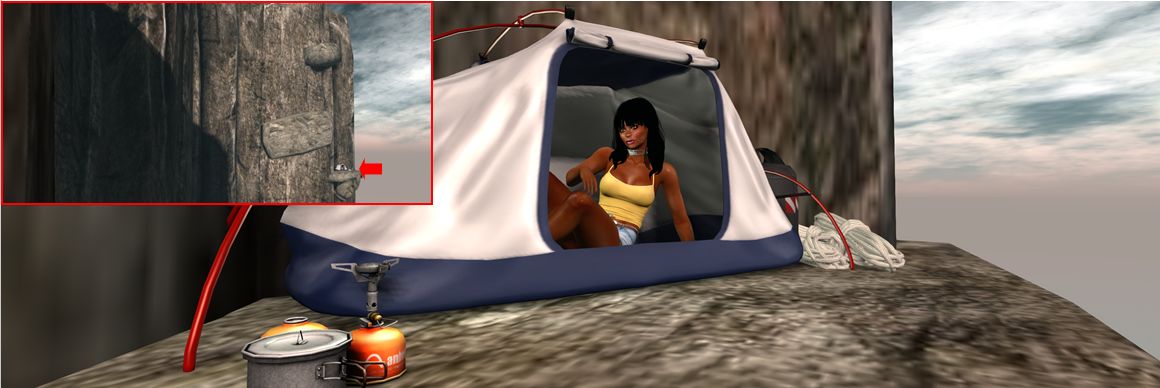
Here, at the foot of the ridge, sits a little base camp established by Yasmin, with tents, food and a warm fire. Close by is a sign that both introduces the climb(s) up the rock face and provides visitors with the necessary kit when touched. The latter is free, and comprises:
An abseil harness (worn invisibly, just ADD to attach to the stomach attach point); information on the climbing HUD, a note card on the routes up the cliffs – direct or extended; and an image of the cliffs overlaid with the routes up (green) and abseil descents (red).
The climbing HUD – clicking the sign will cause a pop-up asking for this to be attached so your avatar can be animated during a climb.
Starting my climb
The HUD attaches towards the lower right of your screen by default – although obviously can be repositioned. It is colour-coded as follows: Blue (generally the default) = ready; Green = active climb located / engaged; red = disabled. In addition, touch the HUD brings up a dialogue box. There are a handful of points to be remembered when climbing, and with the HUD in particular:
It is still an in-development system, so not all features may be present and the occasional bug might try to put you off your climb.
Not all the options on the dialogue box may be fully functional at present.
The ones you are most likely to want to use are the climbing speeds (Faster / Slower) and the avatar position options (In / Out) – the latter to move your avatar either further away from the rock face (so you’re not up to your elbows inside the rock, for example, or climbing air).
Taking a breather and a look around at 170 metres above sea level and …. Eeep! It’s a long way down!
Climbing is a matter of finding the first pitch along the foot of the ridge. To do this, it is suggested that you examine the image of the ridge and then zoom out with your camera and align things visually. This can be a little difficult (but then, it’s not like people hang signs on rock faces that say, “Start Your Climb Here!” – you pick your start point by eyeballing the best spot to make an ascent), so for those who may get frustrated in trying to work out where to start, there is a direct SLurl link.
When you’ve found the correct point, the HUD will try green to indicate you can start to climb. Use the Up arrow key to climb – turning off any AO system can be an advantage here to prevent conflicts. When pressed, your avatar will start what is effectively a solo free climb. Releasing the key will pause you, but shouldn’t cause any backsliding.
Taking a rest in a bivvy and inset, where it sits on the climb….
The nature of SL may mean at times you might get stuck. Should this happen, release the Up key and they resume. Similarly, you may “slip” and assume your default falling pose – again, releasing the Up key should revert your avatar to the “rest” pose. Also, sometimes using the Left / Right arrow keys can help a little – but take care. Left / Right can help you crab diagonally sideways in the climb, but use one of them too much and you’ll leave the “climbing path” – your HUD will turn blue and you’ll take a fall!
After the first 15 metre climb to a very broad ledge, you’ll have a choice: the direct route, or along the “bivvy” (bivouac) route. The latter is the more challenging, and requires you channel your inner Tom Cruise (Mission Impossible 2) for some diagonal climbing across the rock face to reach various ledges – including one with the tent, allowing you a little respite from the exertions of climbing – and additional vertical ascents.
Abseiling down the Nitida Ridge (note ropes added in post-processing so I don’t look like I’m simply sitting in mid-air!
The direct route is just that – straight up the cliff, using a natural fold in the rock, just as a real climber would. I admit to having a little trouble at the top of this – the climb animation refused to release, so I’d reach the top, fall back a couple of metres and resume climbing, reach the top, fall back… A double-click TP resolved this.
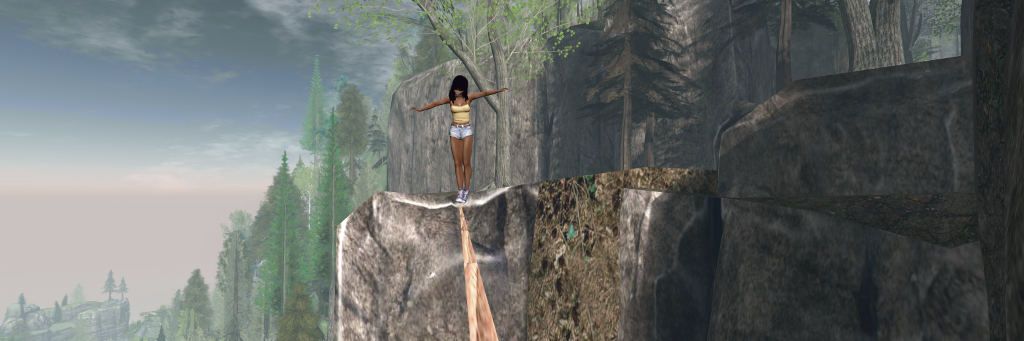
For those prone to a little daring-do, the Nitida Ridge climbs also include a couple of high lines (shown in blue on the climb image), where a little tightrope walking can be, um, enjoyed, using Yasmin’s tightrope kit.
Of course, getting up a climb is half the story – there is also getting back down. For this, Yasmin has included abseil options. Just find the anchor points located at various places on the cliff face (again, use the supplied image to help in locating them). Each is a square metal plate fixed to the rock with a carabiner hanging from it. Touch the carabiner and you’ll abseil neatly down the rock face.
Ropes for abseiling are invisible (a particle system would likely complicate matters), but the animations are fun to watch, and in keeping with climbing (I assume at least, not being an expert in any way whatsoever!) the shorter descents are more hand-over-hand.
This system is – as noted – still somewhat in development, but it is simple and clean – and works. Obviously, you can add to the feel of climbing by dressing appropriately if you wish – I was tempted to add either a rucksack as a climbing backpack, or at least a bum bag to double as a chalk bag, but in the end just opted to get on with it.
Yasmin offers a number of alternate possible climbs within the HUD instructions note card, but as the HUD appears to be temp attach, you’ll need to keep it in place in order to try them, or return to Nitida Ridge to affix a new one before visiting an alternate climb. Overall, however, the Nitida Ridge climb is the most well-rounded in terms of climbs and features.
High lines offer the opportunity for some tightrope walking …
You still wouldn’t get me hanging off the side of a cliff at the end of a length of rope in the physical world, but within Second Life, free climbing / rock climbing like this is fun, and Yasmin has put together an excellent package that can be enjoyed individually or with friends. The kit isn’t (yet?) commercially available as it is in development (a further reason to try it at Nitida Ridge!), but I would suggest that if / when it is made commercially available, anyone with reasonable cliffs and highlands (say 15m or greater), it could be an attractive addition as an activity.
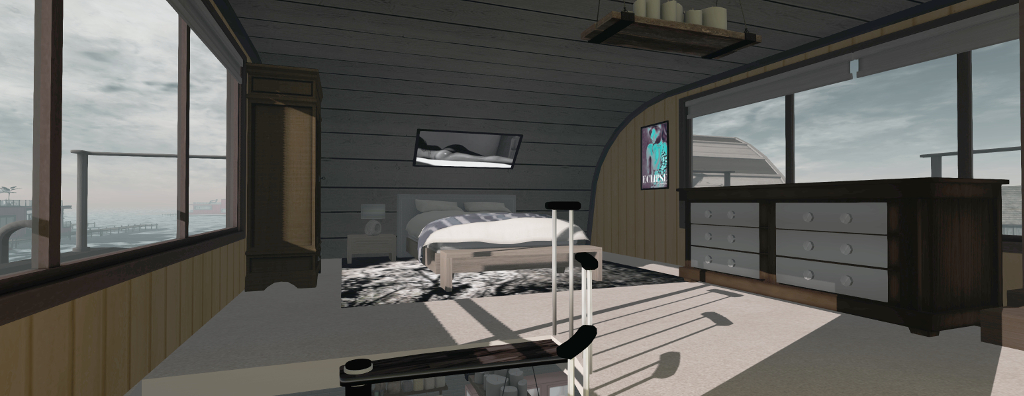
Playing with the Evening Star Linden Houseboat. Note the additional “window” towards the stern and the spiral stairs
My playing around with the Linden Home houseboats is something of a matter of record in this blog. I’ve previously written about the result of my fiddling with the Windless (see here and here), and the Barnacle (see here). In all, I’ve come up with half-a-dozen different interior layouts for three of the available houseboat designs (including the Wallower).
But there is one I’ve tended to avoid: the Evening Star. There are several reasons for this: of all four designs, it perhaps has the smallest interior space (although this could be a toss-up with the Wallower); the use of ladders to reach the rooftop deck really doesn’t appeal (nor does the narrowness of the gap between the ladders and the lower deck railings).
The Evening Star interior can be divided into two and the upper skylight area converted into an upper “floor”
I’m also no fan of the way the majority of the windows are crowded towards one end, leaving the “skylight” area at the stern of the design to provide a glimpse of natural light. Even the skylight itself strikes me as a “wasted” (if possibly small) space, and like the Barnacle, the Evening Star has a curved wall that I’m not particularly fond of.
But, these are the things that niggled me: could something be done to overcome them? As it turned out, the answer is yes.
Despite its apparent small size, the raising ceiling area of the Evening Star can be converted into a reasonable bedroom, and a spiral staircase reduces the amount of floorspace a staircase might otherwise need
Take that skylight space, for example. Small it might be, but it only takes a few prims to create a suitable for on which a bedroom can be established. Further, said prims can be extended to provide a non-plank ceiling for the deck below, if needed, Add a suitable spiral staircase, and you have a compact way to get between the two “floors”.
The same design of spiral stairway (which I’ve previously used on one of my Windlass designs) solves the problem of avoiding the Evening Star’s ladders by adding a copy to the front of the houseboat, connecting the open upper deck space with the docks I slipped in at water level. A pair of Anywhere Doors (also used with the Windlass designs) solves the problem of accessing the upper deck from the bedroom.
The new “bedroom door” to the upper deck (a Curio Obscura Anywhere Door pairing) and a couple of additional prims to “fix” the truncated window.
One of handy things about these houseboat designs is that as unique as each of them might be, all of them naturally lend themselves to using similar components like this.
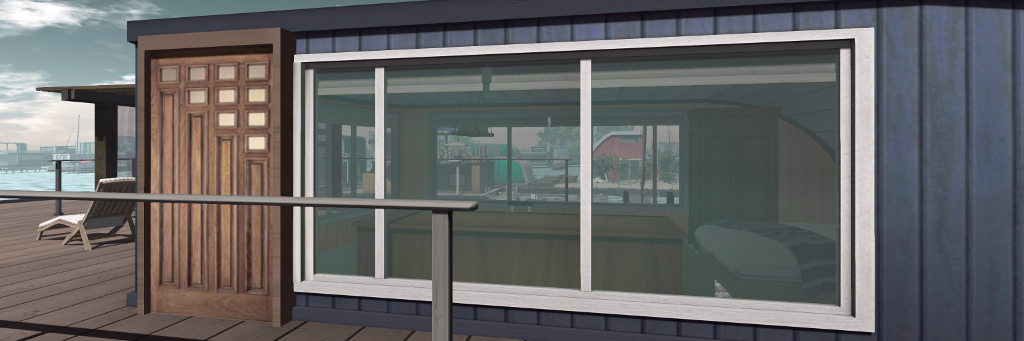
Take Blush Bravin’s Party Boat add-on, for example. Designed for the Barnacle, I’ve used elements with both the Windlass and the Wallower. And with the Evening Star, the “brick” panel allows me to overcome that curved wall at the rear of the lower deck, squaring things off nicely for the kitchen (a combination of items from [DDD] ~ Dysfunctionality and Trompe Loeil). The addition of a faux doorway against this wall adds the illusion of there being a bathroom at the back of the boat. The slatted room divider from Blush’s kit also allows me to split the lower deck into two without leaving it feeling totally closed off.
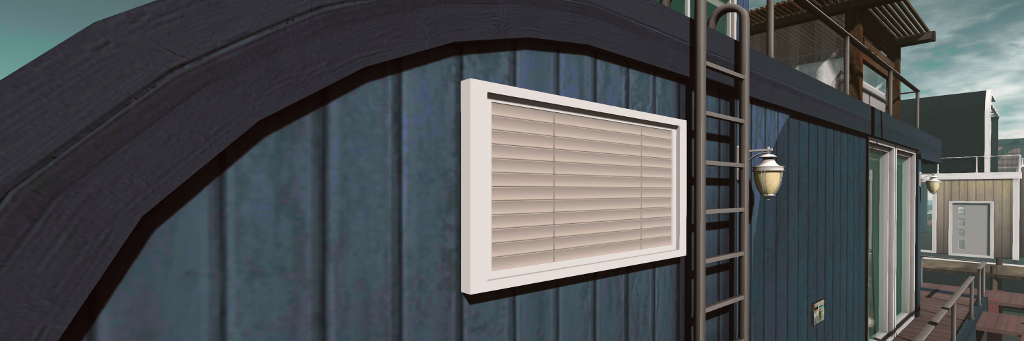
One of the faux windows showing the “blinds” drawn from the outside.
Even so, splitting things can leave the back of the boat feeling a little “dark”. So why not add a couple of faux windows? Just 4 LI apiece and with suitable internal / external textures, and that can be made to look (from the outside) as if the blinds are drawn, and from the inside, they offer “views” of the “sky”. OK, so the inner and outer appearances of the windows don’t actually match one another, nor do the “windows” actually admit light – but they do help give a sense of brightness to the back of the houseboat. A quick bit of scripting also means the “inside” sky images are automatically swapped with images of the drawn blinds during the local SL “night”, avoiding the “view” from them clashing with what can be seen outside!
Dividing the interior into two isn’t necessary, but for me, it makes things a little more cosy and offers distinct living spaces – lounge and kitchen / dining. However, given the sheer amount of glass at the front end of the Evening Star, it leaves a small problem of where to hang pictures. Fortunately, it doesn’t take much to add a couple prim walls to block-in two of the windows – and these can run back toward the rear of the houseboat, covering both the wall panelling on the inside (which I mentioned I wasn’t too fond of) and the weird black semi-circle on the outer walls.
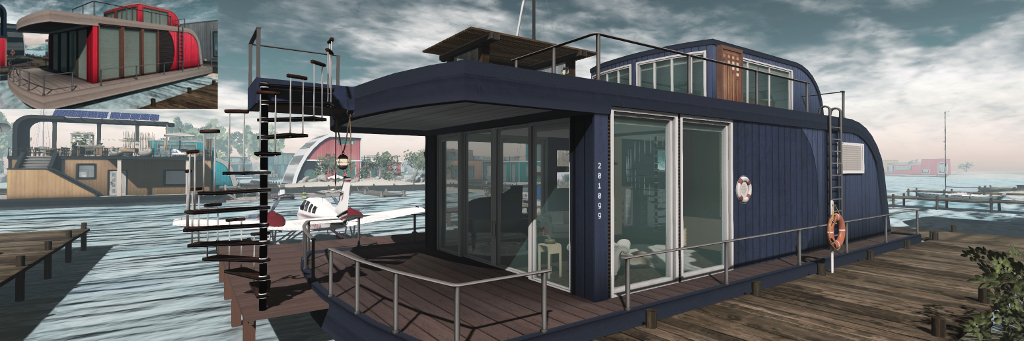
The Evening Star showing my mods (forward spiral stairs, upper side door to the new bedroom area, new side walls and “windows”), compared to the original look, inset.
I think it fair to say the Evening Star – like the Wallower – surprised me. What at first seemed to be a potentially awkward living space with limited options, is actually pretty flexible and capable of being modified in a fairly low land impact: 82 LI including all the ceiling, walls, lighting, pictures, kitchen, kitchen fixings and docks for my boats and planes (of course, a custom vehicle rezzer for the latter finished things off 🙂 ).
I continue to be impressed with these Linden Homes and the sheer flexibility they can offer. Put it this way, I now have a different houseboat for each day of the week 🙂 .
Yes, I’m playing with my Linden Home houseboat again. Note the “extra door” on the side of the Windlass design, about which more below
A lot has been written about the “new” Linden Homes and their continent, Bellisseria – I know, because I’m one of those doing a lot of the writing 🙂 . However, the truth is that with four styles of house or houseboat to play with (and the promise of new types of both on the horizon), it’s really hard to stop playing with them and trying different interior layouts – as can be seen in the ever-growing forum thread on interior designs.
I started with the Windless, which has the largest interior floor space of the four houseboats initially offered by the Lab, using a simple open-plan design. From that I moved on to the Barnacle, playing with various designs, one of which I inflicted on you in a blog post. More recently, I’ve played with the Wallower – but I’ll spare you that! – before returning to the Windlass once more.
The Windlass actually has a high-ceilinged element which can, with care, be turned into an additional room
My reasons for going back to the Windlass rather than playing with the Evening Star – the forth design in the current houseboat styles – come down to the facts that, a) I’m actually not that keen on the Evening Star; b) I really wanted to see if I could come up with a Windlass design that’s a little more “cosy” thsn my original open-plan design; and c), I’ve been intrigued by the way people have added an “upper floor” to the Windlass.
For those unfamiliar with the design, the Windlass offers a split level layout, with one end having a raised ceiling so that it is possible to access the open-air roof deck via an internal staircase.
On the one hand, making this raised space into a room of its own is a simple matter of slapping in a new ceiling / floor. On the other, it’s a bit of a pain, because the newly-created space cannot be directly accessed from the existing staircase. This means either installing a teleport between the two floors, or giving up some of the available floor space “upstairs” in order to add a second staircase. But, teleports are terribly passé, and even allowing for losing some floor space, having two stairways relatively close together in a living space can look … odd.
I opted to solve this by minimising the impact of a second stairway through the use of a spiral staircase from VL Designs by Veronica Lockwell. I’ve used her Mesh Spiral Staircase – Walnut kit in the past and find it highly adaptable. It’s also well made, with low LI, good LOD, and a small overall footprint, allowing me to minimise the amount to floor I has to “lose” in the new bedroom.
The spiral stairway leading up to the new bedroom space, together with the walls separating the Windlass interior stairs from the rest of the design, and which create a space for the kitchen.
To overcome the issue of have two open-plan stairways in the houseboat, I installed a couple of new walls to separate the “built-in” stairs. Doing this had the additional positive of allowing me to create space for a gallery-style kitchen, as shown in the image above. In addition, dropping in a simple prim block (partially obscured by the spiral staircase in the image above) and false door allowed me to create a faux bathroom.
However, this left me with another issue. What’s the point of having an “upstairs” room adjacent to the huge roof deck on the Windlass if you can’t easily get from the bedroom to the roof? You can’t easily use the houseboat’s own roof door due to the intervening banister wall.
The new bedroom, reached via the spiral staircase in the left corner
I solved this through the use of the Curio Obscura Anywhere Door by Pandora Wrigglesworth. Sure, it’s a teleport system, but it gives the illusion of “walking” through a doorway rather than just being teleported, and can be modified with ease.
A pair of these mounted on the side wall of the new bedroom (one inside, one out), complete with a set of images added to suggesting showing the “indoors” or “outdoors” views when open, and presto! instant bedroom access to the roof deck!
Using an Anywhere Door to add roof deck access from my Windlass bedroom
The Anywhere Door system also solved another annoyance I have with the Windlass: it only has one “ground level” door. If you have a parcel like mine that places your houseboat “beam on” to the shore, this can make getting to the waterside mooring a nuisance. Either use the front door and walk around, or drop in additional piers and steps from the small lower deck balcony on the Windlass. I find neither approach particularly attractive.
So, with the simple expedient of two more Anywhere Doors (again with suitable images to added to suggest the interior and exterior views when the doors are open), I created a way to get from inside the Windlass to the moorings and my boats / planes with relative ease, with one of the Anywhere Doors forming a “back door” between kitchen and “bathroom”.
Borrowing a section of Blush Bravin’s Party Add-on for the Barnacle Houseboat and combining them with prims, allowed me to neatly section-off the raised part of the Windlass floor space to create a cosy lounge area, complete with a little entrance are fr the front door. To further add warmth to this space, I also blanked of a couple of the large windows at that end of the boat to create additional “solid” walls, providing space for a fireplace on one side and a little corner for my piano on the other.
Looking across the lounge area towards the front door from the fireplace, and peeking over the top of the carriage clock on the fireplace mantle
I’m still not 100% sure about using my Linden Home as a “full-time” living space, but as it is I think I now had enough variations of designs for three of the houseboat types to keep living there interesting, should I end up going in that direction! 🙂 .
A rezzing system / scene rezzer can allow you to save all the décor designs you create for your Linden Home / Houseboat and have them available each time you opt to re-use a particular style of house.
As we’re all now aware, the new Linden Homes are provided via a rezzing system, allowing their owners to live in any one of four styles of home for each type – and to freely swap between house styles whenever they want. This makes the new Linden Homes both flexible and user-friendly: tired of the house you currently have? Then simply clear it out and replace it with another from your parcel’s mailbox or lifebuoy (or swap the house / houseboat style and re-orient your furnishing to suit).
However, if you do like swapping between house / houseboat styles, manually re-doing things each time can be something of a pain. The most obvious way to avoid this is to use a rezzing system or a scene rezzer. Both sound the same – and some systems may well offer both functions, but for the purposes of this article, I’m going to differentiate them as follows:
A rezzing system allows you save the furniture and décor (and things like your garden furnishings, any add-ons you’ve purchased / made) for a house / houseboat as a single package, which you can pull from inventory and use to re-rez that particular design / layout whenever you opt to re-use the style of house / houseboat for which it was created. My personal preferences for tools of this type are:
Builder’s Buddy, a free system. You can get the raw scripts from the Second Life wiki (just copy / paste the two scripts from the wiki pages into appropriately-named new scripts in your inventory), or via the SL Marketplace.
The Rez Faux system by Lex Neva. Primarily intended for creating packages of goods you’ve created and wish to sell, this costs L$600, is available in-world, and works perfectly well with “personal” projects.
Note that I am not endorsing these options over other rezzer system products, they are simply the two I personally use.
A scene rezzer can allow you to save multiple design / décor layouts for multiple homes, and have them all available through a single in-world device.
Use of individual rezzers tends to be quicker and easier than using a scene rezzer, and offers greater flexibility when adding or changing things within an individual design.
Using a scene rezzer means you can quickly access all your layouts at the cost of only 1 or 2 LI without having to fiddle around with the correct placement of the individual rezzer. However, updating a saved design is a lot harder, as it can require re-saving the entire design, rather than just adding / swapping individual items.
However, the most important thing to remember is that, in order to work, the items placed within any rezzing system must be both Modify and Copy. You also need to have a basic understanding of editing objects in Second Life. Also note that due to the way the majority of these systems work, if you opt to physically relocate to another parcel in Bellisseria, you will most likely have to create new rezzers for that parcel. Also, note that I’m not referring to “temp rezzers”; these are both against the Bellisseria covenant, and should in general be avoided as they are horrible resource hogs.
The following notes have been written to help you use the above-named systems.
Builder’s Buddy and Rez Faux – Individual Rezzers for House layouts
Creating the Rezzer and Adding Contents
Builder’s Buddy: Create a default cube. Drop the Builder’s Buddy Base Script into it. This is now your Base Prim – the rezzer.
Rez Faux: rez a copy of the Create A New Package object – this is your rezzer for Rez Faux.
Both:
Rename your new rezzer according to your needs (e.g. “Winchester House With Party Add-on” or “Barnacle Houseboat Mango Interior” or some such).
Position the rezzer object you’re just created towards the centre of your parcel, then copy the X, Y, Z position coordinates from its Object tab and paste them into the Description field of the General tab.
When you use something like Builder’s Buddy or Rez Faux that uses positioning relative to the rezzing item, it is essential the X, Y, Z coordinates of the rezzer are saved (e.g. by using the General tab’s Description field). Note that two Edit floaters are shown in this image for the purposes of illustration only