Second Life Combat User Group: June 13th, 2024 summary

Credit: Rider Linden

The following notes were taken from the Thursday, June 13th, 2024 Combat User Group meeting. They form a summary of the core items discussed and responded to by Lindens, and are not intended to be a full transcript.

Meeting Overview

  • The Combat User Group exists as a forum to discuss improvements to the Linden Lab Combat System or LLCS to better support combat in Second Life.
    • The core idea is to provide additional events and capabilities which sit on top of LLCS to provide combat creators with better tools with which to create better combat systems for their specific scenarios.
    • It is not intended to be a complete combat system in and of itself.
  • The meetings are the result of a proposal document on improving the native damage system in SL, written by Rider Linden, and which is the focus for both the meeting and any work arising from them.
  • These meetings are conducted (as a rule):
    • By Rider Linden, with the support of Kyle Linden.
    • On alternating Thursdays (rotating with the Content Creation User Group) at 13:00 SLT. Meeting dates are recorded in the Second Life Public Calendar and at this location.
    • In local chat.
  • Discussion topics, requests, etc., can be found on the SL Feedback Portal Combat Board.
  • Additional details are available via the SL wiki Combat2 page.

Work In Progress

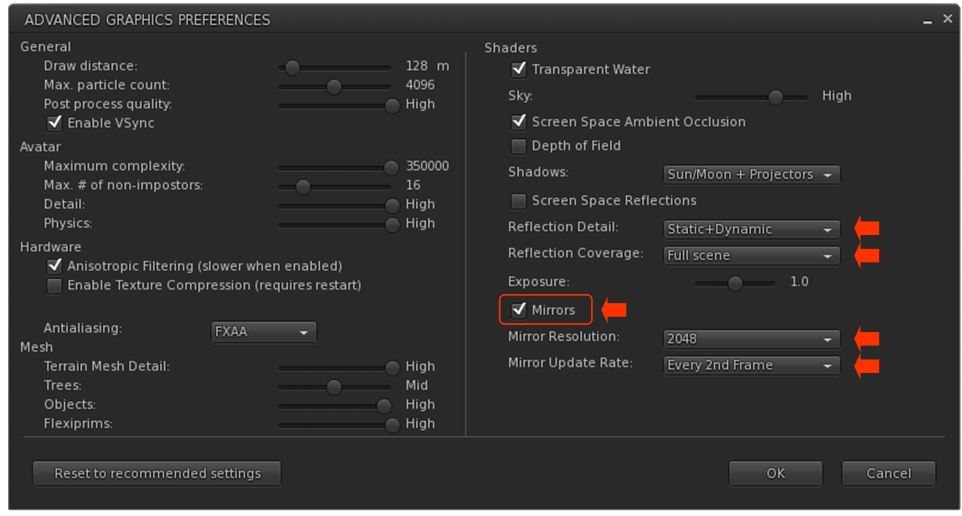
  • The current iteration of Combat 2.0 support on the server-side is due to be included in the Summer Fun simulator update, which is looking to be deployed some time after SL21B.
    • Those wishing to test the system can do so on Aditi on regions Gallipoli and Thermopylae.
    • Issues / feedback should be reported via the Support Portal Combat Board.
    • As noted in my previous update, this will very much be a release to find out exactly what works and what doesn’t for the Combat community/ies in Second Life and will be iterated upon going forward.
  • Rider is looking at avatar rotation / aiming and improving llRotateAvatar, but as the former are controller viewer-side and the later in simulator-side, is making this is proving to be an issue.
  • Rider has also been looking at improving hit boxes / hit box adjustments. However, this work is liable to be in follow-on updates to the initial release.

Comments and Requests

  • There was further request for Linden Lab to adopt the first-person shooter improvements found in the Black Dragon viewer. However:
    • As noted in my previous summary, this can only be done if Black Dragon’s develop provides the code to Linden Lab as a code contribution / code pull request, indication LL can consider / adopt the code.
    • The developer has indicated he can do this, but he might require time to do so for various reasons, including the fact it will probably need a lot more fine tuning and bug fixes.
  • The the above led to a discussion of using some form of IK update or scripted attachment added to hand-held weapons which could act as an animation targets for moving avatar hands to grips, magazines, etc. Some sample weapons have been put out on the combat regions on Aditi, and some sample scripts will be added to the SL wiki Combat Page to allow people to play with this idea.
  • As noted in my last summary, there has been a request made to add a “fast” parameter to llRezObjectWithParams to allow objects to rez at a reduced delay to allow things like higher rates of fire for some weapons without the need for additional rez nodes.
    • There is a potential griefing vector with this idea, so it was suggested that the parameter could be managed at region owner / estate level (e.g. so only enabled where specifically required).
    • At this meeting, Rider noted that implementing it would be a non-trivial task, because script delays are built into the function definition in the virtual machine, and so would require considerable update.
    • He also noted that even with an estate level control to counter issues of griefing on region that do not need it, such a parameter could result in the simulator’s rez queue being swamped by requests. However, it was suggested that this would be avoided because rezzers with too high a request rate would hit the grey goo fence.
  • There was a general discussion on llSensor and searching damageable types, with Rider noting the DAMAGE parameter searches for objects that either process on_damage, final_damage or have a health value, and when used, should combine both ACTIVE and PASSIVE, as it filters results.
  • In terms of damage, Rider noted that negative damage should be unthrottled and not trigger the region damage cap or contribute to the individual call throttle.
  • It was suggested that as a well as damage controls, there should be healing controls as well (e.g. a healing toggle and healing throttle) so as to prevent people making themselves “immortal”. However, it was noted:
    • It would be easier just to reduce all damage to 0, not matter what hits the avatar.
    • Either way, people abusing the system like this would show up clearly in the combat log, with combat region owners to potentially write a monitoring relay that will teleport anyone cheating in such a manner to be teleported home with a warning.
  • During the previous meeting it was asked if the former combat-enabled regions on the old Teen Grid – Lexington, Concord and No Man’s Land – could be brought back.
    • During that meeting, Madori Linden was able to bring back Lexington and Concord, but scripts on both were turned off – as of this meeting, scripts on both regions should be enabled.
    • It is proving difficult to recover No Mans Land, due to the lack of a good archived simstate.
    • A further request has been made to relocate Concord and Lexington to the Combat Sandbox red team and blue team regions, and make both combat sandboxes.

In the Lavender Fields of MMe Loutre in Second Life

Nathhimmel: Lavender Fields of Madame Loutre, June 2024 – click any image for full size

From the east and south the land rises in a gentle slope, climbing gently to the west and north to meet with the upward sweep of land for the north side of the region so that all three slopes slopes form the low hump of a hill before falling back towards the western edge of the region. Across this landscape and broken by precious few trees, is spread a blanket of lavender, running from the water’s edge on all sides and drawn into regimented lines and blocks by avenues of grass in places topped by short lines of paving stones.

This is a tranquil place, the eastern shoreline interrupted by two bays pushing into it, the smaller of which looks like a giant thumb has been pressed into the ground to leave an indentation for the surrounding waters to claim as theirs. Such is the lie of the setting, were the wind to come from the east and passing over these bays, it is not hard to imagine it driving waves to where the shore breaks their progress so they transfer their momentum to the lavender, causing it to ripple inland and up the slope to wash around the house atop that single low hill.

Nathhimmel: Lavender Fields of Madame Loutre, June 2024

Boxy and long, the house presents a tiled roof to the sky which extends out over a north-facing veranda, affording it some protection against the likes of sunshine and rain. It is counterbalanced by the rising second floor of the house rising from the southern end of the house to provide sufficient space for a cosy bedroom. Aside from broken ruins a short walk down slope, the house is the only human-made structure on the island – and the only place still occupied.

With its low-walled garden lushly overgrown with flowers allowed to grow wild on one side and the other planted with cobbles, the house exudes the tranquillity that seems to flow outwards over the surrounding lavender and to the very edges of the region. Alone and at peace, this is the home of Madame Loutre, the last inhabitant of this restful setting, and the spread of aromatic plants growing around it are known as the Lavender Fields of Madame Loutre.

Nathhimmel: Lavender Fields of Madame Loutre, June 2024

But who is she? I hear you ask, and where might this place be found? Well (and to ignore the surrounding waters, I’ll let Konrad (Kaiju Kohime) and Saskia Rieko explain, for they are the people who have made our journeys to this place possible:

In the secluded one-house village, nestled deep within the enchanting region of Provence, resides the mysterious Madame Loutre, an ethereal otter spirit … Madame Loutre is both a guardian and a secret keeper of the village, known for her wisdom and the enchanting, calming presence she bestows upon visitors. The villagers from nearby towns speak in hushed tones about her magical abilities and the tranquillity her lavender brings. This idyllic haven remains untouched by time, a place of quiet wonder and mystical charm.

– From the Nathhimmel website

Nathhimmel: Lavender Fields of Madame Loutre, June 2024

Saskia and Konrad are, of course, the designers of Nathhimmel region settings in Second Life and which have appeared in these pages several times since the couple started offering their work as places for Second Life users to visit and photograph;  and the Lavender Fields of Madame Loutre is the latest iteration of their work, having opened at the start of June 2024.

This is a design which – quite genuinely – does not require description or explanation; it speaks beautifully and clearly for itself. The house offers a focal point around which endless stories might be woven about the mysterious MMe. Loutre – who she might by, why the locals think she has magical powers, what has given her a love of lavender – and more. The landscape offers subtle opportunities for photography, whilst dotted around three sides of the region places to sit / rest are awaiting those who seek them. Should props be required for photography, then joining the local group (no charge) will provide rezzing rights – but do please remember to pick your thing up afterwards!

Nathhimmel: Lavender Fields of Madame Loutre, June 2024

The landing point, located in the south-east corner of the region includes a link for obtaining additional information on the region (although the supplied notecard does give details on a previous Natthimmel design), and a teleport link to the region’s gallery – although this was without art at the time of my visit, so possibly awaiting a new exhibition. Neither of these latter points detract from the setting, which offers a relaxing and gentle visit for all who choose to drop in.

SLurl Details

Tutorial: creating a simple (prim) mirror in Second Life

Background notes: this tutorial is provided as a *basic* guide to making a simple mirror in-world using prims, following the release of the Graphics Features viewer. Further:

  • It has been written using the official Second Life Viewer (SLV) from Linden Lab.
  • The steps outlined should apply pretty much to any third-party viewer currently supporting PBR rendering, allowing for differences in UI and menu option presentation.
  • As Firestorm has more extensive changes to some of the UI elements used, I’ll likely provide a dedicated tutorial for that viewer when it releases with PBR support.
Table of Contents

Please note:

  • If you have never created PBR mirrors before, it is recommended you read the entire tutorial including (Please) Read Me and Setting Viewer Preferences.
  • If you wish to know how to set your viewer so you can see PBR mirror effects, you only need to read  (Please) Read Me and Setting Viewer Preferences.

(Please) Read Me

  • Mirrors comprise two elements:
    • The actual object that forms the mirror. The can be a prim, a mesh face, a single object, part of a more complex (e.g. a mirror face in a frame).
    • A PBR reflection probe: a special kind of object new to Second Life under glTF / PBR which, for the purposes of this tutorial, actually generates the “reflections” on the mirror. As such, it is a object linked to the mirror object, above.
    • Creation of both of these is covered in this tutorial.
  • PBR mirrors:
    • Are planar (or flat surface mirrors), they don’t work particularly well on curved surfaces (like car bodies).
    • Are not designed to be worn as avatar attachments, and will not function correctly if used as such.
    • Come in two forms:
      • Static – meaning they will create reflections of just about everything within their sphere of influence except avatars.
      • Dynamic – meaning they will create reflections of just about everything within their sphere of influence including avatars.
    • Can have a performance impact – so should be used in moderation and with consideration of the effect you are trying to achieve, and the impact it may have on viewers close to them.
      • Example: it might sound cool to have a dynamic mirror as the floor or along one wall of a dance club, reflecting all the dancers – but it will likely kill viewer performance for all the dancers on the floor / dancing close to the wall. So if you must do either, use a Static mirror so avatars are not reflected.
  • To help reduce the performance impact generated by mirrors, only one will ever be active at a time in any given viewer. This will generally be the mirror closest the the viewer’s camera position; all others will simply appear shiny.
    • If you place two mirrors, each with its own reflection probe, too close to one another, you may find you get strange results in both of them.
    • For this reason, if you want to make a wall of mirrors, better to make multiple mirror objects and have a single reflection probe aligned with them to generate reflections in all of them.

This Tutorial

This tutorial breaks mirror creation down into four core steps:

  1. Setting your viewer preferences.
    • Some of these steps may only have to be down once; others may require setting each time you work with PBR reflection probes.
  2. Creating the mirror object using a prim & setting its surface material.
    • The required material can be made using either Blinn-Phong (aka “legacy” or “classic” materials) or the new PBR materials capabilities in the viewer.
    • This tutorial provides guidance on both.
  3. Creating the mirror reflection probe.
  4. Finishing touches – positioning the probe relative to the mirror object, and completing the mirror.

Notes:

  • All of the images in the sections below can be opened in their own tab(s) for greater clarity, if required.
  • Important: be aware that if you place a mirror within a room that contains its own reflection probe already, you may get some very odd results, as the mirror surface can also show “reflections” from the room’s reflection probe.

Step 1: Setting Your Viewer Preferences

Setting your viewer to work with mirrors requires two steps:

  • Ensuring the viewer’s Graphic Preferences is set to view mirrors correctly.
    • This generally only needs to be done once, as the setting will persist between log-in sessions.
    • Must be done by anyone wishing to simply view mirror in-world or who wishes to create them.
  • Enabling the ability to select reflection probes so they can be edited and manipulated.
    • This is intentionally a non-persistent setting, and must be enabled once per log-in session whenever reflection probes are to be directly selected / edited.

Graphics Preferences for Mirrors

Note: as per the notes above, these settings need to be active any in viewer that is to interact with to PBR mirrors.

  • Open up Preferences → Graphics.
  • Click the Advanced Settings button to open the Advanced Settings Preferences Floater. Now locate and set the following:
    • Mirrors checkbox – make sure it is checked, otherwise PBR mirrors will only appear as shiny surfaces.
    • Reflection Detail:
      • If you wish to view everything a mirror is designed to reflect, whether it is static or dynamic, set this drop-down to Static + Dynamic.
      • If your system struggles with performance as a result of mirrors, set this to Static, so no avatar reflections will be rendered.
    • Reflection Coverage: make sure this is set to Full Screen.
    • Mirror Resolution set the resolution your viewer will use to display mirror reflections. Higher resolutions will obviously be sharper, but may have an increased impact on performance when rendering mirror reflections.
    • Mirror Update Rate: set the frequency with which you wish you update to update rendered mirror reflections. Again, the more frequent the updates, the more realistic the reflections – and the potential for greater impact on viewer performance.
 Setting your viewer’s Graphic Preferences to see / create mirrors

Setting the Viewer so You Can Select Reflection Probes

Reminder: You only need to do this if you are going to be selection and editing / moving any reflection probe. It is a non-persistent setting, so must be performed once each log-in session when you wish to select and edit a reflection probe of any description.

  1. Go to the Build menu at the top of the viewer window.
  2. Click the menu to open it, scroll down to Option to open that sub-menu.
  3. Locate the option Select Reflections Probes and click it to check it.

Step 2: Making the Mirror & Setting the Surface Material

Creating the Mirror Object

  • Create a cube prim and size it as required. Keep the Build / Edit floater open after creating and sizing your prim.
  • Click on the Texture tab in the Build / Edit floater, and (also see image, below):
    1. Click on the texture swatch to open the Pick: Texture floater.
    2. In the Pick: Texture floater, click the Blank button.
    3. This will cause the texture swatch in the Texture picker to turn white (and the mirror object itself).
    4. Click the OK button in the Pick Texture floater to close it.
  • You now need to set the object’s surface materials either by using Blinn-Phong (“legacy”) materials (below) or by using PBR materials.
Setting the mirror object to a blank white face / object

Setting the Surface Material Using Blinn-Phong

  • Edit the mirror object just created and select the front face. Click on the Texture Tab of the Edit floater.
  • In the Texture tab of the Edit floater, click on the Shininess (Specular) radio button (arrowed in the image below).
  • Now (as per the image below):
    1. Click on the texture swatch to open the Pick: Texture floater.
    2. In the Pick Texture floater, click the Blank button.
    3. This will cause the texture swatch in the Texture picker to turn white.
    4. Click the OK button in the Pick Texture floater to close it.
    5. This will update the Texture tab to display new options: Glossiness, Environment and Color.
  • Set Glossiness and Environment each to 255 and ignore Color.
  • Your mirror object should now be shiny – don’t worry about the appearance, it will soon improve.
  • Close the Edit floater.
  • Continue with Making the Reflection Probe.
Setting the mirror object to have a shiny surface using Blinn-Phong (aka “legacy” or “classic”) materials (click to enlarge in new tab, if required)

Setting the Surface Material Using PBR

Refer to the image below when following these instructions.

  • Edit the mirror object just created and select the front face. Click on the Texture Tab of the Edit floater.
    1. Click on the Material drop-down.
    2. Select PBR Metallic Roughness from the drop-down.
  • The Texture Tab display will update. Now take the following steps:
    1.  Click on the empty texture swatch or click on Choose from Inventory to open the Pick: Texture floater.
    2. Click the Blank button in the Pick: Texture floater this will update the texture swatch in the floater (and in the Texture tab).
    3. Click the OK button in the Pick: Texture to close the floater.
    4. The Edit Selected button in the Texture tab will now be enabled.
    5. Click Edit Selected to open the Editing Materials floater.
    6. In the Editing Materials floater, change the value of Roughness Factor to 0.0.
  • Your mirror object should now be shiny – don’t worry about the appearance, it will soon improve.
  • Close the Edit floater.
  • Continue with Creating the Reflection Probe (below).
Setting the mirror object to have a shiny surface using PBR materials (click to enlarge in new tab, if required)

Step 3: Making the Reflection Probe

Reminder: When creating / editing reflection probes, always make sure you have enabled Build Menu → Options → Select Reflection Probes. Failure to do so will leave you unable to properly edit any reflection probes you create.

  • Create a cube prim.
  • Important:
    • Rotate the prim so that the TOP face of the cube is facing the same direction as the surface of your mirror (that is, the blue arrow of the gizmo tool is pointing away from the face of the mirror object).
    • Make sure it is perfectly at right angles once rotated.
  • Click on the Features tab of the Build / Edit floater:
    1. At the bottom of the tab, check the box labelled Reflection Probe.
    2. A pop-up will generally be displayed, read and understand it (you can check the Don’t Show box if you do not want to see this warning in future), then click OK to convert the prim to a reflection probe.
    3. This will enable the options at the bottom of the Features tab.
    4. Click on the Sphere drop-down and change it to Box.
    5. Click on the Static drop down and:
      • If you wish the mirror to only reflect the objects in front of it, and not avatars as well, select Mirror (Environment).
      • If you wish the mirror to reflect avatars as well, select Mirror (Everything).
Setting the reflection probe properties (click to enlarge in new tab, if required)

Step 4: Finishing Touches

Positioning and sizing the mirror probe to give the required reflections on the mirror object.
  • With the reflection probe selected, make sure the Move radio button at the top left of the Edit floater is enabled.
  • Position the reflection probe so it is overlapping the mirror such that the red arrow / line of the gizmo move tool is just in front of the mirror object.
  • Click the Stretch Radio button in the top of the Edit floater and stretch the reflection probe to fit the mirror object, giving you a mirror-like reflection.
    • Note: The exact size of the reflection probe and its position / depth relative to the front of the mirror might require a little juggling to get right.
  • When done correctly, you should have a basic mirror reflecting the space around you.
  • Finally, link the mirror components together as a single object – but make sure the reflection probe is not the root of the linkset for ease of future moving / editing the mirror.
  • Name the mirror and Take it (or a copy) back to inventory for future use (if required) and / or place the original where you wish to use it.

Note:

  • Because the reflection probe will be deeper than the mirror, anything shiny that is also encompassed by it and in the same plane will also act as a mirrored surface.
  • Similarly, if you have several “mirror” surfaces in the same plane as the reflection probe (e.g. several mirrors on the same wall), you can extend the mirror’s size to encompass all of them, thus use as single reflection probe for multiple mirrors.

Video and Final Words

For those who prefer to watch, the video below – courtesy of Ascension Media and Lighting (You Tube) – goes through all of the above steps for creating a mirror object and its reflection probe. Other videos are available, but I felt this one was very easy to follow, especially given it does not rely on Voice or text (but best to make it full screen to see everything).

Again, this is a basic (if wordy!) tutorial. There is a lot more that can be done when creating mirror objects. and I’m not attempting to cover everything here; this is simply to get people started. Remember that mirrors do have limitations imposed, and can impact viewer performance – so use them wisely!

Finally, note that mirrors are a specialised use for reflection probes – the latter can be quite intrinsic to general reflections and lighting in Second Life. To get a feel for how they can be used, I recommend taking a read of Reflection Probes and You by Kristy Aurelia.

2024 SL SUG meetings week #24 summary

Bella’s Lullaby, May 2024 – blog post

The following notes were taken from the Tuesday,  June 11th, 2024 Simulator User Group (SUG) meeting. They form a summary of the items discussed, and are not intended to be a full transcript, and were taken from my chat log and the video by Pantera – my thanks to her as always for providing it.

Meeting Overview

  • The Simulator User Group (also referred to by its older name of Server User Group) exists to provide an opportunity for discussion about simulator technology, bugs, and feature ideas.
  • These meetings are conducted (as a rule):
  • Meetings are open to anyone with a concern / interest in the above topics, and form one of a series of regular / semi-regular User Group meetings conducted by Linden Lab.
  • Dates and times of all current meetings can be found on the Second Life Public Calendar, and descriptions of meetings are defined on the SL wiki.

Simulator Deployments

  • On Tuesday, June 11th, the Main SLS channel was restarted without any deployment due to a bug in the Spring Break release.
  • On Wednesday, June 12th, all RC channels should be updated with the bug fixed version of Spring Break, if it clears QA.

SL Viewer Updates

The rest of the current official viewers in the pipeline remain as:

  • Release viewer: Maintenance X RC (usability improvements), version 7.1.7.8974243247, dated May 8 and  promoted May 13 – no change.
  • Release channel cohorts:
    • Maintenance C RC (reset skeleton in all viewers), version 7.1.7.8820704257, May 6.
  • Project viewers:

In Brief

Please refer to the video for the following:

  • The server team has recently switched over to Gitflow as their workflow. This may enable the team to provide very bleeding-edge simulator channels on Aditi (the Beta grid), where the curious can poke at code that is mostly untried and certainly untested.
  • For the current week, the server team is engaged on a bugsmash run: suspending work on their core projects and spending a week(ish) focusing on resolving bugs and smaller features for inclusion in a future simulator release. Further requests for simulator-side fixes were taken at the meeting.
  • Monty’s work on smoothly the impact of teleports into regions is starting on its way to being included in a simulator update – no time frame on when it will surface, however.
  • Leviathan Linden pointed out that there is a public github repository for the official “master message template”. This is the file which describes all of the “message” blocks that can be packed in the UDP SL protocol, both between the viewer and the server and also between the backend servers, and which can be used during local builds of the viewer. However, the  repository has been stale for 7 years, and he is now updating it with up-to-date information.
  • A discussion on avatar physics shapes, physics on avatar attachment (none), avatar physics shapes and hit boxes (the latter related to future Combat 2.0 work).
  • General discussions on features and options (not all of them simulator-related).

† The header images included in these summaries are not intended to represent anything discussed at the meetings; they are simply here to avoid a repeated image of a rooftop of people every week. They are taken from my list of region visits, with a link to the post for those interested.

2024 SL viewer release summaries week #23

Logos representative only and should not be seen as an endorsement / preference / recommendation

Updates from the week through to Sunday, June 9th, 2024

This summary is generally published every Monday, and is a list of SL viewer / client releases (official and TPV) made during the previous week. When reading it, please note:

  • It is based on my Current Viewer Releases Page, a list of all Second Life viewers and clients that are in popular use (and of which I am aware), and which are recognised as adhering to the TPV Policy. This page includes comprehensive links to download pages, blog notes, release notes, etc., as well as links to any / all reviews of specific viewers / clients made within this blog.
  • By its nature, this summary presented here will always be in arrears, please refer to the Current Viewer Release Page for more up-to-date information.
  • Note that for purposes of length, TPV test viewers, preview / beta viewers / nightly builds are generally not recorded in these summaries.

Official LL Viewers

  • Release viewer: 7.1.6.8745209917, formerly the Maintenance Y/Z RC ( My Outfits folder improvements; ability to remove entries from landmark history), dated April 19 and promoted April 23 – No Change
  • Release channel cohorts (please see my notes on manually installing RC viewer versions if you wish to install any release candidate(s) yourself).
  • Project viewers:
    • No updates.

LL Viewer Resources

Third-party Viewers

V6-style

  • Lovesense Viewer version 1.0.1, June 5  – no release notes.

V1-style

  • Cool VL Viewer Stable branch updated to version: 1.32.0.26 (PBR); and Experimental to version 1.32.1.9 (PBR) on June 8 – release notes.

Mobile / Other Clients

  • No updates.

Additional TPV Resources

Related Links

SL21B: Community Round Table & Town Hall Sessions

via Linden Lab

June 2024 will mark the 21st anniversary of Second Life opening to public access – and to mark it, Linden Lab has announced the 2024 Birthday celebrations as being marked across an entire month – from Friday, June 21st through until  Sunday July 21st, 2024.

Theme

This theme for Second Life’s 21st birthday (SL21B) has been given as Elements, which the Lab describes thus:

This theme invites us to explore the fundamental components that make up our vast virtual landscape and the diverse communities within it. From the fiery passion of creators and artists to the fluid adaptability of our social environments, from the solid bonds within our communities to the fresh breezes of innovation that propel us forward, “Elements” is a celebration of the core forces that shape our experiences in Second Life.

– From the official SL21B announcement blog post

Community Round Table and Town Halls Sessions

For the last several years, the birthday celebrations have included a series of sessions called Meet the Lindens: opportunities for people to hear from and put questions to Linden Lab personnel, generally with questions submitted beforehand. In 2023, these Meet The Linden sessions morphed into Lab Gab sessions, and this year they are being referred to as Town Hall meetings, all to be held live at the SL21B event, and which will include the second of the Community Round Table events, at which questions can be specifically put to members of the Linden Lab leadership team.

It is not clear as to who will be representing the Lab at each of these sessions, or when the sessions will be held. In the announcement that they would be taking place, the Lab only promise details to come and indicate:

The founder of Second Life Philip Linden and Executive Chairman Oberwolf Linden will be among the participants, which also include many leading executives and team leads from Second Life’s Product, Engineering, and Product Operations departments.

However, the blog post does include a link to a form those wishing to ask questions of the Lab can complete and submit, which includes the opportunity to indicate to whom the question should be addressed, if required (although a little difficult outside of the usual suspects for these events given that, as noted, exactly who will be attending them has yet to be announced).

BUT – if you do wish to submit a question, then hop over to the form and do so, and note that it will remain available until Thursday, June 20th, 2024.