![]() Monday, January 1st, 2018 saw the long-await release of Catnzip R12 – the release coming a little over a years since the last update – and slightly earlier than planned, thanks to the auto-update!
Monday, January 1st, 2018 saw the long-await release of Catnzip R12 – the release coming a little over a years since the last update – and slightly earlier than planned, thanks to the auto-update!
As one might expect, this update brings a large number of user-facing updates, which are quite comprehensively documented in the accompanying release notes, and rings Catznip up to parity with the current LL released viewer code base 5.0.9. It is currently only available for Windows, in 32-bit and 64-bit versions, the latter conforming to the Lab’s Alex Ivy 64-bit build.
Given the depth of the release notes, I’m providing an overviews of just some of the updates here:
- Quick Preferences updates.
- Inventory Management improvements.
- Chat / group chat updates.
For the rest of the changes, please refer to the release notes.
Quick Preferences Updates
Main Quick Preferences Panel
The main Quick Preference panel sees a number of small updates and improvements:
- The short cut
CTRL-SHIFT-P no longer conflicts with Print Selected Object Info (the latter nowALT-SHIFT-P). - The panel can now be minimised via a button (item 1 in the image below)
- The Other Section of avatar rendering now includes a button to open the Exceptions panel for listing exceptions to your avatar rendering settings (item 2 in the image below)
- The worn items tab button (item 3 in the image below) now displays a tab with button to display sort options for the items listed in it (item 4 in the image).

Quick Inventory
We all use HUDS – HUDS for AOs, HUDs for mesh bodies, HUDs for mesh heads, HUDs for appliers, etc.). However, wearing the all, all the time not only clutters the viewer’s window, it actually eats texture memory. We also have certain things we like to wear all the time. However, even if you dump all of your HUDs into a single folder in inventory, finding the one you want can be a pain.
Catznip R12 helps ease some of this pain through the provision of a Quick Inventory function. Used via Quick Preferences, this can afford faster, cleaner access to your HUDs, etc. To use it:
- Create a folder anywhere in your inventory (if you don’t already have one ready to go).
- Drag and drop your HUDs an bits (or links to them ) into it.
- Open Quick Prefs and click on the inventory button (item 1 in the image below).
- Click on the Folder <click to select> button (item 2 in the image below) to open a folder picker.
- Click on the folder with your HUDs and bits to select it.
- The contents of the folder will be displayed in the inventory tab of Quick Preferences each time it is opened, allowing you to easily Wear / Add items from it (right-hand picture in the image below).
- The folder can be changed at any time by clicking on the folder button in the inventory tab.

Inventory Management
Inventory management updates make up the core of the R12 changes, and these come in a number of improvements, from how you chose to receive goods purchased in-world in your inventory or passed to you by others, through searching inventory to where boxed items are unpacked and stored in your inventory.
Accepting In-World Purchases and Inventory Offers
With Catznip R12 you can now designate where the items you purchase in-world or are given by others, are stored within your inventory. So, for example, you could opt to receive all your in-world purchases in a folder you call “Shopping Bag”, any demos you grab in a folder called “Demos”, anything your offered by friends in “From Friends”, and so on. How you organise things is entirely up to you. This means both the Pay and Buy floaters in Catznip R12, together with the Accept Inventory floater now offer you the ability to select where incoming items are going to be stored in your inventory.
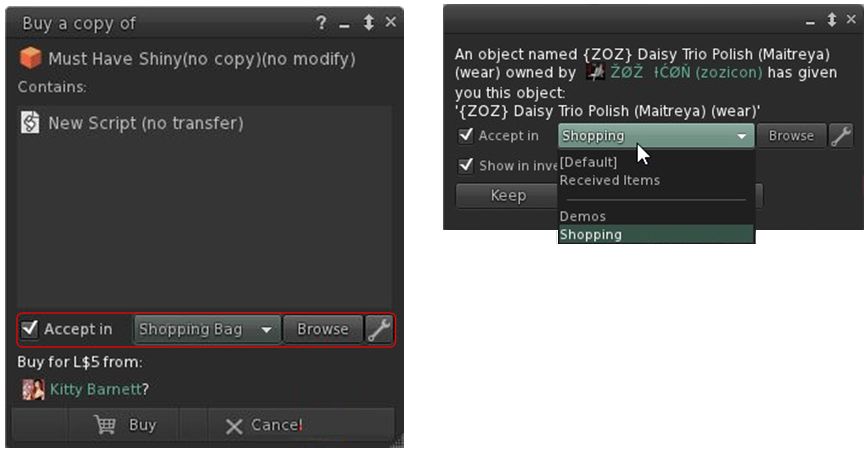
The options should be fairly self-explanatory. Check Accept in and the remaining options are activated. The drop-down will display a list of folders you have opted to allow incoming items to be delivered (show in the image on the right), the browse button allows an alternative to you list of folders in the drop-down to be selected, and the spanner button allows you to establish your list of destination folders. The roadmap of these various options is shown below.
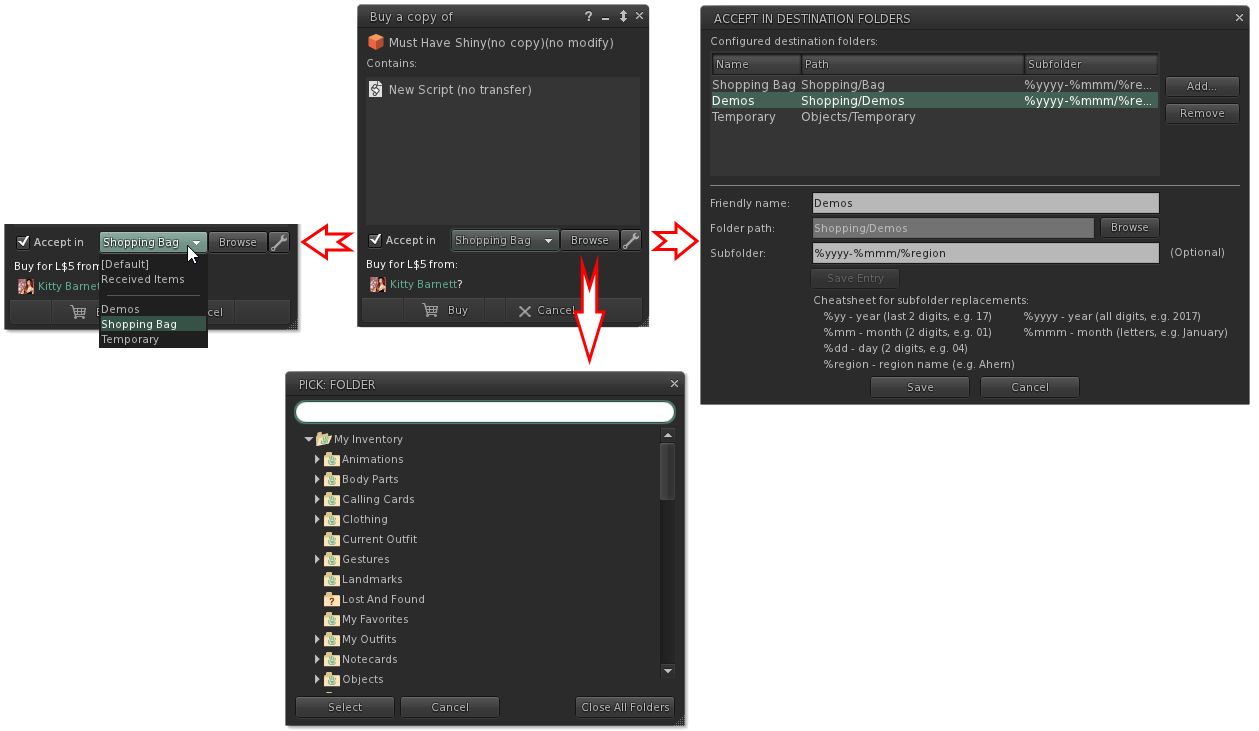
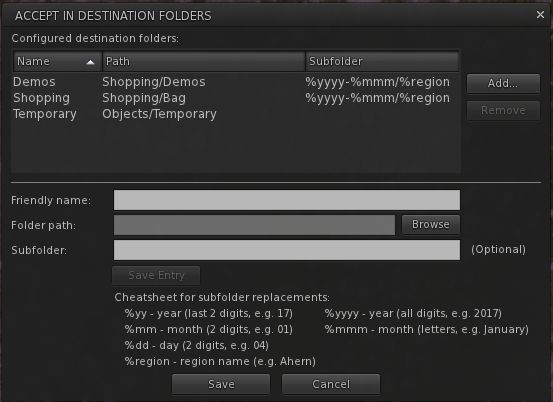
Not only can you select the folders into which you want incoming purchases to go, you can also set Catznip R12 to dynamically create new folders in which to place incoming items. This means, for example, that if you got to a big shopping event at one location, you can set the viewer to deliver all the demo you obtain / items you purchase into folders define by – say – the month in which you got them, and the location where they were obtained.
So, for example, if in April you go to shopping event X on region YYYY, and grab a load of demos, and then later in the month go to event A on region BBBB and grab more demos, you can have them delivered to sub-folders in your “Demos” folder, respectively labelled “April 2017 YYYY” and “April 2017 BBBB” – both of which are dynamically created by Catznip as they are needed. So even if you don’t get around to trying them for days after your visit, you can quickly and easily locate the demo items without have for fiddle around searching for folders and objects.
Continue reading “Catznip R12: inventory, shopping and more”
