SL projects update week 38 (1): server releases, viewer, and more

Server Deployments – Week 38

As always, please refer to the week’s forum deployment thread for the latest news and updates.

Second Life Server (SLS Main) Channel – Tuesday September 17th

The Main channel received the HTTP updates  previously deployed to Magnum in weeks 36 and 37. Overviews of these changes, which will be transparent to users pending viewer-side updates, can be found here and here. These changes introduce new capabilities for mesh fetching operations and should lead improvements in the reliability in viewer / server connectivity when fetching mesh and textures as the viewer-side updates are released.

Release Candidate Channels – Wednesday September 18th

  • BlueSteel and LeTigre should remain on the same maintenance package as week 37, but additionally should receive two updates to the package:
    • A fix for a newly discovered crash mode
    • The HTTP updates deployed to Magnum in weeks 36 and 37 and to the Main channel on Tuesday September 17th.
  • Magnum should receive a new maintenance package which again includes the BlueSteel / LeTigre updates, and includes a number of crash fixes and an update to parcel access priorities “making it so that avatars who are on the ‘allowed’ list can bypass some of the other access restrictions (payment info on file was listed specifically)”

Commenting on the crash mode fixed on BlueSteel  / LeTigre, Andrew Linden said, ” The crash bug I fixed was actually rather rare… a corruption of the terrain data when building packets. Happened maybe… 5 times in three weeks. But we thought maybe it was related to some interest list changes so I looked into it anyway.”

Viewer Updates

Maintenance RC Release

A new RC viewer reached the release channel on Friday September 13th. Second Life RC viewer 3.6.6.280939 includes the following core updates:

  • Automatic avatar render limit and feedback system
  • Support for the additional LSL particle parameters.
  • rendering optimizations
  • avatar render cost information
  • simple impostors
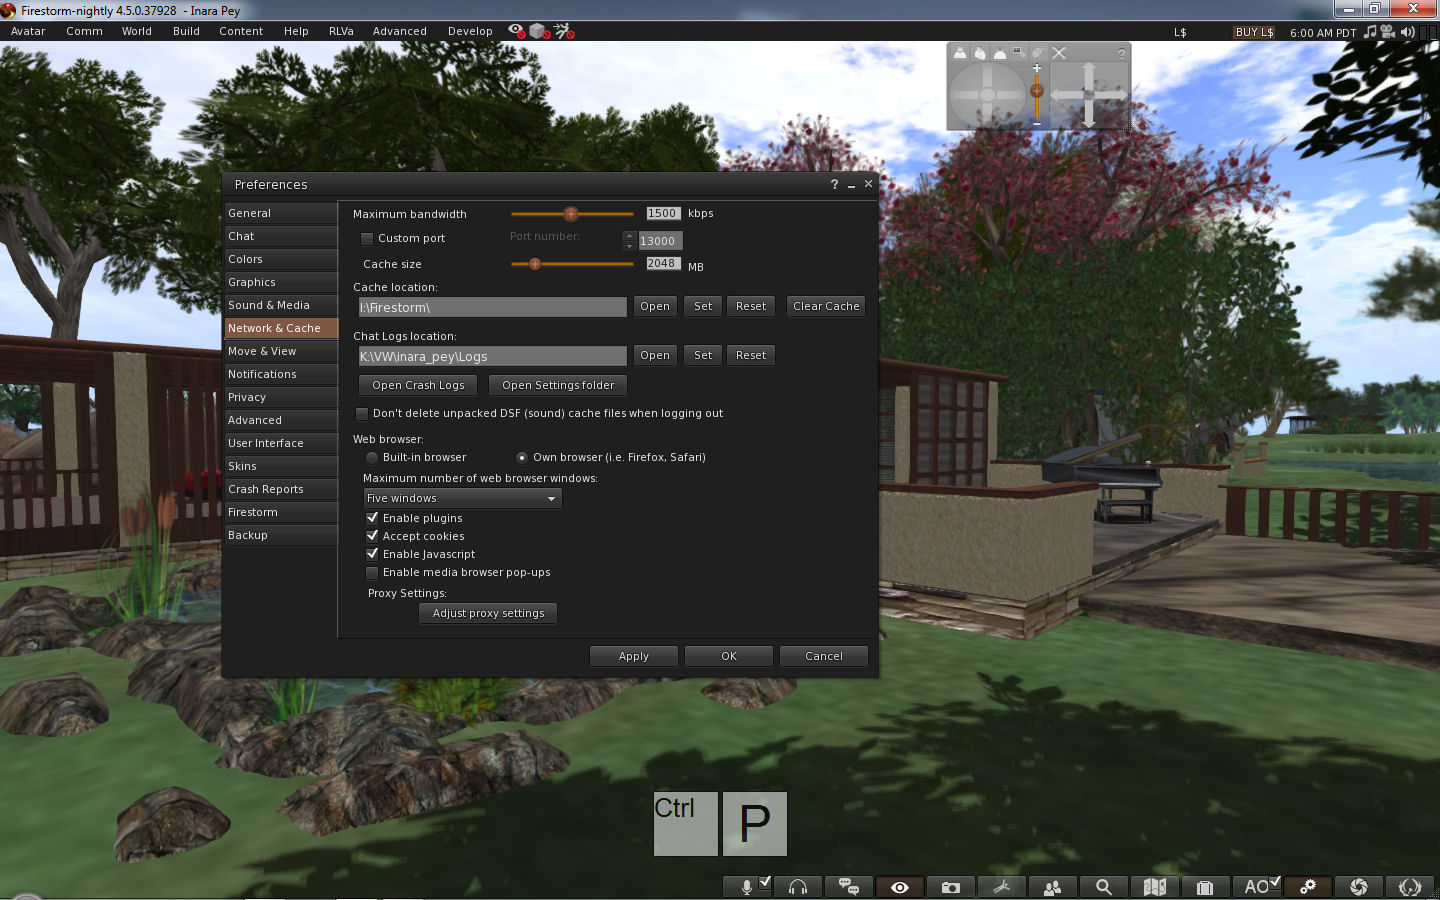
  • graphics pref update
  • new debug setting “RenderAutoMuteRenderCostLimit” sets render cost cut-off point (default 0 = disabled cutoff check)

The new particle options comprise:

  • Glow
  • Ribbon effects
  • Blending options.

The SL wiki includes full details of these new particle parameters.

  • The glow effect basically looks the same as the prim glow setting on prims, adding PSYS_PART_START_GLOW and PSYS_PART_END_GLOW, which take a float in the 0.0 to 1.0 range
  • The particle blending takes 2 parameters, PSYS_PART_BLEND_FUNC_SOURCE and PSYS_PART_BLEND_FUNC_DEST, and each of those takes one of the 8 ‘values’ listed underneath, so there are actually 8*8 = 64 blend options. It exposes OpenGL’s glBlendFunc to LSL, see the glBlendFunc documentation at http://www.opengl.org/sdk/docs/man/xhtml/glBlendFunc.xml
An example of how the now ribbon capabilities might be used in SL, showing the arc of the sword through the air, supplied by Maestro Linden (courtesy of Hollowfear.com)
  • The new ribbon capability should allow for much better particle effects for things like ropes and chains links between objects (amount other things), using a ” go-from” prim/position (the prim centre), and a “go-to” prim/position (defined by PSYS_SRC_TARGET_KEY), the advantage being there would no longer be any gaps in the particle stream. However, there may be times when the ribbon effect may not be facing your camera (so there may be times when you need to reposition your camera in order to see the effect).

Continue reading “SL projects update week 38 (1): server releases, viewer, and more”

Keshiki: screen capture for tutorial makers and more

Yuzuru Jewell has been keeping himself busy. As well as releasing the Idobata text-to-speech application on Monday September 9th, which I was able to preview, he has also released a further application under the Kanae Projects brand.

Keshiki (景色 – meaning “landscape” or “scenery”) is a little different from his other products reviewed in these pages in that it isn’t aimed directly at virtual worlds – although it can easily be used with them. It’s a screen capture utility, and as such has a wide variety of potential uses, although Yuzuru specifically points to its potential in creating tutorials.

As I already use Easy Screen Capture, I was interested in taking Keshiki  for a test-drive and comparing the two.

Keshiki is available for both Windows 7 32-bit and 64-bit as a ZIP download, containing  a readme file and the program executable. No installation is required; simply drop the EXE file in to the folder from which you want to use it.

keshiki-2
Keshiki launches in a minimised mode (or did for me) – look for it on the taskbar

I’m running Windows 7, and double-clicking the program icon launched Keshiki in minimised mode, displaying a small icon on the taskbar. Clicking this opens the application’s Set-up window, while right-clicking on it provides quick access to a number of options (see below).

Set-up Options Run-through

Keshiki set-up window

The Set-up window allow you to define how you want Keshiki to work – which hot key will activate it, what will be captured, where the captured images will be saved, etc.

At the top of the window are a set of buttons:

  • Default – reset Keshiki to its default settings
  • Performance Option – access the Windows performance options to tune Keshiki
  • Create(/Delete) Start-up link – create or remove a link to start Keshiki at windows start-up
  • Cancel – quit out of any changes you have made to the set-up options (closing the window will do the same)
  • OK – confirm and update Keshiki’s settings

The Capture drop-down allows you to define what it is you which to capture:

  • Active Window – captures the active window
  • Active Client – captures the client area of the active window.
  • Desktop – captures the desktop area which contains the tool bar. If you use multiple monitors, the monitor in which the mouse pointer is ositioned will be captured
  • Work Area – captures your work area without the tool bar. Again, if you use multiple monitors, the monitor in which the mouse pointer is positioned will be captured
  • Pop-up menu – any displayed pop-up menu
  • Thumbnail on Taskbar – captures the taskbar thumbnail for an application.

Additionally, using the Options section, you can define what else Keshiki should capture – the mouse pointer, any visible tool tips, etc. Which of these options is available will depend on the type of capture you have set using the drop-down menu.

Other options within Set-up allow you to:

  • Specify a delay (in seconds) between the hotkey used to make a screen capture being pressed and the actual capture itself, allowing you to press other keys and optionally have them recorded in the image as well, using the Keyboard / System options. This is a very handy option if you’re producing a tutorial, as keystrokes can be recorded directly onto your screen captures in one of six pre-defined places (top left/centre/right; bottom left/centre/right)
  • Define the hotkey used to make a capture (Print Screen is the default)
  • The image format for captures (PNG – default; JPG or BMP)
  • Where images are saved to on capture  – you can use one of three default options, your desktop, Documents folder or My Pictures folder, or you can specify a folder on your system.
Keshiki can capture keystrokes for you for use in tutorials. Make sure you keep the required keys pressed until the timer countdown has ended.
Keshiki can capture keystrokes for you for use in tutorials. Make sure you keep the required keys pressed until the timer countdown has ended. Note that the position of the keys in the image can be adjusted within the six default placement areas using the Height and Margin options in the set-up window, and the colour of the keys changed using the Alpha option.

Pop-up Menu

The pop-up menu from the Taskbar icon

Once you have set-up Keshiki, right-clicking on the program icon in the Windows taskbar displays a pop-up menu you can use to quickly toggle between capturing the active window or active client and activate / turn off any other options you’ve set (such as capturing keystrokes) without having to open the application set-up window.

Again, which of the options is available does depend on whether you have set them up through the main set-up window. The menu also includes an option to open the set-up window if you find you need to change any options.

Using Keshiki

You don’t need to have the application window open in order to use Keshiki. Once you’ve set your preferences, clicking OK will save them and minimise the application. To capture an image, simply press your defined hotkey. The image is automatically saved to your defined save location, and additional captures are automatically sequentially numbered. It’s as simple as that.

Feedback

Keshiki is an extremely versatile screen capture tool with some nice touches. When compared to Easy Screen Capture ($29.95), Keshiki offers a broadly similar range of capture options with the exception of being able to capture a user-defined area of an application or window(s)., although it does offer the option of capturing keystrokes, which Easy Screen Capture hasn’t got, so it’s swings and roundabouts.

I did encounter problem trying to capture a taskbar thumbnail. I’m actually assuming that as such a capture is shown in the Keshiki documentation, the problem lies on this side of the keyboard, rather than in the application itself. Other than this, Keshiki did “exactly what it says on the tin”, as the saying goes.

The Set-up /application window makes it easy to change things on the fly without having to select menus, pull-up dialogues, etc., making Kehiki very user-friendly. The one thing I would possibly suggest adding would be some kind of feedback mechanism to indicate a capture has been successful – a sound would do. As images are grabbed and automatically saved, there is otherwise no indication that a capture has been successful, which might cause confusion / instil a need to constantly check that the last capture did work.

Overall, a handy tool if you’re looking for a free a screen capture utility with a good degree of flexibility (just remember the donate options on Yuzuru’s website if you do find Keshiki to your liking :).

Keshiki can be downloaded from the Kanae projects website – links below.

Related Links

Firestorm meeting 14th September, 2013 – video and transcript

firestorm-logoOn Saturday 14th September 2013, the Firestorm team hosted another informal question-and-answer session. While the meeting was recorded, the Firestorm team are aware that many of their users have hearing difficulties, and / or prefer to read text. It is because of this that this transcript has been provided. When reading it, please remember:

  • This is not a word-for-word transcript of the entire meeting. While all quotes given are as they are spoken in the video, to assist in readability and maintain the flow of conversation, not all asides, jokes, interruptions, etc., have been included in the text presented here
  • If there are any sizeable gaps in comments from a speaker which resulted from asides, questions to other etc,, these are indicated by the use of “…”
  • Timestamps are provided as guidance should anyone wish to hear the comments in full from any speaker on the video
  • Questions were asked in chat while speakers were talking. This inevitably meant that replies to questions would lag well behind when they were originally asked. Therefore, to provide context between questions and answers, questions in the transcript are time stamped at the point at which each is addressed by a member of the Firestorm team
  • Some questions were asked and answered purely in text. These have been excluded for one of two reasons. Either a) they lacked context with the voice conversation, or b) the seating arrangements in the auditorium meant there were some questions or answers which didn’t appear in my local chat window.

Please note: This transcript is provided for informational purposes only. As such, questions on technical issues relating to Firestorm and  / or project-specific questions cannot be answered here unless one of the Firestorm team drops by.

Video courtesy of Northspring

Continue reading “Firestorm meeting 14th September, 2013 – video and transcript”

Viewer release summary 2013: week 37

This summary is published every Monday and is a list of SL viewer / client releases (official and TPV) made during the previous week. When reading it, please note:

  • It is based on my Viewer Round-up Page, a list of  all Second Life viewers and clients that are in popular use (and of which I am aware) and which are recognised as adhering to the TPV Policy
  • By its nature, this summary will always be in arrears
  • The Viewer Round-up Page is updated as soon as I’m aware of any releases / changes to viewers & clients, and should be referred to for more up-to-date information
  • The Viewer Round-up Page also includes comprehensive links to download pages, blog notes, release notes, etc., as well as links to any / all reviews of specific viewers / clients made within this blog.

Updates for the week ending: September 15th, 2013 (with extras)

Official LL Viewers

LL Viewer Resources

Third-party Viewers

V3-Style

  • CtrlAltStudio Experimental version (Oculus Rift): updated on September 15th to version 1.1.0.34268 – core updates: added Max OSX support; added looking around with the Rift in 3rd person view; various fixes (release notes)

V1-Style

Other Clients

  • Mobile Grid client updated to version 1.21.1203 – core updates: people search fix (not showing results with less than a 100 entries)

Additional TPV Resources

Deprecated / Discontinued Viewers

  • Niran’s Viewer – discontinued as of version 2.2.0.2701 & superceded by Black Dragon
  • SLiteChat removed from listing; no updates since 2011, removed from TPV Directory & no response from developer
  • SL Second Life Beta viewer – deprecated as of version 3.6.2.278491, July 15, 2103
  • SL Development viewer – deprecated as of version 3.5.2.274629 April 24, 2013
  • Zen Viewer – discontinued by developer and no longer available, January 27th, 2013
  • Phoenix viewer – development and support ended on December 31st, 2012

Related Links

For The Few

High Flightclick to enlarge

In the artist’s garden

Artist's Garden
Artists Garden

In July I paid a visit to The Untroubled Sound, Arty Skytower’s beautiful region modelled after New Zealand’s Marlborough Sounds. It’s a popular destination for SL photographers, and rightly so.

As a result of my visit, Arty dropped me a line inviting me to take a look at another region he’s been developing, the Artist’s Garden SL Botanicals New Zealand Bush Walk. It’s another beautiful  place, a landscaped coastal region with paths and walks which allow Arty to demonstrate his range of New Zealand focused flora and his landscape accessories.

Artist's Garden
Artists Garden

You arrive on wooden walkway which follows the coast of a bay, leading back to a white-boarded house in one direction, and in the other, onwards around a headland to a small beach area, before allowing visitors to explore onwards around the island.

There are some remarkable examples of New Zealand flora to be seen here; everything from plants through to trees (I love the Pohutukawa tree on a rock), any of which can be purchased via the packing cases you’ll encounter as you explore.

Artist's Garden
Artists Garden

Follow the paths around the island and you’ll find much to delight; places to sit, places to watch the world go by, and places to simply enjoy your surroundings, including a delightful central garden area with a large body of water for the local ducks to enjoy. I do recommend that when exploring, you have in-world sounds enabled; there is a wonderful soundscape to accompany the region.

It’s in the garden, located behind the main house, that artwork by FumbleBee (RL artist Janet Marshall) can be found. These are paintings of various scenes from England’s Cornwall, and which are also available for purchase. Inside the house itself are more examples of Arty’s flora and displays of Fumblebee’s art – stunning studies of birds native to New Zealand.

Artist's Garden
Artists Garden

Those who have visited The Untroubled Sound will find much that is familiar here; the region appears to be in a coastal sound, boats are present, both tied-up at the quay or anchored in the bay. There are similar waterfront elements with paths, the house and style of sim surround. But this is not to say the Artist’s Garden is merely a copy of The Untroubled Sound; far from it.

By using similar elements and style, Arty and FumbleBee have created a somewhere which feels as if it is a part of the same landscape as The Untroubled Sound; that if you were to cross the water and follow the coast around the high, rugged hills surrounding the place, you’d eventually find your way into another drowned valley – and to The Untroubled Sound itself. This feeling of continuity between the two does much to lend them to a side-by-side visit if you’ve never been to either.

For the SL photographer, the region offer as many opportunities as The Untroubled Sound.  Arty has supplied the region with a foggy default windlight, suggestive of an autumnal evening, but the region lends itself to a huge number of windlight options, while the sim surround positively invites tweaking the cloud coverage and planning with different windlight options to invoke different moods.

Artist's Garden
Artists Garden – one of Morgan Garret’s stunning birds

All-in-all another worthwhile destination which comes highly recommended. Enjoy!

Related Links