
Tag: My SL
Product review: the WALT Sea Roo in Second Life
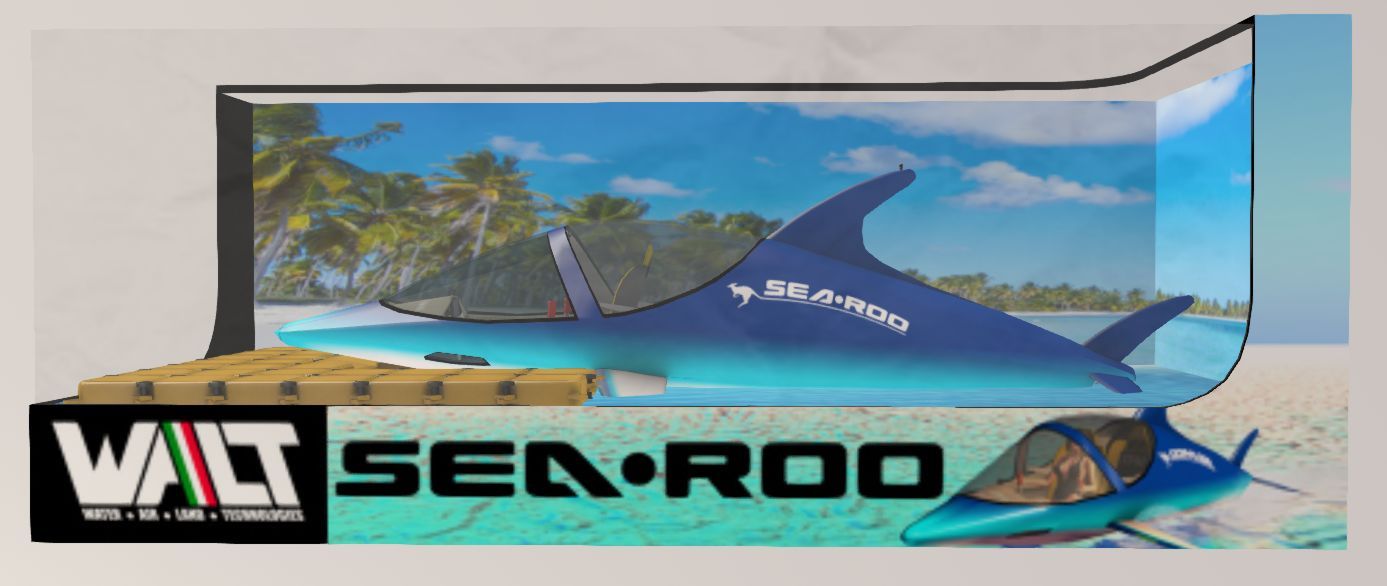
It’s taken a while to reach the market place since I first wrote about it under the prototype name of WaveHopper (see Previewing a little wave hopping in Second Life), but Ape Piaggio’s WALT (Walter, Air Land, Technologies) branded SeaRoo has reached the market. The delays in the release have been due to some final fine-tuning of the vehicle and its scripting – and have also allowed Ape to add further animations as well as a number of further options for the vehicle.
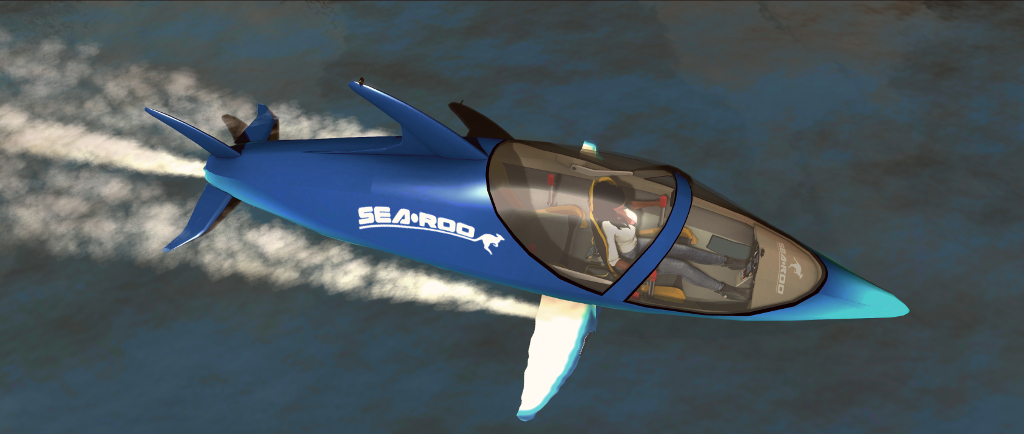
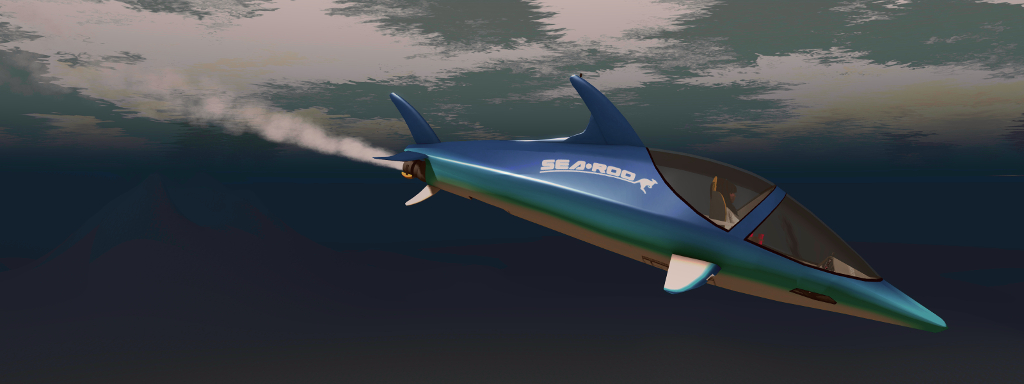
Based on the physical world Innespace Seabreacher, a two-seat semi-submersible personal watercraft that is shaped like a Dolphin and mimics its movement on and under the water, the SeaRoo behaves like a speedboat and can make short dives (up to 60 seconds at a time) underwater. It can be piloted in both Mouselook (the dashboard has working instruments) and third-person views, making it an all-around leisure craft.
Priced at L$3,000, the SeaRoo is delivered in a package that comprises the vehicle, a system to build one or more SeaRoo mooring points (and which includes a fuelling station), an obstacle / race course building set, the SeaRoo Key (described below), a tool kit for adding custom animations (it comes with a range of single and couple animations for when it is not being piloted) and a comprehensive set of manuals, the main user guide of which includes a link for downloading a set of .PST files should you wish to create paint schemes for the vehicle.

I’m not going to run through absolutely everything with the SeaRoo – the user guide is comprehensive in that regard, but it is worth covering come of the highlights.
SeaRoo Controls and Operation
By default, the SeaRoo’s controls match those of an aircraft:
- The ◀ and ▶ or A and D keys turn the SeaRoo left or right when in motion.
- The ▲ and ▼ or W and S keys pitch the nose down (dive) or up (surface / jump)
- The PAGE UP and PAGE DOWN keys or E and C increase and decrease the throttle respectively, with PAGE DOWN / C putting the vehicle into reverse from 0% throttle.
- A double tap on PAGE UP / W will set the throttle to 100%.
- Pressing PAGE UP and PAGE DOWN (or E and C) simultaneously will cut the throttle to 0%.
Those who prefer a boat-style layout for the main controls, with the ▲ and ▼ (W and S) keys controlling the throttle, can switch to this mode of operation via the menu → Settings → Tuning → CTRL Style. In this mode, the PAGE keys and E/C will control the SeaRoo’s pitch down/up.
To sit in the vehicle, right click on it and select Sit Here from the context / pie menu. Once seated, and as with most vehicles, the SeaRoo’s engine can be turned on / off using “s” in local chat, or “start” / “stop” – note that all of the SeaRoo’s chat commands are entered in lower case.
Key Vehicle Features
“Keyless Activation”
Enabled by default, this causes the canopy to open and the dashboard to engage when you are with a few metres of your SeaRoo. Similarly, when moving away from the vehicle, the dashboard will turn off and the canopy canopy automatically close. This option can be disabled / enabled via the menu: Settings → Keyless.
The HUD

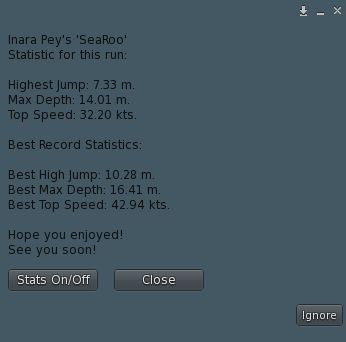
By default, those sitting in a SeaRoo (pilot or passenger) get offered a HUD. It is not vital to piloting the SeaRoo, but provides an informational display (shown on the right) for fuel, speed, heading, engine temperature and power settings. It also includes three buttons:
- Resize: increase / decrease the HUD’s size via a dialogue box.
- Menu: access the main menu.
- Colors: set the colours for the SeaRoo’s dashboard.
Note that the HUD is inactive whenever the SeaRoo’s engine is not running, and further details can be found in the user guide.
Hovertext Information
When the SeaRoo’s engine is on, information on the vehicle’s speed, engine power level and temperature, and the fuel level is displayed over the SeaRoo’s tail. It can be disabled / enabled by typing “hud” in local chat.
General Handling Notes
Like many vehicles, the faster the SeaRoo goes, the more responsive it becomes. As such, I recommend handling it at low to mid-range speeds to get familiar with it, rather than leaping in and going flat out; but keep in mind some capabilities work best at mid to higher speeds, such as diving / staying underwater, and performing jumps and acrobatics.
As speed is increased, the SeaRoo also takes on a nice Dolphin-like movement as if responding to the waves as it moves. Also, like a real boat, if it is moving at speed and you press both throttle keys to drop the throttle to 0%, it may take time to come to a complete stop.
The vehicle’s time underwater is – as noted – limited to 60 seconds. This is because the air intakes must be closed when submerged. A timer is displayed with the stern hovertext to help keep track of submerged time, and an audible alarm will sound when 20 seconds of submerged time remains. Try to stay underwater beyond 60 seconds, and the engine will cut out to prevent damage, and the SeaRoo automatically surfaces. Once there, and providing the AutoRestart option has not been disabled, the engine will automatically restart.
Jumps are achieved from underwater by making sure you have sufficient speed, then pitching the nose up by about 30-45°. As you clear the water, gently pitch the nose forward to re-enter the water. Note that if you are moving too slow or pitch the nose up too high, the SeaRoo might either stand on its tail and fall backwards into the water, or perform a belly flop. You can also use SHIFT+ ◀ or A to roll left or SHIFT+ ▶ or D = roll right for both underwater acrobatics and to help level the SeaRoo after turning.
Refuelling
The SeaRoo has a limited fuel supply, and can be refuelled in a couple of ways:
- Using the fuel pump supplied with the SeaRoo dock system or any Bandit / TMS compatible gas station – see the user guide for details.
- Using the SeaRoo’s fuel canister when at sea: with the engine stopped and type “f” in local chat (no quotes) to trigger the refuelling animation. Note you may have to repeat this to completely fill the tank.
Continue reading “Product review: the WALT Sea Roo in Second Life”
A video of home in Second Life
A look at the new house design, inspired by the Sky Tower from 2013’s Oblivion, (see More on a Sky Tower home in Second Life) as I get back to updating my video capture and editing capabilities.
Once again, Ramin Djwadi’s music from the Westworld series formed the basis for the video, this time the hauntingly beautiful Take My Heart When You Go, from season 2, and which comes courtesy of an arrangement via Lunar Black.
A baker’s dozen in Second Life
December 5th is my SL rezday anniversary and this year marks 13 years since I arrived back in Second Life as Inara Pey. Thirteen years is actually the 2nd longest time by which I’ve called a single place my home, given a lot of my childhood and teen years saw my family moving around a lot in the physical world, and my early adult life was similarly marked by semi-regular relocations due to the annoyance of careers.

As I noted in my 2018 piece Twelve years in Second Life, I really didn’t expect to still be logging-in to the the platform after so long, given that a few years ago, I sort-of agreed with myself to hang up my SL hiking boots on the occasion of my 10th anniversary as Inara in-world.
In that piece, I noted three major reasons for still being around now: fun, discovery and freedom. I’m not going to re-tread those reasons here and now; suffice it to say that they do still hold true. I’m still having fun with SL sailing, boating ad flying as well as still enjoying my time kitbashing and scratch building (I’m still very much a prim person for building, never having really got my head around Blender, but also enjoy taking mesh bits and re-purposing them).
I’m still out and about visiting SL regions and appreciating all the art that is offered through the platform, and I’m obviously still captivated by the freedom Second Life offers all of us to be who and what we want to be (within the boundaries of the Terms of Service and Community Standards, of course!) regardless of race, religion, gender species or ability.
There’s also the fact that the technical complexity of Second Life continues to fascinate me, and I still enjoy trying to dig into things and understand them, be they genuine technical developments or updates, or more esoteric issues such as the SL economy, what’s going on at Linden Lab, and so on.
One of the most enjoyable aspects of of my Second Life time is maintaining this blog. What started as a fairly narrow-focused and perhaps lopsided projects has grown over the years, has become something that I’ve striven to make into not only a journal of my SL travels and appreciation of art in Second Life, but which can also be a useful resource for other users – hence the menu system at the top of each page (if you’ve not used it before, I do encourage you to do so!).
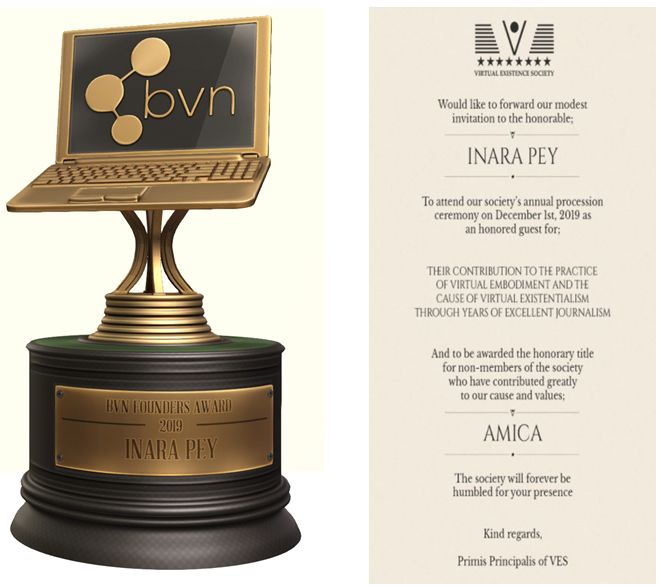
While I’ve never sought recognition, I am flattered and honoured by the fact that over the years, this blog has been recognised, from topping a poll of New World Notes readers’ favourite blogs, through to this year being awarded the Blogger and Vlogger Network (BVN) Founders Award, while I was also flattered and honoured to be made an Amica honoree by the Virtual Existence Society (VES). MY thanks again to both organisations for these honours.
This year has been interesting blog-wise, given the changes that have popped-up within Second Life, such as the arrival of the new Premium Linden Homes and their continent, there have been the various fee changes that have taken place, the arrival of Animesh and more – all of which have kept me busy. Sansar has also kept me engaged – to a degree, although I admit that the uneven pace of development with that platform and the unevenness of the same has caused a lessening the time I’ve been spending there.
Right now, I don’t see my blogging journey coming to and end – but we really can’t guarantee what the future may bring; so rather than prattling on, I’ll simply say another “thank you” to all of you who continue to read this blog, who support me via social media with re-tweets, likes, etc.. You as much as anything keep me engaged in Second Life. My thanks as well to Brett Linden at the Lab for continuing to put up with my questions and requests for information. And most of all, my thanks to Caitlyn and all my friends who continue to make my explorations and time in SL fun.
Virtual Existence Society Honouree

On Sunday, December 1st, 2019, I was one of a number of recipients of the first honorary titles to be awarded by the Virtual Existence Society (VES).
The Amica (Friend) award is a title awarded by VES to individuals in recognition of:
Their contribution to the practice of virtual embodiment and the cause of virtual existentialism through years of excellent journalism.
Those in receipt of the Amica award were invited to attend a special awards ceremony held by the VES on Sunday, December 1st, where they, and the members of the Society who had been nominated for, and accepted, were able to receive their award and title.
Unfortunately, due to the ceremony being held at a time that makes it difficult for me to be in-world on a weekend (and particularly Sundays), I was unable to attend in person.
However, I would like to extend my sincere thanks to VES senior / founder members lucagrabacr and Nodoka Hanamura and to the brothers and sisters of VES for nominating me to be one of the first recipients of the Amica title, and congratulations to my fellow recipients, and to all of the VES members in receipt of the Fidelis title.
You can see a full list of all recipients on the VES website.
About The Virtual Existence Society
The Virtual Existence Society is a non-profit group of like-minded individuals who find value in the practice of virtual embodiment and the philosophy of virtual existentialism, and want to preserve, and promote those things.
The purpose of the Society is to preserve and promote shared belief and values by the means of passively strengthening members’ faith through philosophical formulation and understanding of those values, and actively participating in activities aimed to preserve and promote said belief and values.
In addition, the society also conducts activities aimed to preserve and promote virtual world platforms to which it resides in (e.g. Second Life).
You can find out more about VES, including its structure on the Virtual Existence Society website, and visitors are welcome at the society’s in-world headquarters.

A vehicle transportation system in Second Life
So you have a luxury yacht with a helipad and been annoyed that you can’t sail it with your favourite helicopter rezzed on the deck? Or you have a landing craft and would like to be able to have a driveable vehicle it can carry and you can drive straight off? Or a cargo plane you’d like to fly around with your favourite car inside ready to drive? Well, Ape Piaggio might have the answer.
While working to complete the SeaRoo aquatic vehicle (formerly the WaveHopper – see: Previewing a little wave hopping in Second Life – and still very much “coming soon” as the final bugs are ironed out), she’s developed a neat little script set called the Vehicle Transportation System that allows two Modify / Copy vehicles to be combined so that one can be carried by the other, so that the “one” can be used when desired / as the local region settings allow.
As usual, I’ve been able to take the system for a test-run and thought I’d offer a piece on it for those who might be interested.
The system does require a careful amount of setting-up. In particular, it requires the unlinking and re-linking of one vehicle. This is something that can create issues, because vehicles often use a defined linkset numbering system which, if altered, can stop the vehicle function correctly. For this reason, there are scripted tools available to manage linksets. It’s also why Ape provides two versions of the Vehicle Transportation System:
- The Vehicle Transportation System, containing only the scripts needed to allow one vehicle carry another, and suitable for those already have a re-link / unlink tool, or are confident in their own ability to edit linksets.
- A Combo pack, offering both the Vehicle Transportation System and Ape’s own Relinker Kit, suitable for those who are not confident in editing linksets or who do not have a suitable script set for linkset editing.
Both kits are available on the Marketplace and will deliver the scripts to your inventory in two different folders.
In addition, the following points should be noted:
- Both vehicles must be Copy / Modify.
- The system uses a pair of defined terms:
- Primary vehicle – refers to the vehicle that will transport another vehicle (e.g. a yacht you want to carry a helicopter or jet ski or something; or an aircraft carrying a car or tank or other vehicle, etc.).
- Secondary vehicle – refers to the vehicle that is being transported.
- A primary vehicle can only carry one other secondary vehicle.
- When in use, the system will only work in regions / parcels where rezzing is enabled.
- If you are the only person on your primary vehicle, note that it may be auto-returned if you swap to your secondary vehicle and are away from the primary longer than the local auto-return time.
Setting The System Up
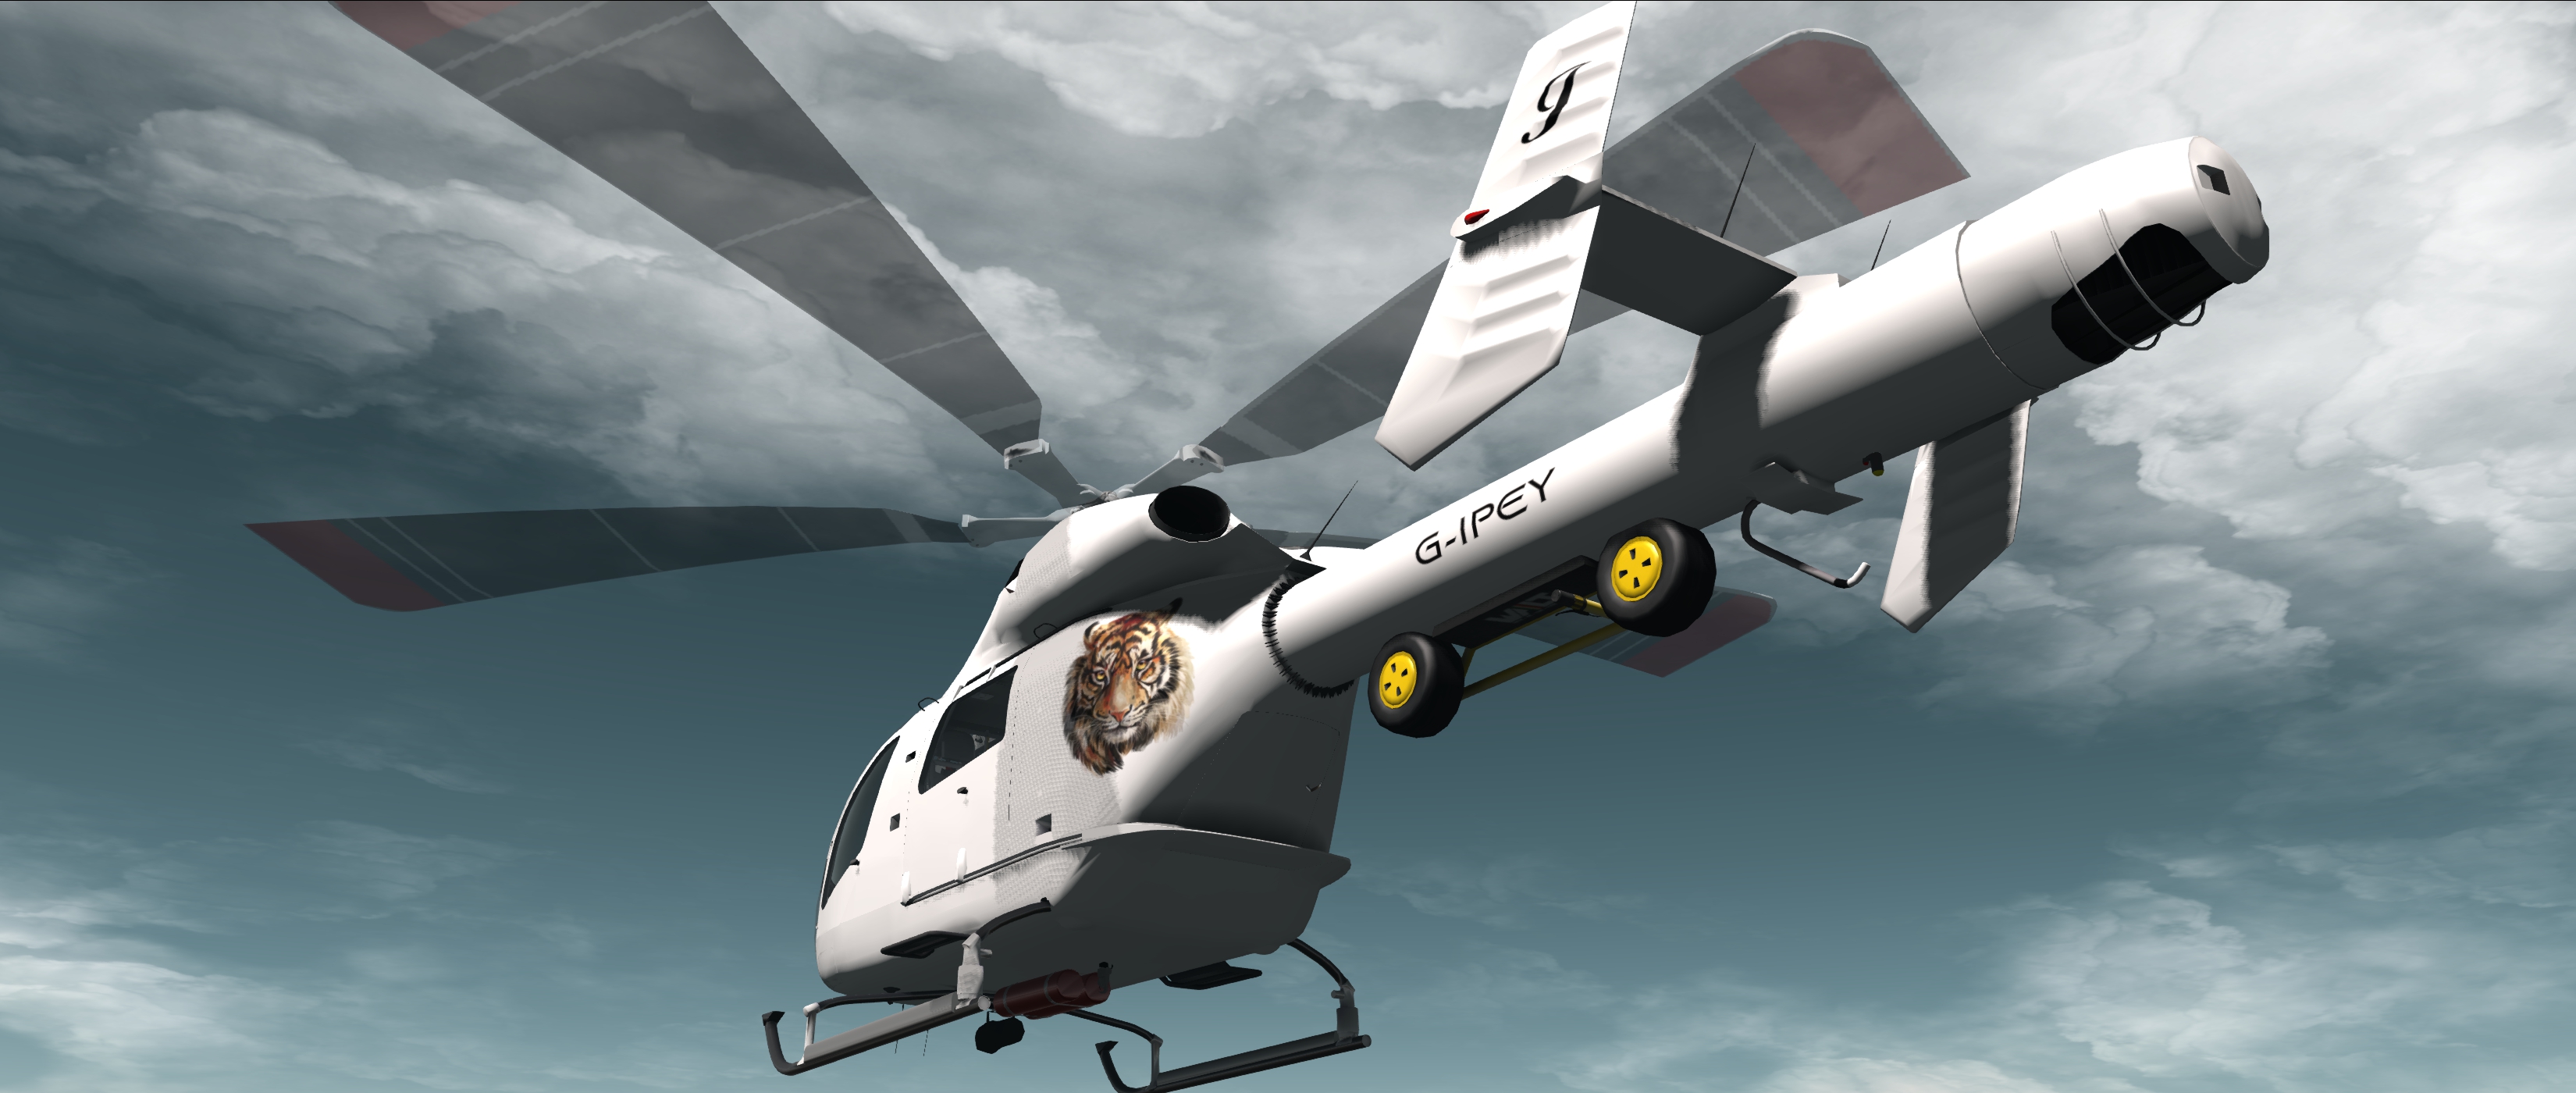
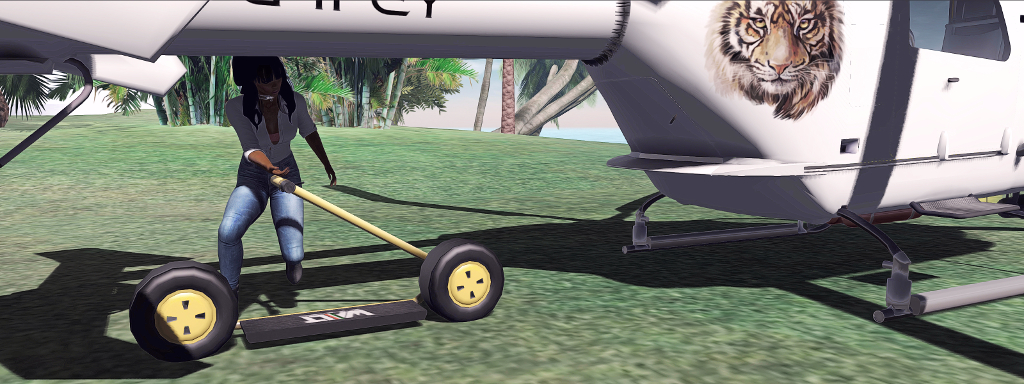
Note: for the purposes of this article, I’m using my Spijkers & Wingtips MD900 Explorer helicopter and Piaggio SG33E RoadRunner scooter as, respectively, my primary and secondary vehicles, ans they happen to be the two of my vehicles that offer a reasonably logical pairing. As noted above, the system can be used with any suitable pair of Copy / Modify vehicles.
Setting the system up comprises three steps:
- Preparing a static version of the secondary to be carried by the primary.
- Linking that version of the secondary to the primary.
- Preparing a version of the secondary that can be rezzed from the primary when it is to be used.

Preparing a Static Version of the Secondary Vehicle
- Rez your primary vehicle.
- Rez a copy of your secondary vehicle and place it on your primary where you wish it to be positioned when the primary is in use (e.g. put a helicopter on the helipad of a yacht, or a car in the cargo hold of a plane).
- Edit the secondary and open the Contents tab.
- From the Vehicle Transportation System folder in your inventory, drag and drop the script called CONVERT INTO STATIC OBJECT into the Contents tab of the secondary vehicle.
WARNING: this script will DELETE all contents from the secondary and render it unuseable, so again, you should only do this if the vehicle is COPY and you retain a working version in your inventory.
- Wait for the local chat message –> CONVERSION FINISHED <–.
- Leave the converted vehicle in place.
Linking the Static Version of Secondary to the Primary
Note, the following references using the Piaggio Relinker kit; if you are using another scripted means of unlinking / relinking an object, then please refer to the instructions available with that tool.
- Edit the static version of the secondary vehicle and open the Contents tab.
- From the Piaggio Systems Relinker System folder, drag and drop ONE of the ADD scripts into the Contents tab:
- Use ADD (CONVEX) if the root of the secondary is mesh.
- Use ADD (PRIM) if the root of the secondary is a prim.
- If you are unsure of the root of your secondary vehicle, use ADD (NONE).
- Close the Edit floater of the secondary vehicle.
- Edit the primary vehicle, and then from the Build menu, select Scripts → Set Scripts to Not Running.
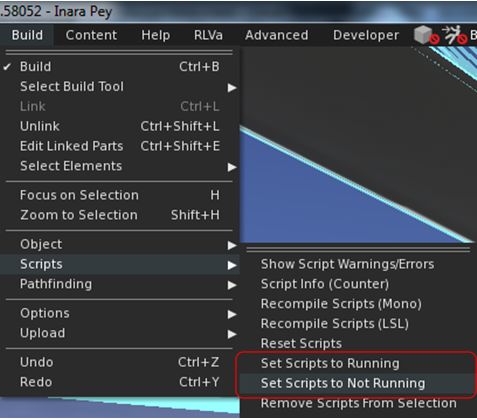
- From the Piaggio Systems Relinker folder in your inventory, drag and drop the RELINKER – MAIN script into the primary.
- A series of dialogues will be displayed, requesting permission to de-link and re-link he primary vehicle.
- You must reply YES to each in turn.
- When the process has finished, local chat will display the message: DONE: REMOVING SCRIPT.
- Edit the primary vehicle again Scripts → Set Scripts to Running.
Preparing a Rezzable Version of the Secondary for use with the Primary
- Rez a new copy of the secondary vehicle and edit it.
- From the Vehicle Transportation System folder, drag and drop the script SECONDARY VEHICLE SYSTEM into the Contents tab of the secondary vehicle.
- From the General tab of the Build / Edit floater, highlight and Copy (CTRL-C) the name of the secondary vehicle.
- Take the updated copy of the secondary vehicle back to inventory.
- Edit the primary and open the Contents tab, then:
- From the Vehicle Transportation System kit folder, drag and drop the script PRIMARY VEHICLE SYSTEM.
- Then drag and drop the updated secondary vehicle from inventory into the Contents of the primary.
- In chat, type NAME, followed by the name of the secondary vehicle as in appears in the primary’s contents. For example:
name SG33E RoadRunner
Note: you can use Paste (CTRL-V) to paste the vehicle name accurately. Also, note this is only required if the primary has other objects in its contents.
Your vehicles should now be set-up and ready to go. Take a copy of the completed pairing back to inventory so you always have a “master” copy.
Using the Vehicle Transportation System
Notes:
- As per the notes above, the system will only work in regions / parcels where rezzing is enabled.
- The engine systems of both the primary and the secondary vehicle must be OFF in order for the system to work correctly.
Use the primary vehicle as you usually would. It should perform exactly as it did before you added the secondary vehicle.
When you reach a point where you want to use the secondary vehicle, stop the primary and make sure the engine script is not running, then in local chat type RELEASE.:
The version of the secondary vehicle will be removed from the primary and a copy of the driveable version contained in the primary vehicles inventory will be rezzed in its place. You can then sit in the secondary and use it as normal.
When you have finished using the secondary, return to the primary and dismount from it. Make sure the engines of both are turned off, then in local chat type CONNECT.
The rezzed version of the secondary will be removed, and the “static” version will reappear connected to the primary.
Note: if the primary has been auto-returned to your Lost and Found folder, you can re-rez it to complete the above operation and continue travelling with the primary. Or you can delete the copy of the secondary and simply pull a fresh version of the primary from inventory the next time you want to use it.
This is an elegant solution for an issue many have found to be annoying. Those interested in trying it for themselves can obtain it as follows:
- Piaggio Systems Vehicle Transportation System – price L$250. Use this if you are confident in unlinking and re-linking an object, or if you have a suitable re-linking script.
- Piaggio Systems Relinker and Vehicle Transport Script Combo – price L$450. Contains the Vehicle Transportation System AND Relinker system. Use this if you are uncertain about unlinking / re-linking objects or do not have a suitable re-linking script.
