Two Bandits at sea in Second Life

The Bandit 460 (foreground) and 580

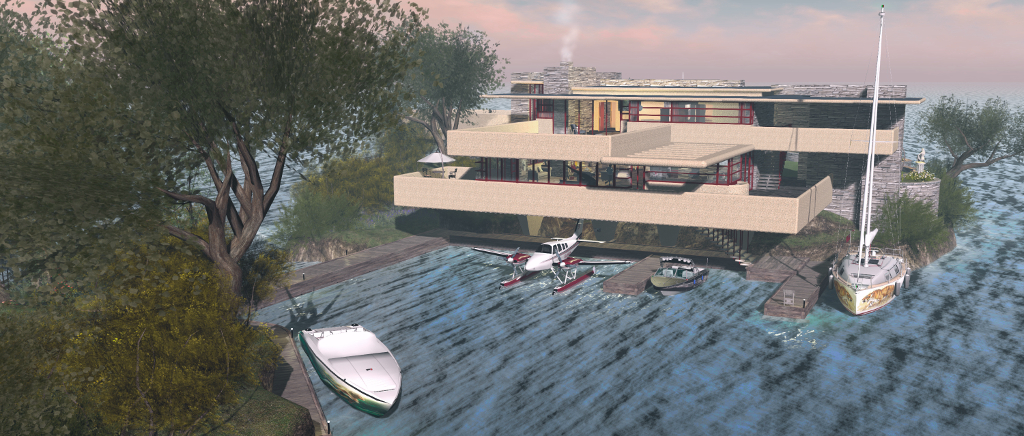
Over the last several years I’ve collected numerous boats in Second Life, but one thing that has been missing from collection is a cabin cruiser. After looking around, and given budget is a little limited at the moment, I decided to pick up a Bandit 580.

Now, to be sure, this is not the most recent design in the Bandit range by Analyse Dean, but there was something about the lines I liked, together with its rich range of animations. It also, given the budget limit noted above, fitted my purse rather nicely, given I wasn’t entirely sure how often it would be used. However, I was in for a very pleasant surprise; unbeknownst to me, Analyse had noted the purchase, and no sooner had I arrived home and started unpacking the 580, she tapped me on the (IM) shoulder and dropped the more recent Bandit 460AK (the AK a reference to the included streaming radio) into my lap. So now I have not one, but two cabin cruisers to play with – thank you, Analyse!

The Bandit 580

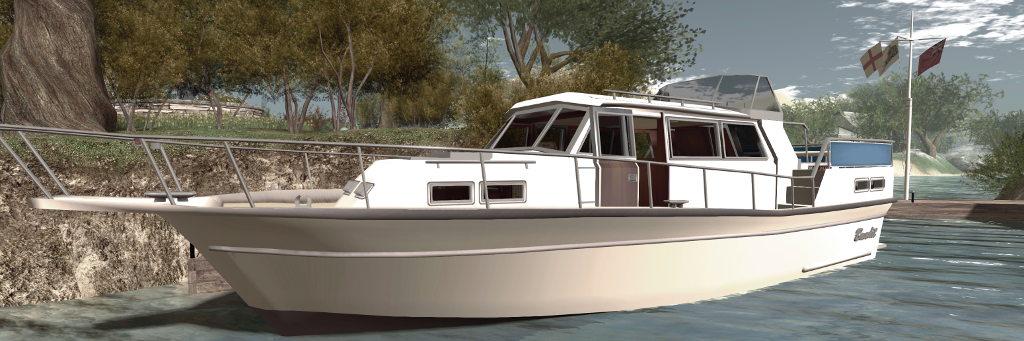
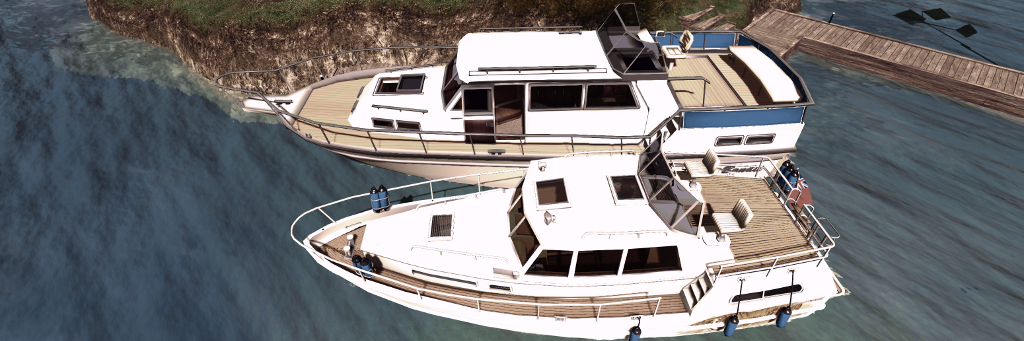
As noted, the 580 is the older model, roughly 16 metres in length and about 5.8 metres across the beam. It has a large central cabin with a double berth forward, and dining cabin to the stern, which raises the helm station and stern deck. A second helm position can be found in the main cabin and both this and the stern helm station have working gauges and are suitable for Mouselook piloting. Two versions are supplied, the 580GT noting it has a built-in GridTalkie grid-wide marine 2-way radio system.

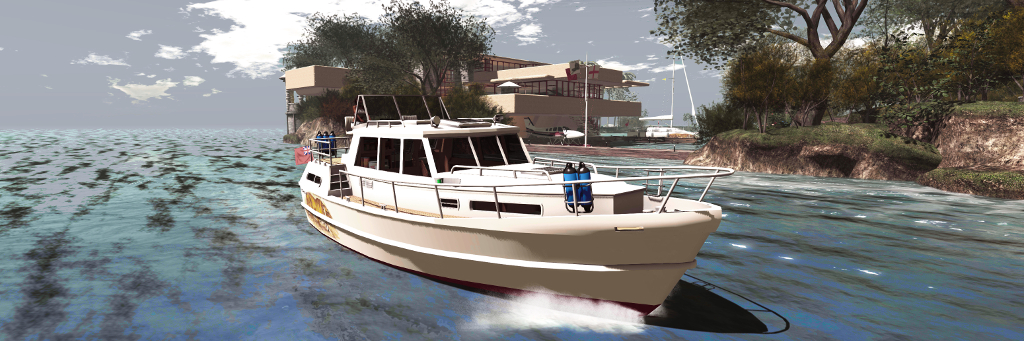
At roughly 12.1 metres in length and 4.6 metres at the beam, the Bandit 460AK is noticeably smaller than the 580, but it packs in a lot more. As with the 580, it has a primary midships cabin, with a stern sleeping area and forward dining area / sleeping cabin with a “functioning” toilet / shower cubicle. Piloting the boat can be performed from both inside the main cabin (standing position) plus a seated stern helm area with co-pilots seat alongside, separated by the single hatch to access the cabin.

The Bandit 460 with my own custom hull finish

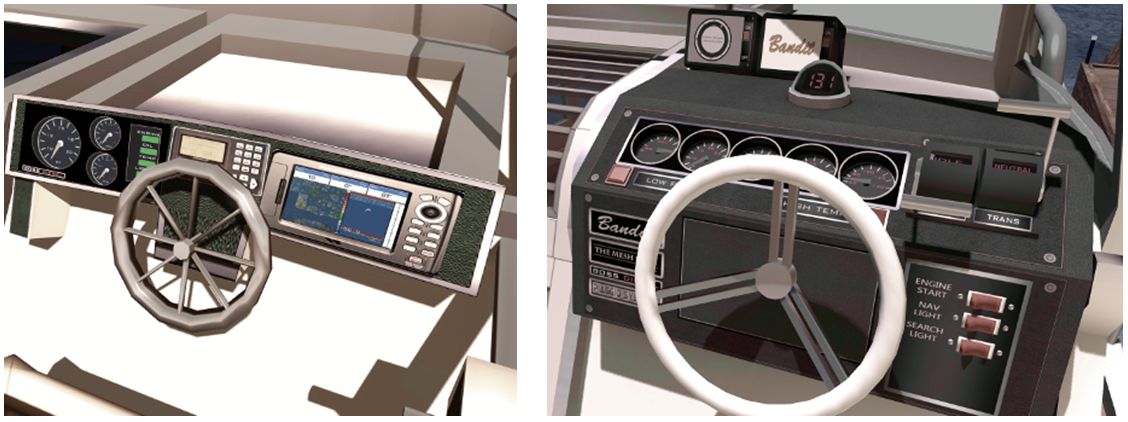
A visual comparison between the two quickly reveals the improvements Analyse has made to her modelling; the steering wheels on the 580 are noticeably more “clunky” looking than those on the 460AK, for example, while the control switches on the latter all work via touch, as do the cabin light switches, hatches and a number of windows – the instruction manual highlights all touchables. Overall, the detailing on the 460AK is a step above the 580, but there are also similarities between the two. Many of the animations found in the 580 are also present in the 460AK: both share the same, or have similar, swimming, dancing, and deck working animations, for example (although overall, the 460AK has more animations). Local chat commands are similar for the two as well, although again, the 460AK’s are more extensive.

But when it comes to handling, these are very different boats. A twin-screwed vessel (the engines can be accessed via floor panels in the main cabin), the 580 has a higher top speed than the 460AK, and includes a racing mode. Trim can be automatically set via the engine script, or manually adjusted (Page Up and Page Down keys).  The engine sounds are suitably diesel-like for a vessel of this size, and while turning feels very flat, overall handling and manoeuvring is acceptable.

The Bandit 580 (l) dashboard features working gauges, but is showing its age a little – note the steering wheel. The 460 dashboard (r) offers more refined working gauges and steering wheel, together with a working compass and master switches for Mouselook driving

By contrast, the 460AK has more realistic handling, the boat naturally rolling outwards as it turns, and the helm being affected by inertia when travelling a speed (the faster you’re going to more pressure is required on the left or right cursor keys to maintain the turn). Like the 580, it is well suited to Mouselook piloting, and the superior helm controls make this a joy. My one small disappointment is the engine noise itself, which is  – to my ears – is a little underwhelming.

Another difference between the two boats is in their LI and physics costs. The 580 weighs-in at 32 LI and a physics cost of 24.2. The 460AK, however is a heavy 55 LI and 40.5 physics. Both of these tend to make themselves felt at region crossings, making the 460AK something of a handful, although like the 580 it recovers well enough.

Taking the Bandit 460AK around Isla Pey

The additional LI / physics costs with the 460AK is a result of the range of options included: deck furniture for the rear deck – chairs, table, drinks-; forward deck loungers that sit over the main cabin, radio (working) forward cabin switchable bed / table, cushions and curtains for the cabins and a stern deck railing canvas. The upper deck also has a 3-option Bimini (at least the top canvas needs to be deployed to see the in-world text HUD displayed over the boat), and the rear cabin has a built-in television.

Further accessories are supplied in a separate box, the smartest of which is the 460AK wooden dock. Place this out in a suitable position and bring the 460AK in close with engine running, preferably with the fantail at the stern facing towards the small extension side from the  dock, and then type “moor” in local chat. The 460AK will slide neat into to place, fenders deployed, before mooring lines appear, together with a shoreline power connector, before the boat’s engine shuts down.

The 460AK alongside with mooring and power lines deployed

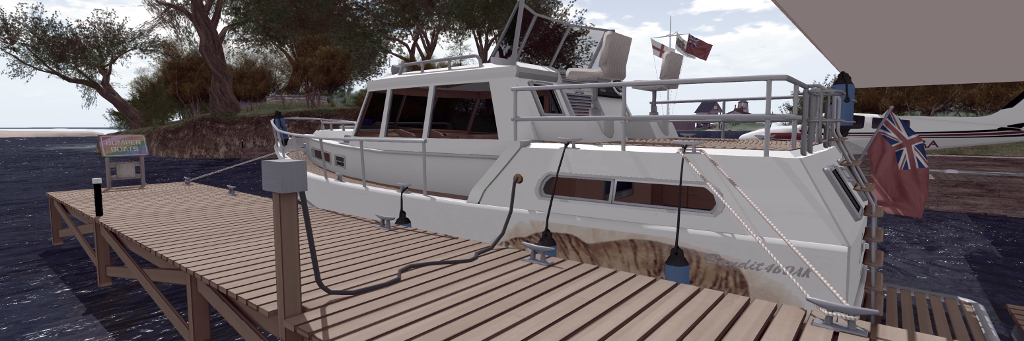
When leaving the dock, starting the engine will automatically hide the mooring lines – then just click the fenders to return them to their stowage bins on the boats’ railings, and you’re ready to advance the throttle and ease away from the dock. The dock itself is provided in handed versions – but the second is unscripted. Other accessories include a fishing rod, dock poles, a second radio for the boat and a lounge chair.

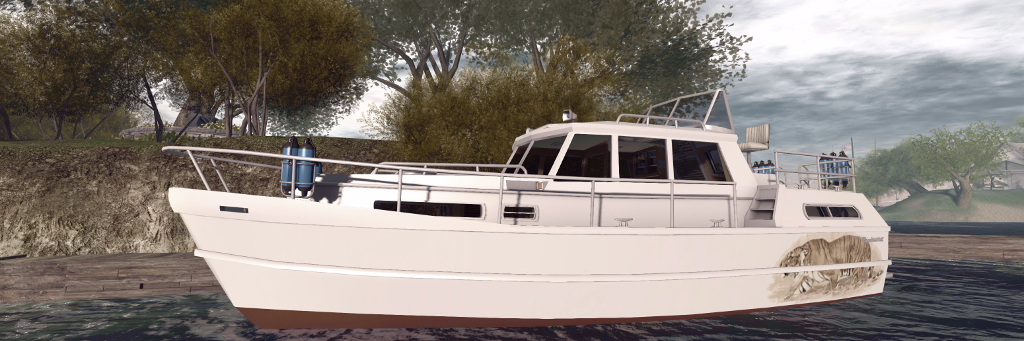
Custom painting of either boat is possible, with texture PNG files supplied. These are adequate for the task, with each boat having at least one additional hull finish. For those not up to painting, there are also several paint schemes from various merchants to be found on the Marketplace – just search Bandit 580 or Bandit 460. I opted to use one of the supplied Bandit 580 pre-sets, as it has a nice musical theme, but took work I’d previously produced for my Loonetta 31 and applied it to the 460AK to offer something of a matching theme.

Both the Bandit 580 (l) and the Bandit 460 (r) are set-up to be rezzed from our vehicle rezzer, although the 460AK tends to remain rezzed by default.

As noted, both boats have optional in-world hover text information displays, while the 580 also includes two screen HUDs, one for the skipper and one for crew. The former provides options to start the boat, activate the lights and sound the horn. It also includes a CTRL button, which takes control of the driving the boat back from any crew member currently driving it. Crew can drive the boat if the skipper (owner) expressly allows it, and use the crew HUD Control button to take command.

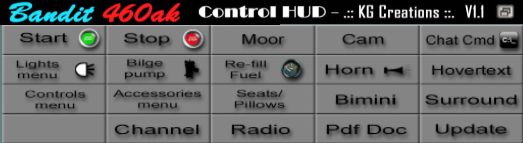
The 460AK doesn’t have a screen HUD of its own, relying on chat commands – which can get a little tedious (e.g. typing “bimini” multiple times to step through the Bimini options and remove it). However, .:: KG Creations ::. have produced a L$170 460AK Control HUD, that reproduces the majority of the boat’s commands either directly (button click) or via button-click and displayed menu. By default, when attached to your screen, this will appear at the top of the viewer window (and can be repositioned, obviously), making switching from the HUD to a displayed menu dialogue straightforward.

The third-party Bandit 460AK Control HUD by .:: KG Creations ::.

Analyse is justifiably proud of the Bandit 460AK, and while it takes a little getting used to handling-wise, it’s a feature-packed vessel that justifies the L$3,000 price tag. While older in build quality and lacking all the options found in the 460AK, the Bandit 580 offers a good cruising experience at a modest L$1,250.

But before buying either, I do recommend seeing them in-world at the Bandit / Mesh Shop store at Dutch Harbor, where demo versions are available to take out and get a feel for their respective handling – note that the demos are limited to 10 minutes rez time, but that should be more than adequate. In addition, the 460AK can be obtained via the Bandit Marketplace store.

Related Links

The Culprit Sonata Baby Grand piano in Second Life

The Culprit Sonata Baby Grand in two of its finishes

In September 2018, I wrote about the Culprit Sonata Bento Piano created by Eku Zhong and Yure4u Sosa (see The Culprit Sonata Bento piano in Second Life). At that time, I noted that Eko and Yure4u were working on a baby grand edition, and on March 13th, 2019 they graciously sent me a copy.

As I noted in that piece, as a pianist, I have a leaning towards the grand (concert or baby), as I appreciate the more rounded richness of its note. As having one in the physical world is impractical (although I do have a Yamaha N1), I enjoy having them in-world, and have been looking forward to the opportunity to try this particular baby grand and seeing how the Bento animations work with such an instrument.

The Culprit Sonata Baby Grand

Unlike the upright variant, the Culprit Baby Grand is supplied in one size, and follows the accepted shape of a grand, with a sweeping case built around a horizontal plate and pin block / action. In this, the Culprit Baby Ground might appear little different to other grand pianos in SL. However, it is fair to say that it is the play mechanism in this piano that is one of the aspects that sets it apart from others, even without the Bento play capability.

Where others might in part reproduce the mechanism – some strings,  the plate and sound board – or offer a texture of a grand’s “innards”, the Culprit Baby Grand goes much further. A peek under the raised lid reveals the cast iron plate with soundboard below – and a beautiful pin block and hammer set, with strings neatly positioned, presenting one of the best facsimiles of a grand I’ve yet witnessed.

Play-wise the Culprit Baby Grand is similar in nature to the Sonata upright: sit at the piano and you’ll be placed in an “idle” pose – and moving your arms as if conducting – or perhaps warming-up in readiness to play. While mentioning this pose, note that as playing the piano can result in your avatar’s eyes rolling up into the head and flicking back to this option – available from the Muted option (see below) before standing will avoid this. Sitting will also display the piano’s menu, which has the following options:

  • Texture: allows the piano body and the stool’s cushion to be textured to suit your preferences.
  • Muted: presents a total of 12 different playing styles without any associated music – so you can set a style in keeping with the music you’re listening to out world, or on your parcel stream.
  • Songs: offers 54 solo pieces to play, all public domain, representing a good cross-reference of music.
  • Duets: offers 11 duet pieces of public domain music to be enjoyed with a friend of partner playing with you.
The Culprit Sonata Baby Grand – mechanism detail

The menu also includes options to adjust the seated position on the stool, and to swap positions when playing duets, all of which makes for a pretty comprehensive set-up.

Selecting a piece of music from the Songs or Duets menus will display sheet music on the piano and move your avatar into a matching playing animation. It is here where the Bento element comes in. If you have Bento hands and watch yourself play (note that non-Bento users can still play the piano, it will just be minus the finger movements). The animations appear to be those used in the Culprit Sonata Upright, so just like that piano, they are fluid and natural, if with a slightly dramatic flair in a couple of styles  – although even the fact this is a grand, they are perhaps more in keeping with playing classical pieces than might be the case with the upright version.

Bento hand movements  are available in the three playing options built-in to the Culprit Sonata Baby Grand. Note the thumb-led glissando (filmed on the Sonata)

For those who like their in-world pianos to autoplay without being physically seated at it, the Culprit Baby Grand is perhaps not an ideal choice, simply because it does require and avatar to be seated (you can set rights to control who can). But then, this is a piano that is all about the Bento playing actions. On a personal note, I found the Culprit Baby Grand a little larger than I was expecting; the width of the piano means the reaching the extremes of the keyboard is a stretch for an avatar proportioned close to a physical world build, like mine. However, this is a minor point when compared to the “interior” modelling of the piano, its music selection and playing animations mean, all of which make it an ideal addition to any home – and it is now the preferred piano at Isla Pey, replacing the slightly smaller Lisp Persimmon grand.

With a total LI of 11, the Culprit Baby Grand will début at the Boardwalk shopping event from March 15th, 2019, at a price of L$995. It will be generally available, including via the Culprit store, from April 15th.

Flying the TBM Kronos in Second Life

Flying the TBM Kronos over Isla Pey

Every time I promise myself, “no more planes!”, something happens to change my mind. Most recently, I’ve been throwing the CLSA Stampe SV.4 around the sky a lot of late (you can read a review of this ‘plane – now costing L$15 – here). This, plus a couple of suggestions led me to try – and buy – the TBM  Kronos V6.

Resembling the Pitt Special S1 / S2, the Kronos is a partial mesh build weighing-in at a default 51 LI, with a display cost of just under 42K and a quite enviable physics cost of 1.5. All of which makes for a very nibble aeroplane with some of the best close-to-real handling I’ve experienced in Second Life – not that I’m necessarily an expert in such things.

The Kronos variants: the full-size version (centre rear); version for smaller avatars (l); version for Tinies (right) and the Petite version (centre front)

A single-seater the Kronos eschews any menu system, and instead offers all commands and options directly through chat or a simple HUD. By default the latter attaches to the top right of the screen, and is nicely shaped to fit the corner without taking up too much space. The controls provided comprise an airspeed indicator, compass, altimeter, and four pre-set camera options.

This is a plane that packs in a lot in many respects. Delivered in a neat suitcase, which opens to reveal a (non-functioning) radio controlled model, together with control handset and a little fuel supply, the ‘plane unpacks to revels not one, but five models. These are: the Default sized ‘plane (51 LI), a slightly smaller version for smaller avatars (43 LI, together with a 0.9 physics cost), a version for Tinies (35 LI), a really dinky version for Petites (32 LI). Also supplied is a non-flying static model. Also supplied is an engine test stand and engine, documentation (basic but sufficient) and a poster.

Inverted climb over Blake Sea

The plane itself is a good-looking little machine, by default presented in an eye-catching and logo-emblazoned finish suitable for the aerobatics / airshow circuit, although perhaps a little too loud for my taste with all the flame motifs.  The engine hood is presented semi-transparent, and the design of the ‘plane can make getting to it a little difficult if you’d prefer it to be opaque, as I did.

Flight controls are the usual for an aircraft: WASD / arrow keys for elevators / rudder and ailerons; E and C / PAGE keys for throttle. For those not used to such a responsive aircraft, remember use of the SHIFT key with the LEFT / RIGHT keys will allow rudder-only turns (unless in Mouselook). Lights are absent the ‘plane, but as it is intended for aerobatics, white smoke can be toggled by typing “i” once the engine is started.   Throttle-wise, 5%-10% provides suitable ground movement speed, and when steering, the plane is both responsive and positive – one of the best ground-handlers I’ve been in.

A low pass over Isla Pey

As a STOL plane, the Kronos will lift-off at anything over 35% of throttle once the airspeed is high enough, and it’ll place itself in “landing mode” with a fairly fast rate of descent at 25% throttle. 30-40% throttle is ideal for cruising, and anything above 45% suitable for aerobatics.

In terms of the latter, the Kronos is a delight, although those used to flying more sedentary ‘planes many find it an initial handful. Light and responsive, it will loop and roll t a touch, and with a little practice it is possible to throw this ‘plane around quite and lot and keep it inside the boundaries of a single region.

The plane is nippy enough in “standard” mode. However, it has two further modes: H for “hardcore” and HH for “hyper hardcore.” I confess, I didn’t feel a lot of difference between H and HH, but the Kronos did respond faster in “hardcore” mode.

The smoke system in action – be sure to have your viewer’s particle system turned up

A template is provided for painting, and there are also some commercial kits available. Custom work can be a little bit of a pain when applying manually: there are a number of transparent elements overlaying some of the ‘plane’s surfaces (notably the engine cover and the wing surfaces), so a little care and patience is required, but nothing that is particularly taxing. For my part, I opted to use the supplied paint scheme as a base – largely due to the presence of the tigers on the tailplane 🙂 .

Good-looking, manoeuvrable, fun-to-fly, the Kronos is a great little single-seater by Rafaell Sorbet and Tania Bouvier, with a nice little HUD by Bunnys Fride. At L$ 1,799, it’s a recommended buy – but if you’re new to flying in SL, try the demo at TBM’s in-world airfield first.

Links

Modemworld – navigation updates

blogging

One of the things I strive for in this blog is ease of access to information, be it through the way I use categories and tags for posts or through the use of the available menu options and widgets, etc., within the blog’s theme.

Three changes I’ve made through 2018 – which may or may not have been noticed  –  is to information displayed in the widgets bar on the right of the blog.

In terms of the order in which they appear, these are:

  • A section on SL user groups.
  • A section on SL tutorials in this blog.
  • A revised RSS feed from the SL grid status.

All three can be found between the Blogroll lists and Tag Cloud.

The new / updated blog widgets – all colour items are clickable links. These actually appear one above the next (l-r) in the widgets bar on the right of the blog. 

SL User Groups: provides direct links to all of the current Second Life user group pages on the Second Life wiki. These pages provide a summary of the purpose of the meetings, the date and times of forthcoming meetings and often, but not always an agenda for the next meeting and / or, where recorded, archives of past meetings. All meetings are open to those interested in attending. I provide summaries of all meetings I attend.

SL Tutorials: over the years I’ve provided a series of Second Life tutorials on various subjects. This widget is designed to provide a link to my full index of tutorials (which also includes links to tutorials by others). It also lists key Second Life tutorials I’ve produced either on my own, or with the assistance of Linden Lab (e.g. the Abuse Reports tutorial). I plan to add further relevant tutorials to this selection as they become available, together with what I think are the more interesting of my own tutorials on interesting subjects.

RSS Feed: this is tweak to the RSS feed from the Second Life Grid Status page, which hopefully presents updates in a clean, readable manner.

Menu Updates

Since the introduction of the current blog layout in 2017, I’ve continued to make adjustments to the menu system to try to ease navigation, not all of which I’ve subsequently written about.

Most recently, I’ve attempted to simplify the menu structure further by combining a couple of the top-level menus and reducing the sub-menu structure of each.

Revised menu structure as of December 2018

The top-level menus are now as follows:

  • SL (unchanged): provides access to all Second Life posts and pages, divided into the following sub-menus / categories, including news items, opinion pieces, my Exploring Second Life travelogues, all of my SL user group meeting summaries, art reviews, all viewer reviews, etc.
  • LL (unchanged): provides access to general news and information specific to Linden Lab, including all transcripts of Lab Chats and Q&As by Lab CEOs and senior staff.
  • Sansar (unchanged): provides a breakdown of all Sansar-related posts and articles in this blog, again divided into sub-menus / categories.
  • Other Worlds and Tech (unchanged): covers articles on other virtual worlds, AR and VR, pieces on general tech and my Space Sunday astronomy & space reports.
  • Guests (unchanged): provides access to all articles written by guests on this blog, accessed via the writer’s name.
  • Blog Bits (new): this now combines general information on this blog (blog guidelines, blog navigation, privacy statement and my review systems specifications), my “personal” items (biography, SL home life, my blogging journey, my SL videos, etc.), as shown in the image above.

Note that the majority of the menu items in the above options have right-pointing arrow (“>”) indicating sub-menu options can be accessed. However, do please note that all articles for a specific category can be accessed by clicking on the top-level menu / sub-category option, as (hopefully!) explained in the image below.  The only exception to this is the About Me item under Blog Bits – just use the sub-menu from this to navigate further.

1. Clicking a top-level menu will display all articles under that topic, as indicated by the yellow lines. 2. Clicking on a topic within a top-level menu will display all articles for all sub-menus under that topic, as indicated by the red lines. 3. Clicking on a topic within a sub-menu will display all articles found under any sub-sub-menus for that topic, as indicated by the black lines. 4. Clicking on a specific topic name without any “>” will display only the articles related to that topic.

I hope these changes and updates further help people locate information within this blog. Obviously, the tag cloud can also be used to assist with finding article sets, and don’t forget there are the search options, also found in the right-side widget bar, which include the ability to list post by the major article categories used in this blog, or to list all articles published in a given month (most recent to oldest).

Isla Pey: year-end changes

Isla Pey

Back in April 2018, I returned Fallingwater – albeit somewhat modified to better suit our needs – to Second Life, redesigning Isla Pey around it in the process. Since then, we’ve been very settled, and the need to fiddle around with things hasn’t really come up.

However, in facing north and out over the “edge” of the grid, we may well see nothing but open seas, but we also miss a lot of the passing surface traffic; something that can be attractive to watch. Making a big move with the house wasn’t something I particularly wanted to contemplate (and not something the shape of the land would really tolerate). But, it did occur to me that by swinging the house through 180-degrees and cutting the island in two, something might be done…

Isla Pey

And so as Caitlyn reached for the hard hats, I started playing. Again.

As the parcel holding Isla Pey is rather long and slender, and given we already had a “north” and “south” end, linked by a large pond, stream and waterfall, cutting the land in two was easy enough. Out went the water, the falls and the surrounding mesh landforms creating the basic landmass was created.  Then, by swinging the house around and moving it southwards, there was room to add a fair-sized back garden – the landscaping made easier (again) by the re-use of the lawn design from the “old” island design.

Isla Pey

This, expanded with the use of Alex Bader’s superb Tiered Garden Wall Building Set, providing room for the art from Ciottolina Xue and pieces from Morgan Sim Designs that have long been features of our garden, while the JIAN Koi Pond Gazebo I’d modified for use with the “original” garden pond helped fill-out the space in the garden.

The southern end of the parcel, now an island in its own right, needed no real changes. It’s still home to our little folly from Trompe Loeil (actually the Amelie pavilion), just a section of HPMD cliffs needed to be added.

Isla Pey

This little island, also home to our sculptures from Silas Merlin, affords the house retain some privacy (one of the reasons I’ve tended to site houses at the north end of the island rather than the south is to help give a sense of privacy whilst being able to see passing ships). But, we needed a way to reach it.

The easiest way to do this was to extend the boat moorings under the house (actually the Botanical Edged Brick Park Path with a little re-texturing), using them as a kind of footbridge while also offering more room for boat / seaplane rezzing in our own little bay. The added room meant I could also add a couple of favourites to our vehicle rezzer that had been missed, the bay offering the perfect area in which to rez them.

Isla Pey

Fiddling with the island home is fun. But with the April changes (which I have nicely stored in a rezzing system 🙂 ) and now this reorganisation, means we probably won’t be making massive changes in the future, unless we opt to move elsewhere.

Just don’t hold me to that statement 😀 .

Twelve years in Second Life

At home

Twelve years ago on December 5th, 2006, I decided to give Second Life a second chance, creating Inara Pey in the process. At the time I never expected to actually still engaged in the platform 12 months on from that date, let alone twelve years – but here I am. Not bad for someone who was at one time considering hanging up her Second Life boots (so to speak) on reaching 10 years.

So why am I still here?

I can probably sum that up in three words: fun, discovery, and freedom. Fun, because – as well all know – Second Life has an awful lot to offer, from playing games through learning to role-play, to doing things we cannot (or would not) do in the physical world. For me, and as I’ve mentioned in the past, it’s the ability to do things like skydiving, or to enjoy flying whenever I want (or the expense of actually owning / leasing a plane or obtaining my PPL!) or to get out on the water under sail or power.

Black Bayou Lake; Inara Pey, October 2018, on FlickrThe ability to explore so many fabulous places, like  Black Bayou Lake, is one of the reasons I continue to enjoy Second Life 

Discovery, because Second Life is always evolving. Not just technically – although this year, with the “15 reasons” roadmap, there’s hopefully ample evidence of this – but also in terms of how regions are always in flux. Yes, it is sad when places vanish, and the shrinkage of the last few years has been of fiscal concern (although not necessarily indicative of any large-scale loss of users): but when it comes to publicly accessible regions, things are surprisingly stable – as fast as one popular place vanishes, another pops up elsewhere.

Twelve years – and counting!

Freedom, in that Second Life allows us to meeting, mingle with, get to know, spend time with, people from all over the world, most of whom we’d probably never likely meet in the physical world. This obviously feeds back into both the fun and the discovery elements, as sharing with friends adds depth to everything we do.

There’s also the aspect that our avatars allow us to be who we wish to be, as well as potentially allowing us to extend ourselves in ways that may not be otherwise expressed. I’m actually a lousy formalised role-player, for example; finding a character inside of myself, one I can maintain and live through with personality aspects perhaps foreign to my own, is something I’ve never managed to comfortably achieve. It’s probably the biggest reason my first attempt with Second Life “failed”;  I came with preconceptions of dropping into role-play (historical or sci-fi or something on those lines), but never really found anything in which I felt “at home”.

As “me” (or “me through Inara”, so to speak) I’ve found a greater range of freedom than might otherwise have been the case: the freedom to share friendships that can be in some respects transient, but because of the nature of Second Life, allow a lot more depth to be plumbed, and genuine connections to be forged.

I’d be a fool if I denied blogging had played a role in my continuance with Second Life. I actually started in 2007, but it wasn’t until I relocated the blog to WordPress in 2009 and really set out trying to learn more about how rich and complex the platform is, both in terms of use and technicality, that I felt I’d really found my niche.

I’m genuinely not a technical person, so discovering all that goes on “behind the scenes”, so to speak have been a constant – and still evolving – learning experience for me. It has also taught me a lot about the platform in general – the users, the places, the art – all of which have expanded my horizons, helped grow my understanding of a range of topics and taught me lessons in appreciation and thinking.  I may not get things right all the time – but that’s part of the fun and discovery.

Looking ahead, there’s liable to be a lot more to write about – be it technical with the move to the cloud, the return of last names, the arrival of EEP, the potential of Animesh products, or as a result of having yet more places to explore, art to appreciate and things to try. So hopefully, I’ll have plenty of opportunity to continue to experience Second Life and report on it.

Thank you to all of you who continue to read this blog, who support me through Twitter and Plurk; you as much as anything keep me engaged in Second Life. And my thanks once again to Caitlyn and all my friends who continue to make my explorations and time in SL fun.