Second Life viewer: Starlight UI skins and options

Hitomi Tiponi's Starlight set provides a total of 10 different skinning options for the official viewer, together with a range of additional UI tweaks and options
Hitomi Tiponi’s Starlight set provides a total of 10 different skinning options for the official viewer, together with a range of additional UI tweaks and options (Starlight Silver Blue skin shown on viewer 4.0.6.315555) – Click any image for full size, if required

Reader Wolf Baginski posted a comment on the subject of alternative skins for the official LL viewer, prompting me to think about Starlight. This is a set of alternative UI skins and additional options available for the official viewer (and for some TPVs, although they are outside the scope of this article), which I last wrote about in these pages page back in 2010/11 when I was using it with viewer 2.x.

So, given I haven’t written about Starlight for a good while, and given there may be users of the official viewer who haven’t previously come across it, I thought it might be a good idea to take a look at Starlight as it is today, and offer something of an introduction for those unfamiliar with it.

Overview

Produced and maintained by Hitomi Tiponi, Starlight has been available for the English language version of the viewer for a good few years, as noted above. Today, it includes no fewer than 10 alternative UI skins and a range of other UI updates and tweaks which may appeal to users. The ten skins comprise:

  • Original Orange: a dark theme with a touch of orange
  • Nostalgia Blue: features buttons and some layout changes to remind you of Viewer 1.x
  • Silver Blue: a ‘dark on light’ theme using a cool blue
  • Silver Pink: as above, but with a hint of pink
  • Mono Teal:  a high-definition black on grey / white & teal green buttons
  • Orb Red: designed to make the interface seem less one-dimensional
  • Orb Blue: as above, but a deep shade of blue
  • Original Teal: The Lab’s original viewer 2.x colour scheme with slightly improved contrast
  • Two customisable skins which can be modified via the  StarLight Colourful User Interface (CUI):
    • Custom Dark: for using with a backdrop of a black, navy blue, dark red etc.
    • Custom Light: for a brighter, vibrant look, ideal for integrating black text with a lighter theme.

The additional UI items offered within Starlight include, but are not limited to:

  • Top bar Draw Distance slider (between 32 and 992 metres)
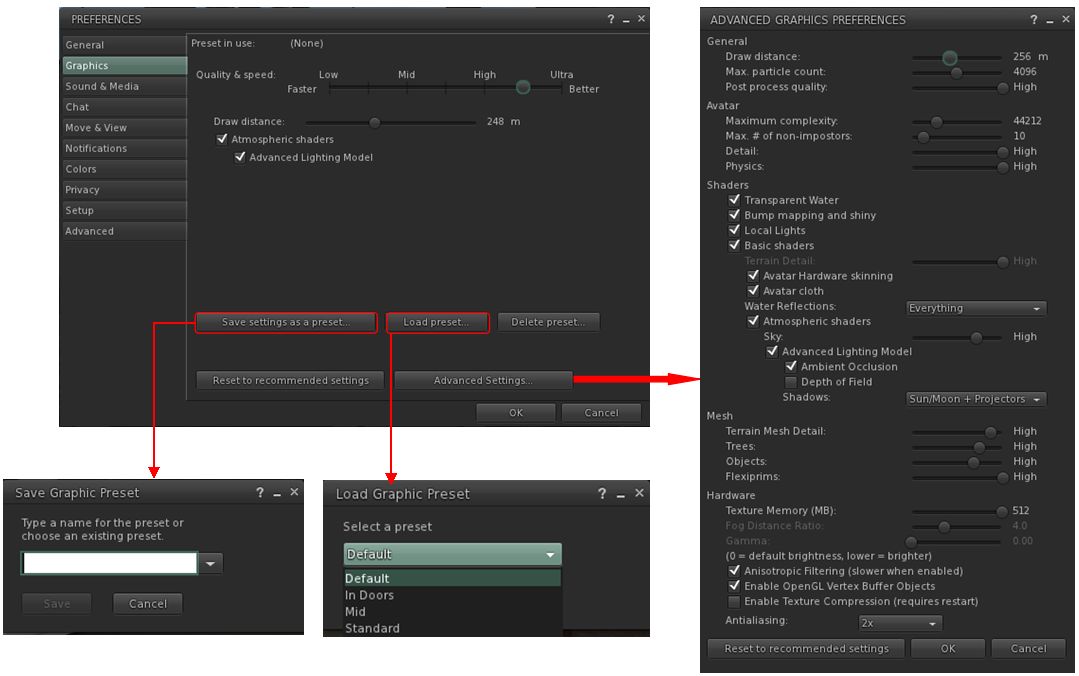
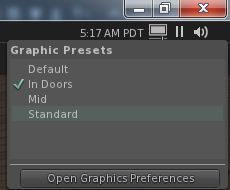
  • Revised Preferences panels
  • Additional Toolbar buttons
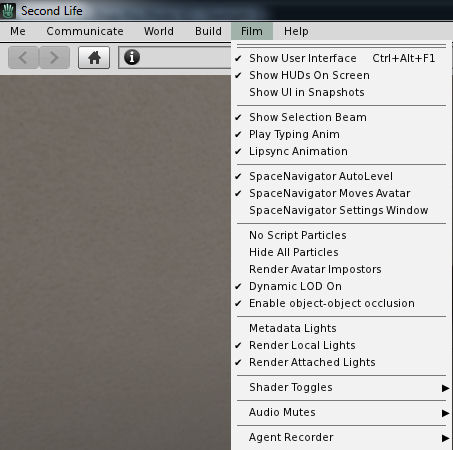
  • Film menu, for photography and machinima fans
  • Inclusion of a “lite” version of PhotoTools
  • Comprehensive Shadows, Rendering, Depth of Field and Local Lights settings in Preferences > Graphics
  • Assorted UI layout improvements / updates.

For a full list of such options and updates, please refer to the Starlight wiki page.

Starlight-7_001
Starlight also offers a range of UI options, including updated floater layouts, new floaters, additional toolbar buttons, easy access Draw Distance slider and more. Click for full size, if required

Installing Starlight

Note that while available for the official viewer, Starlight is a third-party product, and isn’t supported by Linden Lab.

  1. Log out of Second Life.
  2. Go to the Downloads section of the Starlight wiki page.
  3. Read the notes on downloading the correct version.
  4. If you download the .ZIP file (suitable for Windows, OS X and Linux) following the manual installation instructions on the wiki page.
  5. If you download the Windows Easy Installer:
    • Launch the installer and follow the on-screen instructions
    • Make sure you install Starlight to the installation location of the viewer with which it is to be used
    • If you use different RC and project viewers, and wish to have Starlight available for all of them, you must install it for each one.

Note that if a new version of the viewer is subsequently installed to the same location used with Starlight, the Starlight files will be removed as a part of the installation process. You’ll therefore need to re-install the latest version of Starlight in order to keep using it. However, as the Second Life settings files are not removed during viewer updates / installations (they are only removed if you manually carry out a completely clean installation), the viewer should revert to the last active Starlight skin once you have re-installed your Starlight files.

For photographers and machinima makers, Starlight adds the Film menu to the viewer's menu options (Starlight Mono Teal skin shown)
For photographers and machinima makers, Starlight adds the Film menu to the viewer’s menu options (Starlight Mono Teal skin shown)

Running Starlight

  1. Launch the viewer.
  2. Select a Starlight skin from the drop-down displayed below the log-in button.
  3. Re-start the viewer and log-in.

Repeat these steps should you wish to change skins.

Selecting a new Starlight Skin

Additional Notes

Well documented and supported, Hitomi generally has an updated version within hours of any new official viewer de facto release, offering a good cross-section of UI skins and some excellent UI additions, Starlight remains the add-on for the official viewer.

As per Wolf Baginski’s suggestion, I’ll be adding links to Starlight wiki page to my Current Viewers Release List and my weekly viewer release summaries going forward, to help people more easily find it.

Avatar Complexity and Graphics Presets in Second Life

Avatar Complexity provides users with the adbility to
Avatar Complexity is a means to help people who may suffer from performance issues in crowd areas

On Wednesday, May 18th, Linden Lab promoted the long-awaited Quick Graphics viewer to de facto release status. This viewer includes two important new features:

  • The updated Avatar Complexity settings
  • The ability to create, save and load different groups of graphics settings quickly and easily.

Avatar Complexity

As avatars can often be the single biggest impact on the viewer in terms of rendering, particularly in crowded places, so  Avatar Complexity adds a new slider to the viewer which can be used to set a level above which avatars requiring a lot of processing will appear as a solid colour – the casual term to refer to them being “Jelly Dolls” – greatly reducing the load placed on a system compared to having to render them in detail, so improving performance.

The idea is that you can adjust the setting according to circumstance, so that when in a crowded area with lots of avatars, you can dial down the Avatar Complexity setting, found in Preferences > Graphics (and in the Advanced Settings floater), with the result that more of the avatars around you are rendered as solid colours, reducing the load on your graphics card and system, thus improving performance. Then, in quieter areas, the setting can be dialled back up, allowing more avatars to fully render in your view.

Note: this only applies to other avatars in your world view: your own avatar will always fully render in your view.

The Avatar Maximum Complexity slider sets a threshold on avatar rendering by your viewer. Any avatars in your view exceeding this value will be rendered as a
The Avatar Maximum Complexity slider sets a threshold on avatar rendering by your viewer. Any avatars in your view exceeding this value will be rendered as a “Jelly Doll”, sans attachments

If you have a good system with a high-end graphics car, you can set the value on the slider quite high and thus ensure all avatars render fully for you wherever you are.

Note: You can sett the Avatar Maximum Complexity to “No Limit”. However, this is not entirely recommended. some irritants in Second Life still use worn graphics crashers to overload GPUs and crash the viewer. If you set Avatar Maximum complexity to “No Limit”, then such tools, should you ever encounter an irritant using one, will still be effective; so it’s better to set a reasonable high value, leaving your viewer with a cut-off point which should defeat their efforts in crashing you.

There are a few other points to note with Avatar Complexity:

  • You can opt to always render or to not render avatars around you, regardless of your Avatar Maximum Complexity setting by right-clicking on them and selecting your desired action from the context menu
    You can opt to always render or to not render avatars around you, regardless of your Avatar Maximum Complexity setting by right-clicking on them and selecting your desired action from the context menu

    To help you understand how complex you own avatar is, every time you change your appearance, each time you change the appearance of your avatar, a small notice with your new complexity value will appear in the upper right of your display for a few seconds

  • The complexity value of your avatar is transmitted to each simulator as you travel around Second Life. In return, you’ll get a brief notice in the upper right of your screen telling you approximately how many of those around you are (or are not) rendering you because of your complexity
  • If you have a friend or friend you wish to see fully rendered no matter how low you dial Avatar Maximum Complexity (while out at a club, for example, where it may be beneficial to set a lower complexity threshold), you can right-click on those individuals and select “Render Fully” from the context menu
  • Similarly, and if you prefer, you can selectivity render avatars in your view as grey imposters, by right-clicking on them and selecting “Do Not Render” from the context menu.

Note: Both “Render Fully” and “Do Not Render” will only apply during your current log-in session; the options are not persistent between re-logs.

To help people understand Avatar Complexity, the Lab has produced the following:

  • A blog post to accompany the promotion of the Quick Graphics viewer to release status
  • An Avatar Complexity Knowledge Base article
  • A video tuTORial, which I’ve embedded below.

https://www.youtube.com/watch?v=PxWrqd0o3dc

Continue reading “Avatar Complexity and Graphics Presets in Second Life”

SL Project updates: 37/1: inventory reliability improvements

Mysts of Eyr; Inara Pey, September 2015, on FlickrMysts of Eyr September 2015 – blog post

At the TPV Developer meeting on Friday, September 11th, the Lab provided further information about the ongoing work to improve inventory handling and management in Second Life.

As has been reported through these pages, the Lab has been tackling a wide range of issues related to inventory, inventory management, inventory losses, etc., over the last several months. The updates given at the TPV Developer meeting were to provide information and news on both the work to help fix issues around large “flat” inventories, and on new and upcoming work in rationalising inventory related code within the viewer, with Izzy and Aura Linden providing the updates.

The video of the meeting can be seen here, and time stamps are given below to the relevant points in the video where the items are discussed.

“Flat ” Inventories

[10:15] This is something that has been mentioned through a number of project updates in these pages. However, in summary: if you have a large “flat” inventory structure with tens of thousands of items contained in single folders at a time, rather than being split between multiple sub-folders, you can experience significant issues in logging-in to Second Life, up to and including being completely unable to log-in at all.

Earlier in the year, the Lab developed an inventory transform tool which, when run, can take the contents of such large folders and split them into smaller, easier-to-load sub-folders. This tool has been undergoing testing for some time, but has now been issued to the Lab’s support teams. So, those encountering log-in issues and know they have large, relatively “flat” inventory structures can raise a support request (Premium or Basic) and have the tool run against their inventory, thus hopefully fixing  matters for them.

Inventory Code Improvements

Task Paths

[12:50] Currently, the viewer has multiple paths and mechanisms by which inventory tasks can be undertaken / completed. Aura is therefore working through the viewer code to try to rationalise how inventory is handled, ensure that older paths / mechanisms are properly deprecated / removed and replaced by newer and more robust mechanisms.

[14:20] The first set of changes Aura is working on is to remove from the viewer all of the old UDP inventory messaging paths which have already been replaced by more robust mechanisms (and in some cases already had the server-side support for them removed), but which have until now remained a part of the viewer’s code.

These changes should be appearing in a project viewer for testing by TPVs in the next month or so. This is to allow them to identify possible impacts on any dedicated inventory handling mechanisms they may use (e.g. RLV / RLV/a) which may also use the older UDP messaging paths, and address any updates they may need to made as a result.

Once this viewer reaches release status, the Lab will seek to remove any server-side support for legacy UDP for inventory operations from the simulator code. Again, this will be done in consultation with TPVs, with testing regions available on Aditi beforehand, so the Lab can again be warned if they are triggering potential problems which may need to be thought about / addressed.

Code Refactoring

[19:35] The second element in the work is a refactoring of the viewer inventory files. This work will initially rationalise inventory functions within the viewer so that they are more closely coupled with their actual purpose, rather than being more widely scattered through the viewer code, and will not involve any actual code changes.

However, a further part of the work will involve code changes, with the overall aim being to make the code a lot more readable, easier to test and maintain and understand.

Server-side Inventory Rules Enforcement

[23:32] Additionally, once the above work has been carried out, new checks will be added server-side to prevent actions which are known to cause inventory problems from happening.

For example, there have been issues where people have found themselves with more than one Current Outfit folder or with multiple Trash folders, both of which can result in complications when using the viewer. The simulator-side rules, when put into place, will be designed to prevent these kinds of instances occurring.

Time Frames

As noted, the first phase of Aura’s work – the initial code deprecation work – will be appearing in a project viewer in the next month or so, and the work will progress from there in the stages, thus:

  • Remove the deprecated inventory message paths from the viewer
  • Remove any remaining simulator support for deprecated inventory messaging support
  • Rationalise the inventory functions in the viewer
  • Refactor the viewer’s inventory code in the interests of stability, maintenance, testing and update
  • Add simulator checks to prevent folder duplications, etc

How long it will take to implement each phase isn’t currently clear, and will to a degree depend on feedback about issues discovered by TPVs, as well as the results of continued testing by the Lab.

Avatar Complexity and graphics presets update

Avatar Complexity (aka Jelly Babies) is now available in the Quick Graphics project viewer

Update: See BUG-9962 for issues relating to avatars becoming stick as Jelly Babies when using Avatar complexity.

On Friday, August 21st, the Lab issued their Project Quick Graphics project viewer. Version 3.8.4.304433 brings with it the much-anticipated Avatar Complexity and graphics presets capabilities, both of which are intended to assist in improving viewer performance for those on lower-specification computers.

I provided an overview of the viewer while it was still in an early version, so this is offered as a further update.

Avatar Complexity  introduces a new slider to the viewer which can be used to set a level above which avatars requiring a lot of processing will appear as a solid colour (including their attachments), giving them the nickname ” Jelly Babies” after the sweet (candy) of the same name.

As avatars can often be the single biggest impact on the viewer in terms of rendering, particularly in crowded places, using this slider is intended to greatly reduce the load placed on a system compared to having to render them in detail, allowing users to adjust the setting according to circumstance – the setting can be increased, rendering more avatars as solid colours in crowded regions, and turned down for quieter spaces. At the same time, there’s also the ability to set how individual avatars are rendered on-the-fly during the current log-in session.

The Avatar Complexity slider in Preferences > Graphics > Advanced Graphics Preferences (l) and the new format of information displayed when Advanced > Performance Tools > Show Avatar Complexity Information is enabled (r)

The Avatar Complexity slider can be found on the Advanced Graphics floater (Preferences > Graphics > Advanced Settings…), The values run from 19,999 to 300,000, above which it switches to No Limit, meaning all avatars in your field of view will fully render, with the default based on the rendering performance of your system. As noted in my last piece on this, the values used by this slider are based on those previously used to determine Avatar Draw Weight / Avatar Render Cost.

It is possible to see the render complexity of all avatars in your field of view (including your own) by enabling Advanced > Performance Tools > Show Avatar Complexity. This displays a series of figures above avatar heads which is updated in real-time. The one likely to be of interest to most users is at the top: the actual render complexity value. This should remain fairly constant, allowing for how people might change their appearance by adding / removing items and changing their appearance.

The viewer also generates information messages in the upper right corner related to Avatar Complexity. One is displayed each time you change your own avatar’s appearance and impact your own rendering complexity. The second acts as an indicator for when you’re over the limit of “too many” of the avatars around you, and are being rendered as a Jelly Baby.

The viewer displays notifications when you (l) make a change to your own avatar which impacts its render render complexity; (b) if your avatar is largely rendered as a Jelly Baby by others
The viewer displays notifications when you (l) make a change to your own avatar which impacts its render complexity; (b) if your avatar is largely rendered as a Jelly Baby by others

A further element of Avatar Complexity is the ability to selectively alter how individual avatars are rendered on-the-fly. This is achieved via the right-click Avatar context menu, which includes three new options:

The right-click avatar context menu has options to allow you to define how you want specific avatars to render during the current session
  • Render normally – the avatar will render as defined by the Avatar Complexity setting. If the avatar’s complexity is lower than the setting in the viewer, it will render correctly; if it is higher, it will render as a Jelly Baby
  • Always Render Fully – does exactly what it says – the avatar will always be fully rendered, regardless of it exceeding your set complexity limit
  • Do Not Render – renders the avatar as a Jelly Baby (or even not at all save for name tag if already very easy to render) regardless of your Avatar Complexity setting. Note that this setting does not persist across log-ins (so if you re-log, those avatars you’ve used it against will render normally), and it will not block the ability to read their local chat or receive their IMs, etc.

There are a couple of final points worth mentioning with Avatar Complexity. The first is that it is not a replacement for Avatar Imposters, but can be used alongside it. The second is that with this project viewer release, the colours of Jelly Babied avatars has been muted when compared to test versions of the viewer, making them a lot easier on the eye (the image at the top of this article shows the former, more vivid colours).

Graphics Presets (see STORM-2082) allows users to create, save and use their own graphics presets, each designed to meet a specific requirement, and which can be quickly switched between with the overall aim of helping with viewer performance.

For example, one preset may have all the performance hitting items (shadows, projectors, etc.) turned on / up for times when the overall quality and depth of detail in a scene is important for taking photos, another may have them dialled-down for crowded places, and a third might have them adjusted further for “indoor” use (so draw distance is greatly reduced, sky and terrain details are set to low, water reflections turned off, etc.).

The viewer includes the means to create and save sets of graphics presets which can be quickly loaded according to need / circumstance to help maintain a viewer's performance
The viewer includes the means to create and save sets of graphics presets which can be quickly loaded according to need / circumstance to help maintain a viewer’s performance

Once a preset has been set-up, using the revised Advanced Graphics Preference panel, it can be uniquely saved, and then applied at will using the either via Preferences > Graphics > Load Preset, or more directly by the Graphic Presets icon located in the top right of the viewer.

The new Graphics Presets icon profiles a quick menus of applying previously saved graphics presets and accessing Graphics PreferencesWhen the mouse is hovered over this icon (shown right), a list of all saved presets is displayed, a tick appearing alongside the one currently being used. Clicking on any other preset will immediately apply it.

In addition, this panel also has a button which will open the viewer’s graphics settings in Preferences.

As noted in my previous article on these updates, the Advanced Graphics Preferences panel has been seen as less-than-optimal due to its size; the Lab have acknowledged the feedback, but have not made any significant changes to the layout as yet with this project viewer release. Whether they do or not may depend on feedback they receive directly from users, and what they feel can be done to improve clear deficiencies.

The ability to create and save graphics presets is a welcome addition to the viewer – these are not the same as backing-up and restoring viewer settings as seen in other viewers, but do provide a fast and efficient way to adjust graphics settings according to situation, if needs be.

Avatar Complexity is liable to be an interesting addition to the viewer. While there is a risk of seeing a return of ADW / ARC drama, it also provides the means for people to accurately judge the impact their avatar might be having on others – and their own, given their avatar must be rendered by their own computer as well – SL experience. It also potentially offers content creators to better understand how the use of mesh and textures can impact other people’s SL experience, allowing them to further improve their products.

Those wishing to try the viewer for themselves can find it here. Keep in mind, that is it s project viewer, prone to possible bugs and to further changes from the Lab, and issues should be reported via the JIRA.

Lab issues notifications project viewer

secondlifeOn  Wednesday, July 8th, the Lab issued their notifications project viewer, which sees an overhaul of the way in which notifications – system, group, transaction, etc., are presented through the viewer.

The viewer has been in the works for a while, and is the direct request of a feature request put to the Lab by Aki Shichiroji back in 2012 (see BUG-8000), and which has more recently been working its way through the Lab’s work list to appear in project form on July 8th.

The release of the project viewer, version 3.8.1.303211, was accompanied by an official blog post on the subject, which reads in part:

The Notifications Project Viewer is an improvement for sorting your notifications. This new feature is based on your feedback: a notifications floater with four tabs sorting your incoming notifications into System, Transactions, Invitations, and Groups and allowing better interaction with them as well.  Those who deal with high volumes of money transactions, group notices, group invites, or inventory transfers now have a better way to review their messages and identify which notices need immediate attention.

The images below show the floater and its four tabs:

The new Notifications floater - see below for explanatory notes
The new Notifications floater – see below for explanatory notes

Multiple notifications within a tab are initially shown compressed (above left). Clicking on the down pointing arrow button for a specific notification (highlighted in red, above left) will expand that particular notification within the floater (above right), with scroll bars allowing you to scroll down through an individual notification or through the notifications within that tab.  Clicking the up point arrow button (highlighted in blue, above right) will compress an expanded notification.

As with the current notification system within the release viewer, individual notifications can be deleted from any tab by clicking the X button. There are also additional buttons within the panel for collapsing all expended notifications or deleting all notifications within the currently displayed tab (i.e. clicking Delete All with the System notifications tab will delete all notifications in that tab but not all of your notifications in general).

A further improvement to the way notifications are displayed is that a time stamp for when a notification was sent / received is now clearly visible, both in the collapsed and expanded views for all notifications. The presence of any attachment is also indicated by the use of a paper clip symbol.

Given this is a project viewer, the Lab is requesting feedback and bug reports via the Second Life JIRA.

A couple of issues have been filed already. One of these – BUG-9625 – points out that the notification floater currently fails to include any means of accepting a group invitation; the only way of accepting an invitation in the project viewer at present, is to click on the button displayed in the initial pop-up (which will still be displayed as usual).  Expect this to be created in due course as the project viewer is updated.

Also, do keep in mind this is a project viewer, and currently not intended for prime time use.

Related Links

Lab offer “obsolete platforms viewer” for unsupported OS

secondlifeThe recent switch by Linden Lab to an updated set of tools for building the viewer (which are also being adopted by active TPVs) has meant that as viewers built using these new tools will no longer install on either Windows XP or versions of OS X below 10.7.

Given that neither Windows XP or version of OS X below 10.7 are regarded as supported products by either Microsoft or Apple, the most preferable thing for users on them to do is to upgrade. However, in some cases, this might be easier said than done. To help users who might, for whatever reason, be unable to upgrade to a later version of their OS in the short term, the Lab has issued an “obsolete platform viewer” into the viewer release channel, which will be provided for as long as is reasonable – but not indefinitely.

Version 3.7.28.300847 of the viewer (dated May 8th although it only appeared in the release channel this past week), is a “static” viewer, meaning:

  • It will not receive new features or bug fixes
  • It will not be promoted to release status
  • It does not change the Lab’s support policy on Windows XP or versions of OS X below 10.7, and is purely – as noted – an interim offering to help people.

The viewer is based on the April 2015 maintenance viewer release (version 3.7.27.300636), and so includes things like the unified snapshot floater.

Given it is offered only for as long as is reasonable, it should not be relied upon for long-term use, but rather as a means for those who prefer the official viewer and who use Windows XP and older versions of OS X to continue to access SL until such time as they are in a position to update their systems (or the viewer has to be withdrawn from use).

As per all the alternate viewers offered by the Lab, the viewer is listed on the Alternate Viewers page of the SL wiki, or you can use the direct link given above to view the official release notes and download options.