HTTP and Group Services updates

There are a number of projects underway at the moment to improve various aspects of Second Life performance. Some of these have been reported on as a part of the Shining Project, others are being dealt with elsewhere are reported on through the likes of the SL Scripting User Group and the fortnightly TPV/Developer meetings.

The following is by way of a brief update on the ongoing HTTP Library and Group Management projects with information taken from the most recent TPV/Developer meeting (recording link).

HTTP Library

The focus of this aspect of the Shining Project is to improve the underpinning HTTP messaging that is crucial to simulator / simulator and simulator / viewer communications, and it is under the management of Monty Linden.

Discussion on progress with the project commences at 36:36 into the recording.

The project code (textures only) is with the Linden Lab QA team and is expected to be in the 3.4.1 viewer once it has been released by QA. In the meantime, the HTTP project viewer was updated at the end of July. Many people are noticing improvements in viewer performance that go beyond initial texture loading, although there have been reports of other aspects of the viewer which use HTTP apparently being “slower” to use. This latter issue is most likely a false impression, with Monty commenting at the August 24th meeting that, “Most parts shouldn’t be affected. It’s competitive, when you’re doing both texture downloading and some of that work … but other things aren’t being cheated if you’re not downloading textures at the time.”

An issue has been noted in older Macbook Pro systems (late 2007 into 2008 dual-core systems, although the span of the problem isn’t clear) using nVidia drivers, wherein the expected speed-up with cached data which can be seen on other systems isn’t occurring. Monty is still investigating this. Overall, however, feedback on this project has been positive.

Group Management Functions

Large group loading: a familiar problem

Baker Linden has been working to resolve this problem, and his plan is also to go the HTTP route, which will require changes on both the server and the viewer sides of the equation. His comments on progress start at 42:53 into the TPV/Developer meeting recording.

The server-side code for an initial implementation of the solution has been passed to LL’s QA and is expected to be rolled to selected regions on the Beta (Aditi) grid soon.

In terms of the viewer, the plan is to develop a Project Viewer, which will be made available in the near future for people to use with the Aditi test regions. How soon this viewer is likely to appear is open to question – the code will initially need to be passed by LL’s QA (who may have received it on the 24th August) prior to the viewer being built. Once in the project viewer repository, the code will also be available for TPVs to produce test viewers of their own.

How long the testing period will last is also open to question and dependent upon feedback / issues arising. However, the plan will be to follow the usual pattern for roll-outs in that once the code has been tested on Aditi and necessary updates made, it will be rolled to a main grid RC for more more involved testing. This is important, as there is a significant different in the number and sizes of groups operating on the two grids. For example, the largest group on Aditi numbers some 40,000 members; on the main grid the largest group is about 112K, and there are many more groups with between 40K and 112K members.

One thing that has been made clear is that there will be no attempt at backward compatibility with V1-based viewers on the Lab’s part; the new code will be aimed solely at the V3 code base. However, V1-based viewers will still be able to use the UDP protocols for group management, although the LL servers will limit UDP access to groups with 10K members or fewer, so V1-viewers will have some more code backporting on their hands.

There will also initially be some issues around the new HTTP protocol. For example, in the first implementation, the data will be uncompressed. This means that a 40K member group is around 5Mb in size, which can take up to a few minutes to download, depending on someone’s connection speed, so some frustrations are liable to continue. While data compression will eventually be used, this is not planned for the initial implementation.

The discussion involved providing an option to routinely clear-down group lists based on people’s last log-in date, or who have not logged in for a (group owner specified) number of days. However, LL are not going to implement such a feature on the grounds that it could lead to mistakes being made, and people being accidentally removed from a group.

Time Scale and Implementation

As mentioned above, there is no definitive time scale for this work to be completed. Testing is liable to take several weeks at the very least, so it is unlikely the new group management capabilities will be rolled-out on a widespread basis for at least another month, or possibly longer.

However, and like the upcoming new avatar bake service, once the server code is available on the grid, the switch-over will be transparent. If a viewer has the code to use the new group management HTTP service, it will do so, if it has not been updated, it will continue to use the UDP service (with the aforementioned 10K “cap”) until such time as that capability is “retired” from the grid.

Materials processing: the what, why and where

On August 16th, Linden Lab announced the forthcoming arrival of material processing in SL in the form of specular and normal maps. At the same time, a video was released demonstrating some of the capabilities. But what does this actually all mean for the everyday user in SL? Here’s what I hope is a lay guide to things, including comments from one of the architects of the new system, Geenz Spad, as to how it came about.

Materials Processing

This is not intended to be a technical discussion on computer graphics mapping in general or on normal or specular maps in particular. Rather, it is intended to provide a broad, non-technical explanation as to how the latter work. 

Materials processing is the combining of various computer graphics “maps” to significantly increase the level of detail that appears on any object or surface within a computer game. Within Second Life, textures (themselves a form of computer graphics map called a diffuse map) are routinely used to add the illusion of surface details to in-world objects and surfaces. The new material processing capability will introduce two further kinds of computer graphics map to SL which can be used in-world with textures to dramatically increase the detail and realism of objects and surfaces. These additional maps are called normal maps and specular maps.

Normal  Maps in a Nutshell

Normal maps (sometimes referred to as bump maps, although they are more rightly the most common form of bump map) are a means of faking high levels of detail on an otherwise bland surface by means of simulating the bumps and dips that create the detail. Normal maps can be created in several ways.

For example, when working with 3D models, a common method is to make two models of the same object: one a very complex, highly detailed model with a high polygon count, the other a much lower polygon count model with significantly less detail. An overlay process is then used to generate a normal map of the detailed model’s surface features which can be applied to the less complex model, giving it the same appearance as the highly detailed model, but for just a fraction of the polygon count, reducing the amount of intensive processing required to render it.

Using a normal map to enhance the detail on a low-polygon model. The image on the left shows a model of some 4 million triangles. The centre image shows a model with just 500 triangles. The image on the right shows the 500-triangle model with a normal map taken from the model on the left applied to it (credit: Wikipedia)

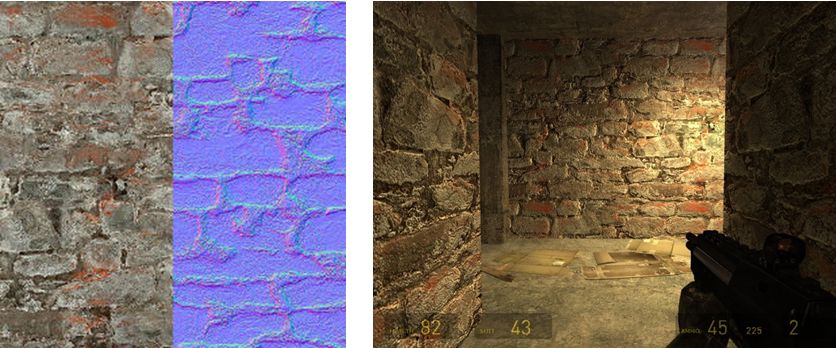
Another common way to produce a normal map is to generate it directly from a texture file. Most modern 2D and 3D graphics programs provide the means to do this, either directly or through the use of a plug-in (such as the nVidia normal map filter for Photoshop). When combined with diffuse maps, the normal map creates the impression of surface detail far greater than can be achieved through the use of the texture alone.

Normal map from a texture: left – the original texture (diffuse map) and its normal map shown as a split view; right – the material resultant from applying both maps to surfaces inside a game (credit: Valve Corporation)

Specular Maps

In the real world, every highlight we see in an object is actually the reflection of a light source. Surfaces and surface details reflect light differently to one another, depending on a range of factors (material, lighting source point(s),  etc.). Specular maps provide a means of simulating this by allowing individual pixels in an object to have different levels of brightness applied to them, giving the illusion of different levels of light being reflected by different points on the object.

When life gives you lemons: a mesh lemon with (l) a  normal map  applied, and (r) a normal and a specular map together. Note how light is apparently being reflected across the surface of the latter (credit: Mind Test Studios)

Like normal maps, specular maps can be produced in a number of ways, both within 3D graphics modelling programs and in tools like PhotoShop. As shown above, they can be combined with normal maps and textures to add detail and realism to 3D models and flat surfaces.

What Does This Mean for Second Life?

Second Life itself already includes a dynamic example of how normal and specular maps can be used: Linden Water. This is created using an animated normal map to create the wave-like effect for the water, while an animated specular map adds the highlights and reflections. The result is a very realistic simulation of moving water able to catch and reflect sunlight.

Just as the use of normal and specular maps create a very real illusion of water with Linden Water, the new materials processing capabilities will significantly enhance the look and realism of both mesh and prim content within SL. Mesh content should additionally benefit as it will be possible to produce high levels of detail on models with low polygon counts (as shown in first image in this article). This will improve rendering performance while also having the potential to lower things like land impact for in-world mesh items.

The only initial limitations as to where and how normal and specular maps can be applied is that they will not be applicable to avatar skins and system layer clothing. Any decision on whether the material processing capability should be extended to include these will depend upon at least two things:

  • Community feedback – whether there is a demand for normal and specular maps to be used with avatar skins
  • Understanding what is happening with the avatar baking process, and determining what is involved in getting the new baking process and material processing to work together.

Use the page numbers below to continue reading

Pathfinding: starting to reach TPVs

The pathfinding tools are starting to find their way into TPVs well ahead of showing any sign of moving from the SL Beta Viewer to the release version.

The delay in updating the release viewer may be down to several reasons. One of these might be that Linden Lab staff acknowledge the pathfinding documentation is currently undergoing update and rationalisation, and so the capability is still regarded as being “in beta”.

The table below is a list of current TPV versions (August 19th) of TPVs which have started to embrace pathfinding, and indicates the tools provided.

(click to enlarge if required)

Note that the Navmesh View  / Test option is tied to the new SL Havok sub-licence arrangement, as such none of the above viewers are able to include it unless / until they sign the sub-licence agreement (and are eligible to do so). However, visualising the navmesh is not essential to setting pathfinding attributes for objects in-world or optimising regions where pathfinding is being actively used. Other “missing” functionality as indicated in the table above will doubtless be addressed by the viewers in future releases.

Links for these viewers, including to their release notes, can be found on my Viewer round-up page.

Related Links

Pathfinding: playing inside buildings

Over the last couple of days, I’ve been experimenting with setting pathfinding characters roaming within buildings. What follows is not intended to be definitive, but more a case of what I’ve found so far. Until there is more up-to-date documentation from LL on setting-up pathfinding, this was very much thumb-in-the-air stuff, and as ever, YMMV. I’m still fiddling with things, and may add a further article later.

Characters with Impact

For the test, I used a basic pathfinding script to animate a cube (which I called “Charlie”). It was simple and was enough for the basic task. One thing to bear in mind with pathfinding characters is that they’ll have a land impact of 15. This is related to the character’s physics weight, and will not change as a result of adding / removing prims (a 1-prim character will still have a land impact of 15 as will a 30-prim character), although other factors (such as streaming cost) may raise the LI.

People may find the idea of a 15 LI character “harsh” (esp. if the prim count is lower). For my part, I don’t think it is that bad; it still allows for a fair few NPCs in a role-play region without significantly impacting prim counts.

Setting Attributes

Setting-up a building in which pathfinding characters can roam requires setting the correct pathfinding attributes. During my tests, I wasn’t trying for anything sophisticated like setting-up paths; rather, I wanted to see how a simple character (like a pet or animal) would roam and interact with its surroundings.

Pathfinding attributes, as outlined in my pathfinding overview, are set via the Linkset floater. There are a few points that need to be noted prior to doing this:

  • Only one attribute can be set for a linkset, so if your structure includes walls and floors within the same linkset, you cannot set one attribute for the floor, another for the walls, and so on
  • It is possible to set pathfinding attributes against NO MOD builds, as pathfinding attributes are not the same as object permissions. However, there are caveats to this – such as whether or not the build includes things like scripted doors (see the following bullet point)
  • Attributes which affect navmesh calculations (e.g. Walkable, Static Obstacle, Exclusion Volume, Material Volume), should not be set against linksets with scripted moving objects (such as doors). Doing so will prevent the scripts in the objects working as intended
    • If you have a structure which includes things like doors, these must be unlinked first and their attribute left as moveable obstacle
    • Obviously, in the case of NO MOD builds, this potentially limits your choices as to how you enable pathfinding within a building and in ensuring pathfinding is suitably optimised.
Pathfinding attributes for buildings require setting with care to avoid possible “breakages”

To set an object’s pathfinding attribute:

  • Right-click on the linkset for the object  and select Show in Linksets
  • Select the required attribute from the drop-down list
  • Apply the attribute to the linkset
  • Use the Rebake Region button which will appear at the bottom of your screen to update the region navmesh.
Setting an object’s pathfinding attributes

Walkable Areas

Broadly speaking, the following options are available when creating walkable areas in a building:

  • Set the entire structure to Walkable. This works reasonably well, however:
    • For modifiable builds, all scripted moveable elements must be configured as linksets separate to the main structure, as noted above
    • This option should not be used for NO MOD buildings with scripted moveable elements integral to the structure
  • If the building’s floor areas are already an independent linkset, set that linkset to Walkable
  • If the building is modifiable, unlink the floor areas and then re-link them as an individual linkset which can be set to Walkable
  • Create your own floor “overlays” from prims, position them over the existing floors and then set their attribute to Walkable (useful in NO MOD builds which include scripted moving elements).

Which of these options you use is down to the building you have and personal choice. I found that setting an entire building to Walkable (after taking care of the door linksets) worked perfectly well for the most part.

Placing a Walkable floor into a build. Left: the floor prim and house; right: as seen in navmesh view with house selected (wireframe) and the floor in green to indicate it is walkable. Note the floor equates to one room of the house

Note you can set the Walkable attribute for the floor prims prior to positioning them, but you’ll have to run a region rebake once you’ve done so. You can “hide” the floor prims by making them transparent.

I should also note that in terms of furnishings, I left anything set with the Movable Phantom attribute alone, and anything set to Movable Obstacle to Static Obstacle (this did not “break” any scripts for sitting, etc.).

Optimising

To give better control over characters roaming inside a building you might wish to set additional attributes against individual elements in a building. For example, in setting an entire building to Walkable and with Charlie moving at the default character speed, I found he would periodically “pass through” a wall or window and continue roaming around outside. I stopped this by setting the walls of the building to Static Obstacle. As well as potentially helping with character behaviour, setting additional attributes for linksets and objects helps optimise pathfinding for the entire region in which it is being used.

Use the page numbers below left to continue reading

Linden Lab announces normal and specular maps coming to SL

Today, Linden Lab has announced a major new open source initiative to improve graphics rendering performance within the viewer. The announcement reads in full:

One of the challenges that virtual world creators face is the trade-off between rich visual detail and geometric complexity. Ideally, by adding more and smaller faces to an object, a designer can model different surface textures and create realistic variations in the interplay of light and shadow. However, adding faces also quickly increases the size of the model and its rendering cost. Normal and Specular Maps are ways to address this by allowing for the appearance of a complex surface without actually modelling fine scale geometry. 

A Normal Map is an image where the color codes indicate how the renderer should reflect light from each pixel on a surface by modifying the direction that the pixel “faces” (imagine that each pixel could be turned on tiny pivots). This means that pixels on a simple surface can be rendered so that they appear to have much more detail than the actual geometry and at much lower rendering cost. Light and shadow are rendered as though the surface had depth and physical texture, simulating roughness, bumps, and even edges and additional faces.

Similarly, a Specular Map allows each pixel to have its own degree of reflectivity, so that some parts of a single face reflect sharply, while adjacent pixels can be dull.

The open source developers of the Exodus Viewer are contributing Viewer support for Normal and Specular Maps, as well as some additional controls for how light reflects from faces. Linden Lab is developing the server side support so that this powerful tool will be available in Second Life.

Design and development are under way. Watch this blog and the Snowstorm Viewers page for information on when test Viewers with these new capabilities become available.

For additional information, or to learn more about how you can participate in the open source program, please contact Oz@lindenlab.com.

A video has also been released, demonstrating the capabilities.

With thanks to Pete Linden for the heads-up

Pathfinding and region performance – Lorca Linden comments

Nalates Urriah has been keeping an eye on the more technical aspects of pathfinding, and has routinely provided excellent updates and commentary on the project. Her work is largely the reason I’ve not delved overly deeply into the subject here, and why my own Pathfinding overview attempts to cover the subject from a lay user’s perspective.

Alongside yesterday’s roll-out came a lot of confusion regarding pathfinding and its impact on region performance. As a result of this, Nalates published a piece seeking to clarify matters. If you are concerned as to the impact of pathfinding, and you’ve not already done so, I thoroughly recommend you give her article a careful read.

Today, Lorca Linden took the extraordinary step of commenting on Nalates blog in order to lend further clarification on the subject. While I do not agree with his stated reasons as to why Linden Lab did not communicate more on the actually roll-out (which, in fairness, has potentially contributed to the confusion / misinformation circulating about pathfinding), the key points of Lorca’s comments vis-a-vis overall performance are nevertheless important in helping to spread better understanding of the matter. I’m therefore reprinting his comments here in full, with the key paragraph on performance underscored, in the hope that it will help them reach a wider audience.

“Although Lindens do not generally post on Resident blogs, I am going to make an “exception in this one case. Don’t expect us to make a habit of it, though 🙂

“I want to start off by thanking Nalates for what I feel has been even-handed coverage of pathfinding as a whole. While I disagreed with several of the assertions made in the “Tsunami” post, it did make us realize that there were misconceptions about pathfinding that needed clarification (particularly in regards to performance implications) and was a useful data point in identifying Resident concerns while we were still in the development phase.

“The 18% performance hit figure referenced on the Phoenix Viewer blog is a worst case scenario that will rarely be seen in practice – eg, you could see that large of a hit on a poorly optimized region that contains hundreds of pathfinding characters running simultaneously. Average perceived (viewer side) fps grid wide was actually .03 fps higher yesterday afternoon than it was the afternoon before. Average server-side performance grid wide was also inline before and after pathfinding server code was rolled out. Region crash rates – excluding a bumpy couple hours during the roll out – remain low. All of this is to say that as far as the Lab can tell, Pathfinding has not had a negative performance or stability impact in the vast majority of situations.

“I also want to make clear that the impact on some vehicles is not directly related to pathfinding per say but rather the underlying physics and terrain optimizations that made pathfinding possible and have benefits beyond pathfinding. As far as we can tell, only a small percentage of existing content is affected by this physics upgrade.

“We do not consider pathfinding to be fully released until the pathfinding viewer tools are out of beta. This is why we have not yet made an official announcement. I agree that we need to do a pass on our pathfinding related wiki as some of the information there has not been updated since we were in alpha. We plan to make a blog post in the near future that will address some common misconceptions we have heard about pathfinding. We also plan to continue updating the “Good Building Practices” guide so that it will be a useful resource for Residents looking to make optimized content.

“We understand that pathfinding can be a confusing topic at times and appreciate the effort interested Residents are making to absorb the technical details. If you have any burning questions about pathfinding, please come to our user group on Pathtest1 (on Aditi) at 4PM SLT Thursdays and ask away. Above all, we are extremely excited to see what you Residents create with the new pathfinding tools and LSL functions!”