2024 week #29: SL CCUG summary

Nong Han Kumphawapi, June 2024 – blog post

The following notes were taken from my audio recording and chat log transcript of the Content Creation User Group (CCUG) meeting held on Thursday, July 18th, 2024.

Meeting Purpose

  • The CCUG meeting is for discussion of work related to content creation in Second Life, including current and upcoming LL projects, and encompasses requests or comments from the community, together with related viewer development work. This meeting is held on alternate Thursdays at Hippotropolis.
  • In regards to meetings:
    • Dates and times are recorded in the SL Public Calendar.
    • Commence at 13:00 SLT on their respective dates.
    • Are conducted in a mix of Voice and text chat.
    • Are open to all with an interest in content creation.
  • The notes herein are a summary of topics discussed and are not intended to be a full transcript of the meeting.

Official Viewers Status

  • Release viewer: version 7.1.8.9375512768, formerly the Graphics Featurettes RC viewer dated June 5 and promoted June 10th.
  • Release channel cohorts (please see my notes on manually installing RC viewer versions if you wish to install any release candidate(s) yourself).
    • WebRTC Voice RC, version 7.1.9.9688089989, July 1.
    • Atlasaurus RC (object take options; improved MOAP URL handling), version 7.1.9.9620320242, June 27.
    • Maintenance B RC (usability updates / imposter changes) 7.1.9.9555137545, June 21.
    • Maintenance C RC (reset skeleton in all viewers), version 7.1.9.9469671545, June 14.
  • Project viewers:
    • None.

WebRTC Voice Update

Not strictly a Content Creation tool / subject, but of import to SL as a whole.

Summary

  • A project intended to move Second Life away from reliance on the Vivox voice service and plug-in, and to using the WebRTC communications protocol (RTC=”real-time communication”). Roxie Linden is leading this work.
  • Key benefits:
    • WebRTC supports a wide range of real-time communications tools in common use (e.g. Google Meet), supporting audio, video and data communications, and is thus something of a “standard” approach.
    • Offers a good range of features: automatic echo cancellation, better noise cancellation and automatic gain control, much improved audio sampling rates for improved audio quality.
    • Opens the door to features and capabilities to voice services which could not be implemented whilst using Vivox.
  • In addition:
    • LL are are of some of the security concerns around WebRTC voice (e.g. risk of eavesdropping, exposure of users’ IP addresses, etc), and is actively working to block these through the use of an internal proxy service.
    • LL will be looking to Linux devs to help give feedback on how well WebRTC is working on their Linux viewers
  • Feature requests for WebRTC should be made via the WebRTC board on the SL Feedback Portal.

Status

  • There is a Release Candidate viewer available on the Alternate Viewers page. Thus is expected to be the next viewer to be promoted to de facto release status.
    • This promotion is liable to occur ahead of the planned simulator deployments (see below), allowing time for TPVs to adopt the code.
  • Currently, LL is looking at August for a potential deployment across all of SL on the server-side.
    • This will follow the usual approach of roll-out to the simulator RC channels first, then to the SLS Main channel.
    • As a result, there will be some short-term issues around peer-to-peer, Group and ad-hoc voice connections between those on regions running the two different voice services (Vivox and WebRTC).
    • Depending on how the deployment goes (e.g. first to a single RC, then multiple RCs, then the SLS Main channel), it is hoped that any such issues will only be for around 2 weeks.
  • Viewers adopting the WebRTC code prior to or during this deployment period will be able to process both WebRTC and Vivox voice, so outside of the possible short-term issues during the back-end deployment mentioned above, voice services should not be interrupted for users.

Graphics / glTF

Transmission / IOR

  • Geenz Linden continues to work on Transmission and Index of Reflection (IOR). This will provide:
    • Both refraction and “blurry” refraction suitable for things like frosted glass surfaces.
    • Dispersion, allowing chromatic aberration, allowing the RGB channels to “separate out” based on a certain factor.
    • Volume, allowing an object surface to be tinted at different surface thicknesses.
  • There are still some bugs to be resolved with this work, after which it will be folded into the main viewer development branch, but is currently tied to the work on mesh import, but may be separated out.

PBR Terrain Painting

  • This is the next planned project for Cosmic Linden, and is in the very early stages of planning, so things are subject to potential change.
  • Currently, the thinking is:
    • The four PBR materials currently used for PBR terrain would remain available for use / painting.
    • The painting element would allow a user to define how these materials are mixed (via a paint map), rather than having to rely purely on the the existing height map.
    • The paint map is likely to initially be on the basis of one blended texture at region level (not parcel), although the resolution of the texture is still TBA at the time of writing.
    • The permissions for terrain painting will be based on ability to edit the height map (if you can alter the latter through the Region settings, then you’ll be able to use the terrain painting capability).
  • This effectively means:
    • Users who have terrain editing permissions will be able to use the existing terrain texture system, using the height map (terrain elevation) to define which textures are visible, and the “blending” between them. or – if provided at the region level – access the PBR terrain paint map and use that to define the terrain (e.g. where grass, dirt, rock, etc., appears),  without having to use terrain elevation changes.
    • Use of the paint map will still be based of the X,Y positioning of terrain (as with the current height map), but all allow for actual blending of materials, rather than just creating transitional noise between textures set for different elevations, as with the height map.
  • Terrain painting will be a significant departure in how terrain texturing has been managed, requiring a new entity to be introduced. This is also still being thought through, but it is unlikely it will be a new asset type stored on the asset servers.
  • LL prefer to limit terrain painting to the four available slots at region revel, rather than allowing fully customisable swatches / slots at parcel level, as the latter presents “non-trivial issues” for terrain texture handling /loading.
  • Two further ideas being discussed in relation to terrain but not on the implementation road map are:
    • Implementing a means by which a prim can act as if it is part of the terrain, and inheriting the materials of the terrain on which it is placed, whilst allowing the geometry of the prim to be still be manipulated.
    • Instead of using terrain, provide a means by which “something else” (something created external to SL and then imported) as terrain. However, it idea is described as “more pie in the sky” thinking.

glTF Scene Import

  • No update, as Runitai Linden is out of the office.

(Non-Ambient) Lighting

  • Punctual lights is a glTF extension that has recently been folded into the main specification, defining the use of lighting sources (house light, table lamps, street lights, etc.).
  • Geenz Linden is working to implement punctual lights, but they will be tied to the node hierarchy for glTF scene imports.
  • Longer term, they hope to use the extension to enable punctual lights to render shadows (so, if your table lamp is a punctual light, it will cast shadows).
    • However, the extension is currently ambiguous as to what parameters should be used to define/ constrain such shadows, so this aspect of the work is liable to take longer to achieve, and may be dependent upon how other companies implement punctual lighting shadows.
    • In the meantime, Geenz does have some ideas on handling shadows from point and spotlights, which might leverage the work done on reflection probes.
  • In discussing the adoption of glTF punctual lighting, Geenz further noted:
    • There are some notable differences between glTF lighting and SL’s physically-based lighting model and also with the capabilities of lighting projectors as they are currently in SL.
    • As such, trying to unify punctual lighting with SL’s existing lighting / projectors could lead to content breakage.
    • Because of this, it is likely that as punctual lighting ins introduced, the existing lighting system will cease to be significantly enhanced, and pretty much left as-is, with the focus shifting to enhancing the punctual lighting system.

General Notes

  • Cosmic has also been completing work on support for PBR terrain texture transforms. This is s subset of the texture manipulation options (scale, offset, rotation, etc.), available with texturing prims, and is per material.
  • A request has been received to get planar face alignment to be functional for PBR, and this is defined as something the Lab wants to resolve “soon”.
  • Order-independent transparency is not something on the current road map, as it is seen as “too performance costly” to implement.
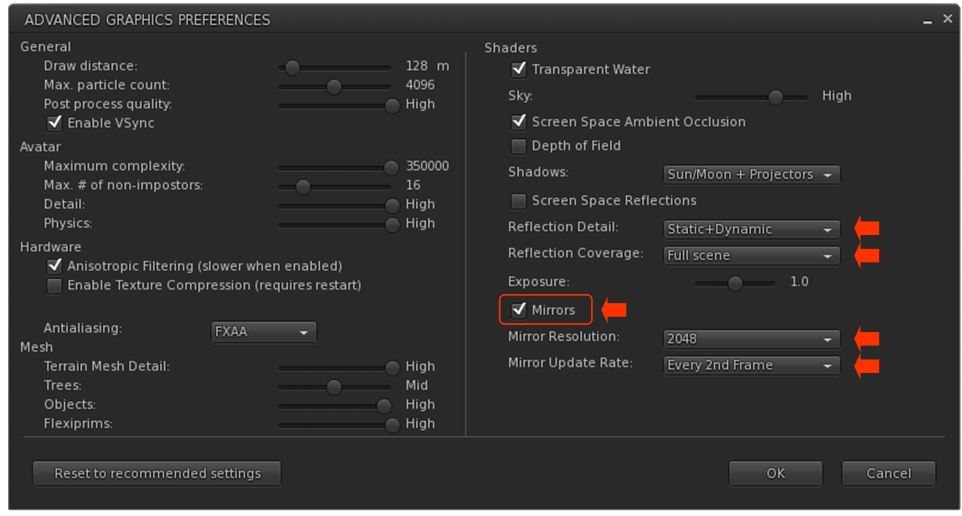
  • There is some potential for performance improvements / optimisations for mirrors.
    • Currently, whilst the mirror surface is planar, the reflection probe generates reflections for a full 180º in front of the mirror, not all of which might be required.
    • It might therefore be possible to adjust this to angles more appropriate for such viewers, making them slightly more performant – but the improvement will not be huge.
    • It should be remembered that mirrors can also be turned off (or have the update rate reduced) through Preferences by those feeling a mirror they are closes to and is active is too big a performance hit.
  • There have been multiple calls for Linden Water to be restored to its pre-PBR looks. Geenz noted that while making improvements to the appearance of Linden Water are not out of the question, the fact that Linden Water is not glTF compliant makes what can be done more difficult.

Next Meeting

† The header images included in these summaries are not intended to represent anything discussed at the meetings; they are simply here to avoid a repeated image of a gathering of people every week. They are taken from my list of region visits, with a link to the post for those interested.

2024 week #25: SL CCUG summary

Joyful Gardens, June 2024 – blog post

The following notes were taken from my audio recording and chat log transcript of the Content Creation User Group (CCUG) meeting held on Thursday, June 20th, 2024.

Meeting Purpose

  • The CCUG meeting is for discussion of work related to content creation in Second Life, including current and upcoming LL projects, and encompasses requests or comments from the community, together with related viewer development work. This meeting is held on alternate Thursdays at Hippotropolis.
  • In regards to meetings:
    • Dates and times are recorded in the SL Public Calendar.
    • Commence at 13:00 SLT on their respective dates.
    • Are conducted in a mix of Voice and text chat.
    • Are open to all with an interest in content creation.
  • The notes herein are a summary of topics discussed and are not intended to be a full transcript of the meeting.

Official Viewers Status

  • Release viewer: version 7.1.8.9375512768, formerly the Graphics Featurettes RC viewer dated June 5 and promoted June 10th.
  • Release channel cohorts:
    • Maintenance C RC (reset skeleton in all viewers), version 7.1.9.9469671545, June 14.
    • Maintenance B RC (usability updates / imposter changes) 7.1.8.9130881608, June 10.
  • Project viewers:

WebRTC Voice Update

Not strictly a Content Creation tool / subject, but of import to SL as a whole.

Summary

  • A project intended to replace the Vivox Voice system with the WebRTC communications protocol (RTC=”real-time communication”).
  • Will see the removal of the SLplugin.EXE from the viewer, to be replaced with a library wrapper within the viewer.
  • Offers much better and more flexible voice support across platforms, with improved capabilities (e.g. automatic echo cancellation, automatic gain control, better noise cancellation) with better audio sampling / quality.
  • Also opens the door to adding new features and capabilities to SL Voice, some of which have been long-requested.
  • Care is being taking to address potential security issues (e.g. preventing eavesdropping, exposing users’ IP address (by using an internal proxy server), etc.).
  • During the transitional period as WebRTC is deployed on the back-end and gradually made available by viewers, support will be provided for both Vivox and WebRTC (i.e. if you are using a viewer using the Vivox plug-in, you will connect to voice via Vivox, and if using a viewer with WebRTC, then that protocol will be used.
  • Both Vivox and WebRTC work together, but their may be some initial limitations / issues until the project is fully deployed and the switch made.
  • Feature requests for WebRTC made via the WebRTC board on the SL Feedback Portal are being evaluated and some are being actioned, together with issues being investigated.

Status

  • There is a Project viewer available on the Alternate Viewers page. Thus is expected to to to Release Candidate status very soon.
  • The server support is currently available on the region WebRTC on the main grid.
  • The focus is currently on getting the viewer code up to release status so it can be adopted by TPVs, with a gradual deployment of the server code, however, it is unlikely the latter will be widely deployed until after the viewer code has been more fully adopted.
  • That said, this is something of a priority project, likely to be fast-tracked as much as possible.

Graphics / glTF

Terrain

  • Cosmic Linden is working on PBR terrain custom repat controls allowing for improved Texel densities to help reduce the “stretching” of textures of elevation changes)  and better support 2K textures.
  • Most of the viewer work for this is now almost complete, but is awaiting simulator-side support on Aditi in order to be offered in a test viewer.
  • There is a more general bug where PBR terrain does not render in planar mirrors, and Cosmic is also working on trying to resolve this issue.
  • PBR Terrain painting: depending on how the above progress, Cosmic hopes to be able to start looking into the potential for PBR terrain painting in the near future. Currently the tentative plan is:
    • To allow land owners to control the mix of the four PBR materials on terrain, rather than the current situation where it’s determined by some elevation weights plus some noise added on top.
    • This capability will potentially be allowed for whoever can edit the terrain heights in a given parcel.

glTF Scene Import

  • Runitai Linden is continuing to work on glTF scene import. The focus remains on the viewer-side code.
    • As previously noted, this allows glTF scenes to be uploaded, tied to an in-world object and previewed in the viewer.
    • The support for this is available on the Rumpus Room regions on Aditi (the Beta Grid).
  • Actual simulator / back-end support for glTF scene will not start to be implemented until after the viewer side of the code is in better shape.
  • The overall goal is to get scene import working with Blender (and in accordance with the glTF specification), and mee the requirements /  guidelines outline in the Blender glTF Imort / Export documentation. The plan is to:
    • Support all of the animation data defined in the document.
    • Support “most” of the materials data in additional to the already supported  metallic roughness & emissive unlit.
  • As this work is still in the prototype phase no decisions have been made regarding the potential Land Impact for scenes or how LI will be calculated. This will come later in the project, once LL have more of a handle on things (upload, streaming, download, runtime cost, etc.).
  • There are also a lot of additional decisions yet to be made regarding this work – the LSL API, avatar limits (which can be attached to an avatar within a scene), all of which mean it will sill be a while before glTF scene imports are ready for any form of testing on the main grid (Agni).

General Notes

  • Runitai Linden is looking at the render pipe and possible optimisations and the potential to improve things like rendering objects, etc. Some of this work is likely to find its way back into production viewers in time.
    • This work also includes refinements to mirrors (e.g. so they get occluded, improvements to the update rate, etc).
  • Geenz Linden continues to work on Transmission and Index of Reflection (IOR), however, as they were out of the office for this meeting, no update was available.
  • Proper support for HDRI skies is being increasingly requested as a result of the Graphics Featurette viewer, and this work may  be accelerated. However, they will require a new asset type.

Next Meeting

† The header images included in these summaries are not intended to represent anything discussed at the meetings; they are simply here to avoid a repeated image of a gathering of people every week. They are taken from my list of region visits, with a link to the post for those interested.

Tutorial: creating a simple (prim) mirror with Firestorm

Background notes: this tutorial is provided as a *basic* guide to making a simple mirror in-world using prims and the Firestorm PBR release (7.1.9.74746), reviewed here. As such:

  • Is offered alongside my other simple mirror tutorial, which more directly applies to the official viewer and other TPVs.
  • Specifically addresses the use of the Firestorm Build / Edit floater, which is substantially different in information presentation compared to the official viewer.
Table of Contents

Please note:

  • If you have never created PBR mirrors before, it is recommended you read the entire tutorial including (Please) Read Me and Setting Viewer Preferences.
  • If you wish to know how to set your viewer so you can see PBR mirror effects, you only need to read  (Please) Read Me and Setting Viewer Preferences.
  • This tutorial assumes the use of the Firestorm Texture layout within the Build / Edit Floater. If you prefer using the the more traditional Texture layout in that floater, then this tutorial might be more appropriate: Creating a simple (prim) mirror in Second Life.

(Please) Read Me

  • Mirrors comprise two elements:
    • The actual object that forms the mirror. The can be a prim, a mesh face, a single object, part of a more complex (e.g. a mirror face in a frame).
    • A PBR reflection probe: a special kind of object new to Second Life under glTF / PBR which, for the purposes of this tutorial, actually generates the “reflections” on the mirror. As such, it is a object linked to the mirror object, above.
    • Creation of both of these is covered in this tutorial.
  • Mirrors:
    • Are planar (or flat surface mirrors), they don’t work particularly well on curved surfaces (like car bodies).
    • Are not designed to be worn as avatar attachments, and will not function correctly if used as such.
    • Come in two forms:
      • Static – meaning they will create reflections of just about everything within their sphere of influence except avatars.
      • Dynamic – meaning they will create reflections of just about everything within their sphere of influence including avatars.
    • Can have a performance impact – so should be used in moderation and with consideration of the effect you are trying to achieve, and the impact it may have on viewers close to them.
      • Example: it might sound cool to have a dynamic mirror as the floor or along one wall of a dance club, reflecting all the dancers – but it will likely kill viewer performance for all the dancers on the floor / dancing close to the wall. So if you must do either, use a Static mirror so avatars are not reflected.
  • To help reduce the performance impact generated by mirrors, only one will ever be active at a time in any given viewer. This will generally be the mirror closest the the viewer’s camera position; all others will simply appear shiny.
    • If you place two mirrors, each with its own reflection probe, too close to one another, you may find you get strange results in both of them.
    • For this reason, if you want to make a wall of mirrors, better to make multiple mirror objects and have a single reflection probe aligned with them to generate reflections in all of them.

This Tutorial

This tutorial breaks mirror creation down into four core steps:

  1. Setting your viewer preferences.
    • Some of these steps may only have to be down once; others may require setting each time you work with PBR reflection probes.
  2. Creating the mirror object using a prim & setting its surface material.
    • The required material can be made using either Blinn-Phong (aka “legacy” or “classic” materials) or the new PBR materials capabilities in the viewer.
    • This tutorial provides guidance on both.
  3. Creating the mirror reflection probe.
  4. Finishing touches – positioning the probe relative to the mirror object, and completing the mirror.

Notes:

  • All of the images in the sections below can be opened in their own tab(s) for greater clarity, if required.
  • Important: be aware that if you place a mirror within a room that contains its own reflection probe already, you may get some very odd results, as the mirror surface can also show “reflections” from the room’s reflection probe.

Step 1: Setting Your Viewer Preferences

Setting your viewer to work with mirrors requires two steps:

  • Ensuring the viewer’s Graphic Preferences is set to view mirrors correctly.
    • This generally only needs to be done once, as the setting will persist between log-in sessions.
    • Must be done by anyone wishing to simply view mirror in-world or who wishes to create them.
  • Enabling the ability to select reflection probes so they can be edited and manipulated.
    • This is intentionally a non-persistent setting, and must be enabled once per log-in session whenever reflection probes are to be directly selected / edited.

Graphics Preferences for Mirrors

Note: as per the notes above, these settings need to be active any in viewer that is to interact with mirrors.

  • Open up Preferences → Graphics and:
    1. Make sure the Mirrors option is checked. (otherwise PBR mirrors will only appear as shiny surfaces).
    2. Reflection Detail:
      • If you wish to view everything a mirror is designed to reflect, whether it is static or dynamic, set this drop-down to Static + Dynamic.
      • If your system struggles with performance as a result of mirrors, set this to Static, so no avatar reflections will be rendered.
    3. Reflection Coverage: make sure this is set to Full Screen.
    4. Mirror Resolution: set the resolution your viewer will use to display mirror reflections. Higher resolutions will obviously be sharper, but may have an increased impact on performance when rendering mirror reflections.
    5. Mirror Update Rate: set the frequency with which you wish you update to update rendered mirror reflections. Again, the more frequent the updates, the more realistic the reflections – and the potential for greater impact on viewer performance.
Setting your viewer’s Graphic Preferences to see / create mirrors

Setting the Viewer so You Can Select Reflection Probes

Reminder: You only need to do this if you are going to be selection and editing / moving any reflection probe. It is a non-persistent setting, so must be performed once each log-in session when you wish to select and edit a reflection probe of any description.

Setting the viewer can be done in one of two ways:

  • Via the Build menu:
    1. Go to the Build menu at the top of the viewer window.
    2. Click the menu to open it, scroll down to Option to open that sub-menu.
    3. Locate the option Select Reflection Probes and click it to check it.
  • Via the Select Reflection Probes in the top section of the Build / Edit floater.
When creating / editing reflection probes, you must ensure you can select them for ease of manipulation, by check the Select Reflection Probes option via the Build → Options sub-menu (l), or directly in the upper section of the build / Edit floater (r)

Step 2: Making the Mirror & Setting the Surface Material

Using Blinn-Phong

If you intend to create a mirror using PBR materials, you can skip to here.

    • Create a cube prim and size it as required. Keep the Build / Edit floater open after creating and sizing your prim.
    • Click the Select Face radio button and click on the side of the object you want to be the mirror surface.
    • Click on the Texture tab in the Edit floater and complete the following steps using the image below as a guide:
      1. Click on the Click on the Blinn-Phong tab (if not already selected). This will display texture / materials options similar to pre-PBR.
      2. Click on the Texture swatch to open the Pick: Texture floater.
      3. In the Pick: Texture floater, click the Blank button.
      4. This will cause the texture swatch in the Texture picker to turn white (and the mirror object itself).
      5. Click OK to close Pick: Texture.
      6. Click on the “empty” Specular swatch to open the Pick: Texture floater. Repeat steps 2 through 5 above.
      7. In the updated Build / Edit floater, locate the Glossiness and Environment spinner and set both to 255.
    • Your mirror object should now have a shiny face (most likely the one facing you).
    • Continue with Creating the Reflection Probe (below).
Creating a mirror object and setting the surface material using Blinn-Phong materials

Using PBR

  • Create a cube prim and size it as required. Keep the Build / Edit floater open after creating and sizing your prim.
  • Click the Select Face radio button and click on the side of the object you want to be the mirror surface.
  • Click on the Texture tab in the Edit floater and complete the following steps using the image below as a guide:
    1. Make sure the PBR tab is selected, or click on it if is is not.
    2. Click the Materials Texture swatch to open the Pick: Texture floater.
    3. Click Blank in the Pick: Texture floater.
    4. This will cause the texture swatch in the Texture picker to turn white (and the mirror object itself).
    5. Click OK to close Pick: Texture.
    6. The Roughness spinner in the Build / Edit floater will now be enabled. Set this to 0.0.
  • Your mirror object should now have a shiny face (most likely the one facing you).
  • Continue with Creating the Reflection Probe (below).
Creating a mirror object and setting the surface material using PBR materials

Step 3: Making the Reflection Probe

Reminder: When creating / editing reflection probes, always make sure you have enabled Build Menu → Options → Select Reflection Probes. Failure to do so will leave you unable to properly edit any reflection probes you create.

  • Create a cube prim.
  • Important:
    • Rotate the prim so that the TOP face of the cube is facing the same direction as the surface of your mirror (that is, the blue arrow of the gizmo tool is pointing away from the face of the mirror object).
    • Make sure it is perfectly at right angles once rotated.
  • Click on the Features tab of the Build / Edit floater:
    1. At the bottom of the tab, check the box labelled Reflection Probe.
    2. A pop-up will generally be displayed, read and understand it.
      • You can check the Don’t Show box if you do not want to see this warning in future
      • Click OK to convert the prim to a reflection probe – this will enable the Probe Update options at the bottom of the Build / Edit floater.
    3. Click on the Static drop down and:
      • If you wish the mirror to only reflect the objects in front of it, and not avatars as well, select Mirror (Environment).
      • If you wish the mirror to reflect avatars as well, select Mirror (Everything).
Setting the reflection probe properties (click to enlarge in new tab, if required)

Step 4: Finishing Touches

Positioning and sizing the mirror probe to give the required reflections on the mirror object.
  • With the reflection probe selected, make sure the Move radio button at the top left of the Edit floater is enabled.
  • Position the reflection probe so it is overlapping the mirror such that the red arrow / line of the gizmo move tool is just in front of the mirror object.
  • Click the Stretch Radio button in the top of the Edit floater and stretch the reflection probe to fit the mirror object, giving you a mirror-like reflection.
    • Note: The exact size of the reflection probe and its position / depth relative to the front of the mirror might require a little juggling to get right.
  • When done correctly, you should have a basic mirror reflecting the space around you.
  • Finally, link the mirror components together as a single object – but make sure the reflection probe is not the root of the linkset for ease of future moving / editing the mirror.
  • Name the mirror and Take it (or a copy) back to inventory for future use (if required) and / or place the original where you wish to use it.

Notes:

  • Because the reflection probe will be deeper than the mirror, anything shiny that is also encompassed by it and in the same plane will also act as a mirrored surface.
  • Similarly, if you have several “mirror” surfaces in the same plane as the reflection probe (e.g. several mirrors on the same wall), you can extend the mirror’s size to encompass all of them, thus use as single reflection probe for multiple mirrors.

Video and Final Words

For those who prefer to watch, the video below – courtesy of Zi Ree from the Firestorm team – goes through all of the above steps for creating a mirror object and its reflection probe.

Again, this is a basic (if wordy!) tutorial. There is a lot more that can be done when creating mirror objects. and I’m not attempting to cover everything here; this is simply to get people started. Remember that mirrors do have limitations imposed, and can impact viewer performance – so use them wisely!

Finally, note that mirrors are a specialised use for reflection probes – the latter can be quite intrinsic to general reflections and lighting in Second Life. To get a feel for how they can be used, I recommend taking a read of Reflection Probes and You by Kristy Aurelia.

Tutorial: creating a simple (prim) mirror in Second Life

Background notes: this tutorial is provided as a *basic* guide to making a simple mirror in-world using prims, following the release of the Graphics Features viewer. Further:

  • It has been written using the official Second Life Viewer (SLV) from Linden Lab.
  • The steps outlined should apply pretty much to any third-party viewer currently supporting PBR rendering, allowing for differences in UI and menu option presentation.
  • As Firestorm has more extensive changes to some of the UI elements used, I’ll likely provide a dedicated tutorial for that viewer when it releases with PBR support.
Table of Contents

Please note:

  • If you have never created PBR mirrors before, it is recommended you read the entire tutorial including (Please) Read Me and Setting Viewer Preferences.
  • If you wish to know how to set your viewer so you can see PBR mirror effects, you only need to read  (Please) Read Me and Setting Viewer Preferences.

(Please) Read Me

  • Mirrors comprise two elements:
    • The actual object that forms the mirror. The can be a prim, a mesh face, a single object, part of a more complex (e.g. a mirror face in a frame).
    • A PBR reflection probe: a special kind of object new to Second Life under glTF / PBR which, for the purposes of this tutorial, actually generates the “reflections” on the mirror. As such, it is a object linked to the mirror object, above.
    • Creation of both of these is covered in this tutorial.
  • PBR mirrors:
    • Are planar (or flat surface mirrors), they don’t work particularly well on curved surfaces (like car bodies).
    • Are not designed to be worn as avatar attachments, and will not function correctly if used as such.
    • Come in two forms:
      • Static – meaning they will create reflections of just about everything within their sphere of influence except avatars.
      • Dynamic – meaning they will create reflections of just about everything within their sphere of influence including avatars.
    • Can have a performance impact – so should be used in moderation and with consideration of the effect you are trying to achieve, and the impact it may have on viewers close to them.
      • Example: it might sound cool to have a dynamic mirror as the floor or along one wall of a dance club, reflecting all the dancers – but it will likely kill viewer performance for all the dancers on the floor / dancing close to the wall. So if you must do either, use a Static mirror so avatars are not reflected.
  • To help reduce the performance impact generated by mirrors, only one will ever be active at a time in any given viewer. This will generally be the mirror closest the the viewer’s camera position; all others will simply appear shiny.
    • If you place two mirrors, each with its own reflection probe, too close to one another, you may find you get strange results in both of them.
    • For this reason, if you want to make a wall of mirrors, better to make multiple mirror objects and have a single reflection probe aligned with them to generate reflections in all of them.

This Tutorial

This tutorial breaks mirror creation down into four core steps:

  1. Setting your viewer preferences.
    • Some of these steps may only have to be down once; others may require setting each time you work with PBR reflection probes.
  2. Creating the mirror object using a prim & setting its surface material.
    • The required material can be made using either Blinn-Phong (aka “legacy” or “classic” materials) or the new PBR materials capabilities in the viewer.
    • This tutorial provides guidance on both.
  3. Creating the mirror reflection probe.
  4. Finishing touches – positioning the probe relative to the mirror object, and completing the mirror.

Notes:

  • All of the images in the sections below can be opened in their own tab(s) for greater clarity, if required.
  • Important: be aware that if you place a mirror within a room that contains its own reflection probe already, you may get some very odd results, as the mirror surface can also show “reflections” from the room’s reflection probe.

Step 1: Setting Your Viewer Preferences

Setting your viewer to work with mirrors requires two steps:

  • Ensuring the viewer’s Graphic Preferences is set to view mirrors correctly.
    • This generally only needs to be done once, as the setting will persist between log-in sessions.
    • Must be done by anyone wishing to simply view mirror in-world or who wishes to create them.
  • Enabling the ability to select reflection probes so they can be edited and manipulated.
    • This is intentionally a non-persistent setting, and must be enabled once per log-in session whenever reflection probes are to be directly selected / edited.

Graphics Preferences for Mirrors

Note: as per the notes above, these settings need to be active any in viewer that is to interact with to PBR mirrors.

  • Open up Preferences → Graphics.
  • Click the Advanced Settings button to open the Advanced Settings Preferences Floater. Now locate and set the following:
    • Mirrors checkbox – make sure it is checked, otherwise PBR mirrors will only appear as shiny surfaces.
    • Reflection Detail:
      • If you wish to view everything a mirror is designed to reflect, whether it is static or dynamic, set this drop-down to Static + Dynamic.
      • If your system struggles with performance as a result of mirrors, set this to Static, so no avatar reflections will be rendered.
    • Reflection Coverage: make sure this is set to Full Screen.
    • Mirror Resolution set the resolution your viewer will use to display mirror reflections. Higher resolutions will obviously be sharper, but may have an increased impact on performance when rendering mirror reflections.
    • Mirror Update Rate: set the frequency with which you wish you update to update rendered mirror reflections. Again, the more frequent the updates, the more realistic the reflections – and the potential for greater impact on viewer performance.
 Setting your viewer’s Graphic Preferences to see / create mirrors

Setting the Viewer so You Can Select Reflection Probes

Reminder: You only need to do this if you are going to be selection and editing / moving any reflection probe. It is a non-persistent setting, so must be performed once each log-in session when you wish to select and edit a reflection probe of any description.

  1. Go to the Build menu at the top of the viewer window.
  2. Click the menu to open it, scroll down to Option to open that sub-menu.
  3. Locate the option Select Reflections Probes and click it to check it.

Step 2: Making the Mirror & Setting the Surface Material

Creating the Mirror Object

  • Create a cube prim and size it as required. Keep the Build / Edit floater open after creating and sizing your prim.
  • Click on the Texture tab in the Build / Edit floater, and (also see image, below):
    1. Click on the texture swatch to open the Pick: Texture floater.
    2. In the Pick: Texture floater, click the Blank button.
    3. This will cause the texture swatch in the Texture picker to turn white (and the mirror object itself).
    4. Click the OK button in the Pick Texture floater to close it.
  • You now need to set the object’s surface materials either by using Blinn-Phong (“legacy”) materials (below) or by using PBR materials.
Setting the mirror object to a blank white face / object

Setting the Surface Material Using Blinn-Phong

  • Edit the mirror object just created and select the front face. Click on the Texture Tab of the Edit floater.
  • In the Texture tab of the Edit floater, click on the Shininess (Specular) radio button (arrowed in the image below).
  • Now (as per the image below):
    1. Click on the texture swatch to open the Pick: Texture floater.
    2. In the Pick Texture floater, click the Blank button.
    3. This will cause the texture swatch in the Texture picker to turn white.
    4. Click the OK button in the Pick Texture floater to close it.
    5. This will update the Texture tab to display new options: Glossiness, Environment and Color.
  • Set Glossiness and Environment each to 255 and ignore Color.
  • Your mirror object should now be shiny – don’t worry about the appearance, it will soon improve.
  • Close the Edit floater.
  • Continue with Making the Reflection Probe.
Setting the mirror object to have a shiny surface using Blinn-Phong (aka “legacy” or “classic”) materials (click to enlarge in new tab, if required)

Setting the Surface Material Using PBR

Refer to the image below when following these instructions.

  • Edit the mirror object just created and select the front face. Click on the Texture Tab of the Edit floater.
    1. Click on the Material drop-down.
    2. Select PBR Metallic Roughness from the drop-down.
  • The Texture Tab display will update. Now take the following steps:
    1.  Click on the empty texture swatch or click on Choose from Inventory to open the Pick: Texture floater.
    2. Click the Blank button in the Pick: Texture floater this will update the texture swatch in the floater (and in the Texture tab).
    3. Click the OK button in the Pick: Texture to close the floater.
    4. The Edit Selected button in the Texture tab will now be enabled.
    5. Click Edit Selected to open the Editing Materials floater.
    6. In the Editing Materials floater, change the value of Roughness Factor to 0.0.
  • Your mirror object should now be shiny – don’t worry about the appearance, it will soon improve.
  • Close the Edit floater.
  • Continue with Creating the Reflection Probe (below).
Setting the mirror object to have a shiny surface using PBR materials (click to enlarge in new tab, if required)

Step 3: Making the Reflection Probe

Reminder: When creating / editing reflection probes, always make sure you have enabled Build Menu → Options → Select Reflection Probes. Failure to do so will leave you unable to properly edit any reflection probes you create.

  • Create a cube prim.
  • Important:
    • Rotate the prim so that the TOP face of the cube is facing the same direction as the surface of your mirror (that is, the blue arrow of the gizmo tool is pointing away from the face of the mirror object).
    • Make sure it is perfectly at right angles once rotated.
  • Click on the Features tab of the Build / Edit floater:
    1. At the bottom of the tab, check the box labelled Reflection Probe.
    2. A pop-up will generally be displayed, read and understand it (you can check the Don’t Show box if you do not want to see this warning in future), then click OK to convert the prim to a reflection probe.
    3. This will enable the options at the bottom of the Features tab.
    4. Click on the Sphere drop-down and change it to Box.
    5. Click on the Static drop down and:
      • If you wish the mirror to only reflect the objects in front of it, and not avatars as well, select Mirror (Environment).
      • If you wish the mirror to reflect avatars as well, select Mirror (Everything).
Setting the reflection probe properties (click to enlarge in new tab, if required)

Step 4: Finishing Touches

Positioning and sizing the mirror probe to give the required reflections on the mirror object.
  • With the reflection probe selected, make sure the Move radio button at the top left of the Edit floater is enabled.
  • Position the reflection probe so it is overlapping the mirror such that the red arrow / line of the gizmo move tool is just in front of the mirror object.
  • Click the Stretch Radio button in the top of the Edit floater and stretch the reflection probe to fit the mirror object, giving you a mirror-like reflection.
    • Note: The exact size of the reflection probe and its position / depth relative to the front of the mirror might require a little juggling to get right.
  • When done correctly, you should have a basic mirror reflecting the space around you.
  • Finally, link the mirror components together as a single object – but make sure the reflection probe is not the root of the linkset for ease of future moving / editing the mirror.
  • Name the mirror and Take it (or a copy) back to inventory for future use (if required) and / or place the original where you wish to use it.

Note:

  • Because the reflection probe will be deeper than the mirror, anything shiny that is also encompassed by it and in the same plane will also act as a mirrored surface.
  • Similarly, if you have several “mirror” surfaces in the same plane as the reflection probe (e.g. several mirrors on the same wall), you can extend the mirror’s size to encompass all of them, thus use as single reflection probe for multiple mirrors.

Video and Final Words

For those who prefer to watch, the video below – courtesy of Ascension Media and Lighting (You Tube) – goes through all of the above steps for creating a mirror object and its reflection probe. Other videos are available, but I felt this one was very easy to follow, especially given it does not rely on Voice or text (but best to make it full screen to see everything).

Again, this is a basic (if wordy!) tutorial. There is a lot more that can be done when creating mirror objects. and I’m not attempting to cover everything here; this is simply to get people started. Remember that mirrors do have limitations imposed, and can impact viewer performance – so use them wisely!

Finally, note that mirrors are a specialised use for reflection probes – the latter can be quite intrinsic to general reflections and lighting in Second Life. To get a feel for how they can be used, I recommend taking a read of Reflection Probes and You by Kristy Aurelia.

2024 week #23: SL CCUG and TPVD meetings summary

TheNest : Sunbird, May 2024 – blog post

The following notes were taken from:

  • My audio recording and chat log transcript of the Content Creation User Group (CCUG) meeting held on Thursday, June 6th, 2024.
  • My audio recording + the video recording by Pantera (embedded at the end of this summary) of the Third-Party Developer meeting (TPVD) held on Friday, June 7th, 2024. My thank to Pantera as always for providing it.

Meetings Purpose

  • The CCUG meeting is for discussion of work related to content creation in Second Life, including current and upcoming LL projects, and encompasses requests or comments from the community, together with related viewer development work. This meeting is held on alternate Thursdays at Hippotropolis.
  • The TPV Developer meeting provides an opportunity for discussion about the development of, and features for, the Second Life viewer, and for Linden Lab viewer developers and third-party viewer (TPV) / open-source code contributors to discuss general viewer development. This meeting is held once a month on a Friday, at 13:00 SLT at the Hippotropolis Theatre.
  • For both meetings: dates and times are recorded in the SL Public Calendar, and they re conducted in a mix of Voice and text chat.
  • The notes herein are a summary of topics discussed and are not intended to be a full transcript of the meeting.

Official Viewers Status

[Video: 0:27-3:03]

  • Release viewer: Maintenance X RC (usability improvements), version 7.1.7.8974243247, dated May 8th  promoted May 13.
  • Release channel cohorts:
    • Materials Featurettes RC viewer, version 7.1.8.9375512768, June 5.
    • Maintenance C RC (reset skeleton in all viewers), version 7.1.7.8820704257, May 6.
    • Maintenance B RC (usability updates / imposter changes), version 7.1.7.8820696922, April 29.
  • Project viewers:

General Viewer Notes (Both Meetings)

  • The latest Graphics Featurettes RC viewer is seen as the last RC update prior to this viewer being promoted, hopefully in week #24 if it passes QA. This will see the official release of Viewer-side setting of PBR materials for terrain; 2K texture upload support; glTF / PBR mirrors.
    • A request has been made to fix an alpha asset mode issue prior to release. This is seen as unlikely, unless QA reject the viewer going to release status.
  • It is anticipated the WebRTC viewer will move from project viewer status to RC viewer status with its next update.
    • The initial RC viewer will support both Vivox Voice and WebRTC, depending on how voice is handled on the back-end for any given region.
    • However, there may be issues when trying to use Voice across different regions / in groups where use of WebRTC and Vivox is mixed.
    • See here for more on the WebRTC project.
  • A planned Maintenance RC viewer (Maint A) is currently pending the resolution of a number of fixes, hence why Maint B and C are currently in the pipeline.

Graphics / glTF

General Notes on glTF / PBR (CCUG Meeting)

  • Cosmic Linden is working on custom repeats for PBR terrain, allowing for higher texel densities to help reduce the “stretching” of textures of elevation changes)  and better support 2K textures.  This work is *not* part of the PBR Terrain updates in the Graphics Featurettes viewer, but will be part of a follow-on set of glTF updates currently contain within a development viewer branch on Github.
    • This branch also includes a improvement specifically for Mac performance related to actions such as editing, moving UI elements around, etc.
  • It has been noted that the current implementation for reading & writing glTF data has some limitations in terms of SL, so there is some internal work to re-write it to better fit the SL systems / services. Part of this work means Geenz is re-writing some of the work on glTF transmission to better fit the SL asset loader.
    • This work will also assist the development work going into the glTF scene import project.

glTF Scene Import (TPVD Meeting)

[Video: 5:18-18:10]

  • Recap:
    • Development of the ability to import glTF scenes (objects, materials, animations, etc.), directly from Blender to Second Life. This includes a node hierarchy which will allow some degree of editing / modification of scene elements once imported. There will also be the ability to export scenes back to Blender for more extensive update by the creator. Both of these latter points (editing / export) will be subject to the SL permissions system.
    • Scenes are liable to use the MSFT glTF extension for Level of Detail (LOD), as this allows LODs to be set per node within a scene, providing more intuitive / consistent LOD switching management (based on screen coverage).
    • There will be constraints placed on scene imports (e.g. will not be able to have a scene which exceeds the capacity of a region; scenes will not be able to span more than one region (so as to avoid issues with physics, etc.); and so on).
  • Status:
    • Rapid prototyping of the ability to upload and preview glTF scenes is progressing. This can be tested via prototype viewer made available through the Content Creator Discord channel (apologies, but due to a request from Linden Lab I cannot provide details on how to join this channel, outside of contact Vir Linden) and on the glTF development / test regions on Aditi.
    • The functionality currently remains that of being able to preview a scene – there is no actual simulator-side representation of the scene (e.g. it is viewer-side only, so only visible in the viewer used for the preview). Obviously, this will change as the work progresses.
    • For those wishing to test the capability, note that there is an known issue with large file uploads for glTF scenes failing. This is being investigated by Pepper Linden.
    • The work is now within the general development branch of the graphics / glTF work.
    • Limits (avatar limits, land impact, number of vertices, faces, etc), will be defined in detail as the project develops, with any defined as a “must” within the glTF specification being a hard line, those defined as a “should” being considered as the baseline.
  • [Video: 20:50-21:55] Transitioning to glTF scene support (when it ready for more widespread availability) will be in a manner akin to the introduction of mesh support back in 2011/12: those running viewers that have not updated to the code supporting glTF scene rendering will not see any scenes they enter, but will instead see “something akin to a little chiclet of a sculpt”.


Next Meetings

† The header images included in these summaries are not intended to represent anything discussed at the meetings; they are simply here to avoid a repeated image of a gathering of people every week. They are taken from my list of region visits, with a link to the post for those interested.

2024 week #20: SL CCUG summary

The Butterfly Effect, May 2024 – blog post

The following notes were taken from my audio recording and chat log transcript of the Content Creation User Group (CCUG) meeting held on Thursday, May 16th, 2024.

Meeting Purpose

  • The CCUG meeting is for discussion of work related to content creation in Second Life, including current and upcoming LL projects, and encompasses requests or comments from the community, together with related viewer development work. This meeting is held on alternate Thursdays at Hippotropolis.
  • In regards to meetings:
    • Dates and times are recorded in the SL Public Calendar.
    • Commence at 13:00 SLT on their respective dates.
    • Are conducted in a mix of Voice and text chat.
    • Are open to all with an interest in content creation.
  • The notes herein are a summary of topics discussed and are not intended to be a full transcript of the meeting.

Official Viewers Status

  • Release viewer: Maintenance X RC (usability improvements), version 7.1.7.8974243247, dated May 8and  promoted May 13 – NEW
  • Release channel cohorts (please see my notes on manually installing RC viewer versions if you wish to install any release candidate(s) yourself).
    • Maintenance C RC (reset skeleton in all viewers), version 7.1.7.8820704257, May 6.
    • Materials Featurettes RC viewer, version 7.1.7.8883017948, May 2.
    • Maintenance B RC (usability updates / imposter changes), version 7.1.7.8820696922, April 29.
  • Project viewers:

Graphics / glTF

Featurettes Viewer – Recap

  • Support for:
    • Viewer-side setting of PBR materials for terrain.
    • 2K texture upload support.
    • Mirrors: using reflection probes to generate local static or dynamic (incl. avatar) reflections in real-time.
  • Both Geenz Linden (mirrors) and Cosmic Linden (PBR terrain) are engaged in follow-up work for both of these projects, which will hopefully appear in a future graphics featurette viewer – not the current version (e.g. allowing PBR materials on terrain to have custom repeats, offsets, rotation).
  • It terms of PBR terrain, it was noted:
    • Emissive is supported on terrain.
    • There is a issue with Mac systems (either emissive or normal may “fall off”).
    • As running all four PBR materials on terrain can put a load on the viewer, there are some automatic fallbacks for systems unable to handle the full load which mean some of the materials may not be applied
    • Those opting to use PBR for terrain, as the viewer capability gains adoption (and region owners enable it), there is not requirement to also provide textures for terrain (to allow for those on non-PBR viewers).

General Notes on glTF / PBR

  • As an extension to the last point above, it was further noted that as PBR gains adoption, there is no enforced requirement for creators to continue to provide fallbacks to handle “non-PBR” viewers.
    • This lead to a further statement (first made at the May 10th TPV Developer meeting) that creators building for SL21B are not required to provide Blinn-Phong materials fallbacks on their builds when using PBR.
    • The above can be taken as an informal view that viewers need to support PBR either fully or with a “beta” release by the time of SL21B (commencing Friday, June 21st, 2024).
  • One of the reasons Linden Water reflections are not as good under PBR is due to attempts to optimise the rendering load so that any potential frame rate hit is minimised for more users.
    • Geenz Linden is looking at improving them once more as a result of the work done for mirrors. This work, if successful won’t bring water reflections up to the standard of pre-PBR water reflections (updated every frame), but will offer an improvement over what is currently seen with PBR.
    • Water as a material has been requested and is something LL “is interested in”, but this is not part of the current glTF / PBR work.
  • LL believe that most users should not see a dramatic fall-off in viewer FPS as a result of PBR, such that their experience is heavily impacted.
  • There remains no current plan to support displacement maps.
  • As well as working on mirrors, Geenz Linden is now working on Index of Refraction (IOR) and transmission, both in line with the glTF 2.0 specification (e.g. allowing transparent surfaces that distort what is behind them, as can sometimes be seen in the physical world).

glTF Scene Import

  • Recap:
    • Runitai Linden is continuing to work on glTF scene import. This has reached a point where (on test viewers) it is now possible to preview a scene (tied to an in-world object) in-world.
    • The initial aim is to get to a point where scenes can be imported and seen, and nodes within them updated with both tools in the viewer and / or using LSL, and ensuring they stay in synch with the rest of the scene.
    • Scenes are liable to use the MSFT glTF extension for Level of Detail (LOD), as this allows LODs to be set per node within a scene, providing more intuitive / consistent LOD switching management (based on screen coverage).
    • There will be constraints placed on scene imports (e.g. will not be able to have a scene which exceeds the capacity of a region; scenes will not be able to span more than one region (so as to avoid issues with physics, etc.); and so on).
  • In terms of scene import / export, while it is still earlier days, Runitai noted again that:
    • The idea is to make the import / export a two-way street for creators so they can modify their scenes with relative ease by taking it back to Blender to fix issues that cannot be fixed in-world.
    • This will be subject to the permissions system to prevent the wholesale export of content added to a scene.
    • Scenes uploaded will have attributions appended by the asset service (we owns the asset, when it was uploaded, etc).

In Brief

  • PBR and Bakes on Mesh:
    • LL “keenly aware” this needs to be done, and is noting support for it coming via the Feedback Portal.
    • However – it is not currently a live project.
    • The discussion also again carried the caveat that updating the Bake Service to support 2K textures is only part of the issue: all SL wearable definitions all also need to be revised to be able to support 2K textures, as these are also currently limited in their resolution.
  • There was an extended discussion on content ripping from Second Life and copybotting (with the latter covering a number of flavours). In short:
    • The is the hoary old (but nevertheless true) acknowledgement that Second Life relies on local computer rendering; ergo, regardless of whether it is via a”copybot viewer” or not, content can be ripped from SL and used elsewhere by those determined to do so.
    • Insofar as content being ripped and re-sold in Second Life (or elsewhere) there is the DMCA process – and in terms of other platforms, it does not matter if they have a DMCA Portal or not – a formal identification of content being misused (with proof of ownership) can still be sent to them in order to initiate a take-down process.
    • There was discussion on why “obvious” copyright-infringing content in SL was not taken down (with the example of Chanel products being used). As I understand it (and IANAL), this is bound up with the Safe Harbor provisions of the DMCA, design to provide immunity to ISPs and website operators for copyright infringement committed by their users by providing them with a framework for taking action. Pro-actively removing content potentially circumvents this process, leaving the company open to possible legal action if mistakes are made (and / or for simply not pre-actively addressing all infringements, large and small).
  • There was also a discussion on animations under glTF. However, as this will be a future element of the glTF scene support project, so I’ll leave specifics until such time as the work starts and LL talk more directly as to what they are doing and when.
  • The latter part of the meeting included (an occasionally heated) discussion on the new Modesty Layers being proposed by Linden Lab (see: 2024 SL Governance meeting week #19: Child Avatar Policy). However, as this was somewhat entangled with matters of policy, and those directly involved in making the changes to said policy / overseeing changes were not available  / present at the meeting, ad what was suggested as to possible technical solutions was somewhat speculative, I would prefer to leave further reference out of this summary, and leave matters until those at Linden Lab responsible for the policy have more fully engaged directly with content creators.

Next Meeting

† The header images included in these summaries are not intended to represent anything discussed at the meetings; they are simply here to avoid a repeated image of a gathering of people every week. They are taken from my list of region visits, with a link to the post for those interested.