Taking flight in a Goose in Second Life

The Wilder / Astral G-21 Goose over Isla Catinara

When it comes to flying, Wilder Skies is not a Second Life brand I’ve really been familiar with. However, For the last couple of months I’ve been toying with the idea of giving the Wilder Skies / Astral Technologies G-21 Goose amphibian a go, even though (at the time of writing) circumstances dictate that it is only available through the Marketplace – no in-world option to take it for a test flight.

However, one of SL’s foremost aviators, and someone I hold in a great deal of respect – Laetizia “Tish” Coronet – must’ve been reading my thought bubbles, as she recently posted a series of images to her SL feed focused on the Goose, and then gave it a solid thumbs up review in the Marketplace listing. That was enough for me to decide to spend the pennies and grab a copy!

The G-21 on the water with my work-in-progress paint scheme and the the restoration version in the background

In the physical world, the G-21 has an interesting history. It came into being as a result of a group of wealthy Long Islanders commissioning Grumman Aircraft Corp to build a small, reasonably fast light aircraft capable of commuting between their country estates and New York City. First flown in 1937, the twin-engined, almost entirely metal built monoplane was an instant hit. Its amphibious nature meant it could pretty much go anywhere, whilst the cabin – generally outfitted to seat two or 3 as a luxury cruiser, the rest of the space being given over to a bar and toilet – was actually very capable in both the passenger and the cargo roles.

The military particularly liked the boxy design, seeing it as an ideal light transport and spotter. The US Air Corps, US Navy and US Coastguard all quickly adopted it, as did the armed forces of a number of allied governments, including the UK’s Fleet Air Arm, who gave the G-21 it’s name: Goose. Woking alongside its sibling, the G-44, the Goose saw service around the world during the war, notably in the air-sea rescue role, and continued to prove popular afterwards – so much so, that two companies took over production and maintenance after Grumman stopped, and many McKinnon and Antilles variants of the G-21 still fly today.

The restoration version and one of the poses

The Wilder / Astral G-21 captures everything about the G-21 that made it so popular: its rugged, pugnacious looks, its roomy cabin and its amphibious capabilities, as well as some of its general handling characteristics. Priced at L$2,689, the package actually contains two versions of the G-21: the original version 1.0, and the updated version 2.0. Each of these is in turn supplied it three variants: – two that are flyable and in “civvie” and “ex-Navy” colourings respectively, and a “restoration” variant that has the ‘plane (in the ex-Navy finish and looking the worse for wear) up on stocks and partially dismantled, with a new crated engine, a workbench and ladder (with poses for working on the hull / dismantled undercarriage assembly).

Also included in the package are two sets of textures (the civvie and ex-Navy finishes) + UV files, making re-texturing possible, although at the time of writing, I’m still working on mine, so consider the images of it here a work-in-progress). Finally, a HUD is also supplied, which matches the working instruments on the flight console.

I didn’t find the G-21 amenable to Mouselook flying, the the view from the cockpit (with camera adjusted) gave a good sense of flying

Flight controls are the usual – a combination of chat commands / keyboard input / HUD options – Arrow keys for pitch and roll, Arrows + SHIFT for rudder, PAGE keys from throttle, etc. No reverse pitch on the P&W rotary engines, so manoeuvring on the water can be a little cumbersome in confined spaces or docks.

As with the real Goose, this is a hands-on flyer: walk away from the keyboard in flight and you’re liable to return and find you’re on the water or annoying someone by being an unexpected / unwanted garden ornament. The sweet cruising point is around 60-65% of throttle and a little care is needed on landing, particularly as this is a tail dragger and the hull really needs goo clearance. External poses are also supplied for when on the ground / water, accessed via a touch menu access through the radar egg atop the fuselage. Up to 6 can fly in the G-21 – two up front and four pax – although I’ve yet to try carrying anyone with me.

I confess I’ve thus far found region crossings a little spotty: the ‘plane handles them well enough, but as they mount up, the chances of the camera slewing into the side of the ‘plane and giving you a nice view of an retracted wheel tend to increase. I ended up banging about with the dynamic camera (“c”) and ESC to try to recover things, bit not always successfully and twice ran out of sky trying to get things sorted. However, the majority of the time, the ‘plane handles very well, and I’m gearing up towards some very long haul flights in it 🙂 .

Catching the G-21 from below

The lack of PSD files with layers included is a drawback for those who like re-texturing their aircraft. It doesn’t make things impossible, just harder; it would be nice to have them as a dropbox option, as Tish notes on the MP. The texture files also add up to a fair few to download and sort through. However, the fact I’m part-way through re-working a copy of my G-21 shows it is possible 🙂 .

Rugged, equipped with not-your-usual run-of-the-mill flight scripting, adaptable (will take a certain amount of careful physical modding as well as re-painting) and Get the Freight Out ready, the Wilder / Astral G-21 Goose is a nice intermediary SL aircraft. One that looks bloody good in the air or on the water!

Slurl Details

Postcards from home in SL

A little view of home

Apropos nothing in particular, I’ve been hovering around the island home a lot of late recently, fiddling with bits and pieces in the grounds, playing with old and new landscaping kits – notably Alex Bader’s Animated River Building Kits, which were sent to me when launched, but which I’ve only recently got around to being able to put to good use (and found them to be exceptionally versatile in making streams, rivers and even coastal edges for islands) and taking photos of the results.

So, this being the case, I thought I’d be self-indulgent and bore you with some of the resultant shots 😀 .

The Studio Skye Animated River Building Kits allowed me to build a set of streams to help break up the island land, while also offering the perfect setting for another favourite of mine, the Chapel Ruins by Marcus Inkpen. A bridge built using elements of IvanBenjammin’s Wooden Walkways & Stairs set is used to span the main stream

One of the things I like about Marcus’ Chapel Ruins is that they are easily customisable: with the use of plants from Happy Mood, Alex Bader, Cube Republic and others, they can be made into something of a garden space. It also forms a place for us to relax in, courtesy of a hammock, and the ideal place to display a sculpture by ArtemisGreece, an artist I’ve recently come to admire.

Another mesh sculptor I’ve long admired is Ciottolina Xue. Her sculptures have adorned the gardens of all the homes I’ve had in Second Life since I first came across her work in 2015, and they are part of the current design as well, some free-standing and others combined with plant displays.

Sasaya Kayo provides some excellent low-LI ground cover under the Happy Mood Brand, and also some interesting tree forms that can offer a nice twist on a given landscape (note the twisted trunk on the right). The board walk has been built using IvanBenjammin’s Wooden Walkways & Stairs set mentioned above.

Private corners are always good to have, and a combination of Krystali Rabeni’s Love Eternal Folly (with the swing removed and replaced with a picnic set by Follow Us!) and gardened by a dragon, provides one of ours.

Another tree I like is by AzaleaBluebell (seen at the centre of this image). A gift offered at a past Fantasy Faire, it’s a simple, effective design that resizes somewhat (LI allowing) and offers a nice amount of shade.

Hammocks make a great place to play spot-the-shapes-in-the-clouds…

Anyway, for what it’s worth, that’s another glimpse of our little corner of SL and with it, I’ll return you to your regularly scheduled viewing 🙂 .

Modding a house in Second Life: tips and pointers

This slideshow requires JavaScript.

I recently wrote about my purchase of the CONVAIR Edelweiss Chalet and work on modifying it for use on our main island home (see: A little Edelweiss in Second Life).  The article prompted a request from BarbarA for me to go into more detail about how I go about such work – and it’s not the first time I’ve received such a request.

Truth is, and for a variety of reasons (e.g. how any particular house is put together, what someone might want to do with a house, etc.), providing a step-by-step guide to modding a house isn’t really practical. So instead, I’ve tried to provide a set of more general notes focused on how I go about things.

Basic Skills

Obviously, any modding requires some basic skills:

  • An understanding of the core Build functions (e.g. creating prims; moving / rotating / resizing objects; using Shift-select; linking (CTRL-L) and unlinking (CTRL-SHIT-L) objects / object parts; use of the Show Transparent Prims toggle (CRTL-ALT-T).
  • Knowledge of texturing: how to select object faces, apply textures, scale and (possibly)  rotate them; how to use Local Textures to “test fit” textures you may wish to upload from your computer & use; and a basic appreciation of basic texture memory use. Note that “seamless” textures are generally best for buildings.
  • A basic understanding of the permissions system, particularly the Modify and Copy permissions (the former is vital to any form of modification, since without it you won’t be able to alter a building so easily; latter a nice-to-have).

An article like this isn’t really the place to go into any of the above in particular depth, so I refer those who need to learn more about editing and building in SL, I’m including some links to resources at the end.

My General Approach

I tend to approach modding any building as a 3-step process:

  1. Determine what is to be done. For example: will the work require combining parts of different buildings? Will it involve integrating items from other creators? Will it require inclusion of purpose-made new prim elements (e.g. walls, floors, etc.)?
  2. Visit a copy of the building in-world (e.g. a copy displayed at an in-world store or found in a public region) before any purchase and:
    • Confirm it has the required permissions (generally Copy and Modify).
    • Examine the use of textures to determine if they might need replacing / make require replacing as a result of my changes (e.g. because some surfaces have shadows or lighting effects “baked” into a texture.
    • Check how the building has been put together, and whether the desired changes can easily be made (e.g. by removing parts), or whether there might be complications / whether you may have to include “replacement” prim parts yourself.
    • Look at the general structure of the building and whether simple structural changes can be made to  improve LI.
  3. Revise plans accordingly after (2.), and if the decision is made to go ahead, break the work down into logical steps and complete each in turn.

Checking the Suitability of a Building for Modding

Checking Textures

There are a couple of reasons why textures might need to be replaced:

  • They don’t meet the desired aesthetics.
  • They include “baked” details that may not be wanted.

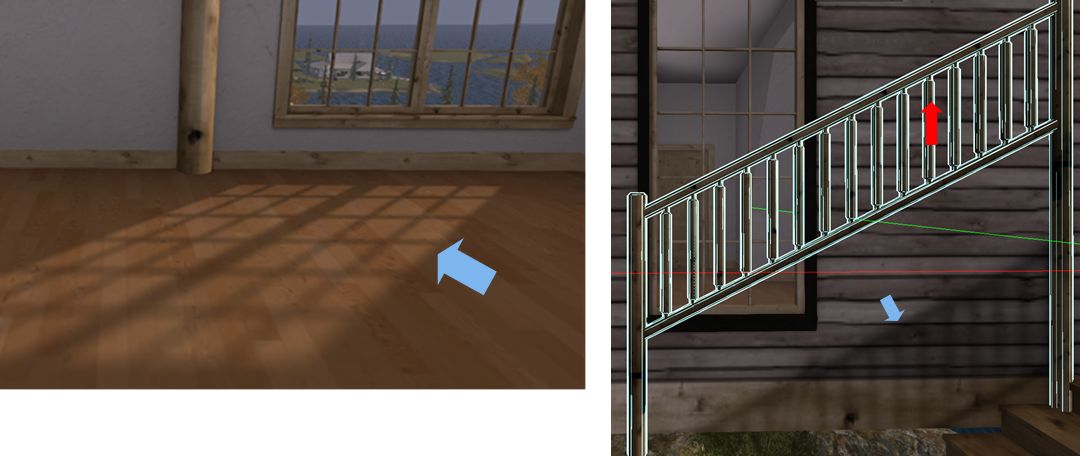
In the case of the latter, some baked details may be easy to spot – as per the image below left, other may be harder to identify, such as with the image below right, and may not be revealed until you actually start physically altering the build, should you go ahead. However, in both cases, it’s worth checking the faces (surfaces) of a building that you might want / need to re-texture.

Some builders bake details into their textures, such as the light “cast” by windows (l); or shadows which can be left behind when an element of the building is moved or removed, as with the railings (r). So careful checking of a building may help determine where / if textures may be replaced.

Carrying out such checks is pretty straightforward:

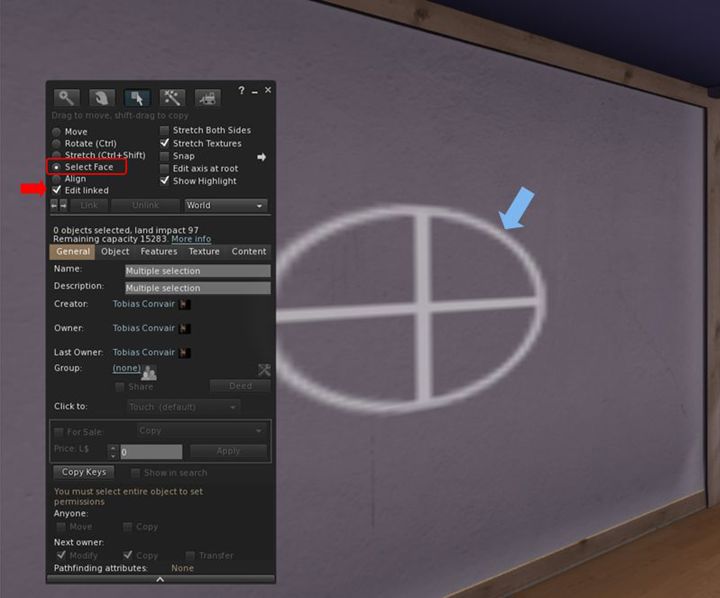
  • Visit a copy of the building in-world and right-click on it and select Edit from the menu.
  • In the Edit floater, do two things:
    • Click on the Edit Linked selection box to make sure it is ticked (enabled).
    • Click on the Select Face radio button to enable it as well.
  • Finally, left-click on the surface in the building you would like to re-texture to display the texturing cross-hairs.

Identifying and checking surfaces for re-texturing it. Use the Edit Linked and Select face options in the Edit / build floater to identify the extend of a given face, shown by the cross-hairs (arrowed).

Note that some builders incorporate transparent prims in their builds (e.g. in walls and floors). Such prims can get in the way of checking surfaces, so you must keep an eye out for them. There are two ways to do this:

  • By pressing CTRL-ALT-T: this will highlight all transparent surfaces in red. If a part of the red is highlighted, then you have likely selected a face of the transparent prim.
  • With the surface selected, click on the Texture tab in the Edit floater. If the Transparency % spinner is set to 100, you have selected the face of a transparent prim.

Should you find you’re actually selecting a transparent prim face instead of the surface you want, I’m afraid there is no easy solution except manoeuvring your camera in as close as possible to the surface you want, and then trying to select it. To assist with this, go to the Advanced menu (use CTRL-SHIT-ALT-D to display the Advanced menu if not already enabled) and make sure Disable Camera Constraints is checked (click it if not).

With the required surface selected, check around it carefully for any of the following:

  • If the cross-hairs / highlighting on a wall / floor / ceiling extend into other rooms beyond the one you’re checking (e.g. a neighbouring wall / floor).
  • Whether the highlighting extends to other features within the surface you’ve selected (e.g. if you’re checking a wall with a window frame, is the frame also highlighted, or if you are checking a door, is the handle and other furniture also highlighted?).
  • Do any other parts of the house you might not expect to be highlighted appear to be so?

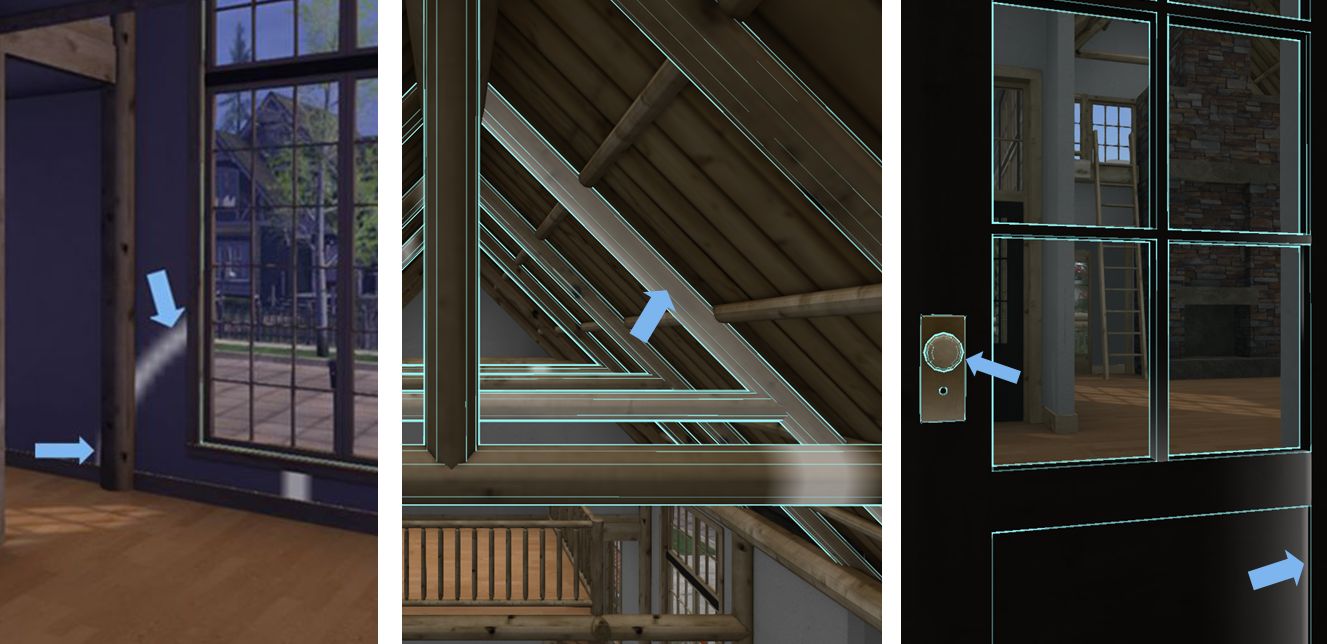
Always check around surfaces you might want to re-texture to see how other surfaces might be affected. Left: the texture cross hairs extend beyond a doorway into the next room, indicating they share a single wall face. Centre: selecting a single roof beam (arrowed) all selects those “in front” and “behind” it, indicating they are all a single texture face. Right: selecting the paintwork of the door (right side arrow) also highlights the door handle (left side arrow), indicating they are the same face and any texture applied to the door will also cover the door handle.  

If the answer to any of these questions is “yes”, then the items that are highlighted will also be affected by any texture you apply. This doesn’t mean you cannot necessarily go ahead with your ideas, just that you may revise what your re-texture or how you go about your alterations (e.g. might your problem be overcome by adding a prim and texturing that?).

Continue reading “Modding a house in Second Life: tips and pointers”

A little Edelweiss in Second Life

The CONVAIR Edelweiss Chalet at Isla Caitinara with a Trompe Loeil pavilion on the deck

In December 2020 I picked up the CONVAIR Bridge House by Tobias Convair for use on our main island home in Second Norway (see: A Bridge House in Second Life). It’s a nice looking house with a good internal layout and it fits well with the Second Norway environment, having something of a Scandinavian feel.

It is also a design that gave me something of a taste for CONVAIR builds. So when we recently visited The Redwoods (see: Exploring The Redwoods of Second Life) and saw another CONVAIR build being used as the park lodge, I started getting the itch to see how well it might fit as yet another alternative for our house – and as it turns out, it does so fairly well.

The design in question is the Edelweiss Chalet, a two-storey design with wood exterior and exposed beams and woodwork inside. Unfurnished at purchase, it is priced at L$2,200 both in-world and on the Marketplace, and is supplied Copy and Modify. While delivered boxed, it doesn’t come with a rezzer. Instead, the entire 99 LI building is a single item that can be pulled out of inventory and positioned as required.

The layout comprises a single large main room on the ground floor with two smaller rooms at one end. the upper floor area is split between a bedroom and gallery overlooking the main room and one end and reached via a staircase, with a loft-like space accessed via a ladder located at the other end of the house. This sits over a broad verandah that also continues along the length of one side of the house.

The CONVAIR Edelweiss Chalet at Isla Caitinara with a Trompe Loeil pavilion on the deck

This verandah is one of the attractions of the house. As it is raised on stilts, the house can sit partially over water, making the long arm of the verandah – with suitable modification – ideal for mooring boats.

Having said that, the slits were something we needed at Isla Caitinara, as the water’s edge there is sufficiently elevated. This allowed me to locate the house at ground level, the verandah neatly forming a part of the existing moorings while also allowing me to remove the eternal steps leading up to the verandah and to the two doors leading into the house on the other side, together with their attendant transparent prims. Making the space available to boats was then a simple matter of removing the railings guarding the edge of the verandah.

This slideshow requires JavaScript.

In terms of living space, this is a house that really has a lot to offer: the main room has plenty of space for use as a living / dining / kitchen area, as I hope the slideshow above demonstrates. The two additional downstairs rooms could be used as a separate bathroom and toilet or as a small bathroom / toilet and second bedroom. The upstairs bedroom has a reasonable amount of space, although given the slope of the ceilings, fitting taller furnishings might be a little difficult.

I particularly like the gallery overlooking the main room; this both offers a lower ceiling for a kitchen area helping to make it feel cosier, whilst also offering a nice location for one of my pianos so that it isn’t crowding out the main room – but the space could just as easily be a little office area or similar. Across the main room, the “loft space” is similarly very flexible – it could be a little reading space with books or – as we’ve done, a little snuggle spot, made warmer through the addition of a wood-burning stove that uses the main fireplace flue.

That said there are a few niggles with the build. There is a slight over-reliance in the use of transparent prims. The main floor,for example, uses a mesh and two transparent prims – so why not simply forego the former and make the latter visible and texture hem? That’s what I did. The use of baked shadows can also be an annoyance when modding the build. Again, replacing the main floor solved this in part, although I had to retexture the exterior walls in order to get rid of other nuisances. Finally, some of the textures are disappointingly blurred: I’m still fiddling with options to replace the texture used for the wooden beams.

A mug of hot chocolate before bed, after outfitting the new house

Fortunately, there aren’t insurmountable problems;  as noted above, I solved them easily enough, allowing for fixing the texture blurring. I will admit I felt this let what is otherwise a very capable and worthwhile design down. certainly, the interior mesh faces are more than sufficient to allow comfortable re-decorating of the walls if you wish (I did!), and as noted you get a good deal of space in which to make a home – indoors and out.

Link and SLurl

A personal look at the Linden Stilt Homes in Second Life

My over-the-water Stilt Home parcel at Bellisseria, with the Tortuga style house rezzed and furnished

Back when I previewed the Linden Homes Stilt House theme, and again when the theme was released at the end of 2020, I mentioned it was the first theme that might tempt me away from the Houseboat theme, which has tended to always win-out against the subsequent Linden Home releases in terms of desirability.

While swapping homes wasn’t high on my priority list, I have to admit that the temptation to just give the Stilt Homes a try had been growing over the Christmas break. And so, while it did cause no small amount of anxiety – my Houseboat location was really very good – at the start of the week, I decided to make the swap, trying for an over-the-water Stilt Home.

Obtaining one took a little time – Stilt Homes-are obviously popular, being new, and the over-the-water version particularly so (Stilt Homes are offered individually as over-the-water; with pier or on land variants on the Linden Homes selection page). But careful refreshing within the page throttle limit meant I was able to eventually pick one up.

My Linden Stilt Home parcel with the Havana style house with moorings I’ve added myself

When previewing the houses, I had been somewhat swayed towards the two-storey designs (Lauderdale and Santiago). However, after re-familiarising myself with all four styles, I actually found the Havana and Tortuga better suited to my tastes, providing the best value (in my view) between living space and available water in the parcel for mooring boats, and betted options for interior customisation, having very good sized rooms (the Tortuga in particular).

Both styles are 3-roomed designs, with the Tortuga offering the slightly greater interior space in the form of two large through-rooms and a smaller room, while the Havana presents a central front-to-back through room flanked by a smaller room on either side. Both designs have a large, split-level rear deck that gives plenty of scope for sun decks and moorings.

Havana interior: the main room gives plenty of room for expression

While I cannot compare it directly with  Camper / Trailer, Victorian or Log Home themes, the Content Creation Pack for the Stilt Homes offers a somewhat greater range of options than the pack for the Houseboats, with furniture plants, textures, useful colour matching guides and other little goodies than might be put to good use. I was a little disappointed no corner posts were offered to go with the additional deck railings, or that there was no bi-fold door that might be used to split the Tortuga’s two through-rooms, but these are not exactly hard-to-overcome “shortfalls”.

Although there are already add-on kits for the Stilt Homes a-plenty on the Marketplace, I much prefer building / kitbashing, and the Tortuga with its big rooms immediately attracted me with the potential for adding my own features. So much so, that I spent several hours playing with different ideas in both rooms!

The Tortuga’s large deck area can be used for boat moorings without it feeling crowded – although admittedly, I’ve thus far minimalised décor and furnishings( a simple pergola, suitably sized, shading a couple of rocking chairs and some planters with flower to break things up

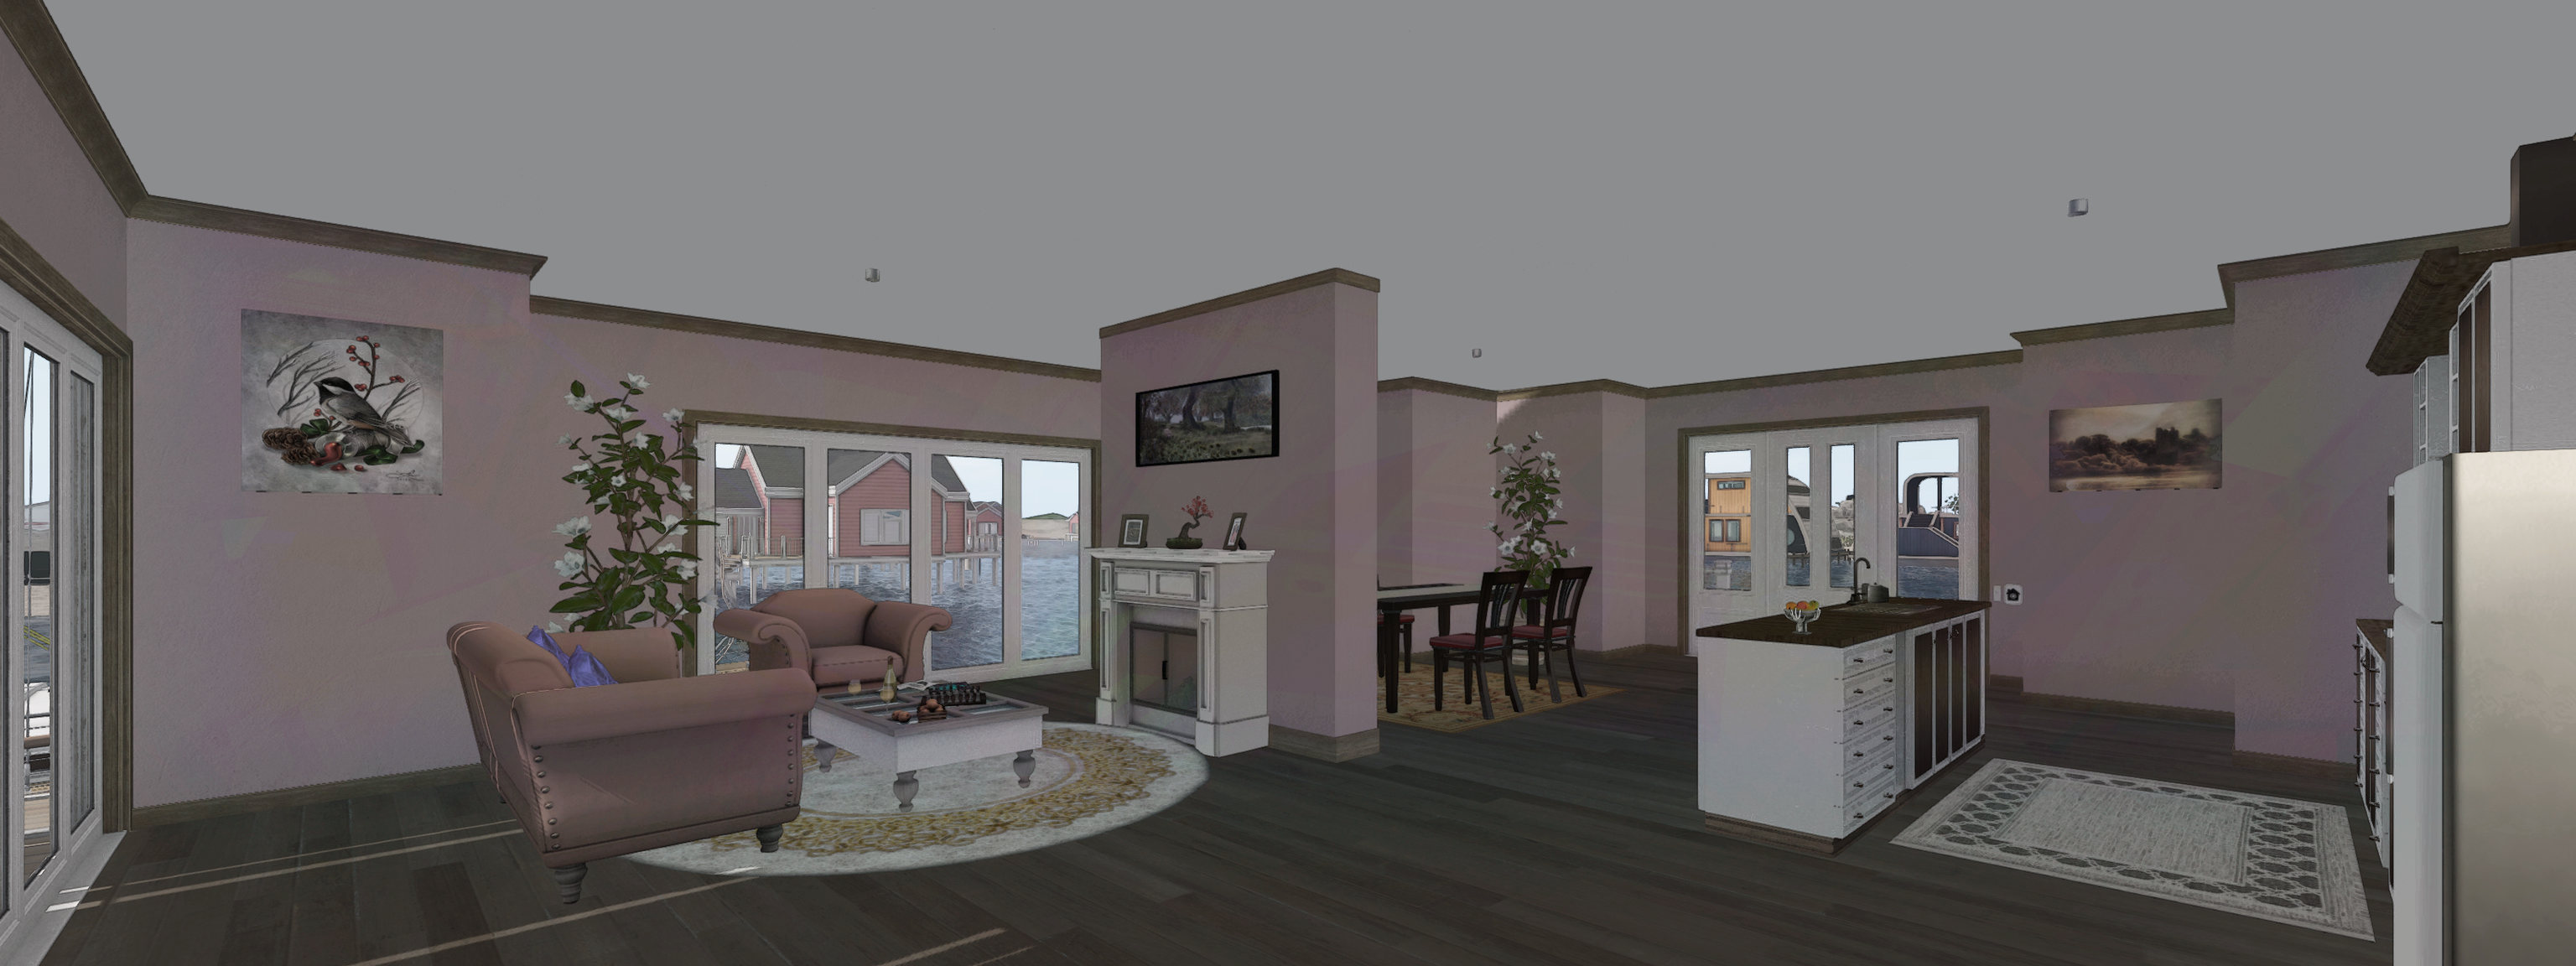
In the end, I went with the simplest approach: a free-standing “room divider wall” that splits the largest room in the Tortuga into two without actually dominating the space or looking out-of-place. One side of this became my “living room” overlooking the rear decks, with the divider itself neatly providing space for a fireplace (with added chimney jutting from the roof above!). This then allowed me to use the “front” part of the room as a kitchen / the dining area, with the long interior wall ideally suited for placing kitchen units, while the width of the room meant I could include a kitchen island, again naturally breaking up the floor space quite naturally.

While the Havana’s large main room could be similarly broken up, I found that with a little careful placement of bits, this isn’t really necessary; I was again able to include living area, dining area and kitchen comfortably into it. With the addition of decking and steps to  moorings outside the front of both (and the use of one side of the Tortuga’s deck), I have been able to provide ample space for mooring those boats I want to have rezzed (all of them otherwise sitting in my vehicle rezzer until I want them).

I’ve deliberately kept furnishings and décor on the decks of both the Havana and Tortuga to a minimum, the former having a free-standing pergola with large sofa, etc., and the latter a pergola and shades directly adjoining the back of the house (thus helping to shade the living room from the Sun) and a couple of rocking chairs  I may admittedly play with both decks a little more in the future, but for now, that’s all I really need.

I like the large main room of the Tortuga particularly amenable to being made a comfortable living space – plenty of room for a kitchen, dining area and lounge space – and even a fireplace to act as a natural room divider

As noted earlier, giving up my Houseboat did give me a moment of anxiety after I’d let it go, but over the last 3+ days I’ve become more settled with my decision; the Tortuga has been proving to be a very comfortable and flexible living space (even if only as a second home when Isla Caitinara isn’t available), and it is very likely I’ll end up saving several internal layouts of furnishings, etc., into my personal rezzer, just as I did with the Houseboat. I’m also admittedly fortunate that, like my old Houseboat, the parcel I’m on is fronted by a large channel of open water (a natural divide between Stilt Homes and Houseboats), so I don’t feel at all crowded in.

I’m not sure I’ll make use of the 2-storey styles;  while I like to look of both, they’re a little too big for my needs. But then, I might just be tempted at some point to have a play.  in the meantime, would I recommend the Stilt Home designs to someone looking for a new Linden Premium Account Home? Absolutely.

Paint your skies with Stevie Davros’ EEP sets

A dramatic EEP Fixed Sky with custom cloud texture (Painted Drama Windy Afternoon from the Painted Clouds set) by Stevie Davros

Back in 2018, I wrote about Stevie Davros, and Australian photographer, who had produced as series of Windlight skies and clouds for people to use to help enhance their environment when taking pictures, or to offer a unique environment within their region (see: Clouds and windlight skies by Stevie Davros).

Since the arrival of the Lab’s Environment Enhancement Project (EEP), Stevie has been working on new skies and cloud assets specifically for use with EEP, and offered me the opportunity to try some of them out. And I have to say, that like his Windlight skies and clouds, these are impressive collections, ideal for photographers looking to enhance their images, and offering region and parcel holders a set of options for setting a Fixed Sky over their parcel / region (and which can also be used to create dynamic Day Cycles).

If you are unfamiliar with using EEP assets and settings, I recommend you refer to one of the following:

However, and for completeness, these notes include a quick overview of how to apply Stevie’s settings.

Saturn looms large: a EEP Fixed Sky setting from the Cosmic Skies set by Stevie Davros

At the time of writing this article, Stevie had a dozen EEP packs available via his Marketplace store, comprising:

  • Painted Clouds: a folder of 13 Fixed Sky assets featuring cloud texture files sampled from the brush strokes of 19th Century French impressionist painters.
  • Aussie Cirrus: a folder of 19 skies featuring cloud texture files created from photographs Stevie took of the skies over Adelaide in Australia, and then processed.
  • Gossamer Cirrus: a set of 19 skies featuring cloud textures depicting very high altitude cirrus strands, some of which are presented in a their own “fantasy” style of sky.
  • Cirrus Cloudbank: a set of 21 skies featuring strands of cirrus cloud overlaid with / extending from banks of cloud
  • Cirrus Clouds: a bumper set of 34 cloud textures, suitable for “real” and “fantasy” settings.
  • Stormy Skies: a selection of cloud texture collages created by Stevie to give dramatic sky and cloudscapes.

All of these packs, whilst focusing on cloud formations, include customised ambient lighting and may include custom Sun / Moon textures.

Painted Sky Banded Sky from the Painted Clouds set by Stevie Davros

In addition, Stevie has produced several sets of Fixed Skies offering more of a “cosmic” setting:

  • Replacement Moons: a set of six replacement Moon textures (crescent, waxing, full, gibbous dual crescent and blue).
  • Replacement Suns: a set of replacement Sun textures very suitable for sci-fi settings, including a blue giant and a binary system with a blue giant and red dwarf star.
  • Cosmic skies: a set of 10 textures offering various astronomical / sci-fi images, including solar eclipses, a comet, a (frighteningly large) meteor, galaxies, a crescent Earth (ideal for a Moon base setting) and Saturn with his rings.
  • Aurora Night Sky: a selection of night skies with cloud textures designed to give the effect of looking at the aurora (Borealis or Australis, you pick 🙂 ).

The remaining two packs are more quirky in nature the first presents something for the romantics: link heart clouds,  and the second that places an erupting volcano on the horizon (the volcano replacing the Sun texture).

A radical sunrise (Gossamer Cirrus Surf Beach Sunrise from the Gossamer Clouds set) by Stevie Davros

There are a few points worth noting with these sets:

  • When purchased, each pack is delivered as a folder to the Received Items folder / panel of  your inventory (so no unpacking required). They can all be used directly from the folder they are received in; however, you might want to copy said folder to the Settings folder in your inventory – the system folder than is intended to contain all EEP assets you create and / or purchase.
  • As Fixed Sky elements, these are all assets that have fixed ambient lighting, and fixed Sun / Moon positions in the sky, with the clouds moving dynamically in response to the wind direction and speed.
  • The assets are supplied Copy / Modify, so you can make copies of any of them and then make alterations to it using the EEP Fixed Sky editor to produce your own variants. You can also use any of them as a basis to create your own dynamic Day Cycles.
  • Alternatively, to make changes purely for photography purposes, these assets can be applied and then adjusted using the Personal Lighting panel.

Use the standard EEP options for using Stevie’s assets

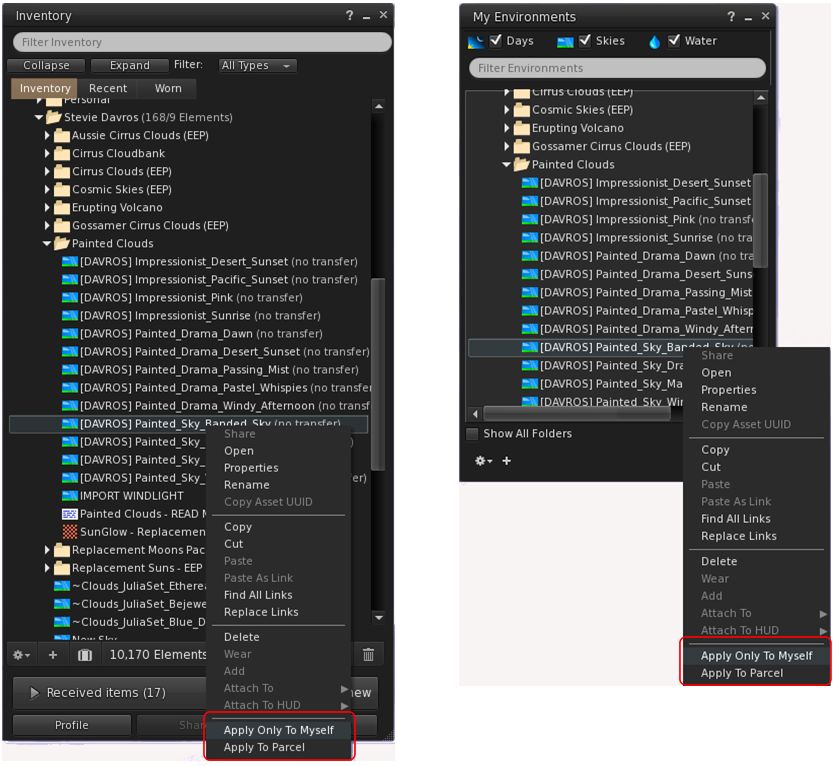
The easiest way to use these assets is to apply them directly to your avatar – highlight the asset you wish to use the right-click on it and select Apply only To Myself. This can be done from inventory or from World → Environment → My Environments … Applied in this way, the setting you’ve selected is only visible within your viewer, and will not be seen by others.

Alternatively, and if you have the requisite permissions, you can apply the asset to your parcel, where anyone within it who is using an EEP-supporting viewer set to (World → Environment →) Used Shared Environment, will also witness it. Further, if you are a region holder, you can apply the asset to your region  this option is not shown in the image above, as I do not have region rights, and so Firestorm has removed the option from my context menu).

Rigel in the sky (Big Giant Sun from the Replacement Suns set) by Stevie Davros
With prices ranging from L$99 to L$399 for the cloud packs, and the “cosmic” sky packs all priced below L$100, Stevie’s EEP sets represent very good value for money for photographers, and a potentially useful means for those interested in learning how to manipulate EEP settings (although the latter can admittedly be done via EEP settings available through the Library → Environments folder as well).

Again, you  can pick up Stevie’s packs from his Marketplace Store, and my thanks to him for taking them for a test drive.