December 5th sees a further update to Lumiya, with the release of version 2.3.3.
Over the course of the last year Lumiya has developed from a basic text client into a app which rivals the viewer in terms of its capabilities – 3D rendering, avatar rendering, inventory access and management, outfits, touch, pay, OpenSim support. What’s more, all this has been ahieved in less than a year; it’s an incredible testament to Alina Lyvette’s abilities and determination to develop a functional, credible mobile client for virtual worlds like Second Life.
With version 2.3.3, Alina again raises the bar with a host of new features, as well a a number of fixes and updates:
Texture updates, including textured terrain in 3D view and option high-quality textures
Flying controls in 3D view
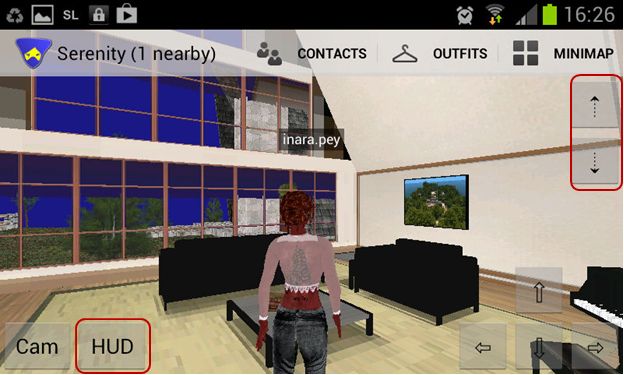
HUD support
“Clear cache” option in settings
Chat messages and user keys can be copied to clipboard
Option to restart sim for land owners
Configurable LED blinking for notifications
NEON-optimized code for texture decompression
Textures
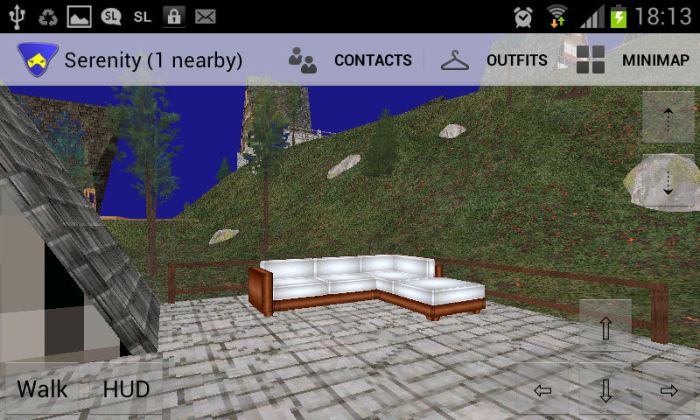
The first big update with Lumiya 2.3.3 is textures and texture handling. First and foremost, Lumiya will now render ground textures in the 3D view, something which immediately increases the attractiveness of outdoor scenes when rendered.
We haz teh grass! Lumiya now displays terrain textures
Lumiya also includes a number of configurable texture options available through the 3D View section of Settings (tap the menu button on your device, then tap Settings). These are:
High Quality Textures: toggles the high quality option on and off – this can put a device’s GPU under considerable stress and lead to extended rezzing times
Texture Memory Limit: set the maximum limit your device can use for textures from a set of four defaults: 32MB, 64MB, 128MB and 256MB. Note that Android can limit GPU memory use to 128MB, so using the 256MB may cause problems on some devices, including locked the application completely
Concurrent Texture Downloads: set how many textures can be downloaded concurrently (2, 4, 8, or 16)
Terrain textures: toggle the terrain texture rendering on / off.
Flying Controls
Lumiya 2.3.3 sees three new buttons appear on the 3D world view, two of which (in the top right corner of the screen) allow you to fly, as with a full viewer. Tap the UP arrow key to start flying / fly up, and the DOWN arrow to descent / land. Fly forwards / backwards using the movement keys in the lower right corner of the screen.
The new Fly buttons (top right) and HUD access button
When you start flying, a STOP FLYING button is displayed. One being tapped, it does precisely what it says: stops you flying – complete with the traditional falling animation as well!
Alina Lyvette has again been beavering away with Lumiya, adding features, fixing bugs and sorting a couple of things out. In this, I feel a little guilty, as one of the things she’s been sorting out is the Outfits folder. I mentioned last time around that there was a slight hitch with it, and Alina immediately started work correcting it, when really she should have been taking a break.
The result is yet another release for Lumiya, this one 2.3.2, which features the following key updates:
Avatar tags in 3D view
Object dialogs are now displayed as pop-ups
Ability to touch attached objects
Ability to view textures from inventory
Support for subfolders in My Outfits
Configurable avatar rendering limit
Avatar Tags in 3D View
Tagged!
This does exactly what it says on the label: displays the name tag over an avatar’s head, using either the avatar’s display name or legacy name.
Group names are currently not displayed and frankly, when using Lumiya on a small screen, they’re something I can personally get by without; although I suspect Alina is working on adding them!
Note that there is an option on the Settings menu to display either legacy avatar names user names) or Display Names. This will determine whether Display Names or user names are displayed in the 3D world view as well as in chat, etc. Toggling between the two options will immediately switch between displaying other avatars’ user name or Display Names in chat and IM, but may require a re-log in order for the 3D world view to update correctly.
Object Dialogue Pop-ups
Until now, touching a scripted object in the in-world view and handling the menu was a bit of a convoluted affair: touch the object, switch to chat to see the menu, use the menu, swap back to the 3D view.
Well, no more. Touch an object and you’ll get an initial menu, complete with a TOUCH button. Tap that, and the menu for the object will overlay the in-world view, which you can used exactly as you would in a full viewer.
Touching Attachments
Lumiya 2.3.2 brings a new means of touching worn scripted attachments.
To touch one of your own scripted attachments:
In the 3D view open the Outfits window (hanger icon) – note that the text mode shortcut for attachments is no longer available from 2.3.2.
Switch to the WEARING tab in the Outfits window (if using Lumiya on a small screen, you may have to tap “My Outfits” to display a menu which will allow you to switch to a list of worn items)
Scroll through the list of worn items to the one you wish to touch – it will have a TOUCH button associated with it. Tap this to display the menu
When you have finished with the menu, tap the Back button on your device to clear the menu dialogue box.
Touching a scripted attachment on your own avatar
If you wish to touch an attachment worn by another avatar, you can do so in one of two ways: via the 3D world view or via text mode.
In the 3D world view:
Long touch the avatar wearing the attachment – aim for the middle of the avatar, not the attachment itself
A menu is displayed at the top of the screen, which includes a TOUCH button if the avatar is wearing anything touchable. Tap this to display a list of touchable items the avatar is wearing
Tap an item on the list; if it is publicly accessible (or if you’ve been granted access to the attachment by the user), any menu associated with the object should be displayed
When you have finished with the menu, tap the Back button on your device to clear the menu dialogue box.
Alina Lyvette is a miracle worker. There is no other way to describe her. Since its first release, her Lumiya client has developed into a mobile Second Life / OpenSim client which is truly remarkable.
Version 2.3.1 raises the bar even further, adding:
Avatar and animation rendering
Camera control in 3D view
Avatar outfit control
Ability to change active group
Improved inventory update speed
Issue fix for ghost objects.
Avatar and animation rendering
This is the most visible change to Lumiya with this release. Whereas previous versions only generated a greyed-out male avatar form, this version aims to render recognisable avatars and provide them with a decent walk animation. Now, the results aren’t 100% like-for-like with avatar rendering in a full viewer – and in fairness, you shouldn’t expect this to be the case. Even so, what is offered is really remarkable, and adds a huge depth to Lumiya in terms of offering mobile access to SL and OpenSim.
Avatar rendering: Lumiya (l) and an SL viewer (r)
There is a little of the Unity feel to the avatars, particularly in the exaggerated arm length, but overall the results really are impressive. And default walk animation is very good as well, and again adds a lot to the in-world experience; no more gliding ghost-like around.
Camera Control
Camera button
Version 2.3.1 adds camera control to Lumiya’s 3D view. This is accessed using the CAM button located in the bottom left of the in-world view.
Tapping this allows you to alter your camera angle / position simply be dragging your finger across the screen or up / down.
When tapped, the button caption changes to WALK, indicating that the next time you tap it, it will toggle back to WALK mode, allowing you to move your avatar, and the camera will snap back to the default rear view.
You can also use the arrow keys to the right of the in-world view when in CAM mode . The left / right arrow keys will orbit the camera around your avatar, while the up / down keys will zoom your view in / out.
Outfits Folder Support
Alina is working towards providing compatibility with the upcoming new avatar baking service Linden Lab are working on. This work involves support for the Current Outfits folder, and as a first part of that, Lumiya incorporates Outfits Folder support within the 3D view. currently, the functionality doesn’t support sub-folders within outfits, which limits its effectiveness for those who have invested heavily in organising their (My) Outfits folders, but Alina is aware of this, and will be addressing matters in the future.
Change Group
You can now change your active group tag within Lumiya. Simply go to the Chat screen, tap GROUPS, and then long touch the name of the group you wish to set as your active group. A pop-up will be displayed asking you to confirm, and on doing so, your active group will be changed. Simples.
OpenSim Issues
There were reports of crash issues with 2.3.0 on OpenSim, and Alina issued 2.3.1 to fix this. Both 2.3.0 and 2.3.1 functioned very smoothly for me, although I did encounter an issue on Kitely in that the skin and system layer clothes on my avatar would not rez (although her prim hair did) and she remained a white cipher. Other than this, however, Lumiya worked as well with Kitely as it did for SL, and I had a pleasant several minutes simply camming around and taking a look at Fallingwater, something which hasn’t been easily achievable on Lumiya in the past without a lot of walking aroundand looking over my own shoulder :).
Performance
Lumiya is doing a lot of work for an app designed to run on a mobile device / tablet. As such, don’t expect performance to match a standard viewer when on a wifi connection. That said, as I’ve commented on my previous Lumiya reviews, this doesn’t mean it is a slouch. While there can be pauses when handling large updates, it still runs more that comfortably on my Galaxy S2, and others have reported it runs at least as well on a number of other modern phones. Rendering is not that slow (avatars can take time to load, and this does admittedly take time in a crowded location), but on a wifi connection, it is still possible to use Lumiya with ease and see people, chat, move around and interact.
When connected to a 3G network (UK O2 network), bandwidth usage was slightly up on previous versions, with 2.3.0 hitting 2.6Mb in five minutes, compared to an average of just on 2 Mb with previous releases. I assume the additional use is down to avatar rendering data – so if you’re using Lumiya on 3G and in a crowded space, you’d best keep more of an eye on bandwidth use.
Having several other avatars in mt draw distance also impacted performance (unsurprisingly – it does on all viewers), so if you are again in a crowded place, you might want to keep DD right down (although a cap on the number of avatars Lumiya will attempt to render might also be a good idea).
Opinion
Alina’s work on Lumiya never ceases to amaze me, and this release really is quite something. The avatar rendering is phenomenal, and the camera movement options are both intuitive and really do improve the in-world experience. There’s still more work to be done around Outfits Folder use, but that’s hardly likely to cause many issues. I’m not actually sure how widespread the use of (My) Outfits is; there are limitations with the implementation in the official viewer, and it can create a fair amount of inventory bloat. While I do tend to use it for NO COPY outfits from a couple of my favourite designers, friends do tend to respond with a “never bothered with it” when discussing using it.
Wednesday August 8th saw the launch of Lumiya 2.2.0, followed on Saturday August 11th by 2.2.1. With them came a host of goodies, including:
A new user interface
Split-screen layouts for tablets
The ability to:
Add and remove friends
Set an auto-response for incoming IMs
Send teleport offers to others
Support for legacy user names (rather than only using Display Names)
Avination added to grid list.
As we shall see, this is really quite a modest representation of what amounts to a huge amount of work to completely overhaul what was already a very usable and increasingly intuitive application and turn it into a highly polished product.
This review was written using a Samsung Galaxy S2 smartphone running ICS 4.0.4. Note that as I do not have a tablet device, I’m unable to do any direct screen comparisons, therefore some details might differ on a larger display.
Sign-In Screen
The changes are apparent from the moment you launch Lumiya, as a slick new log-in page appears, complete with new widgets.
The older (l) and newer (r) log-in screens – note the widgets, top right, in the latter
The widgets are at the top right of the screen and comprise (in left-to-right order):
Account Manager: easily access all of the accounts you’ve used Lumiya to log-in to SL. Tapping on this will display a list of accounts, including the name of the grid the account is used to access. Tapping an account name will return you to the sign-in screen, with the user name and password fields auto-completed with the required credentials, and the client pointing towards the required grid
Settings: tap on this to access and set / amend your preferred settings for Lumiya.
Settings Options
Before getting into the various changes within Lumiya itself, it is worth covering the Settings options, as these include some important updates. Chief among them is the new Light skin option. Until now, Lumiya has presented itself on a dark background. On smaller screen, than can be hard on the eyes and lead to discomfort. The Light skin option displays Lumiya’s screens on a white background which on smaller screens especially can be easier on the eye.
The two visualisation options for Lumiya
Also within Settings are the new options to: use legacy names rather than Display Names; enable the split-screen display and when it will be activated (see Screen Orientation, below); and display local chat in the 3D world view (see Conversing in the 3D World View, on the next page).
Grid Access
The grid access list can now be displayed in one of two ways:
By tapping the name of the currently selected grid. This will display a pop-up list of grids
By tapping the Menu button on your device and selecting Grids from the menu which is displayed. This will switch to a full-screen list of defined grids
Tapping on the name of a grid in either list will automatically return you to the sign-in page, with the grid selected. Both lists also include the option to add further grids, as I’ve documented in my last review of Lumiya.
Menu Options and Icons
Tapping the Menu button on your device in earlier versions of Lumiya would pop-up a set of on-screen buttons. This has now been replaced by what I’ve dubbed here the “Lumiya menu”. This is a set of context-sensitive menus which will display options in accordance with the screen you are using / function you are performing and which take into consideration screen orientation (see below). These make working with Lumiya even smoother and more intuitive.
Greater use is also made of on-screen buttons as well. These are also context-sensitive and present a far slicker and faster means of performing activities within Lumiya than with previous versions. As the buttons rely on icons extensively when in portrait mode (at least on smaller devices), a PDF-format guide to the icons and their functions can be found here. A long touch on an icon will also show an on-screen tool tip.
Screen Orientation
Lumiya now includes much better screen orientation options when rotating between portrait and landscape modes, and adds a split-screen capability.
When rotating between portrait and landscape views the screen layout will automatically adjust itself. This will generally result in better screen utilisation in either orientation. However, when in landscape mode, it may appear as if buttons are vanishing from the screen due to the use of icons & labels – not so! Any buttons that are not displayed as icons are moved to the Lumiya menu, accessed via the Menu button on your device.
Where the icons go: rotating the Lumiya display to landscape may seem to cause buttons to vanish from the layout. Tap the Menu button on your device to display them within the Lumiya’s menu
The a split-screen option is primarily intended for tablet devices, but can still be useful when used with suitable screens on mobile phones. It is enabled via Settings (tap the Menu button on your device to display the Lumiya menu and then tap Settings), and can be set to one of the following:
Automatic: Tablets will automatically switch to split-screen when in landscape orientation, devices with smaller screens may not
Always in Landscape: the split-screen will activate whenever the device is rotated to a landscape orientation, regardless of screen size
Always: the split-screen mode will be active in both landscape and portrait modes, again regardless of screen size
Alina Lyvette continues to develop Lumiya, the Android client that offers 3D rendering capabilities. This week saw the roll-out of two releases in quick succession: versions 2..1.0 and 2.1.1 on the 5th and 6th July respectively.
Version 2.1.0 saw Lumiya expand its reach with support for OpenSim grids being added. Also included in the release where:
Significantly improved 3D view performance
Support for multiple accounts
Highlighting picked objects in the 3D view
New Teleport Home and Close Chat options.
Version 2.1.1 was released around 24 hours after 2.1.0 to correct some issues found in the latter.
OpenSim Support
Lumiya now supports a number of OpenSim grids by default and provides an option to add further grids yourself. The grid list can be displayed by tapping the grid selection button (which also displays the currently selected grid), sitting below the user name and password entry fields of the sign-in screen.
To select a grid, enter the user name and password and then tap the grid selection button to open the grid list. Tap the radio button for the grid you wish to access. The grid is selected and you are returned to the log-in screen an. Tap Sign In to log in.
Grid selection button (L), default grid list (c), manually add a grid (r)
To add further grids to the list, tap the Add Another Grid option at the bottom of the grid list. This will open a custom grid screen (above right), which prompts you for the name of the grid and the URI.
I tested Lumiya on InWorldz and Kitely. Accessing both was straight-forward, although you will need to use the plug-in independent method in order to log-in to Kitely. Once in-world, things rezzed OK in the 3D view, and I was able to move around with ease. As I was at a sandbox in InWorldz and a little pushed for time, I didn’t stay too long. With Kitely I took extra time as I was logging-in to my own place there, Fallingwater, and was impressed with the way the client handled rezzing the house – but did notice that it seemed unable to handle the system trees, which were completely absent from my in-world view.
Fallingwater on Lumiya
Multiple Accounts
Lumiya will now store passwords for multiple accounts and for different grids. This means that once you have entered the log-in credentials for an account and providing you’ve checked the box, you only need to enter the user name (and select the required grid if necessary) – the client will automatically associate the required password based on user name / grid selected, making signing-in to your grids less typing intensive, which is always a boon when working on compact virtual keyboards.
Other Goodies
Lumiya will now highlight objects that are picked in the 3D view, making it easier for you to see when you have selected the item you require – particularly useful if you are touching objects from a distance. Selected items are highlighted in red, and if any associated event triggered, the chat screen is displayed, allowing you to take the required action / select from the associated menu.
In terms of rendering the 3D view in Second Life, Lumiya does seem somewhat faster. While previous releases weren’t exactly slow on my Galaxy S2, it could take a while for some textures to rez. With 2.1.1, the delay is a lot less noticeable – if it happens at all. Even when jumping around several sims, things within my draw range rezzed and textured very fast, and the client handled distances of 96 metres somewhat easier than I remember from previous tests.
Object Filtering
Object filtering options
The object list now has an enhanced filter capability. To be honest, I’m not sure when this was added – I don’t remember seeing it in the last releases of Lumiya I reviewed, but I may have simply missed it. The new filter options are displayed by accessing the Objects list and then tapping the More button alongside the text input box. The options allow you to control the range at which Lumiya will scan for objects and define the type(s) of objects you wish to have listed via a set of check-boxes. Combined with the use of an object description or keyword, this can significantly reduce the number of items displayed in the Objects list, and is a good step forward.
Finally, Lumiya 2.1.1 also adds a couple of new options: Close Chat and a Teleport Home button. The latter appears to get your home location from the server – this is the first time I’ve used Lumiya since moving to a new region, but it had no problem in teleporting me back to my new home as I jumped around the grid.
All-in-all another great set of updates, tightly packaged and which significantly adds to Lumiya’s capabilities and appeal – particularly with regards to the addition of OpenSim support.
Lumiya continues with what amounts to almost weekly releases, with version 2.0.4 arriving in Google Play on June 10th, bringing with it the first cut at inventory support, as well as a host of other features.
Inventory Features
The inventory capabilities comprise the ability to view your inventory; copy, rename, move and delete inventory items; edit asset permissions and the ability to share inventory with other users. The inventory display can be accessed from most of the Lumiya screens via your device’s Menu button, and uses the familiar suitcase icon.
Inventory access in Lumiya (click to enlarge)
Tapping INVENTORY will display a familiar folder list, ordered in the default System Folders to Top mode. Currently this can’t be changed, but the inventory capabilities are still evolving in Lumiya, so this may not always be the case.
As with the inventory panel on any graphical Viewer, you can navigate through your folders – simply tap on a folder to refresh the screen and show its contents. To work your way back up through your inventory, tap the BACK button at the top of the screen not the Back button on your device. The latter will quit you out of inventory and return you to the screen you were displaying prior to accessing inventory.
Also, note that Lumiya will remember your last position within inventory for as long as you remained logged-in to SL, and that it is this position that will be displayed when you next access inventory; thus it is very easy to switch in and out of inventory when performing a number of activities with Lumiya. You are only returned to the top-level of your inventory if you use the on-screen BACK button or if you sign-out of your current SL session and then log back in.
Asset information (click to enlarge)
Tapping on an item in the inventory window will display the asset information for the object (see right). If the item has any editable permissions associated with it, this screen will include an EDIT PERMISSIONS button. Tapping this button will display a pop-up where you can set those permissions to which you have access: tap on the required check boxes to assign (green tick) or remove rights. When you’ve finished, tap Save Changes at the bottom of the pop-up to save, or Cancel to leave the permissions unchanged. Tapping either will return you to the asset information screen.
Tapping either of the PROFILE buttons in the asset information screen will display the associated profile information (owner or creator). Tap the Back button on your device to return to the asset information screen.
If you perform a long touch on an object item in inventory (press and hold for a couple of seconds), a pop-up menu is displayed allowing you to copy (permissions allowing), rename or delete the object as well as providing another means of displaying the object’s asset information.
To copy an item of inventory, display the pop-up menu and select COPY, navigate to the point in your inventory where you wish to paste the copy of the item and then tap the SAVE HERE button displayed at the foot of the screen. Note that:
At this point in time Lumiya doesn’t support inventory links
When you have copied an item, the originating folder for the item will be displayed, not the location to which you have copied it.
Edit and create notecards in Lumiya & embed attachments (click to enlarge)
The inventory functions additionally allow you to:
Teleport directly to a location by tapping on the associated landmark in your inventory
Open and read / edit (subject to permissions) any notecards in your inventory
Create new notecards by tapping on the Menu button on your device and then on New Notecard. When creating notecards, be aware that:
The notecard will be created in the current folder you are browsing, not the notecard folder
You can add landmarks and other notecards to a new notecard by tapping on your device’s Menu button and then on Insert Item – this will open your inventory display, allowing you to navigate to the landmark / notecard you wish to embed; tap on the item to add it to your new notecard.
Sharing Inventory
Inventory can be passed to another user (permissions allowing) via the CONTACTS screen using either the CONTACTS or NEARBY lists to select the person to whom you want to give inventory and then tapping on their name to open an IM window.
With the IM window open, tap your device’s menu button and select SHARE ITEM. This will take you to your inventory window, where you can locate the item you wish to give. Tapping on a full permissions item will automatically transfer it to the selected individual. Tapping on a Transfer / No Copy item will generate a pop-up warning you that you are about to transfer a No Copy object; click on OK to complete the transfer.
If you are offered an item of inventory, a message will be displayed in an IM window from the person offering you the item (as with graphical Viewers). Clicking on Accept in the IM window will open your inventory window, and you can navigate to the folder in which you wish to save the item. When you have located and opened the required folder, tap SAVE HERE to save the received item. Note that you can also DECLINE unwanted inventory offers, which are discarded.
Group Notices
Group notice with an attachment (click to enlarge)
Lumiya 2.0.4 also includes the ability to send group notices (with attachments). Note that in order to use this function, you must be in a group role that allows you to send notices (be an owner of the group, for example) – if you do not have such a role, the group notice option will not be displayed in Lumiya.
The option is accessed by tapping CONTACTS and then opening the IM window for the group, then tapping the Menu button on your device and selecting NEW NOTICE.
A button near the top of the screen allows you to access your inventory to attach items to the notice – once an item is selected by tapping on it, you are automatically returned to the notice editor, and the button switches to display REMOVE, allowing you to remove the item (and replace it with another if you so wish).
Opinion
This version also sees a number of nips and tucks to Lumiya; hardware keys are now supported in the 3D world view, log-in performance has been improved for those with large contact lists, etc., all of which make 2.0.4 a further very positive step forward for the client, bringing some important functionality to the client. Currently there is no support for wearing / adding clothing and attachments, but again, this is only the first release for inventory handling within Lumiya; things will very probably improve as the functionality is enhanced.
This is also the first version of Lumiya I’ve got to use on Android 4.0.3 ICS – largely because I’ve only just got my Galaxy S2 updated. I encountered no problems running on the new OS, while overall, 2.0.4’s performance on the S2 continued to match that of earlier releases on both wifi and 3G.
With all of these recent updates, Lumiya is now firmly in the lead in providing mobile access for SL on the Android platform, making it the obvious choice for those running suitable phones or Android tablets.