Lumiya: Manage groups, blocks and scripts – and more

lumiya-logoAlina Lyvette released version 2.5.6 of the Android Second Life / OpenSim Lumiya client on Sunday December 8th, with a further release of version 2.5.7 on Monday December 9th; with both came a chance to have a real play with my latest toy: a gorgeous new Asus Google Nexus 7 HD 2013!

Between them, these two updates comprise:

  • 2.5.6:
    • View your own profile and your transaction history
    • Send and receive group invites;
    • Persistent mute/block list support
    • Improved performance when handling large chat histories and of flexible prims in 3D mode
    • Fixes for an issue with touching complex mesh objects and a few known crash issues.
  • 2.5.7:
    • Quick fix for broken Unicode support in instant messages
    • Support for editing scripts, both in inventory and objects.

Note that with this review, I am using a 7-inch display screen, and so have split screens enabled. If you are using a device with a smaller screen / without spilt screen functionality enabled, your screen displays may differ from those shown in this review. All examples may not be the only means of accessing specific functions; they are based on my preferred usage of Lumiya.

Viewing Your Own Profile or Transaction History

View your own profile in Lumiya
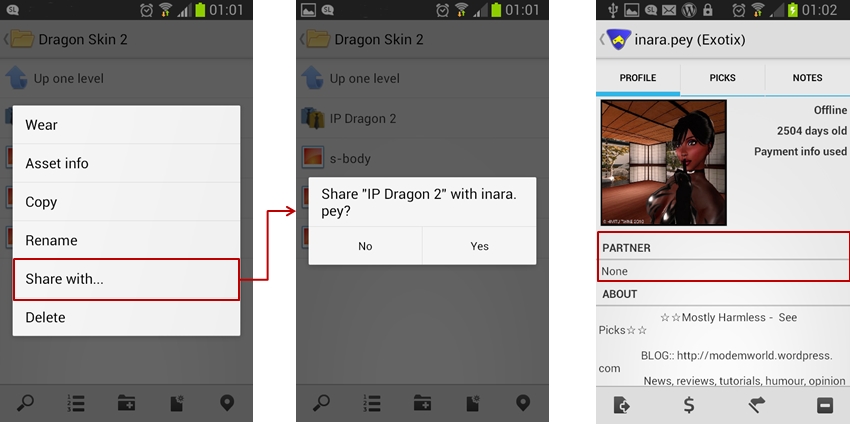
Until now, Lumiya has only offered the opportunity to view other people’s profiles. With version 2.5.6+ you can now view your own. you can also view your transaction history, which will list any transactions made during your current log-in session.

To view your profile, display the Chat or 3D world view and tap on the More option (three vertical dots) at the top-right of the screen. This will open a menu of additional options. Tap on My Avatar.

  • If you have split screens enabled, your profile will be displayed on the right, with the My Avatar options on the left
  • If you are not using split screens, tap My Profile to display your profile.

To view your transaction history, follow the steps above to display the My Avatar options, then tap L$ Balance option. All transactions which have taken place while you’ve been logged-in will be displayed.

Send and Receive Group Invites

Lumiya 2.5.6 starts into providing more group management functions with the ability to send /  group invites with those groups in which you have be granted the required ability, or to receive group invites from others.

Sending A Group Invite

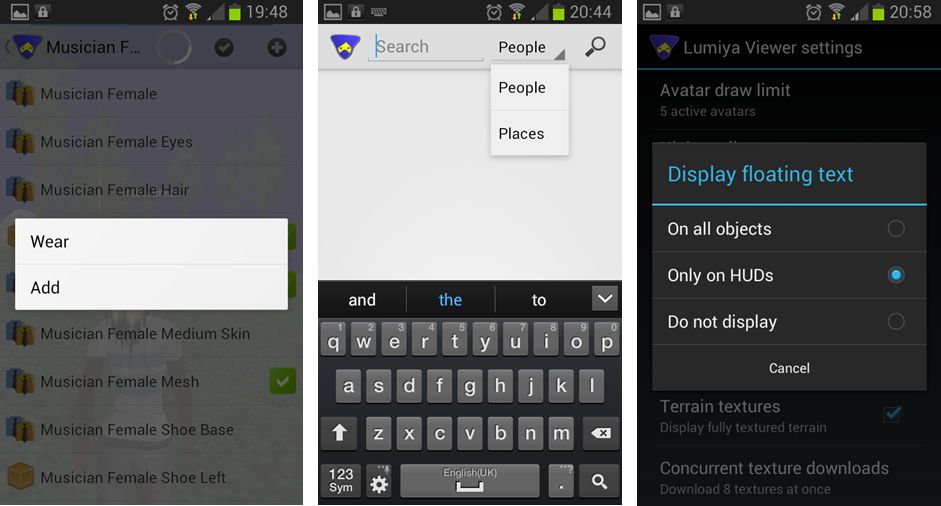
Currently, you can only send an invite to join a group to people recorded on your Recent, Friends or Nearby lists, there is no name picker to allow you to search for and invite anyone.

  • Tap Chat to display your Chat / Group options
  • Tap the name of a group to which you wish to invite new members. The group’s panel will open
  • Tap the invite icon located at the top right of the group’s panel.
Lumiya 2.5.6+: the new invite option for inviting people to join your groups
  • A pop-up is displayed, allowing you to select the person you wish to invite from your Recent, Friends or Nearby Lists
  • Tap the name of the person you wish to extend an invite. A role picker pop-up is displayed
  • Tap the role you wish to assign to the person. The role is selected and an invite is automatically sent.

Receiving a Group Invite

As with any graphical viewer, when you receive an invitation to join a group, Lumiya displays the invitation in you Chat panel, with the name of the person sending the invitation, details of the group you are being invited to join and option buttons to join the group or decline the invitation.

Persistent Mute / Block

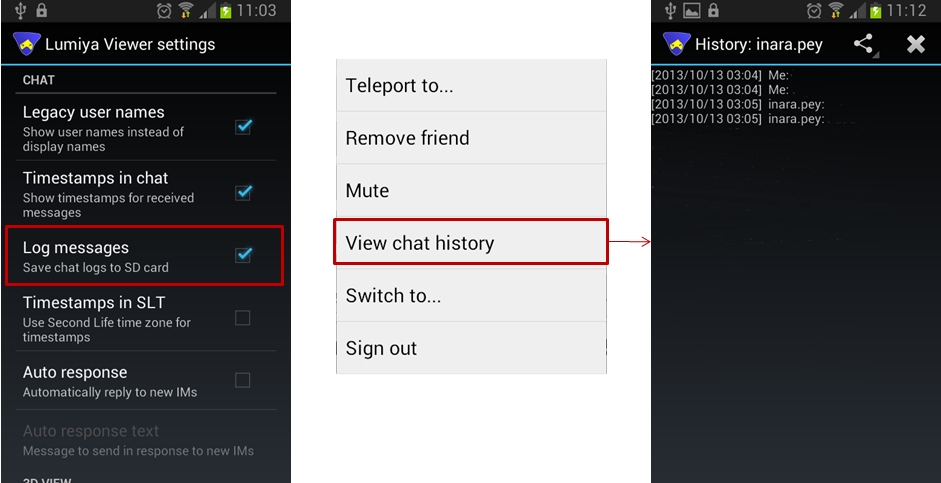
Lumiya 2.5.6 introduces the ability to mute / block IMs and group chat sessions, either for the current log-in session or persistently across all sessions until the block is lifted.

Muting an Individual or Group

There are a number of ways to mute an individual or group:

Muting via the chat list:

  • If the person or group you wish to mute is in your local chat list, long-touch the name.
  • A pop-up menu is displayed:
    • If you have selected an individual, it will include the option to Block them. Tap this. You will be prompted to confirm your action; doing so will add the individual to your Block list
    • If you have selected a group, it will include an option to Close and Mute the group chat. Tapping this will prompt whether you wish to mute the group chat for just the current log-in session or permanently (until unblocked). Tap the required option to add the group to your Block list.
You can mute / block for your current log-in session or persistently across all log-in sessions, including via other viewers
You can mute / block group chat for your current log-in session or persistently across all log-in sessions, including via other viewers

Muting via the Friends, Group or Nearby lists or from within an IM or Group chat session:

You can block someone via an open IM session, or by starting an IM session and selecting the mute option
  • Select the individual you wish to mute / block from your Friends or Nearby lists OR tap on the name of the group you wish to mute chat from in your Group list
  • The IM or Group chat panel will open. Tap the More option icon (three vertical buttons) to display a further list of options. Tap Mute.
  • You will be prompted whether you wish to cancel, or mute the individual / group for the current session or persistently across all log-ins – tap your desired preference.

Muting an individual in  group chat:

  • Long-touch the individual’s name within the Group chat panel
  • A pop-up is displayed allowing you to Copy Message Text or Block the individual
  • Tap Block to add the individual to your Block list.

Muting via the Block list:

  • From Chat or the 3D world view, click the More icon (three vertical dots) in the top right of the screen
  • Tap My Avatar
  • Tap Block List to display a list of blocked individuals, groups and objects
  • Tap the ADD button (top right of the list)
  • A pop-up is displayed for your Recent, Friends and Nearby lists. Tap the required list to display a list of names
  • Tap on the avatar name you wish to block, it will be added to your Block list
  • Repeat for any additional names you wish to block.

Blocking an Object

To block a spammy object:

  • Locate it in Chat and long-touch it
  • A pop-up is displayed which includes the option to Block it
  • Tap the Block option to add the object to your Block list.

Unmuting / Unblocking an Individual, Group or Object

The easiest way to unblock an individual or group is via your More menu:

  • From Chat (or the 3D world view, click the More icon (three vertical dots) to display further menu options
  • Click My Avatar
  • Click Block List to display a list of blocked individuals, groups and objects
  • Scroll through the list to the item you wish to unblock and long-touch You’ll be prompted to confirm the action
  • Once you have confirmed, the individual, group or object will be unblocked.

Note that you can also unmute an individual or group by tapping on the name in your Friends / Nearby / Group list to start an IM / Group chat session, then tapping the More icon and tapping the Unmute option.

Script Editing

Lumiya 2.5.7 allows users to view and edit scripts to which they have the requisite rights both from within inventory and contained within an object.

Open a Script from Inventory

  • Tap the Inventory icon to open the Inventory panel
  • Navigate to the folder containing the script to be edited
  • Locate the script in the folder’s contents and tap it
  • The script editor is displayed, together with the selected script in view mode.

Open  a Script in an Object

  • In the 3D world view, long-touch the object containing the script you wish to edit
  • Tap the More button to display additional options
  • Tap Open Contents. A panel displaying the objects content is displayed
  • Locate and tap the script to be edited. The script editor is displayed, together with the selected script in view mode.
Lumiya 2.5.7+: viewing and editing your scripts

Editing a Script

  • Tap the Edit Script button at the bottom of the script editor
  • Position the cursor at the point at which you wish to start editing
  • Use the Save or Discard Changes buttons as required.

Lumiya on the Nexus 7 HD 2013

And now, a short aside.

Until now, I’ve been running Lumiya on a Samsung Galaxy S2. However, when updating my mobile (cell) phone recently, my new service provider offered me a bundled deal of a new ‘phone and free Nexus 7 HD 2013 (and other goodies) for the same monthly tariff rate I had been paying for just the S2. Needless to say, I took the deal.

Lumiya has always worked well on the S2 for me, although it did struggled at times and the relatively small screen tended to make some operations difficult. With the Nexus 7 HD, Lumiya is nothing short of glorious.

Not only do I now have the benefit of full split-screen functionality on a screen big enough to handle it when operating in landscape mode, I have the power of two quad-core processors to handle the application and graphics and twice the available memory to play with. As a result, the 3D view is a joy to behold and move around in, with very fast rendering (as compared to the S2), and much smoother movement – both of which go a long way towards making Lumiya even more of a desirable travel companion.

The in-world view is also given something of a boost as a result of the Nexus 7 HD’s screen resolution: 1920×1200 which is a higher resolution than I’m getting  on my main monitor (1440×900) and at an amazing 323ppi. This presents a really crisp, clean in-world image when using the 3D view which is very pleasing to the eye; so much so that I don’t feel a screen cap really does it justice.

My home on Lumiya and the Nexus 7

The Nexus does still struggle when using the High Quality Textures setting, particularly at higher draw distances (48-96 metres), but given the load this is placing on the tablet in areas rich in textures, many of which will be of very high-resolution, I’m not actually surprised by this.

As I plan to use (and already have used) the Nexus to do “serious” work when moving around, I opted to invest in a bluetooth keyboard to go with it; and I have to say it is an absolute joy to have – part of this article was actually written on the Nexus using the keyboard and Kingsoft Office. The keyboard really adds to using Lumiya in that it obviously avoids the need to use the on-screen keypad, and the cursor keys / WASD keys can make moving around a lot more natural in feel if you’re used to using them on a viewer. Another benefit with a keyovard is the reduction in the amount of finger prints and smears appearing on the screen as you work.

I’m actually rather chuffed with the keyboard, which I obtained via ebay for £15.00 (around 18.00 Euros or $24.00 USD). When not in use it forms a protective cover for the screen, clipping securely around the tablet. Despite being aluminium in construction, it adds very little physical bulk to the Nexus when “closed”, and also has the benefit of solid-feeling keys which have a decent travel distance, which aids typing considerably. With Lumiya, it certainly adds a huge amount of ease to chatting and (now) to editing scripts! If you’re a Nexus user and decide to get one, just make sure you get the version which matches your Nexus model (2012 or 2013).

A suitable bluetooth keyboard can further enhance using Lumiya

Feedback

Two more outstanding updates for Lumiya which significantly enhance its capabilities, although on smaller screen the script editor may have limited appeal due to issues of trying to correctly position the cursor for editing and seeing what you’re actually doing when an on-screen keypad is open as well.   On a tablet, the editor performs much better, although big fingers may still have problems positioning the cursor.  As noted above, use of a suitable keyboard easily overcomes this problem (although are not always easy to use when on the move), and also makes chatting and IMs massively easier for those who aren’t keen on on-screen keypads.

The group and mute / block options are likely to be heartily welcomed by those putting Lumiya to extensive use and / or who routinely visit busy places. Both work very well using the methods I’ve indicated in these notes, and the functionality appears flawless.

All told, these are more than worthwhile updates to Lumiya further enhancing its reputation as the go-to solution for anyone on android who needs to access SL for a broad range of tasks while on the move.

Related Links

Lumiya 2.5.5: Share and enjoy

lumiya-logoThursday October 10th saw the latest release of Lumiya, the Android client for Second Life and OpenSim arrive.

Version 2.5.5 brings with a number of updates and improvements including:

  • Sliding gesture toggles between contact list and chat
  • Share inventory
  • Partner information in user profiles
  • Option to view chat logs within the application.

Slide Gesture for Chat / IMs and Contacts

iI5IrndThe slide gesture is a handy means of moving between your contacts list and an ongoing conversation either in open chat or IM without needing to use your device’s Back button.

To move between a conversation window and your Contacts list:

  • Start a conversation in chat or use Contacts to IM a friend
  • Place you finger on the screen and drag to the right. Your Contacts list will slide into view
  • Drag your finger to the left to return to the conversation
  • The image on the right, courtesy of Alina Lyvette, shows the function in use (the size of the image is unfortunately dictated by a limitation within WordPress.com when handling animated GIF files. Apologies if it is a little “in your face”.)

You can move between multiple IM windows by “sliding” back to Contacts and then tapping the name of the person you which to talk with and then “sliding” back and tapping the name of someone else.

Share Inventory

Version 2.5.5 allows you to share /give inventory items with / to others (subject to permissions, as usual).

To share and item:

  • Open you inventory and navigate to the folder containing the item you wish to share / give
  • Long touch the item for the context menu
  • Tap the Share With… button – this will open your Contacts screen
  • Tap the name of the person you with whom you wish to share the item
  • A pop-up dialogue will be displayed asking you to confirm that to wish to proceed. Tap Yes to do so.

Note that Lumiya doesn’t display the warning notification if you are sharing a Transfer / No Copy item, nor does it display the “User is offline….” message when the recipient is offline. However, a message confirming the object has been transferred is displayed in local chat.

Lumiya 2.5.5 allows you to share / give inventory items with / to others (left and centre) and also display partner information in the Profile display (right)

Partner Information

The ability for Lumiya to display partner information has been added to the Profile display.

Viewing Chat Logs within Lumiya

Lumiya 2.5.5 allows you to access chat logs (history) within the application. This does require that Log Messages is enabled in Settings.  Also note that due to a file name format change, chat logs saved in previous versions of Lumiya may not display.

  • Tap the Menu key on your device from Lumiya’s main screen and then tap Settings
  • Scroll down the Settings page to the Chat section and make sure Log Messages is checked
  • Initiate a conversation with someone
  • To see the chat history, tap the Menu screen from within the Chat / IM window and select View Chat History – note that if there is no recorded history log, this option will not be displayed in the menu
  • If a chat log file exists, it will be displayed.
View chat history: make sure the Log messages option is checked (l); from the chat / IM screen, tap the Menu button on your device and select the View Chat History option (c) to open the history, if available (r).
View chat history: make sure the Log messages option is checked (l); from the chat / IM screen, tap the Menu button on your device and select the View Chat History option (c) to open the history, if available (r). Note that if the option is not displayed, there is no history file to view

Other Items

Other updates in this release comprise:

  • Support for llLoadURL() – so you can now open a web page in a browser installed on your device, if a dialogue box is displayed asking if you wish to do so
  • Improved notifications
  • Bug fixes and performance improvements.

Feedback

Another very tidy update from Alina which adds some useful functions to Lumiya, with the ability to share / give items of inventory liable to be welcome among users. Kudos!

Related Links

Lumiya 2.5.0: advanced rendering

Update August 29th: There have been two additional updates with Lumiya since this review was published. Versions 2.5.2 and 2.5.3 both offer the same additional functionality as reviewed here, but include further fixes for devices using Adreno GPUs.

lumiya-logoAlina has released versions 2.5.0 / 2.5.1 of Lumiya. The two versions, released on August 26th and August 27th respectively, comprises the same updates features-wise, but the 2.5.1 release includes an additional fix to correct a crash issue users encountered with devices using Adreno GPUs (such as the HTC One).

The focus for this release has been on rendering capabilities, with the 2.5.0 release notes summarising the updates as:

  • An advanced rendering mode for better visual quality
  • Limited windlight support (sky, clouds, stars, time of the day)
  • Drag-to-select pointer for easy selection of small objects in 3D mode
  • Ability to purchase objects
  • Fixed an issue with terrain not being rendered when 3D view is opened too early.

Advanced Rendering and Windlight

The number of rendering options already included in Lumiya is impressive. Advanced Rendering brings with it the ability to render in-world light and other visual effects, windlight support for clouds, night-time stars, setting the time-of-day in the world view, and anti-aliasing.

Advanced Rendering options. note that Advanced Rednering must be enabled via a separate option in the Settings menu in order to access the options
Advanced Rendering options: note that the capability must be enabled via a separate option in the Settings menu in order to access these options

The additional capabilities are added to the 3D View section of Lumiya’s Settings menu (device Menu button > Settings), although they are on by default. While they do offer some enticing options, they do make Lumiya very much more device dependent than perhaps has been the case with the client in the past.

For example, I found that with the Advanced Rendering options active, my Galaxy S2 struggled mightily to render an in-world scene, even with high quality textures disabled, max avatars dialled back to 1 and draw distance down to a minimal 48 metres. More particularly, it got very hot in my hand; something I’ve not encountered previously. Once rendered, the scene also lacked clouds (although I’d chosen a region with a cloudscape overhead on purpose), but stars were visible when switching the time to night. Because of this, I’ve not included images from my phone, but rather demo images Alina captured on a tablet device with more oomph than my S2 can manage, as they give a fairer indication of what can be seen when using the right hardware.

Lumiya has clouds - if your Android device has the power
Lumiya has clouds – if your Android device has the power

That my S2 struggled isn’t surprising. There’s an awful lot of work for a small hand-held device to manage, even with just some of the bells and whistles turned on. Just as it is unrealistic to expect older computer hardware with limited graphics performance, memory, etc., to be able to handle all the latest shiny in Second Life, it’s also unfair to expect devices which necessarily have limited capacity to present everyone with the same level of detail with all the options ticked.

Starry, starry night / Paint your palette the Lumiya way ...
Starry, starry night / Paint your palette the Lumiya way …

Drag-to-Select

Another major new addition to Lumiya in this release is Drag to Select. This comprises a small hand icon in the top left of the world view, with the label Drag to Select. Following the instruction allows you to drag the icon (which changes to an arrow) and point to objects in-world, enabling you to interact with them more easily. Releasing the icon when pointing at an object will bring up the initial interaction menu, allowing you to touch, sit, etc., depending on the object.

Use Drag to Select to interact with in-world objects which may be too small to otherwise use long touch on

This is especially useful when using a small screen, where the finger can easily cover multiple items, resulting in some frustration when trying to long touch something for its menu. Do note, however that as the option removes your avatar from the in-world view, you can’t use it to touch your own attachments; nor does it appear to work on other avatars’ attachments.

Making Purchases

You can now shop ’til you drop with Lumiya. Simply find a vendor or object set for sale, long-touch it, and the pop-up menu includes a Buy Object item. Tap this for a final confirmation before buying.

You can now purchase things with lumiya
You can now purchase things with Lumiya (account balance blanked on purpose)

Feedback

Another interesting update, albeit it one which may well tax some devices, prompting users to disable some of the options. Seeing windlight start to arrive in Lumiya is good, and helps the client to become more of a mobile alternative to a full-blown viewer for those on the move requiring their SL fix. Similarly, having the ability to make in-world purchases adds to Lumiya’s attractiveness. I also like the new Drag to select function, although its addition is starting to make the in-world view on small screens rather crowded. Even so, I’d rather have it than not.

I understand that in-world building is on the cards for a future release of Lumiya; now that will be interesting. I presume it’ll be a capability best suited to tablet devices rather than small-screened handhelds, but that’s no reason for seeing it excluded. It just means I’ll have to go buy myself a tablet! :D.

Related Links

Lumiya 2.4.7: bake, float, layer and find your place

lumiya-logoLumiya, the mobile client for Android devices saw two rapid-fire updates on June 11th. First came version 2.4.6, offering a lot of new and improved functionality, which was followed by 2.4.7 with a round of bug fixes which demonstrated again that no matter how hard you try to stomp on the little sods before a release, some of them will still be there to blow raspberries at you after a release…

Given the rapid-fire nature of the updates, I’ll be reviewing them all under the banner of the 2.4.7 release.

The Fixes

The under-the-hood fixes to Lumiya with this release comprise:

  • Minor inconsistencies with avatar shape rendering correctly
  • Fixed terrain rendering in regions with default terrain textures
  • Fixed a crash on clearing cache while connected
  • Updates for server-side baking compatibility.

Multi-wear / Multi-attach

Lumiya now supports multi-wear for clothing at attachments.This is enabled via an ADD option appearing in the pop-up menu when selecting items from inventory or outfits to be worn / attached.

Currently, the order in which items on the same clothing layer are displayed is a little random (so if you wear shirt layer item 1 first and then shirt layer item 2, the second item might appear to be worn over the first, but the next time you add them in the same order, the second might appear to be worn under the first). There is also no ability to re-order items once worn, as is possible with a viewer.

At the moment, system clothing in Lumiya all utilises the same icon in inventory & outfits (a shirt icon), regardless of the layer on which it is worn. Alina does plan to improve this in time, however her attention is on other functionality right now.

aaa
Lumiya 2.4.7: (L) – The new ADD option for multi-wear, allowing additional clothing items to be worn on an occupied layer / attachments to be worn on an occupied point, a-la most viewers, and accessible from both inventory and outfits; (c) – the new Places search option, which can be selected from within Search; (r) – the three options available from within Lumiya’s settings for displaying hover text in-world

Search Places

Lumiya’s Search option has been expanded to incorporate places and well as people. You can toggle between the two on entering search (e.g. by selecting it from the menu displayed when tapping the Menu button on your device) by tapping on the displayed option (People is the default) and selecting the required option from the drop-down.

Emotes and Hover Text

Lumiya now supports emotes in chat (e.g. /me smiles) and will also now display hover text above objects. By default, this is only on for hover text associated with worn HUDs. This is to prevent smaller screens being over-run with lots of on-screen hover text (because you’re roaming through a breedables store, for example). However, it can be enabled for in-world objects (or disabled altogether) by tapping the Menu button on your device and then going to Settings and scrolling down to 3D View and tapping Display floating text. This will display a pop-up menu with three options: On all objects, Only on HUDs, and Do not display – tap the radio button for the desired option.

Feedback

All told, another nice little package of updates to Lumiya which again further increase its capabilities and which enhance it as a worthwhile alternative to a full-blown viewer for those who need to access SL while on the go and away from their computers.  All of the additional functions are nice-to-haves, and the server-side baking / appearance updates ensure that Lumiya remains SSB/A-ready, once the latter starts to go live across the grid. There is something of a delay in changing / updating outfits as a result of SSB/A, so if you do try Lumiya for the first time, please bear this in mind and remember the app is doing an incredible amount of work in order to bring you both a mobile client and a functional in-world, real-time view of the world.

Kudos to Alina once again!

Related Links

Lumiya 2.4.5: nips and tucks

lumiya-logoSaturday May 25th saw the arrival of Lumiya 2.4.5. Something of a maintenance release, rather than one which offers heaps of new features, the update should help improve the overall experience for users who make use of Lumiya to access Second Life while on the go. Which is not to say there aren’t any visible updates to the app – there are; however, these are more aimed at also enhancing existing functionality, rather than adding new bells and whistles.

This update also sees Lumiya made available via Android Pit as well as Google Play, allowing it to be purchased via PayPal.

Profile Pictures, Picks and Notes

2-4-5-3Perhaps the most visible change with the 2.4.5 update has been made to the profile display, which now includes the ability to display people’s profile pictures within Lumiya, together with pictures included in their Picks, and which also allows you to add notes of your own to their profile.

Accessing your own (or a friend’s) profile will now display their profile picture on the left of an updated profile display, with their on-line and payment status information displayed to the right of it, together with their SL age. The selected individual’s About information is now displayed directly under their profile picture in a manner which mirrors the legacy “in-viewer” profile floaters which are common to v1-based viewers and popular with some V3-based TPVs.

Tapping the Picks tab will display a list of available Picks for the selected user, any of which can be accessed by tabbing on them, and will display their associated pictures after any descriptive or other text. Use the Back button on your device to move back and forth between Picks or to exit a profile display altogether, as per usual.

The Note functionality is also accessed by tapping a tab at the top of the profile display, and works exactly the same way as the notes option in viewer profiles – the notes you add are only visible to yourself.

Inventory Search

Lumiya 2.4.5 adds the ability to search your inventory for an item or items matching a given keyword. The search option is accessed by opening your inventory and then tapping the button with the magnifying glass icon (again in keeping with V3-based viewers). This will open a search field at the top of the display as well as displaying the device keypad to input a search term.

Lumiya 2.4.5: Search inventory (l): select a storage device (c) and deactivate a group tag (r)

Deactivate Current Group and External Storage Device Support

With Lumiya 2.4.5 you can deactivate your current group tag, and also define which storage medium you wish to use for the Lumiya database.

The latter – selecting a storage device for storing your Lumiya database – is controlled through Lumiya’s Settings options (accessed through the Menu button on your device). It can be found under the Cache section of settings, towards the bottom of the list of options (“Database location”). Tap to display a list of available alternative (e.g. “Internal storage” and “SD card”) and then tap the desired option.

Deactivating a group tag is a simple matter of displaying your list of groups, then long-touching the name of the active group and tapping the displayed option to Deactivate. This will uncheck the Group name in your list, and will result in your avatar’s tag only showing your display name and / or user name in other people’s views. You can of course activate any group tag simply by long-touching it and then tapping the displayed Activate option once more.

Under the Hood

The under-the-hood changes to Lumiya are designed to improve your experience when running Lumiya and comprise:

  • Auto reconnect after connection loss.
  • Improved handling of large inventories.
  • Runtime texture compression to reduce memory usage.
  • Online/offline notifications in chat windows.
  • Option to deactivate active group.

Feedback

This update to Lumiya is again somewhat “low-key” compared to some of the previous releases, but this doesn’t make it any less valuable. Alina is focusing on refining the client and the options it currently offers, rather than looking to add a lot of additional bells and whistles at this point it time. As such, this update is very evolutionary rather than revolutionary – and there is nothing whatsoever wrong with that, and is a very worthwhile download if you don’t have Lumiya set to auto-update.

Related Links

Lumiya: now you rez it, then you take it

lumiya-logoLumiya, the SL / OpenSim viewer for Android has seen two further updates since my last review. Version 2.4.3, released on February 16th, primarily saw the addition of flexiprim support in the 3D view, and the option to teleport to an avatar as well as some nips, tucks and tweaks.

Version 2.4.4, release on March 7th added object rezzing options and inventory-taking option to Lumiya as well as the ability to create landmarks. Taken together, both updates significantly add to Lumiya’s capabilities, and as I had a little free time, I took version 2.4.4 for a spin to try all the updates out.

Teleport to an Avatar

Teleporting to an avatar using Lumiya is a simple matter of selecting them from your Friends list, the Nearby list using a long touch and then selecting Teleport To from the pop-up menu. You’ll be asked to confirm the action – note that Yes is on the RIGHT of the confirmation dialogue; clicking it will teleport you to the avatar (or any landing point near them, if one is set at their current location).

Creating a Landmark

To create a landmark at any time, display your inventory, then click on the Landmark icon displayed in the bottom right of the inventory window (portrait display) or top right (landscape display). If the icon isn’t displayed in the latter view, tap the Menu button on your device and select Create Landmark from the displayed menu.

Use the Menu button on your device when displaying the inventory window to display a list of options of the Create Lanmark icon isn't already displayed
Use the Menu button on your device when displaying the inventory window to display a list of options of the Create Landmark icon isn’t already displayed

Note that you can access inventory either from the Lumiya Suitcase icon when in text view or in the 3D world view. If the icon isn’t visible in the latter, tap the menu bar on your device to display a list of options – inventory access should be at or near the top.

Tap the Menu button on your device to display all available menu options when in 3D world view

Rezzing Objects and Unpacking

Rezzing an object in-world in Lumiya is a simple matter of locating the object in your inventory and then long-touching it to display a pop-up menu. Tap Rez on the menu then confirm you wish to rez the object in-world in response to the dialogue displayed.

Objext rezzing from inventory & copying / moving the contents of an object back to inventory
Object rezzing from inventory & copying / moving the contents of an object back to inventory

Assuming you have object entry / rezzing rights for the parcel you are on, the object will be rezzed in-world. To display the contents, long-touch it (note that you may have to adjust your camera position to select the object, particularly if it is rezzed on another touchable object), and select the Open option from the displayed menu. An inventory-like window is opened to display the contents of the object, which can be copied / moved to your inventory by tapping the Copy button at the top right of the contents window.

Other Bits and Feedback

Lumiya supports flexiprim motions in the 3D world view as of version 2.4.3

Versions 2.4.3 and 2.4.4 see improved handling of large meshes, improved notification settings and assorted bug fixes.

The flexiprim support in the 3D world view works well, although rendering things like flexihair when in motion may result in slight oddities; for example, when walking, my hair tended to all but vanish at times, but would quickly come back once I stopped, and Lumiya reproduces SL’s signature “hair flair”  – long hair flairing out behind your avatar like a comet’s tail – very well :).

Overall, these have been two somewhat “low-key” updates for Lumiya compared to recent passes (mesh support et al). However, I know that 2.4.3 marked another milestone for Alina, as she’s been working on getting flexiprims to work for the last several months – so it’s good to see she’s succeeded.

The ability to rez / open objects adds another fundamental capability to Lumiya, as does the ability to create landmarks. All-in-all, another good set of updates which once again increase Lumiya’s attractiveness as a very capable means of accessing Second Life and OpenSim while on the move.

My only real issue with the viewer is that if Alina keeps developing Lumiya, I’m going to have to go out and buy a Tablet just so I can really enjoy using it! :D.

Related Links