Isla Pey: all change

The Maven Eco IV, with mods, and part of the updated island

So, yeah. Last time I wrote about the pet project of Isla Pey, I passed comment that unless it went through a major make-over, it likely would not be changing too much. Well, guess what? We’ve just had a major make-over 😀 . It wasn’t intentional; we happened to visit Cerys’ magnificent Collins Land (see here), which got me reconsidering island designs; then I discovered the Maven Homes Eco IV house (available in either unfurnished or furnished variations), which became a “must have”.

The House particularly caught my eye for a number of reasons. The unfurnished variant offers  very flexible living space (a large open plan front area which can be easily made into two rooms and a separate room to the rear, alongside of a comfortably sized wooden deck) neatly fitted into a 25m by 27m footprint and 99 Land Impact. However, the attraction for me is the soft echo of Frank Lloyd Wright in the design and styling: the cool stone walls, the pseudo cantilever angling of the roofs, the use of glass. All of these made it pretty irresistible. So really, I had no option but the consign the cottage and ruins design to a rezzing system and start over…

The Maven Eco IV with Trompe Loeil Keliana pool (left foreground) and steps down the cliff to the boat moorings

Of the two variants of the Eco IV, I opted for the unfurnished since furniture is something we’re hardly lacking. As noted, the large space to the front of the house offers two open plan room spaces, either side of the front door. I borrowed an idea from Leaf and Birdy Moone, adding some low-level stone “room dividers” to further break up the space, putting a lounge on one side and a study / music / cosy on the other.

There are one or two things about the Eco (as with any house design) which didn’t quite suit our preferences. The Eco’s fireplace, for example came across as a little too modern, while the lighting in part comprises fluorescent style strip lights which frankly aren’t that attractive. The old cottage came to the rescue here, providing me with both a replace fireplace and chimney, and a pair of suspended candle lights. The former did require a retexturing of all of the stone walls in the house to blend the chimney into the design, while the later required a little script tinkering and lighting prim placement to both get the candles to work with the built-in house controls and give a decent lighting effect both above and below, but none of this was in any way onerous work.

The modified day space in the Eco IV: the fireplace, dividing walls, ceiling fan and lighting candles are all additions to the basic house, and the stonework is not the original texturing

The use of several large base sections in the house makes it relatively easy to add to the structure and avoid bumping the LI too much. In this case, I added the fireplace, room dividers, additional lighting, rugs, carpets, wall hangings, paintings, photos, and ornaments totalling 38 LI individually for just an additional 14 LI on the house. Controls for the house a pretty good as well. The main panel includes a security /access system, controls for the lights (which can be set to turn on / off at region dusk / dawn and have a colour options), door controls (including setting them to auto-open) and a window opacity / tinting system.

Of course, a new house required a re-working of the island as a whole, and I opted for the Fantik Lofoten Summer rock kit for this, as it offered the best flexibility for the look I wanted to achieve. There are nine basic rock formations in the kit, all with physics. This can limit resizing opportunities due to increased LI; however, if you have rocks you won’t be walking on directly, use the old trick of flicking the physics over from Prim to Convex Hull (Build / Edit floater > Features tab), and you’ll find they are a lot more friendly to resizing.

Looking down on the new house. The chimney actually came from the “old” cottage, with a retexturing of the stone on it and the house to blend the two together. Some of the wood and cement beams on the house have also been tinted to darken them

Those who have used this kit will know just how flexible it is, and it allowed me to easily design the new island around the house and a new water feature of two rocky pools linked by a series of small falls (courtesy of Alex Bader’s Waterfall kit) stepping their way down the rocks, together with a final fall to the sea (with a sluice to prevent the ducks, geese and fishes from being swept away! Kriss Lehmann’s excellent Botanical Edge Brick Park Path kit came out of retirement to provide the paths and steps winding down the rocks, including down the the new boat moorings below the back of the house.

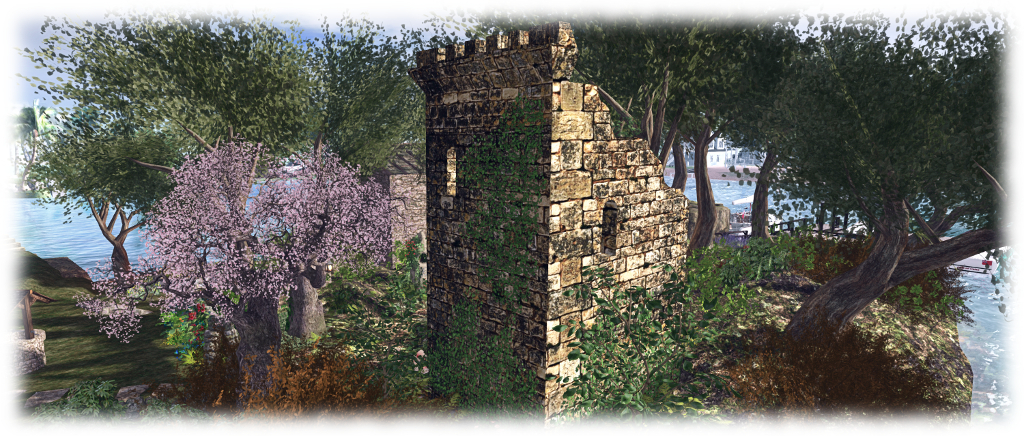
The southern end of the island has been a little truncated – we really didn’t need all the space – and redesigned using elements from the Fanatik kit. Some of the old castle ruins have been retained here – not about to get rid of them entirely! This provides a nice home for our MSD Dragon Garden and offers a shaded little seating spot, while the Trompe Loeil Outcrop Hut is also retained from the last design, giving us a place to watch the boat races go by.

The view from the front of the house looking south over the pond and water to the old ruins

So, that’s what’s been keeping me occupied for the last couple of days, and one (among several) of the reasons the blogging output has slowed of late. But as we’re both happy with the result, I’d say the effort has been worth it 🙂 .

If you’re interested in seeing Eco IV in-world, you can fint it at Cain Maven’s main store.

New blog layout – poll results and thoughts

Contemplating the blog layout…

On June 2nd, I blogged about this blogs new layout and asked for feedback directly or via a poll. As a week has now passed, I thought it time to provide an update on things.

The new layout is not without its problems (notably the banner image on every page), and some had issues I couldn’t easily replicate. My thanks to Richard, Sue W and JMB in particular for their feedback on specific issues, all of which helped me further tweak things – hopefully for the better.

Overall, of those who responded to the poll, most seemed in favour of the changes and the layout, and I’m growing accustomed to it. As such, it will be remaining for a the time being, so I’m not annoying everyone with what feels like a changing look and feel.

However, I’m still looking at options to get something which offers a similar level of functionality and allows plenty of room for images to appear in a decent size, but without having the huge banner image appear on individual articles and pages.

Sadly, while there are a fair few WordPress themes which avid the big banner on individual pages and offer things like a scrolling menu bar, etc., they tend to do so at the expense of text & images, which often get squeezed by an inordinate amount of left-side white space. So, I’ll keep looking.

In the meantime, thanks again to all who responded, be it with comments and / or via the poll.

Giving the blog a face-lift

The new banner – displayed on opening the blog, with latest posts displayed below it

It’s a bit hard to miss, but yes, I’ve made a change to the theme underpinning this blog. It’s by no means a permanent change – that depends on the feedback I get. However, there are a number of reasons why I wanted to change things a little, so I’m hoping readers will prefer the new layout.

  • A lot of effort has gone into the menu system, but it was always a pain to use with the “old” layout, as it was locked to the top of a page – scroll down too far and it would vanish off the top of the browser tab
  • Some readers stated they found the old layout difficult to follow, with the sidebar on the right seeming to “run into” the body text
  • It didn’t loan itself to viewing on mobile devices that well
  • I wanted to tweak the text a little and (hopefully) make it easier on the eye.

As the changes are template-based, it is possible some pages / images in this blog have gone a little sideways in places. I’m working through everything to double-check (unfortunately, the preview option in WordPress doesn’t entirely match the actual page layout, so I could only start checking things once I’d made the change to the new format. Ho hum). Please make allowances if you come across something that looks awkwardly formatted on a page in the meantime 🙂 .

The thing I’m hoping will prove most useful is the menu, which will now following you down a page as you scroll. Given I’ve put a fair amount of time in trying to categorise and track articles and pages in the blog via the menu, this will hopefully make it far more reader-friendly than has been the case in the past.

The menu bar should now move down / up the page as you scroll through this blog

I’ve also revised the default body and headings text font – again, my hope is this improves readability and comfort when browsing. Unfortunately, one thing WordPress won’t let me change is the use of block caps for headings; this is locked into a CSS I can’t access, but I how the use of caps in titles and headings isn’t overpowering.

Finally, this theme had a better set of style sheets for mobile devices. I’ve no idea how many people read this blog from the tablet, etc, but (with the possible exception of the menu, which is a bit “ugh!” on tablets, etc.), it should make for easier reading if you do.

As with the last major restructure to this blog – in 2012, can you believe?!), I’m offering a little feedback poll for those interested in letting me know quick thoughts on the layout

Poll closed – see the update here.

Isla Pey: happiness is getting things *just* so …

The cottage and gardens on the plateau

We’re into another quarter, so it must be time for me to fiddle with the island home 🙂 .

In January, we reverted back to using the Fanatik Rocky Island to give a little elevation to our island home, and while happy with the results, I couldn’t help but feel tweaks were necessary. For one thing, the rotation of that huge rock made the walk from house to boat house something of a trek. It had ended up this way because I thought that was the only way the Rocky island would decently fit the north end of the parcel, where we wanted it. Turned out, I’d measured things a little inaccurately, so if we sacrificed the ‘plane docks, it would actually just fit.

So, around went the 118 LI slab of land by 90-degrees, moving the footpath winding down the side so that it descends directly to the “field” at the foot of the cliffs. So far, so good, other than the loss of the ‘plane docks – and the burying of half the duck pond (which was not looked upon too kindly by our TLC ducks!). Cue a reshuffle of the landscape 🙂 .

The Botanical Enchanted Forest Tower and MSD Among the ruins – Isolde tower can be nicely merged to form a single ruin, and as both are mod, the stonework can be textured to they match. The upper platform on the Enchanted Forest Tower makes for a perfect setting for our MSD Dragon Garden piece.

I won’t bore you with a huge delve into things. Suffice it to say that the reshuffle actually improved things no end. For one thing, moving the pond helped me realise that with a little bit of re-texturing of the stonework, Kriss Lehmann’s Botanical Forest Ruins Tower could be combined with the MSD Among the Ruins – Isolde tower to produce a nicely expanded ruin on the west side of the island. This in turn provided a new home for our MSD Dragon Garden  (which is (reviewed here alongside the Among The Ruins Tower), with a cosy little snuggle beneath it, overlooking the relocated pond.

Looking across the pond from the sitting nook under one of the ruined towers

Moving the Rocky Island around also presented a much more flexible space in which to set the house and  gardens, with a little bit of terracing to break things up a bit. Everything is now much more conveniently located, and finally provided just the right post for out old well (a genuine steal from DIVAs Design at L$25), accessed via a gate (from Cube Republic’s Meadow Farm Fence kit, another recommendation) opening off the back of the garden.

And the ‘planes? Well, moving the pond made room for a smaller set of moorings, and a quick raid of my inventory produced an old Smith Fizz scene rezzing system. Nicely customisable, this now lets us rez whichever float ‘plane or helicopter we fancy using, whilst keeping the dock otherwise clear for friends to use when visiting, whether they come by air or water.

The towers lit at night, and the cottage in its new cliff-top location

So, are we happy with things – finally? Believe it or not, we both are. Will there be more changes in the future? Obviously, as there will always be nips and tucks, tweaks and additions. But unless we decide on a total make-over of the island for something completely new, I think that this time Isla Pey with its walks, ruins and house, is exactly how we both like it.

The dragon, the rune stone and the ruin in Second Life

Three composite creations by Morgan Sim Designs with me alongside to give a sense of scale with each one. From the left: the Dragon Garden, the Rune Stone Garden and Among the Ruins – Isolde

Whilst visiting Spring Spirit recently (see: A Spring Spirit in Second Life), Caitlyn and I were both taken by a magnificent red dragon seated upon a rock amidst a spray of grass and flowers. Taking a peek at it, via the Edit floater, we were led to the Marketplace store of Morgan Sim Designs (MSD). While the name may be familiar to some, it was a new and virtual treasure trove for us – as it is likely to be for anyone looking to add some special touches to their landscape and / or garden.

Operated by Chandra Pelazzi, Morgan Sim Designs is a Marketplace-only store specialising in composite designs. That is, designs which bring together the full permission works of other creators to design and present a unique finished product.

Buying from the Marketplace without the means to check creations in-world can at times be a hit-and-miss affair: will the item really live up to the photos? Is there perhaps some unseen flaw or issue which might others dissuade a purchase? We’ve all likely had such feelings. From what we’ve seen (and purchased!) so far from Morgan Sim Designs there is absolutely no need to worry. The elements used in MSD creations are all good quality pieces from established creators, with the completed pieces by the MSD demonstrating a keen eye for colour, design and detail.

The MSD Dragon Garden on our home island

Take the dragon mentioned above, for example. Called the Dragon Garden, it combines a full perm dragon with plants by Better Gnomes and Cauldrons / Krikket Blackheart, and additional plants and flowers by Decor Depot / Styx Maven and Daffy’s Gadgetmania / Daffy Proto. Offered as Modify / Copy for just L$190, it is a marvellous feature for any garden, weighing in a 22 LI in its default size (as a Modify item it can be resized, which will reduce the LI if downsizing, or increase it if upsizing). We now have one, slightly reduced in size and LI (16), sitting in the “wilder” part of out gardens, keeping an eye on the lower lawns nearby.

Another MSD item now included at home is the Rune Stone Garden. This combines a central full perm version of a rune stone from Otherworld / AnnabelleApocalypse with flowers and plants again by Styx Maven and by Mesh Plants / Reid Parkin (a creator I’ve used in a number of builds), What A Mesh / Dennie Ling, and T-Spot Mesh / Teresa Matfield. At 21 LI in its default size, it is also supplied Copy / Modify, and we now have one sitting on the trail winding through the wooded part of the island, where (if I may say so), it looks superb 🙂 .

The MSD Rune Stone Garden in place on our island home

Another composite from MSD which sits well in out overall design is Among the Ruins – Isolde. A much larger piece, featuring the square tower of a castle by S&M Designs / Mikael Blogger, plants and flowers again by Reid Parkin and Teresa Matfield, together with Bad Katz / Katz Republic. It comes with a 40 LI impact in its default size, and includes a statue by DMC Creations / x1XDanteX4x, which stands amidst a spray of flower inside the tower.

Taken complete, these MSD designs and the others in the range, add a great amount of character and depth to a scene. As most are supplied Modify, not only can they be resized to deal with LI concerns, if required, they can be tweaked better suit specific needs. For example, we have an ancient stone wall running across part of the land which has needed something to bring a little more colour to it. Enter one of MSD’s Medieval Wall Ruins Cottage Garden sets. It was a simple matter to pull out the supplied wall section, slip in a section from the existing wall, and job done. Colour where it is needed, and everything nicely integrated. Even had some base rocks I could re-purpose!

The MSD Among the Ruins – Isolde tower at home on our island

If you are looking for little scenes and pieces to add colour  or interest to a part of your garden, parcel or region, and you’ve not come across Morgan Sim Designs, then the Marketplace store is well worth a perusal. Everything is very modestly priced; everything mentioned here was just L$190, which is something of an average price for the store. Even as I finish this article, another kit from MSD has slipped into my inventory, and will shortly appear in the garden 🙂 .

Teeing off in Second Life

AERO Golf Club
AERO Golf Club

There are many, many activities you can try in Second Life which you may not by able to participate in or enjoy in the physical world. For me this has meant – among other things – playing the odd round of golf (a game I am not overly fond of outside of SL!).

I first tried my hand at a full 18-hole golf course in 2014, when I visited the AERO Golf Club (you can read about that visit here). As I hadn’t been golfing for a while, I suggested to Caitlyn we give it a try together. Given the last time I visited AERO was in mid-2015, it seemed natural for us to head there.

AERO Golf Club
AERO Golf Club

I have no idea how many golf systems are available in Second Life, but the one employed by AERO is very easy to get to grips with and enjoy.  The course itself – the work of Kaja Ashland and Marcus Bremser – is very well laid-out, and was last redesigned in (I think) 2015. Visitors arrive on the east side of the region, on the front terrace of the clubhouse. A quick walk through to the back terrace will take you past the pool and to the golf shack tucked into a corner where you can pick-up your clubs, HUD and scorecard.

There are no fees for playing at AERO, but you will need to join the in-world group. When you have done so, touch the golf bag in the hut to receive your club (actually three in one), HUD and scorecard. Wear / add all three, and you are set to go! The first tee is just a short walk from the hut; a par 4, it takes you down the length of the canal which almost cuts the course in two.

AERO Golf Club: Caitlyn tees off!

Game play is a case of selecting your teeing spot between the two markers, selecting your club type from the HUD (driver, obviously when teeing-off), and then taking note of the wind speed and direction (indicated by a particle cloud which appears next to you when you select your club). The LEFT and RIGHT arrow keys can then be used to adjust the angle at which you will strike the ball (indicated by a pointer on the ground) to compensate for the wind and get your ball down towards the green. Then it is a case of making sure the cursor is over the ground and then clicking and holding the left mouse button to both commence your swing and select the force with which you hit the ball (indicated by a power bar). Releasing the mouse button completes your swing.

AERO Golf club: about to chip the ball onto the green. Note the wind speed cloud and direction pointer
AERO Golf Club: about to chip the ball onto the green. Note the wind speed cloud and direction pointer

The flight of a ball is indicated by a line. By default, this is white, but you can use the Settings option on the HUD to select a preferred colour – handy when playing in a group. Additional strokes are played the same way, with the option of using a wedge for chipping up onto a green or getting out of a bunker, and a putter when on the green. Throughout it all your scorecard will track your shots and keep score.

The holes themselves vary in difficulty – and shorter par holes are not necessarily easier than those with a dog leg or other obstacle: the shorter par needs a steady finger on the strength of your swing or you can end up well into the rough on the far side of the hole!

The eleventh hole has a wicked shot across a bay which cuts into the course, requiring you select your teeing-off spot with care. Should your ball fall into the water at any time, the easiest thing is to remain where you are and try again.

One might argue that it would be nice to have a wider selection of clubs – particularly if you are a golfer – than just the driver, wedge and putter. But the truth is, these are more than adequate and mean that a round of golf is enjoyable without becoming taxing or complicated for the occasional / novice player.

I do have a couple of very small tips: if you use an over-the-shoulder camera view by default, you might want to centre your camera up when playing to get an more accurate view of the ground pointer. Also, if you have double-click to teleport enabled, you might want to turn it off; I carelessly mis-clicked on a putt and ended up attempting to teleport on the spot and lost a stroke.

AERO golf club: Caitlyn makes the putt!
AERO Golf Club: Caitlyn makes the putt!

As well as the 18 holes, AERO offers a poolside terrace and an indoor bar for socialising after a game. The cliff-sided bay I mentioned above has a small beach offering deck chairs and loungers, and there are several points around the course where you can take a break from play and enjoy a chat. You  can also break-off from a round if  the physical world or other requirements intrude; your card will retain your score and progress. However, the clubs are time-limited; should you return and find they have expired, simply obtain a new HUD, club and scorecard from the golf shack, and use the clubs / HUD with your “old” scorecard, and you’ll be able to finish your round.

Should you enjoy your time at AERO, do consider making a donation towards the upkeep of the course, and if you end up playing regularly there, you might want to purchase the pro scorecard – again, the fee goes towards the course.

AERO Golf Club
AERO Golf Club

AERO Golf Club is one of several scattered across Second Life and offers a fun way to enjoy golf in Second Life amidst gorgeous surroundings. Other clubs can be found in the Sports & Hobbies section of the Destination Guide (and doubtless elsewhere in the DG as well!).

SLurl Details