Seventeen years in Second Life

 My SL island home, as rendered on the PBR Materials viewer

So it’s another year and another pair of birthdays, physical and virtual – although I admit as the time passes, I get more and more envious of my avatar’s youth; she remains eternally young, trim and fit. Me? While I admit to still being vain enough to work out and maintain something of a trim figure (home rowing machines and exercise mats are both a godsend and a means of home torture), I have to admit that each year I find the back complaining a little more, the feet and knees getting more resentful when I go for walks or spend 20 minutes on the rowing machine…

However, be that as it may, December 5th saw my avatar reach 17 years of age. I actually had to be reminded of this by Johann Neddings (who always sends rezday greetings, bless him!), as I’d totally missed the fact for myself. I guess that as with the physical world, the older you get the harder it is to mark the passing birthdays with any enthusiasm!

2023 has been an interesting year; events in the physical world have – and continue – to mean that my ability to spend time in-world has become choppy. This is somewhat reflected in the number and frequency of posts appearing in this blog decreasing through the year as I’m just not had time to even begin to keep on top of things in Second Life. Sadly, this is likely to continue through the first part of 2024, largely as a result of one set of contractors messing a project up so badly, another project had to be postponed and cannot now commence until the end of January / start of February 2024. However, on the positive side, the project to switch to solar for the bulk of the house’s electricity requirements did go ahead without fuss or bother (although very nearly derailed by the aforementioned mess-up), and in the last 2 months alone has seen a reliance on the national grid for electricity drop by some 40%.

Anyway, what time I have had in-world has largely been devoted to various personal projects and following the ongoing updates to the platform  – particularly that of PBR Materials and the Lab’s work to adopt the Khronos glTF 2.0 specification. With the first phase of the PBR Materials work now live across the grid (see: A simple introduction to PBR materials, reflection probes & glTF in Second Life), I’m looking forward to getting the home island updated with reflection probes. I’m also eagerly awaiting the availability of the PBR Materials terrain work Cosmic Linden is working on, to see what that allows.

Another view of the island home, with two copies of the No Cottage Bazar used to form the “pool house” (lower left) ad “main house” (behind it, upper left) overlooking the old “castle courtyard”, the two linked via a small walled inner courtyard and be dint of swapping out windows on the upper level of the “pool house” for a door

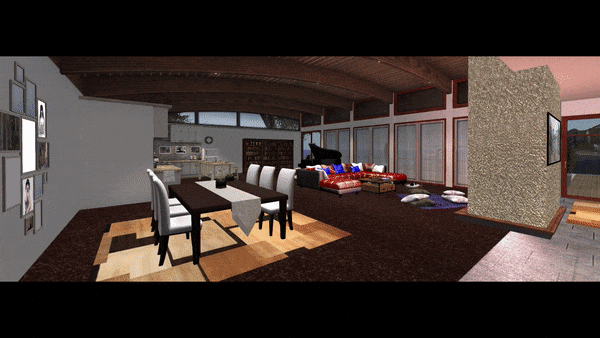
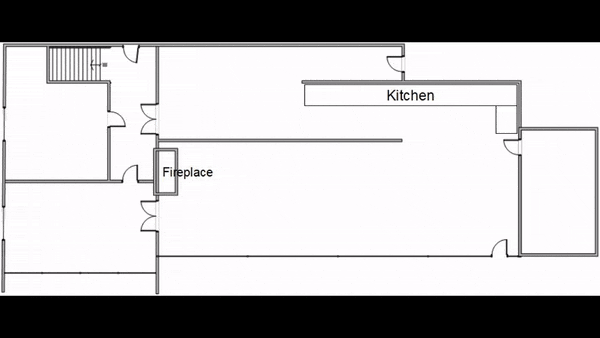
In terms of the home island, Second Norway remains my “home” estate, but time being what it has been, I’ve not had the ability to fiddle-fart around with trying out new island designs and kitbashing houses as frequently as I’ve been known to do in the past. There are certainly a lot of house designs I’ve encountered whilst wandering SL and reporting on public regions, but even if I’d had the time to start playing with ideas, I’m not sure I would; a good deal of available effort this year has been in putting together a home design based on what remains one of my favourite models to be offered with Second Life: Marcthur Goosson’s NO Cottage Bizar, which I first obtained in January and initially kitbashed into – of all things – a home swimming pool and lounge area (see The NO Cottage Bizar in Second Life).

Since then, that build has gone through a couple of iterations, but remains very much in use, becoming the nucleus for a scratch-build home design using renovated ruins as a theme before I finally opted to simply bring two copies of the model together to form a single extended home. Although me being me does mean the layout has had a couple of updates since I originally blogged about it (notably swapping the positions of the “house” and the “swimming pool” with one another).

Under full sail

Due to the lack of time, sailing & boating – a particular pastime I enjoy in SL – has also taken a back seat in 2023, whilst flying has been almost totally absent my SL. However, I would like to again thank Spartaco Zemenis and Analyse Dean for their individual generosity in supplying me with versions of the ’86 Domino cruiser and Skûtsje Barge respectively. I’ve enjoyed taken both out on the water (even if the ’86 Domino is by far the largest vessel I’ve operated in SL!) and equally enjoyed modding them to suit my needs.

The other thing I’ve continued to enjoy / appreciate is Second Life is the art exhibitions and installations I’ve been privileged to be invited to view. I haven’t always been able to make every invite  – and certainly not every exhibit or installation; but the fact that my opinion is actively sought and artists and gallery owners take the time to write to me either via the blog comments or directly after I have written a review, is both greatly appreciated and genuinely humbling. Thank you to all of you for this – it genuinely keeps me engaged in SL and wanting to see (and often learn about) more art and expressionism in SL.

And, of course, there are all the marvellous public builds across the grid I’ve been invited to visit. Again, apologies to those who have sent an invite I’ve been unable to follow-up on for one reason or another; as noted already, time has often and quite genuinely often been against me. However, the fact that folk do take the time to offer a personal invitation is deeply appreciated, and I do try to respond whenever I can by paying a visit, even if time later conspires to prevent me from offering a writing-up.

A final but by no means lesser thank you to everyone who does continue to read this blog, comment on articles and who suggest ideas for articles and / or pass on news and pointers; all of you genuinely make these pages what they are as much as I (only with fewer typos! – I’m still exceedingly lazy in checking my own pieces after a day of checking other people’s written work; my apologies again for that).

Each time my rezday rolls around, I tend to wonder about the portion of my life spent in Second Life, and whether it has been a meaningful, worthwhile effort, and whether or not I should continue to devote time to it. But the flipside to this is just where else is it possible to see such a rich and diverse gathering of creativity, companionship and artistic outreach and expression from the comfort of an armchair and in the company of your own cats (yes, both of mine will actually sit on my lap / on the desk and watch SL on the screen in fascination – and occasionally try to paw something so it will stop moving!)? As long as all of that remains available, it’s kind-of hard to imagine stopping altogether.

Besides, next year my avatar will be old enough to vote! 😀

Making NO Cottage Bizar a home in Second Life

Th No Cottage Bizar combined: foreground: the version used to create the house; Centre Background: the version containing the swimming pool / home gym

Back in January 2023, I wibbled on about the NO Cottage Bizar by Marcthur Goosson (see: The NO Cottage Bizar in Second Life). Despite its unusual name, this is a sublime mesh model of a ruin dating back to medieval times and which has seen more recent attempts to revitalise it through the construction of newer brick walls and installation of modern windows, frames and doors.

As I noted in my previous article, the model is particularly well suited to kitbashing and / or modding, something which back in January saw me convert it into a pool house with hot tub and (after that article was written) a personal exercise space, and which has remained a part of the home island since then. However, having recently got my periodic itch to change things up, home-wise, I started wondering how it might be turned into a comfortable home and perhaps combined with the existing pool house. The answer turned out to be a combination of “surprisingly easily” – further demonstrating the potential for this building design.

The original build – it is delivered as a complete 99 LI build, without a rezzing box, and the Copy-Mod version includes a set of shadow maps to help with the production of custom textures. There is also a full permissions version.

To give a recap on the basic model, it comes in 2 versions, both at 99 LI. One is supplied at Copy / Mod / No Transfer and priced at L$1,499; the second is supplied Full permission, at a price of L$11,500. Both include shademaps, and the Full permissions version includes all diffuse, normal and specular maps. I opted for the Copy / Mod version, but have recently come to rue not getting the Full permission version. The building is supplied boxes but without a rezzer; after unpacking it’s just a case of pulling it from inventory, placing it and you are good to go.

By default, the building has 5 rooms, three on the ground floor, with one extending out to one side so its roof forms a terrace / broad balcony,  and two on the upper. There’s also a small courtyard formed by the addition of brick walls at some point in its recent history, seen on the left of the image below. The textures and material maps used give a good degree of depth to the build, with enough variation in style to give the impression of a building extend over time using different stonework.

The rooms themselves are of mixed size, with two on the ground floor linked by an impressive stone arch into which modern doors have been set, guarded by heavy wooden doors on one side. The two upstairs rooms can be accessed separately, one by a pair of wrought iron stairs leading up from the innermost of the ground floor rooms, and the other via original stone stairs within the building’s single tower (which also provides access to the rooftop terrace / balcony mentioned above).

Four of the rooms of the  No Cottage (out of the box”: two on the lower floor, linked by the large arch and two sets of doors and the paired stairways to the upper level (top), and the two upper floor rooms (bottom).

Now admittedly, the default interior texture do give the building a drab, dank look – entirely intentionally and no critique of Marcthur as they fit the broad theme of the building “as is”; however, for a comfortable sense of home, some of them probably need brightening up. Fortunately, Marcthur has considered this and provided sufficient mesh elements / mesh faces in the build to make this relatively easy for the most part. Thus, with some suitable wall, ceiling and floor textures it is very easy to brighten the place up, whilst leaving the original stone untouched as a contrast.

For my part, I opted to use the room off to one side of the build as a new kitchen, retexturing the wall in a mix of “wallpaper” and (for their exteriors) stucco. Running the full width of the No Cottage, the room is ideal for this kind of use. Meanwhile, the rooms linked by the archway became, respective, the dining area (complete with sofa for enjoying pre- and after dinner drinks!) (also replacing the cement on the outer wall with a white stucco to enhance the look), whilst the first of the rooms linked by the archway and double doors became an ideal dining area with an additional sofa for enjoying pre- and after inner drinks and the living room.

Another view of the two copies of the No Bizar combined. Left and lower, the version forming the house; right and elevated, the version with the pool and home gym, the brick-fronted courtyard of which (centre) forms the link between the two.

In its default form, with huge fireplace, double wrought iron stairways and heavy concrete pillars supporting one side of the arch, this latter room can at first seem too cramped to become a comfortable living space. However, it is very easy to open it out  – such as by the removal of one of the stairways and replacement of the huge fireplace (I used the LISP Mid-Century fireplace by Pandora Popstar), and perhaps the removal of the concrete columns supporting the archway in the room (I also disguised the archway’s broken stonework with an arch of my own).

Removing one of the wrought iron stairways also allows the floor above to be remodelled to give more space, which I opted to use to fell the room become a comfortable bedroom, retaining the door connecting it with the other upper floor room, which became the bathroom (as well as serving a second purpose, of which more anon).

The four rooms after modding, in the same order an shown earlier. Top: the top lower floor rooms, now forming the dining area and lounge. Note the absence of a stairway and the revised arch in the lounge top help open it out. Top: the bedroom, making use of the added floorspace provided by the removal of a stairway, and the bathroom with access at the far end to reach the pool, etc.

If you want even more space, the walled courtyard can be easily converted into a room: just add ceiling/roof, floor and glazing (with the removal of the wrought iron element from the original). How the new room is then used is a matter of personal choice; I opted to install a new “front door” and make it an entrance-come-music room, increasing the sense of space in it by removing the doors separating it from the rest of the house.

One of the things I decided I wanted to achieve early-on in converting a copy of the No Cottage into a house was to combine it with the pool house version I’d created in a manner which suggests they are a single structure. Given the No Cottage essentially has a single mesh forming most of its shell, this might sound a hard-to-achieve goal; but with a little imagination it needn’t be.

Looking down on the “new” room formed out of the original courtyard (shown in the inset image, lower right), complete with glazed windows and a new “front door”.

Cutting a long story short, I managed it through the simple expedient of turning the house through 90º to the existing pool house and then placing it on a lower elevation. This allowed me to align the lower level of the pool house – notably its courtyard with is two stone arches – with the the house version. By aligning ne of the arches from the pool house courtyard with an upper floor window of the house, which could then become a connecting door linking the two (via the bathroom). By removing the wrought iron from the wall of the courtyard, I was also able to provide a second means of access the pool house from the garden (working alongside the double doors off to one side of the building.

To help blend this arrangement with the rest of the land, and to add to the sense this was once a very large structure, I availed myself of the various sets of ruined walls Marcthur also offers, and which are themselves based on elements of the No Cottage build. These were used to construct a ruined gatehouse and tower a short distance from the house, together with the remnants of a curtain wall and a wall to help with the split in elevation between the two versions of the No Cottage.

Looking across the pool house courtyard to where the two versions of the No Cottage have been aligned to give the impression they are a single building. Note the new door within the left-hand archway providing access to the house. The opening in the brick wall behind the sculpture provides access to the pool house from the garden.

As these kits are textured in a manner to suggest they have been ravaged by fire, to don’t entirely blend with the lighter stonework of the No Cottage (hence leaving me rueing the fact I didn’t but the Full permissions version!), but the gap between them and the house hopefully gives the impression the latter avoided the fire experienced by the former.

For those looking for the opportunity to obtain a building design offering some good potential for modding and which can fulfil a variety of roles from house to club venue or bar to deserted ruin – or even to house a swimming pool! – then it is really hard to fault the No Cottage Bizar, as I hope this piece again shows.

The long room to the right of the No Cottage is ideal for conversion for a number of uses. I opted to make a a rather spacious kitchen (partially visible).

Related Links

Cruising on a Domino in Second Life

The 86′ Domino by Spartaco Zemenis and Dogma9 – cruising at speed past Fastnet Light, Blake Sea

In 2021 Spartaco Zemenis sent me – entirely unprompted – a copy of the Moon Shadow motor cruiser he developed and sells alongside of Dogma9 under their respective winLab and Dogma9 Brands. While this was done in no expectation of a review but as a simple “thank you”, I found the boat so enjoyable to use, I ended up customising it and writing a review anyway (which those interested can read in Riding a Moon Shadow in Second Life). Within that review, I noted that the Moon Shadow – which I rechristened Moondancer after re-painting / texturing it – was the largest boat I’d driven / owned in Second Life.

Well, that record has now been broken! Recently, Spartaco forwarded me the latest version of the Moon Shadow, together with a copy of the 86′ Domino, a super yacht also built in collaboration with Dogma9 and available through their respective stores. At roughly 1.6 times the length and almost half as wide again as the Moon Shadow (so around 37 metres in overall length and 9 metres across the beam), it is now by far the largest boat I’m ever likely to own in SL!

Passing under the impressive Second Norway suspension bridge as I head out towards open waters aboard the 86′ Domino

The size of the boat is perhaps reflected in both its LI and price. By default, it tops out in motoring mode at 324 LI, although this can increase with various options (such as meals) are rezzed out as well, while the cost is a possible “eep!” inducing L$15,000 via the Marketplace, or L$12,000 if purchased in-world. However, for this, you do get a considerable amount of bang-for-(Linden) buck in what is a genuinely stylish yacht.

Inspired by the luxury vessels produced by Italy’s Riva brand in the physical world – a brand somewhat popular among mesh model makers – the Domino draws directly on the Riva 86′ Domino to offer keen SL boating enthusiasts with a vessel which looks good, is packed with options, has a high level of script optimisation, and  – I can say having handled it out on Blake Sea at speed across multiple east-west-east crossings (admittedly with only me on-board) and more gently through the channels and waterways of Second Norway – is an exceptionally agile vessel which handles itself very well.

In all three decks are provided on the boat, the uppermost forming the large flying bridge, with driver / pilot’s station seating up to three, and with a very large pair of sunbeds behind the cockpit area. Steps accessed via a floor hatch to one side provide access to the main deck, which comprises an over-the-stern outdoor seating area where lunch might be taken, and which provides access to the swimming / diving fantail and (empty) jetski garage / dive equipment store below.

Forward of this stern deck is the main day cabin, fully furnished and with the main cockpit to the front of this (control of the boat auto-switches between here and the flying bridge on the touch of a console button). Three points of access from the main deck provide access to the lower deck (one either side of the main cockpit, one within the rear deck area, hidden inside what appears to be a storage locker). The lower deck is split into two fully furnished double bedrooms, a galley, a bathroom, and a small seating area within the fore-and-aft companionway. Forward of the day cabin, and reached via sliding doors is the forward sun deck and sleeping area, and the boat’s bows. And this is just scratching at the bare bones.

My untouched Domino alongside one with a more custom finish at Blake Sea – Sirens Isle

Other features include:

  • The ability to carry up to 15 avatars (region crossings allowing!).
  • Fully functioning television media centres and laptop.
  • Animation and poses systems both built-in to the furnishings and via control panels located in various cabins, for a total of 250 couples animations and 120 single multi-function animations, with avatar movement between seats without the need to stand up.
  • 150 interactive objects,  including:
    • A selection of meals that can be rezzed on the main deck table and drinks and snacks that can be rezzed from the fridge.
    • Items that can be rezzed when working at the galley.
    • Working doors on rooms, closets, lockers, etc.
    • Full projected lighting system for internal illumination.
    • A working satellite ‘phone which allows the user to place calls (IMs) via a configurable list of recipients (and I would advise caution on using the default list of contacts 🙂 !).
  • Scripted dynamic control system that can be used to adjust boat handling (stability / performance balance) to suit your driving needs.
  • Automated resource management with manual override: when the engine is running, all scripts deemed unnecessary to motion / navigation are turned off to reduce the vessel’s simulator resource use.
Listening to the inimitable Tuva Semmingsen in concert on the 86′ Domino’s day cabin TV screen

The last two points are particularly useful when driving the Domino. With a 152 server load and 39.3 physics load, it is no lightweight when it comes to region crossings even without avatars and their associated loads, so minimising resource use and managing performance are important aspect in ensuring crossings are as smooth as possible.

HUDs

A key aspect to managing the Domino is the driver / pilot’s HUD. This provides access to the majority of the boat’s controls via clear icon buttons, with a second “page” for  manually locking / unlocking individual sitting positions, whilst camera options can be selected from the presets at the top of the HUD. In  order to work, the HUD needs to be synced to a copy of the boat. This is achieved by wearing / adding the HUD  and then sitting on the boat as the driver. Once attached, the controls, although graphical, are pretty clear.

As well as e primary owner / driver’s HUD, the Domino is equipped with two additional HUDs:

  • A camera HUD available via tissue box like containers on the boat itself. These can provide passengers with a HUD offering the same camera options as the driver’s HUD, allowing them to shard the same experience in viewing a ride and to switch their camera position if they wish.
  • An owner’s flag HUD, allowing the boat’s flag to be customised. This is pre-loaded with a number of national flags, but owners can also drop their own flag designs into it, either in one of the three spare slot, or in one of the used slots, if there is a particular pre-set flag option they won’t use. Clicking the HUD (when synched to the boat in the same manner as the driver’s HUD) will then apply the flag texture to the faces of the flag.
The 86′ Domino lends itself to re-texturing and simple re-tinting (to a degree). I’ll be looking to enhance the two-tone hull finish (mostly likely snow white and a sea blue-grey for the hull and superstructure elements). although uncertain what I might do with the interior furnishings and décor – yet.

General Handling

The controls are the usual: ↑ and ↓ for the throttle, with ↓ beyond 0 engaging reverse, while ← and → control steering (with the WS and AD handling these respectively for those preferring letter keys for movement). In addition – and a useful capability in a vessel of this size – is the inclusion of fore-and-aft side thrusters. Providing the throttle is set to 15% or below, pressing SHIFT-→ or SHIFT-← will push the entire boat sideways, allowing it to ease alongside piers for mooring.

The two driving positions (main cabin and flying bridge) have buttons that will move the driver between them – including when the boat is in motion. I’m not sure how much value my experience holds for region crossings, given I’ve only taken the Domino out on my own. However, for my more extensive testing, I did take it from the south-east corner of Second Norway up through and around the islands to the Blake Sea Channel at moderate to low speeds, prior to turning on the taps from Vest onwards for two full-throttle runs across Blake Sea into the waters of Nautilus and back, as well as a loop of Blake Sea at varying throttle speeds prior to mooring at Blake Sea – Sirens Isle alongside (serendipitously) the “Dogma version” of the Domino. I encountered a few moments of crossing stutter along the way and some issues of the camera not being sure of what it should be doing, but both boat and camera quickly sorted themselves out without any need on my part to cut power or do anything else, so nothing of the experience was lost.

Were I to sum-up my experience with the boat, albeit it over less than half-a-dozen trips (two of them reasonably long-distance, it would be “smooth and pretty much perfect”. But again, that is boating with no more than two on-board, and only myself during the longer / faster rides.

Another interior shot, this one looking down towards the lower deck galley on the 86′ Domino, with the door to the second sleeping berth just off to the right of the picture

Customisation

Textures for the boat are supplied in two packs contained within the Notecard manual. These can be copied to inventory and the textures downloaded for modding. However, I would note this is something that could potentially be improved; while the textures are split between interior and exterior, the labelling is not the friendliest (e.g. “86_Dimino_Int_101”; “86_Domino_Ext_006”, etc.). This can make matching some of the textures with their locations on the boat a little more complicated than it perhaps needs to be (why couldn’t “86_Dimino_Int_101” simply be called Something like “Domino_Int_Bathroom”?). Givingn a hint of location might be tricky with some elements of the external textures, given the way they are split along the hull mesh to maintain correct scaling when applied – but it would perhaps allow those attempting to mod the boat with a greater level of confidence than “texture X” really does match “panel Y” rather than a 100% reliance on Eyeball Mk 1.

Elsewhere, the boat can be additionally customised through the linking of parts and items. The manual spells out the cautionary notes in doing this (which are minimal), and as noted above, there are some 3rd party creators supplying elements for the Domino – search “86′ Domino” on the MP. Just how much customisation the boat will take in terms of linking additional elements to it needs to be considered; the linkset count is already at 248 objects, so there’s not a lot of overhead to play with.

My semi-modified 86′ Domino seen from overhead

General Feedback

As I mentioned earlier, I’m no fan of big cruisers and yachts in SL, some of which can look (to me) to be ridiculously oversized. However, I do like both the Moon Shadow and the 86′ Domino -with the latter perhaps outdoing the former simply because of this sleek looks, despite its much increased size. Niggles-wise, there is the labelling of textures noted above, and the LOD models have been perhaps a little compromised other than for the high detail model. However, neither of these are going to stop those on board the boat from really appreciating it.

I’m not sure if it is me or tweaking to the scripts, but the 86′ Domino also seems to handle better at low speeds and the Moon Shadow; for a boat of its size it managed some of the narrower channels around Second Norway with aplomb, particularly those crossed by the little drawbridge style road bridges (well, “little” when compared to the 86′ Domino!), making the experience of trying to shoehorn this big a boat through channels its perhaps not designed for an actual pleasure. At speed, it becomes very responsive without once feeling like it is about to get away from you.

Overall, for those looking for a luxury yacht that handles well and is packed with features, the 86′ Domino is well worth looking at. It’s not a boat I’d use regularly, simply because of my predisposition towards smaller vessels. It would be nice if the boat could be offered with a time-limited demo for those wishing to try it, given the price Had this not been gifted, it would have been the biggest barrier for me in considering a purchase), but for the large boat enthusiast in SL, it’s unlikely the 86′ Domino sill disappoint.

My sincere thanks to Spartaco for his generosity.

Related Links

The NO Cottage Bizar in Second Life

The NO Cottage Bizar installed at Isla Myvatn

Courtesy of a visit to Clifton Howlett’s Highland Retreat (see: A Highland Retreat on Second Life), I became acquainted with an absolutely engaging (for me) building design by Marcthur Goosson, which immediately set my little mind churning as to the possibilities lying within it for a little kitbashing.

The build in question carries the rather awkward name of NO Cottage Bizar, which really doesn’t do the building justice – although the tag to the name does help illuminate things: medieval restored ruin with modern materials. In short this is a structure that evokes what may have started as a medieval castle or fortified house, which as the years passed was extended as the need for fortifications faded prior to being abandoned, only to be rediscovered in more recent times and once again built-out using modern materials to form a unique home.

The original build – it is delivered as a complete 99 LI build, without a rezzing box, and the Copy-Mod version includes a set of shadow maps to help with the production of custom textures. There is also a full permissions version

This sense of history is imbued through the care in which this 99 LI design has been put together, notably with the use of textures and maps. Stand before the building, and it is possible to see the most aged part of the building, with its irregular stonework and masonry to the left, gradually giving way to later elements with their faced and squared stonework and more managed mortar, some of which bricks-up what might have been older parts of the building’s lower level, before returning to an older wall once more, something resembling a curtain wall that might have once enclosed a courtyard.

Within these elements are the “modern” aspects of the building: the courtyard (if that is what it was) has been full enclosed with cement walls and roofed over to turn it into a large room, the roof forming a balcony reached via the stairs of a still-standing tower which may once have opened onto the original wall. Elsewhere, the interior spaces have been built-up with brick and cement walls, new cement beams keyed into them or the original stonework, in places supported by upright beams in order to support new upper floors. These can be accessed either via the old tower stairs or by iron stairways which, with the iron reinforcements visible in places, give the rebuild something of a post-modern industrial look.

Some of the original rooms within the NO Cottage: two on the lower floor, linked by the large wooden doors. Below these are pictures of the two upper floor rooms

All of this provides a total of five rooms – two up and three down; two of the latter linked by imposing wooden doors which perhaps marked the limit of the original keep, and more modern glass doors. Together, these rooms provide living accommodation of a highly individual kind, whilst the care of the design means that if the finish on the internal walls is not to your liking, you can safely replace them; something I’ll come back to in a moment.

“But hang on a minute!” I hear you cry, “didn’t you blither on about kitbashing a new house just a few days ago? And now you’ve got another one?” Well, yes I did, and no, I haven’t. The modified Tromp Loeil Noa Ranch Cottage I recently reviewed / documented is still the main house; but I have a thing for old ruins in the grounds of my homes, as I’ve mentioned in the past, and on seeing the NO Cottage, I was stuck by a) how marvellous it looked, and b) how it it could make an interesting focal point for the island home, not as a house but as … a swimming pool / summer house. And once the idea entered my head, it became and itch I had to scratch.

Top: the original entrance to the NO Cottage and delivered to a purchaser. Bottom: my conversion as a part of installing the swimming pool – an area with sunken jacuzzi and a shower, with the walls re-textured in an off-white and a new partition added for the jacuzzi

As I’ve previously noted when discussing kitbashing, before starting any project, the first step is to ascertain exactly whether or not the end goal can be reasonably achieved. So off I toddled to the Marcthur’s in-world store and play clicky-click on surfaces, checking faces, parts, etc., to satisfy myself what I wanted to do could be done.

Fortunately, Marcthur designs his builds with the intention that they might be modified (he even sells full perm versions of structures like the NO Cottage so that, subject to a license agreement, they can be made a part of another build and sold); as such, I quickly confirmed this build could be modified and so went ahead and picked up the “standard” Copy / Modify / No Transfer version (L$1499).

The upper levels of the NO Cottage as delivered (top) and after my mods. I kept the original walls in one, but retextured the floor and duplicated the supplied fireplace and resized it to fit (this room is still a WIP at the time of writing). Top open-out the pool area, I removed the floor of the second room entirety, and di some minor touch-up / fixing around the iron stairways

I’m not going to bore you with a blow-by-blow account of the transformation; hopefully the images here will explain. Suffice it so say, with the add of a few prims, the removal of a few parts (the bars over some of the windows, the internal doors an upper floor, the replacement of the lower floors (with the aforementioned prims, and some duplication of parts to provide additional detailing + some re-texturing of a room and the addition of some internal lighting, I ended up with something that I think worked out quite well, and which fits with the rest of the garden and which only increase the base build’s LI by 4.

All-in-all the The No Cottage Bizar is a genuinely eye-catching design and well-put-together build, one which makes the L$1,499 price very reasonable. It is evident thought has gone into designing it to be both flexible in use as well as ready-to-use. While the shadow maps are something of a specialised inclusion (the full maps – diffuse, normal and specular – are available with the full permissions version), they do offer the means to provide your own textures for use in the Copy / Modify version, and making the finished look more unique to yourself.

Top: the original “main” rooms of the NO Cottage, and bottom, how things look post pool conversion, complete with the installation of beams to properly support the archway and stairs

More broadly, I hope this piece shows that there are some superb builds available which, with time and imagination, can be made into ideal homes or – with a little application and care for modding, can be made into something personal and unique, be it simply decorating it as a home, to getting ambitious and looking for a way to fit something more unusual – such as a swimming pool!

And, of course, for my part, I now have another unit I might one day convert into a house 🙂 .

The four shots of my lower floor mods put together

Related Links

The Trompe Loeil Noa Ranch Cottage In Second Life

The Trompe Oeil Noa Ranch Cottage, as modified by me for Isla Myvatn

So, a week or so ago, I visited Gothbrooke Forest, a charming setting in which is located a copy of the Trompe Loeil Noa Ranch Cottage (see: A wander through Gothbrooke Forest in Second Life). At the time I noted the house was one I could end up purchasing for personal use and – as is my way – modify.

Well? Guess what this post is about (if you hadn’t already from the pretty obvious title…!).

Cory Edo is one of my go-to house designers for a number of reasons; many of her builds are light and airy, her work generally (but admittedly not always) lends itself to a fair degree of modification / kitbashing, and her prices are more than competitive. All of this is certainly true of the Noa Ranch Cottage. Although that said, It is also pretty big for a “cottage”, at least by UK terms…

The original Noa Ranch Cottage and my modified version, inset. Note that I also replaced the deck and base of the house to better suit my needs, and added the deck railings as well as re-textured much of the house

With a 122 LI, a footprint of 37 x 24 metres and priced at L$625 (with a “snow” option available for a separate purchase price of L$100), the Noa is an highly induvial style of home well-suited for modification. It comprises a large main room with large windows to the front aspect and a curved roof which extends out of the front deck. This room is split into two parts, defined by a 3/4 height diving wall running part way across it.

To the front is the living area, complete with a large brick fireplace. A basic kitchen sits in one of the back corners of this room, whilst the space behind the dividing wall alongside of it offers space for a dining area. A narrow hall runs behind the kitchen, between it and the rear wall of the house and serving one of two back doors accessing the rear deck.

To either side of the fireplace are sets of double doors. Those towards the front of the house provide access to a second ground floor room of a fair size. The second pair access a small hallway with three doors: one to the rear deck of the house, one to a further ground-floor room and one back to the second front room. This hall also provides access to the stairs serving a small landing and the single, large upper floor room. On the opposite side of the main room to the two storey section of the house is a further small rectangular room with wooden walls on three sides and a single large front window.

A view of my modified Noa Rach Cottage, showing the opened-out main room (see below) with internal lighting added by myself

It’s a design which offers plenty of opportunities for furnishing “as is”; but for me, the kitbashing opportunities and the two-floor section were just too tempting to ignore.

As I’ve noted in previous write-ups of houses I’ve bought, Isla Myvatn has a “split level” landscape, lowlands to the west, and a raised garden atop cliffs and rocks to the east, with the house offering something of a divide between, generally with the upper floor opening onto the back garden, and the front lower floors facing west.

The upper floor landing provided me with the means to replace a window on the house with a sliding door to provide access from the house to the back garden.

One of the attractions of the Noa is that with its upstairs bedroom and landing (the latter with large windows to the rear aspect), it fit the design well, requiring only the addition of a home-made sliding door to replace one of the the windows, as shown above.

As a fan of large, open spaces in a house, the Noa’s design also allowed me to make some changes to the main room, taking out the the double doors and the wall supporting them to create a bigger space, with a new wall and doll installed to allow me to keep two additional lower floor rooms. With the fireplace relocated slightly, this allowed me to create a new entrance to the door, replacing one of the windows with my home-built sliding door (a further copy of which replaced the original front door at the opposite end of the main room).

A basic floorplan showing the design of the original with the main room and 3 side rooms, and my modified version, with one side room removed and the others revised to create a larger main room and an new entrance hall

After this, all that was left was to replace the back wall and door and blank off the passageway to the second back door behind the kitchen, as neither were required, given the house backs up against the raised garden. Once that was done, I opted to remove the small room off the side of the house the the front door and install a new side wall.

All of the above should indicate the Noa makes an ideal house for modding, and while there are some issues with faces, it can also be re-textured relatively easily, as I hope the images here demonstrate, allowing the house to be further personalised.

Two further views of the interior of the Noa Ranch Cottage from two angles. The house following my modifications, seen from the kitchen, and (inset) the original viewed from the front door

As noted, Cory Edo is one of my go-to house designers, her builds offer imaginative and rich designs, and with the Noa (and the Jura Waterfront Cottage before it, which inspired my own scratch-build for private use), she has provided a superb house for use out-of-the-folder or for kitbashing. It I have any issues with the Noa at all, it is that not all of the walls have individual interior / exterior faces, meaning that some retexturing is limited, and with due respect to Cory, some of her textures are a little rough in places when it comes to my tastes – notable the decking and the outside of the curved roof; both of which were easily fixed.

An overhead view, showing the house and the raised back garden. The deck is not part of the original Noa build, but my own replacement, the the roof areas have been re-textured (with the flat roof replaces to allow texturing on two sides) as has the chimney 

All-in-all, for those looking for a new house and who have the space for it, the Noa Rach Cottage makes for a good purchase.

Related Links

My Second Life in 2022

Catch a falling star

Each December, it has become my habit to offer a general look back on Second Life’s progress through the year – as I recently published for 2022, using the Lab’s own look back as a foundation (much as I did in 2021). In some of these looks back, I’ve included some personal notes on my own times in-world, although of late I’ve let that drop away, as is seemed rather self-indulgent. However, to break things up a little as 2022 draws to a close, I thought I’d toot my trumpet again and look back on the year and what it has meant to me.

Most notably on a personal level it’s been a year of evolving friendships, with two of particular note. The early part of the year was marked by times spent with Tasha, someone I’d met in 2021 and shared a good deal of time with having all sorts of fun, thanks to the two of us being in the same time zone and having fairly matching on-line times. Sadly, matters of the physical world meant that for the better part of 2022 we’ve had next to no time in-world, but the memories are precious.

More happily, 2022 brought me into contact with Tulsa, whose sense of fun and humour has prompted me to call her Imp, and whose companionship I’ve come to greatly appreciate, our sharing of a mutual time zone again making getting together easy, and allowing us to share a mutual interest in building. More recently, times in-world have been also shared with Wilhelmina, who has also been a welcome companion in exploring SL and visiting art exhibitions.

Imp being Imp and peeking at me from behind giant books during an August visit to Storybook (see: A Storybook’s return in Second Life)

One of the things blog-wise I did at the start of 2022 was to write about how I came to name my avatar; I did so as a result of having received multiple questions on my name and whether it was connected to the short-lived TV series Firefly (quick answer: yes). Again, I thought the piece to be self-indulgent, but it proved popular among readers and on social media – so thank you on that! Further self-indulgence came in April 2022, when after earlier mis-communications, Strawberry Linden interviewed me for the Lab’s Spotlight series; something I found to be an honour as well, given the luminaries who have featured in the series.

Of course, exploring SL continues to be a passion for me, and 2022 saw me complete over 180 visits and write-ups on in-world public spaces (a handful admittedly return visits later in the year to places I’d dropped into early-on in 2022). It’s an activity I genuinely enjoy because it allows me to see the creativity of others in second life who, whilst not “content creators” in the traditional sense, nevertheless have the creative eye and ability to bring together the works of others in a manner to offer us all places of beauty, mystery, fantasy, and more, where we can explore, relax, play, and have fun.

Sadly, 2022 brought the news that one of the Second Life region designers I particularly admired for his ability – often working with Jade Koltai – to bring us magnificent interpretations of some of the most evocative locations to be found within the physical world. As I noted in a personal reflection on his passing, Serene Footman will be greatly missed by Second Life explorers and photographers.

Black Bayou remains one of my favourite physical world locations Serene Footman and Jade Koltai brought to Second Life. First offered in 2018, it was a location they brought back for a time in April 2022.

In looking at some of the stats on the blog, I was also surprised to realise that 2022 has seen me visit and write about over 170 art exhibitions and installations.

The ability for Second Life to promote art is genuinely second to none. Capable of showcasing 2D and 3D art, whether produced in-world and / or with the assistance of external editing tools, and presenting the ability for artists to upload and display their physical world art, SL is an outstanding platform for artistic expression and audience reach. It has been, and remains, my delight and pleasure to cover art in-world as fully and broadly as I possibly can, although I cannot hope to cover everything, so to those who did through the year extend invites to their opening and exhibitions which I was unable to accept, I offer a genuine apology.

In respect of art and galleries, my thanks to Owl and the folks at NovaOwl and to Hermes Kondor for inviting me to display my own attempts at SL photography at their galleries this year (see: A touch of artistic self-promotion in Second Life and Fifty Shades of Pey in Second Life).

In April Owl, Ceakay and Uli graciously hosted an exhibition of my SL photography at NovaOwl Gallery

A habit I got into a while back, mainly as a means of offering an alternate kind of product review, was writing about the prefab houses I’d buy then promptly kitbash for use on the home island. It is something I continued at the start of the year, utilising a couple of Novocaine Islay’s builds (see: The InVerse Orlando house in Second Life, and The InVerse Nizza house in Second Life). However, I’ve not done anything like it for most of the latter part of the year, not because I’ve not (again) changed house, but because the current house is a scratch-build; albeit it strongly influenced by a commercial build.

In August 2022, I made a number of visits to see Cory Edo’s Jura Waterfront Cabin, trying to work out if it could fulfil an idea I had for a new personal home. Unfortunately, my examinations of the design revealed that I’d have to pretty much tear it apart in order to achieve my goal, so instead I went the scratch-build route, albeit using photos I’d taken of Cory’s design. As such, it’s not a build to be written about in its own right – and I hope Cory will forgive me my cheek! For those of you who are looking for a thoroughly engaging waterfront home, it’s a build I can still recommend it as design unlikely to disappoint.

The current Isla Myvtan house, inspired by Cory Edo’s Jura Waterfront Cabin (inset)

And talking of homes, a genuine highlight for me in 2022 was the invite I received from Miltone Marquette to visit his exquisite in-world reproduction of Fallingwater, aka the Kaufmann House, the iconic house in the Laurel Highlands of southwest Pennsylvania designed by Frank Lloyd Wright.

The original Fallingwater is a house within which I’ve had a long (and indirect) relationship with for many, many years. I’ve been an admirer of many of FLW’s architectural designs, with Fallingwater being the one I have myself built and re-built in-world over the years, and to which I’ve often returned in order to build far more personal takes on the essential looks and layout of the main house in order to give myself a personal home in-world.

However, none of my builds have been as faithful to the original as Miltone’s; his is a genuine work of art in which no detail from the original has been missed. As such it was an absolute delight to be able to visit it and tour the rooms – and drop into two of his other reproductions of FLW houses -, and I wrote about in Miltone’s Fallingwater in Second Life. If you have a similar passion for Frank Lloyd Wright’s designs, I thoroughly recommend contact Miltone directly in-world and arrange a time when you might visit his reproductions of Fallingwater, the Robie House and the Jacobs’ First House.

Fallingwater by Miltone Marquette, October 2022

Of course, 2022 has also allowed me to continue to inflict another pair of my interests on readers – those of space exploration and astronomy, subject which, like my love of sci-fi, came to me by way of late father. I have no idea how broadly popular Space Sunday might be (I try not to look too deeply ay blog analytics for fear I stop writing about what I enjoy and start focus on those subjects that gain the most clicks); however, I will say it is one of the hardest regular pieces I write for the blog; not because the subjects are hard for me to get to grips with, but rather because there is so much I want to cover, I have difficultly in reining myself in, so my apologies to those of you who might find the pieces a case of TL;DR!

Overall, however, 2022 has for me been nicely balanced between blogging and enjoying personal times. I’ll confess that on occasion in recent years I’ve wondered what the hell I am doing with SL outside of writing about it, so 2022 has been an opportunity – thanks in no small part to Imp and those close to me – to strike a new balance and get back to many of the things outside of blogging I enjoy. In this I also want to thank R, whose sage advice – given in 2021 – took root through this past year: do what you enjoy.

And keeping all that in mind, I’m keen to see what 2023 brings!