Note, October 4th: interaction with objects when using Desktop Mode were introduced with the Sansar Discovery release. Read more about the release in this article.
Updated, September 8th: minor changes to reflect changes made to personal teleporting when in Desktop mode in the September release.
Note: this article covers using the Sansar client in Desktop mode. For information on creating a Sansar account, downloading the client, and creating and avatar, please refer to Sansar: getting started – the basics.
The following is a basic guide to using Sansar when visiting / exploring experiences. As the majority of Second Life users do not have VR headsets and controllers, the focus on using Sansar in Desktop mode. Those using a VR headset and controllers, or who have a game controller, should refer to the following official Sansar help pages:
Some of the following notes have been drawn from my earlier articles on getting start with Sansar and pick and tips, and are included her for completeness
The Atlas
Client
- Use the menu to switch Atlas view between displaying all publicly available experiences, those produced by Sansar Studios (Linden Lab and partners), and those you have created.
- Use the Create button to start creating an experience (if available), review your existing experiences or change your Sansar subscription.
- Use the scroll wheel to scroll down / up through the Atlas when the mouse is hovered over the atlas tiles.
- Feature Panel:
- Click “<” or “>” to page through featured experiences.
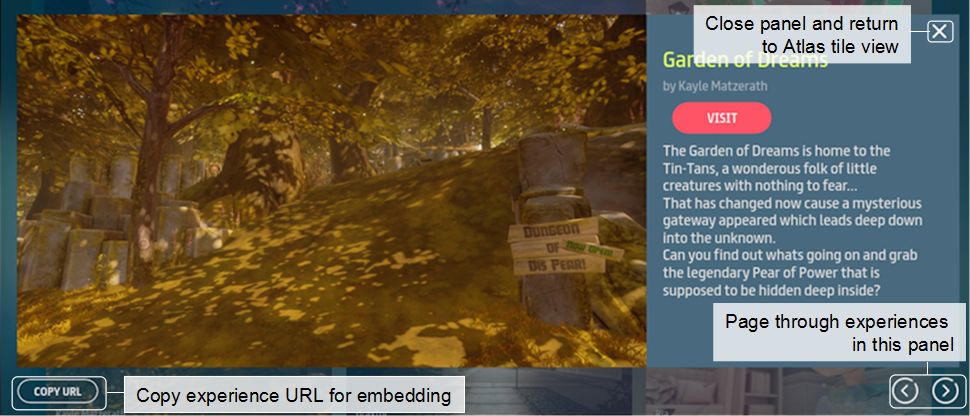
- Click the display experience image to open the experience floater (see image below).
- Click the Visit button to visit the experience.
- Experience tiles:
- Click the display experience image to open the experience floater (see image below)
- Click the Visit button to visit the experience.
- Experience floater:
- Click the Copy URL to the currently selected experience to your computer’s clipboard.
- Use the “<” and “>” to page forward / backward through available experiences.
- Use the X button to close the floater.
- Click the Visit button to visit the currently displayed experience.
Web
- Use Search (top right of the Atlas page) to search experiences (e.g. by full / partial name, by full / partial creator name, etc.)
- Feature Banner:
- Click “<” or “>” to page through featured experiences.
- Click the display experience image to open the experience floater (see image below).
- Click the Visit button to visit the experience.
- Experience tiles:
- Click the display experience image to open the experience web page.
- Click the Visit button to visit the experience.
- Experience Web Page:
- Click the creator’s name to list all experiences by the same creator & select any of them to visit it.
- Click the Visit button to visit the experience.
UI Control Icons
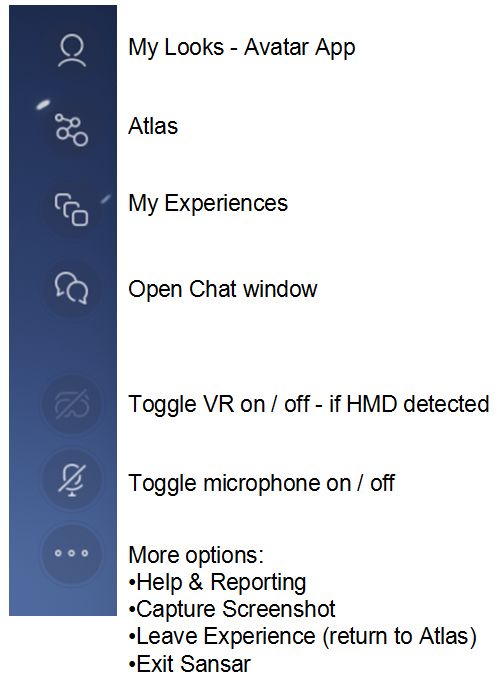
The UI icons in Sansar’s run-time mode are relatively self-explanatory. Hovering the mouse over any of them will display additional hover text.
My Looks: takes you to the Avatar App, where you can change you appearance, swap avatars, create new avatars, add attachments, etc. On exiting the Avatar App, you will be returned to the starting point of the experience you were in.
Atlas: Opens the Atlas, allowing you to select and enter another experience. Closing the Atlas without making a selection returns you to the current experience.
My Experiences: opens a list of the experiences you have created (if any), which you can then jump to. Options to create a new experience (if you are able to) and / or change your subscription are also available.
Chat: opens the Chat window. A green circle displayed against this icon indicates awaiting direct messages / Friend requests.
Headset icon: (only available if a HMD is detected) toggle between Desktop and VR modes (can also be done via F1).
Microphone icon: (only available if a microphone is detected) toggle microphone on / off.
More Icon (…): as per the notes in the image, above right.
Movement – Desktop Mode
Avatar and Camera Movement
| Keys / Mouse actions |
Actions |
| F3 |
Toggle between third-person and 1st person (“Mouselook”) views. |
| F4 |
Enter camera “free flight” mode (F3 to return camera to 3rd person view). |
| W A S D / ↑ ← ↓ → |
Move your avatar / camera (free flight mode) forward, left, back and right. Press and hold the right mouse button to smooth your avatar when turning left/right turning. |
| Press and hold right mouse button & drag mouse around |
|
| Mouse scroll wheel |
3rd person view only: adjust camera position relative to avatar. |
| E and C |
Camera “free flight” mode only: increase / decrease camera vertical elevation. |
| Numeric Pad “-” & “+” |
Camera “free flight” mode only: decrease / increase camera movement speed. |
Personal Teleporting
You can increase your movement around experiences using your personal teleport option, which is available in both 1st and 3rd person modes.
- Press and hold the
SHIFTkey display the blue teleport cylinder.
- Use the mouse to position the cylinder at the point to which you wish to teleport.
- Use the mouse scroll wheel to select the direction you wish to face on arrival (indicated by a blue arrow).
- Click the left mouse button to teleport.

Chat, Adding Friends, Messaging
Voice Chat
Toggle the microphone icon to chat. Note that chat is for the entire instance of the experience you are in, but may be limited in volume by the distance between yourself and others.
Text Chat
- Click the Chat UI icon to open the Chat / Messaging / People window.
- Nearby Chat is selected by default.
- Type in the “Say Something…” area to chat and press Enter to send.
- Note that text chat is for the entire instance of the experience you’re in, and is not limited by distance.
Adding Friends and Accepting Friend Requests
You can currently only make friends with people in the same instance of the experience you are in.
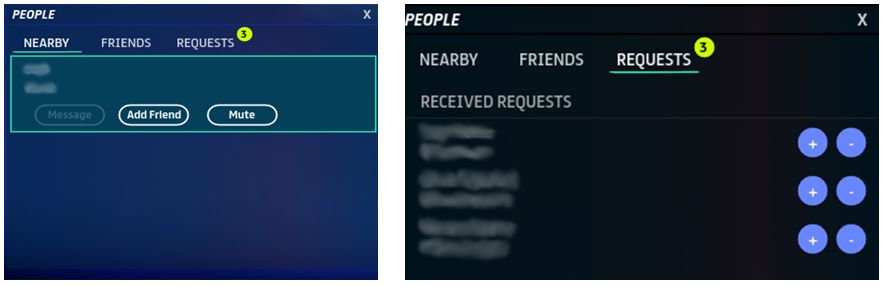
- Click the People button in the Chat window this opens an additional People panel.
- In Nearby, click on the name of the person you want to add as a friend (note their name and unique avatar ID are displayed).
- A pop-up is displayed – select Add Friend to send a request.
Incoming Friend requests are indicated in the Chat window by a green dot appearing in the People button.
- Click the People button in the Chat window to open the People floater.
- The number of received Friend requests will be indicated over the Requests tab. Click the tab open it.
- A list of incoming requests (by avatar name / avatar unique ID) is displayed.
- Click the “+” or “-” option alongside each request to accept or reject each request.
To remove a friend:
- Click the People button in the Chat window.
- Click on the Friends tab.
- Click the name of the person you which to remove as a friend and select Unfriend from the pop-up.
Sending and Receiving Direct Messages
You can direct message (IM) people only in text, either via the Nearby people list or your Friends list. Note that direct messages are system-wide, not dependent upon friends being in the same experience as you.
- Click the People button in the Chat window.
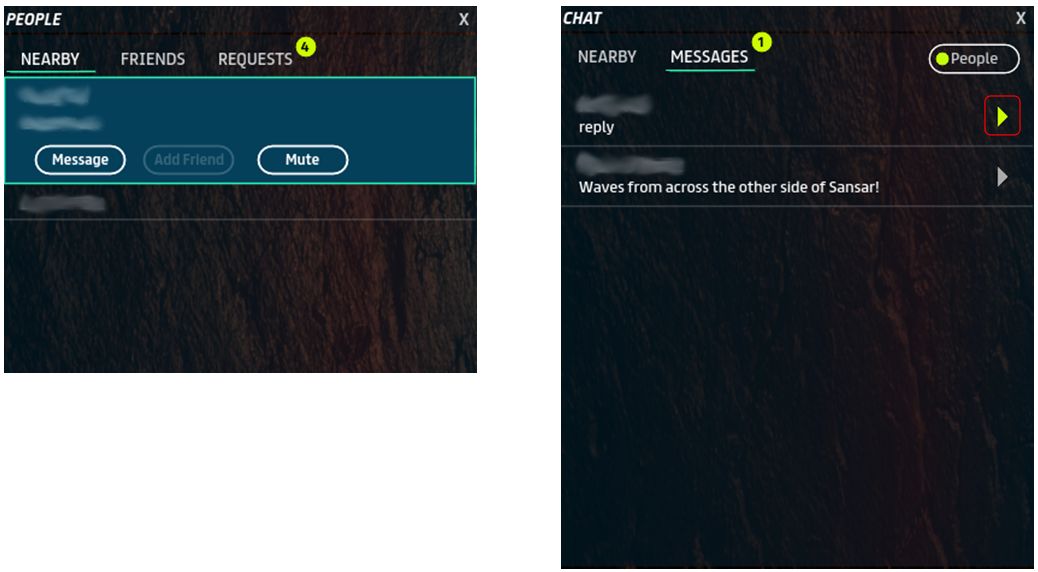
- Click on the Nearby tab or the Friends tab to display your list of friends.
- Click on the name of the nearby person or the friend you want to message and select Message.
- The Chat window changes to display a session focus with that person.
- Type your message and send (Enter).
Incoming direct messages are indicated by green dot appearing alongside the Messages tab of the Chat window, together with the number of incoming messages.
- Click the Message tab to display a list of incoming messages by user.
- New messages are indicated by a green right-pointing chevron next to the name.
- Click a name to open the message session and type your reply. Press enter to send.
- Click the Back to List button to return to your list of direct messages.
Muting Voice
You can mute people’s voice via the Nearby tab of the People window.
- Click the People button in the Chat window.
- Select Nearby.
- Locate the name of the avatar you wish to mute. Click on the name.
- Select Mute from the pop-up.
Reverse these steps to un-mute a friend or someone nearby you’re previously muted.

Great guide! 🙂
LikeLike
Reblogged this on thomas mcgreevy.
LikeLike
Reblogged this on Sansar Newsblog and commented:
Inara Pey has written another excellent blogpost on how to use the Sansar desktop client software, complete with helpful tables and diagrams.
LikeLike
Reblogged this on KULTIVATE MAGAZINE.
LikeLike